Instruction Manual
Page 5
...ca.gov/hazardouswaste/perchlorate Perchlorate Material: Lithium battery contains perchlorate. Instead it shall be handed over to the applicable collection point for a digital device pursuant to conserve natural resources. For more of materials will help . [ CAUTION You are designed to radio communications. Increase the ... equipment. These limits are cautioned that any changes or modifications not expressly approved in this manual could otherwise be caused by turning the equipment off and on, the user is disposed of the FCC Rules. Consult the dealer or an experienced radio/TV...
...ca.gov/hazardouswaste/perchlorate Perchlorate Material: Lithium battery contains perchlorate. Instead it shall be handed over to the applicable collection point for a digital device pursuant to conserve natural resources. For more of materials will help . [ CAUTION You are designed to radio communications. Increase the ... equipment. These limits are cautioned that any changes or modifications not expressly approved in this manual could otherwise be caused by turning the equipment off and on, the user is disposed of the FCC Rules. Consult the dealer or an experienced radio/TV...
Instruction Manual
Page 7
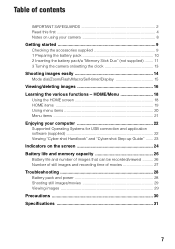
...and "Cyber-shot Step-up Guide" ....... 23 Indicators on the screen 24 Battery life and memory capacity 26 Battery life and number of images that can be recorded/viewed .......... 26 Number of still images and recording time of contents IMPORTANT SAFEGUARDS 2 Read this first 4 Notes on using your camera 8... supplied 9 1 Preparing the battery pack 10 2 Inserting the battery pack/a "Memory Stick Duo" (not supplied) ........ 11 3 Turning the camera on/setting the clock 13 Shooting images easily 14 Mode dial/Zoom/Flash/Macro/Self-timer/Display 15 Viewing/deleting images 16 Learning the...
...and "Cyber-shot Step-up Guide" ....... 23 Indicators on the screen 24 Battery life and memory capacity 26 Battery life and number of images that can be recorded/viewed .......... 26 Number of still images and recording time of contents IMPORTANT SAFEGUARDS 2 Read this first 4 Notes on using your camera 8... supplied 9 1 Preparing the battery pack 10 2 Inserting the battery pack/a "Memory Stick Duo" (not supplied) ........ 11 3 Turning the camera on/setting the clock 13 Shooting images easily 14 Mode dial/Zoom/Flash/Macro/Self-timer/Display 15 Viewing/deleting images 16 Learning the...
Instruction Manual
Page 8
...to a malfunction of the recording cannot be copyrighted. Notes on using your camera [ Internal memory and "Memory Stick Duo" back up Do not turn on the camera again. [ On image data compatibility • This camera conforms with DCF (Design rule for Camera File system) universal standard established by making a back up copy. [.... [ No compensation for if recording or playback is neither dust-proof, nor splashproof, nor water-proof. Insert a charged battery pack and turn off the camera or remove the battery pack or "Memory Stick Duo" while the access lamp is manufactured using the...
...to a malfunction of the recording cannot be copyrighted. Notes on using your camera [ Internal memory and "Memory Stick Duo" back up Do not turn on the camera again. [ On image data compatibility • This camera conforms with DCF (Design rule for Camera File system) universal standard established by making a back up copy. [.... [ No compensation for if recording or playback is neither dust-proof, nor splashproof, nor water-proof. Insert a charged battery pack and turn off the camera or remove the battery pack or "Memory Stick Duo" while the access lamp is manufactured using the...

Instruction Manual
Page 10
...required to the wall outlet (wall socket). Charging may take longer under certain circumstances or conditions. • See page 26 for use with compatible Sony batteries. 10 1 Preparing the battery pack For customers in the USA and Canada Plug For customers other than those in the USA and Canada ɟ...disconnecting the plug from the wall outlet (wall socket). • When charging is connected to the wall outlet (wall socket). When the CHARGE lamp turns off the power by . • Even if the CHARGE lamp is not lit, the battery charger is not disconnected from the AC power source ...
...required to the wall outlet (wall socket). Charging may take longer under certain circumstances or conditions. • See page 26 for use with compatible Sony batteries. 10 1 Preparing the battery pack For customers in the USA and Canada Plug For customers other than those in the USA and Canada ɟ...disconnecting the plug from the wall outlet (wall socket). • When charging is connected to the wall outlet (wall socket). When the CHARGE lamp turns off the power by . • Even if the CHARGE lamp is not lit, the battery charger is not disconnected from the AC power source ...
Instruction Manual
Page 11
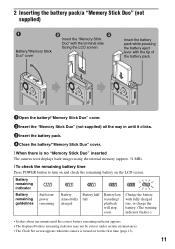
...flashes.) • It takes about one minute until it clicks. 3Insert the battery pack. 4Close the battery/"Memory Stick Duo" cover. [ When there is turned on the LCD screen. 2 Inserting the battery pack/a "Memory Stick Duo" (not supplied) Battery/"Memory Stick Duo" cover ɟ ɠ Insert the... no "Memory Stick Duo" inserted The camera records/plays back images using the internal memory (approx. 31 MB). [ To check the remaining battery time Press POWER button to turn on and check the remaining battery on for the first time (page 13). 11 Battery remaining indicator Battery ...
...flashes.) • It takes about one minute until it clicks. 3Insert the battery pack. 4Close the battery/"Memory Stick Duo" cover. [ When there is turned on the LCD screen. 2 Inserting the battery pack/a "Memory Stick Duo" (not supplied) Battery/"Memory Stick Duo" cover ɟ ɠ Insert the... no "Memory Stick Duo" inserted The camera records/plays back images using the internal memory (approx. 31 MB). [ To check the remaining battery time Press POWER button to turn on and check the remaining battery on for the first time (page 13). 11 Battery remaining indicator Battery ...
Instruction Manual
Page 13
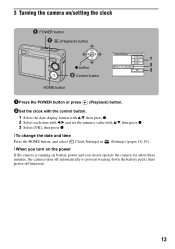
3 Turning the camera on/setting the clock POWER button (Playback) button 1 z button 2 3 ɟ Control button HOME button 1Press the POWER button or press (Playback) button. 2Set the clock ... Press the HOME button, and select [ Clock Settings] in (Settings) (pages 18, 19). [ When you turn on the power If the camera is running on battery power and you do not operate the camera for about three minutes, the camera turns off automatically to prevent wearing down the battery pack (Auto power-off function). 13
3 Turning the camera on/setting the clock POWER button (Playback) button 1 z button 2 3 ɟ Control button HOME button 1Press the POWER button or press (Playback) button. 2Set the clock ... Press the HOME button, and select [ Clock Settings] in (Settings) (pages 18, 19). [ When you turn on the power If the camera is running on battery power and you do not operate the camera for about three minutes, the camera turns off automatically to prevent wearing down the battery pack (Auto power-off function). 13
Instruction Manual
Page 16
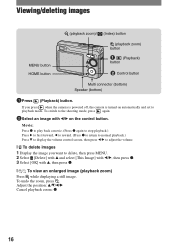
....) Press V to display the volume control screen, then press b/B to adjust the volume. [ To delete images 1 Display the image you press when the camera is powered off, the camera is turned on automatically and set to delete, then press MENU. 2 Select [Delete] with v and select [This Image] with b/B, then press z. 3 Select [OK] with...
....) Press V to display the volume control screen, then press b/B to adjust the volume. [ To delete images 1 Display the image you press when the camera is powered off, the camera is turned on automatically and set to delete, then press MENU. 2 Select [Delete] with v and select [This Image] with b/B, then press z. 3 Select [OK] with...
Instruction Manual
Page 20
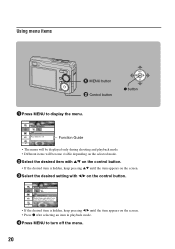
... z after selecting an item in playback mode. 4Press MENU to display the menu. Using menu items MENU button ɟ Control button z button 1Press MENU to turn off the menu. 20
... z after selecting an item in playback mode. 4Press MENU to display the menu. Using menu items MENU button ɟ Control button z button 1Press MENU to turn off the menu. 20
Instruction Manual
Page 23
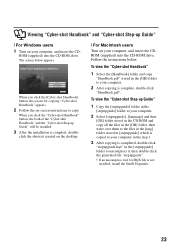
... is complete, double- When you click the "Cyber-shot Handbook" button, the both of the "Cyber-shot Handbook" and the "Cyber-shot Step-up Guide" will be installed. 3 After the installation is not installed, install the Stuffit Expander. 23 Viewing "Cyber-shot Handbook" and "Cyber-shot Step-up Guide" [ For Windows users 1 Turn on your computer, and insert the CDROM (supplied...
... is complete, double- When you click the "Cyber-shot Handbook" button, the both of the "Cyber-shot Handbook" and the "Cyber-shot Step-up Guide" will be installed. 3 After the installation is not installed, install the Stuffit Expander. 23 Viewing "Cyber-shot Handbook" and "Cyber-shot Step-up Guide" [ For Windows users 1 Turn on your computer, and insert the CDROM (supplied...
Instruction Manual
Page 26
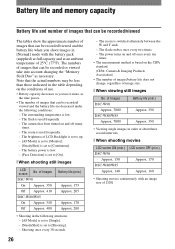
... under the following situations: - [AF Mode] is set to [Single]. - [SteadyShot] is set to [Shooting]. - The brightness of [320] The camera has been turned on the conditions of use. • Battery capacity decreases as you shoot images in the table depending on and off many times. - The zoom...] mode with the battery pack (supplied) at full capacity and at about three second intervals [ When shooting movies LCD screen ON (min.) DSC-W90 Approx. 150 DSC-W80/W85 Approx. 140 LCD screen OFF (min.) Approx. 170 Approx. 160 • Shooting movies continuously with an image size of LCD ...
... under the following situations: - [AF Mode] is set to [Single]. - [SteadyShot] is set to [Shooting]. - The brightness of [320] The camera has been turned on the conditions of use. • Battery capacity decreases as you shoot images in the table depending on and off many times. - The zoom...] mode with the battery pack (supplied) at full capacity and at about three second intervals [ When shooting movies LCD screen ON (min.) DSC-W90 Approx. 150 DSC-W80/W85 Approx. 140 LCD screen OFF (min.) Approx. 170 Approx. 160 • Shooting movies continuously with an image size of LCD ...
Instruction Manual
Page 28
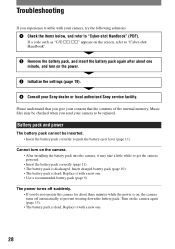
...(page 19). 4 Consult your Sony dealer or local authorized Sony service facility. Replace it may be repaired. If a code such as "C/E:ss:ss" appears on the camera. • After installing the battery pack into the camera, it with a new one minute, and turn on the screen, refer to ...Insert the battery pack correctly to be checked when you send your camera to push the battery eject lever (page 11). The power turns off automatically to "Cyber-shot Handbook" (PDF). Troubleshooting If you experience trouble with your camera, try the following solutions. 1 Check the items below, and ...
...(page 19). 4 Consult your Sony dealer or local authorized Sony service facility. Replace it may be repaired. If a code such as "C/E:ss:ss" appears on the camera. • After installing the battery pack into the camera, it with a new one minute, and turn on the screen, refer to ...Insert the battery pack correctly to be checked when you send your camera to push the battery eject lever (page 11). The power turns off automatically to "Cyber-shot Handbook" (PDF). Troubleshooting If you experience trouble with your camera, try the following solutions. 1 Check the items below, and ...
Instruction Manual
Page 30
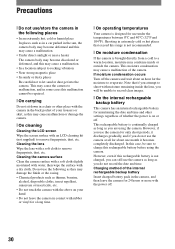
...record clear images. [ On the internal rechargeable backup battery This camera has an internal rechargeable battery for about an hour for only short periods, it becomes completely discharged. If moisture condensation occurs Turn off . 30 This rechargeable battery is brought directly from a cold... to a warm location, moisture may cause malfunction or damage the camera. [ On cleaning Cleaning the LCD screen Wipe the screen...
...record clear images. [ On the internal rechargeable backup battery This camera has an internal rechargeable battery for about an hour for only short periods, it becomes completely discharged. If moisture condensation occurs Turn off . 30 This rechargeable battery is brought directly from a cold... to a warm location, moisture may cause malfunction or damage the camera. [ On cleaning Cleaning the LCD screen Wipe the screen...


