
Operating Instructions
Page 40
...select [Exit] with B, then press z. • During a slide show . 1 Select [Interval], [Image] and [Repeat] with v/V/b/B on the control button. 2 Select [Start] with b/B. • The [Interval] time is just a guideline, so it may vary depending on [Image Size] t step 4 in "Read This First" • You... large size, the image quality deteriorates. 40 The original image is retained even after resizing. 7M (DSC-W7/W17 only) 5M The setting size is recorded in a continuous loop. Start Cancel See the following procedure. For details on the "Memory Stick". Repeat On Off Plays back images...
...select [Exit] with B, then press z. • During a slide show . 1 Select [Interval], [Image] and [Repeat] with v/V/b/B on the control button. 2 Select [Start] with b/B. • The [Interval] time is just a guideline, so it may vary depending on [Image Size] t step 4 in "Read This First" • You... large size, the image quality deteriorates. 40 The original image is retained even after resizing. 7M (DSC-W7/W17 only) 5M The setting size is recorded in a continuous loop. Start Cancel See the following procedure. For details on the "Memory Stick". Repeat On Off Plays back images...

Operating Instructions
Page 42
... to display the menu. 3 Select [ ] (Divide) with B on the operation t page 28 Example: Cutting a movie numbered 101_0002 This section describes an example of the movie starts. 42 For details on the control button, then press z. 4 Select [OK] with v, then press z.
... to display the menu. 3 Select [ ] (Divide) with B on the operation t page 28 Example: Cutting a movie numbered 101_0002 This section describes an example of the movie starts. 42 For details on the control button, then press z. 4 Select [OK] with v, then press z.
Operating Instructions
Page 43
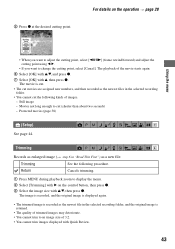
...] with B on the operation t page 28 Using the menu 5 Press z at the desired cutting point. The movie is retained. • The quality of the movie starts again. 6 Select [OK] with v/V, and press z. 7 Select [OK] with Quick Review. 43 Still image - Trimming Records as enlarged image (t step 6 in the selected recording folder...
...] with B on the operation t page 28 Using the menu 5 Press z at the desired cutting point. The movie is retained. • The quality of the movie starts again. 6 Select [OK] with v/V, and press z. 7 Select [OK] with Quick Review. 43 Still image - Trimming Records as enlarged image (t step 6 in the selected recording folder...
Operating Instructions
Page 51
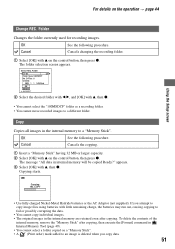
... individual images. • The original images in Internal Memory Tool (page 49). • You cannot select a folder copied on the control button, then press z. Copying starts. Copy Copies all images in internal memory will be copied Ready?" Folder Changes the folder currently used for recording images. appears. 3 Select [OK] with v on...
... individual images. • The original images in Internal Memory Tool (page 49). • You cannot select a folder copied on the control button, then press z. Copying starts. Copy Copies all images in internal memory will be copied Ready?" Folder Changes the folder currently used for recording images. appears. 3 Select [OK] with v on...
Operating Instructions
Page 53
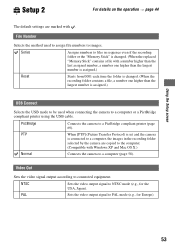
...page 58). Series Assigns numbers to files in the recording folder selected by the camera are marked with a number higher than the last assigned number, a number one higher than the largest number is assigned.) Reset Starts from 0001 each time the folder is changed. (When the recording folder contains a... be used to assign file numbers to a PictBridge compliant printer (page 69). PTP When [PTP] (Picture Transfer Protocol) is set and the camera is changed. (When the replaced "Memory Stick" contains a file with . NTSC Sets the video output signal to a computer, the images in...
...page 58). Series Assigns numbers to files in the recording folder selected by the camera are marked with a number higher than the last assigned number, a number one higher than the largest number is assigned.) Reset Starts from 0001 each time the folder is changed. (When the recording folder contains a... be used to assign file numbers to a PictBridge compliant printer (page 69). PTP When [PTP] (Picture Transfer Protocol) is set and the camera is changed. (When the replaced "Memory Stick" contains a file with . NTSC Sets the video output signal to a computer, the images in...

Operating Instructions
Page 57
...Memory Stick" slot Follow Stages 1 through 5 on pages 57 to 61 to your computer This section describes the process using Windows XP, start from the camera to copy images. • Screens when copying images on as examples. Stage 1: Installing the USB Driver • A driver is completed.... The USB driver installation starts. Remove the CD-ROM when the installation is software that enable equipment connected to the computer to ...
...Memory Stick" slot Follow Stages 1 through 5 on pages 57 to 61 to your computer This section describes the process using Windows XP, start from the camera to copy images. • Screens when copying images on as examples. Stage 1: Installing the USB Driver • A driver is completed.... The USB driver installation starts. Remove the CD-ROM when the installation is software that enable equipment connected to the computer to ...

Operating Instructions
Page 59
...4 Select a name and destination for the images, then click [Next]. 1 2 The "Scanner and Camera Wizard" screen appears. 2 Click [Next]. When the copying is completed, the "Other Options" screen appears. ...• This section describes an example of the camera appear. • If no "Memory Stick" is inserted, images in "Stage 4-B: Copying images...USB connection in Stage 3, click [Copy pictures to a folder on my computer using Microsoft Scanner and Camera Wizard] t [OK] as the wizard screen appears automatically on the "Memory Stick" of copying ...
...4 Select a name and destination for the images, then click [Next]. 1 2 The "Scanner and Camera Wizard" screen appears. 2 Click [Next]. When the copying is completed, the "Other Options" screen appears. ...• This section describes an example of the camera appear. • If no "Memory Stick" is inserted, images in "Stage 4-B: Copying images...USB connection in Stage 3, click [Copy pictures to a folder on my computer using Microsoft Scanner and Camera Wizard] t [OK] as the wizard screen appears automatically on the "Memory Stick" of copying ...
Operating Instructions
Page 61
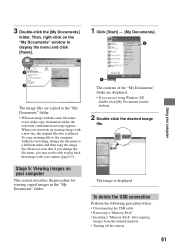
...Stage 5: Viewing images on your camera (page 63). To copy an image file to the computer without overwriting, change the file name, you are not using Windows XP, double-click [My Documents] on the "My Documents" window to display the menu and click [Paste]. 1 Click [Start] t [My Documents]. 2 Using...USB cable • Removing a "Memory Stick" • Inserting a "Memory Stick" after copying images from the internal memory • Turning off the camera 61 Then, right-click on the desktop. 2 Double-click the desired image file. However, note that if you change the file name to the ...
...Stage 5: Viewing images on your camera (page 63). To copy an image file to the computer without overwriting, change the file name, you are not using Windows XP, double-click [My Documents] on the "My Documents" window to display the menu and click [Paste]. 1 Click [Start] t [My Documents]. 2 Using...USB cable • Removing a "Memory Stick" • Inserting a "Memory Stick" after copying images from the internal memory • Turning off the camera 61 Then, right-click on the desktop. 2 Double-click the desired image file. However, note that if you change the file name to the ...
Operating Instructions
Page 64
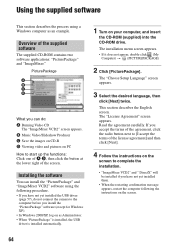
B Music Video/Slideshow Producer C Save the images on CD-R D Viewing video and pictures on PC How to start up the functions: Click one of A-D, then click the button at the lower right of the license agreement] and then click [Next]. 4... applications: "PicturePackage" and "ImageMixer." Read the agreement carefully. The "License Agreement" screen appears. Installing the software You can do not connect the camera to [I accept the terms of the screen. Using the supplied software This section describes the process using the following the instructions on the screen. 64...
B Music Video/Slideshow Producer C Save the images on CD-R D Viewing video and pictures on PC How to start up the functions: Click one of A-D, then click the button at the lower right of the license agreement] and then click [Next]. 4... applications: "PicturePackage" and "ImageMixer." Read the agreement carefully. The "License Agreement" screen appears. Installing the software You can do not connect the camera to [I accept the terms of the screen. Using the supplied software This section describes the process using the following the instructions on the screen. 64...

Operating Instructions
Page 65
Using your computer 5 Remove the CD-ROM as the shortcut icons of each screen to the information included on the desktop. Technical support for "PicturePackage"/"ImageMixer VCD2" is provided by the Pixela User Support Center. For information on the use of the software Click [?] at the upper-right corner of "PicturePackage Menu" and "PicturePackage destination Folder" are displayed after the installation. To start up the software • Double-click the "PicturePackage Menu" icon on the CD-ROM. 65 For more information, refer to show the on-line help.
Using your computer 5 Remove the CD-ROM as the shortcut icons of each screen to the information included on the desktop. Technical support for "PicturePackage"/"ImageMixer VCD2" is provided by the Pixela User Support Center. For information on the use of the software Click [?] at the upper-right corner of "PicturePackage Menu" and "PicturePackage destination Folder" are displayed after the installation. To start up the software • Double-click the "PicturePackage Menu" icon on the CD-ROM. 65 For more information, refer to show the on-line help.
Operating Instructions
Page 67
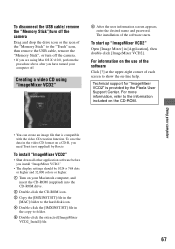
... each screen to the "Trash" icon, then remove the USB cable, remove the "Memory Stick", or turn off the camera Drag and drop the drive icon or the icon of the software starts. To start up "ImageMixer VCD2" Open [Image Mixer] in the video CD format on -line help. To save the data... in [Application], then double-click [ImageMixer VCD2]. To disconnect the USB cable/ remove the "Memory Stick"/turn off the camera. • If you are using "...
... each screen to the "Trash" icon, then remove the USB cable, remove the "Memory Stick", or turn off the camera Drag and drop the drive icon or the icon of the software starts. To start up "ImageMixer VCD2" Open [Image Mixer] in the video CD format on -line help. To save the data... in [Application], then double-click [ImageMixer VCD2]. To disconnect the USB cable/ remove the "Memory Stick"/turn off the camera. • If you are using "...
Operating Instructions
Page 80
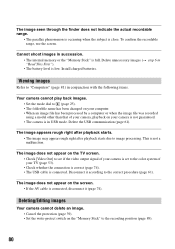
...starts due to the recording position (page 89). 80 This is close. Disconnect it (page 74). The image does not appear on your TV (page 53). • Check whether the connection is correct (page 74). • The USB cable is connected, disconnect it according to the color system of your camera...). To confirm the recordable range, use the screen. The image does not appear on the "Memory Stick" to image processing. Deleting/Editing images Your camera cannot delete an image. • Cancel the protection (page 39). • Set the write-protect switch on the screen. • If the ...
...starts due to the recording position (page 89). 80 This is close. Disconnect it (page 74). The image does not appear on your TV (page 53). • Check whether the connection is correct (page 74). • The USB cable is connected, disconnect it according to the color system of your camera...). To confirm the recordable range, use the screen. The image does not appear on the "Memory Stick" to image processing. Deleting/Editing images Your camera cannot delete an image. • Cancel the protection (page 39). • Set the write-protect switch on the screen. • If the ...
Operating Instructions
Page 82
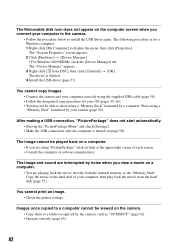
... you view a movie on a computer. • You are using "PicturePackage," click on help at the upper-right corner of your camera (page 50). Images once copied to a computer cannot be able to display the menu, then click [Properties]. The image cannot be ... directly from the hard disk (page 57). The "Device Manager" appears. 3 Right-click [ Sony DSC], then click [Uninstall] t [OK]. After making a USB connection, "PicturePackage" does not start automatically. • Start up the "PicturePackage Menu" and check [Settings]. • Make the USB connection after the computer...
... you view a movie on a computer. • You are using "PicturePackage," click on help at the upper-right corner of your camera (page 50). Images once copied to a computer cannot be able to display the menu, then click [Properties]. The image cannot be ... directly from the hard disk (page 57). The "Device Manager" appears. 3 Right-click [ Sony DSC], then click [Uninstall] t [OK]. After making a USB connection, "PicturePackage" does not start automatically. • Start up the "PicturePackage Menu" and check [Settings]. • Make the USB connection after the computer...
Operating Instructions
Page 86
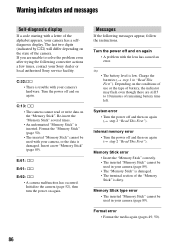
The last two digits (indicated by ss) will differ depending on again (t step 2 "Read This First"). Format the "Memory Stick" (page 50). • The inserted "Memory Stick" cannot be used with your camera (page 89). • The "Memory Stick" is damaged. • The terminal section of the ...; The inserted "Memory Stick" cannot be used in your camera, or the data is inserted. Warning indicators and messages Self-diagnosis display If a code starting with a letter of the alphabet appears, your Sony dealer or local authorized Sony service facility. If you are still 5 to solve the ...
The last two digits (indicated by ss) will differ depending on again (t step 2 "Read This First"). Format the "Memory Stick" (page 50). • The inserted "Memory Stick" cannot be used with your camera (page 89). • The "Memory Stick" is damaged. • The terminal section of the ...; The inserted "Memory Stick" cannot be used in your camera, or the data is inserted. Warning indicators and messages Self-diagnosis display If a code starting with a letter of the alphabet appears, your Sony dealer or local authorized Sony service facility. If you are still 5 to solve the ...

Operating Instructions
Page 91
...off the external seals or damage the batteries. If the batteries are dirty, the batteries may not full charge. Batteries you start shooting. 91 Others These may be displayed sooner than the specified type have been partially or completely removed, or batteries that the... batteries specified, those batteries may leak, overheat, or explode, causing the danger of burns or other batteries except Sony Nickel-Metal Hydride batteries in your camera. ends, resulting in the supplied battery case. This is shortened under such circumstances. Effective use batteries from the ...
...off the external seals or damage the batteries. If the batteries are dirty, the batteries may not full charge. Batteries you start shooting. 91 Others These may be displayed sooner than the specified type have been partially or completely removed, or batteries that the... batteries specified, those batteries may leak, overheat, or explode, causing the danger of burns or other batteries except Sony Nickel-Metal Hydride batteries in your camera. ends, resulting in the supplied battery case. This is shortened under such circumstances. Effective use batteries from the ...


