
Operating Instructions
Page 4
...' functions (page 91). • For details on the usable batteries, see page 89. Carl Zeiss lens This camera is to other bright light. during the access lamp is a "Memory Stick". Back up recommendation • To avoid the potential risk of flash emission may cause dirt on the flash... the sun or other medium. This may cause malfunctions which is . • If you can use . Or it into a Memory Stick Duo Adaptor. Notes on using your camera Types of reproducing sharp images with excellent contrast. Be sure to use the batteries for the first time. (t step 1 in"Read...
...' functions (page 91). • For details on the usable batteries, see page 89. Carl Zeiss lens This camera is to other bright light. during the access lamp is a "Memory Stick". Back up recommendation • To avoid the potential risk of flash emission may cause dirt on the flash... the sun or other medium. This may cause malfunctions which is . • If you can use . Or it into a Memory Stick Duo Adaptor. Notes on using your camera Types of reproducing sharp images with excellent contrast. Be sure to use the batteries for the first time. (t step 1 in"Read...

Operating Instructions
Page 6
For full use of the digital still camera Prepare the camera and shoot in auto adjustment mode "Read This First" (separate volume) 1 Prepare the battery 2 Turn the camera on/set the clock 3 Insert a "Memory Stick" (not supplied) 4 Select the image size for use 5 Shoot images easily (Auto adjustment mode...) Shoot still images (Scene Selection) 6 View images/Delete images Get more friendly with your camera This manual • Shoot ...
For full use of the digital still camera Prepare the camera and shoot in auto adjustment mode "Read This First" (separate volume) 1 Prepare the battery 2 Turn the camera on/set the clock 3 Insert a "Memory Stick" (not supplied) 4 Select the image size for use 5 Shoot images easily (Auto adjustment mode...) Shoot still images (Scene Selection) 6 View images/Delete images Get more friendly with your camera This manual • Shoot ...
Operating Instructions
Page 7
..."image size 13 Identifying parts 15 Indicators on a subject successfully 10 Exposure - On the effects of contents Notes on using your camera 4 Enjoying the camera Basic techniques for better images 10 Focus - Adjusting the light intensity 11 Color - Focusing on the screen 17 Changing the screen ...display 21 Number of still images and recording time of movies 22 When you do not have a "Memory Stick" (Recording with the internal memory...
..."image size 13 Identifying parts 15 Indicators on a subject successfully 10 Exposure - On the effects of contents Notes on using your camera 4 Enjoying the camera Basic techniques for better images 10 Focus - Adjusting the light intensity 11 Color - Focusing on the screen 17 Changing the screen ...display 21 Number of still images and recording time of movies 22 When you do not have a "Memory Stick" (Recording with the internal memory...
Operating Instructions
Page 8
Folder Change REC. Folder Copy Setup 1 52 1 LCD Backlight Beep Language Initialize Setup 2 53 2 File Number USB Connect Video Out Clock Set 8 Viewing menu 37 (Folder) - (Protect) DPOF (Print) (Slide) (Resize) (Rotate) (Divide) (Setup) Trimming Using the Setup screen Using Setup items 44 Camera 1 45 1 AF Mode Digital Zoom Date/Time Red Eye Reduction AF Illuminator Auto Review Camera 2 48 2 Enlarged Icon Internal Memory Tool 49 Format Memory Stick Tool 50 Format Create REC.
Folder Change REC. Folder Copy Setup 1 52 1 LCD Backlight Beep Language Initialize Setup 2 53 2 File Number USB Connect Video Out Clock Set 8 Viewing menu 37 (Folder) - (Protect) DPOF (Print) (Slide) (Resize) (Rotate) (Divide) (Setup) Trimming Using the Setup screen Using Setup items 44 Camera 1 45 1 AF Mode Digital Zoom Date/Time Red Eye Reduction AF Illuminator Auto Review Camera 2 48 2 Enlarged Icon Internal Memory Tool 49 Format Memory Stick Tool 50 Format Create REC.
Operating Instructions
Page 9
...your computer Enjoying your Windows computer 55 Copying images to your computer 57 Viewing image files stored on a computer with your camera (using a "Memory Stick 63 Using the supplied software 64 Using your Macintosh computer 66 Printing still images How to print still images 68 ... using a PictBridge compliant printer 69 Printing at a shop 72 Connecting your camera to your TV Viewing images on a TV screen 74 Troubleshooting Troubleshooting 76 Warning indicators and messages 86 Others On the "Memory Stick 89 On the battery charger and the batteries 91 Precautions 93 Specifications...
...your computer Enjoying your Windows computer 55 Copying images to your computer 57 Viewing image files stored on a computer with your camera (using a "Memory Stick 63 Using the supplied software 64 Using your Macintosh computer 66 Printing still images How to print still images 68 ... using a PictBridge compliant printer 69 Printing at a shop 72 Connecting your camera to your TV Viewing images on a TV screen 74 Troubleshooting Troubleshooting 76 Warning indicators and messages 86 Others On the "Memory Stick 89 On the battery charger and the batteries 91 Precautions 93 Specifications...

Operating Instructions
Page 13
...DSC-W7/W17 only) 3,072 pixels×2,304 pixels = 7,077,888 pixels 2 Image size: 5M 2592 pixels×1944 pixels = 5,038,848 pixels Pixels 3 Image size: VGA(E-Mail) 640 pixels×480 pixels = 307,200 pixels 13 Enjoying the camera 2304 1944 480 Quality On "image quality" and "image size" A digital... image is made up more memory, and the image is displayed in fine detail. "Image size" is printed or displayed on a ...
...DSC-W7/W17 only) 3,072 pixels×2,304 pixels = 7,077,888 pixels 2 Image size: 5M 2592 pixels×1944 pixels = 5,038,848 pixels Pixels 3 Image size: VGA(E-Mail) 640 pixels×480 pixels = 307,200 pixels 13 Enjoying the camera 2304 1944 480 Quality On "image quality" and "image size" A digital... image is made up more memory, and the image is displayed in fine detail. "Image size" is printed or displayed on a ...
Operating Instructions
Page 16
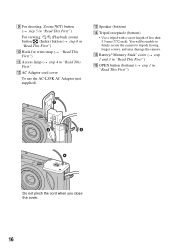
You will be unable to firmly secure the camera to tripods having longer screws, and may damage the camera. O Battery/"Memory Stick" cover (t step 1 and 3 in "Read This First") P OPEN button (bottom) (t step 1 in "Read This First" L AC Adaptor cord cover To use the AC-LS5K ...
You will be unable to firmly secure the camera to tripods having longer screws, and may damage the camera. O Battery/"Memory Stick" cover (t step 1 and 3 in "Read This First") P OPEN button (bottom) (t step 1 in "Read This First" L AC Adaptor cord cover To use the AC-LS5K ...

Operating Instructions
Page 18
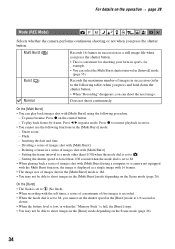
... level value (30) DPOF Menu/Guide menu (28) (not displayed on the screen on the previous page) 18 However, we recommend holding the camera steadily and turning off the indicator to avoid the effects of recordable images (22) Self-timer (t step 5 in W17 only) "Read This First... Image quality (33) 101 Recording folder (50) • This does not appear when using the internal memory. Even if the vibration warning appears, you from shooting clear images. C Display Indication 7M (DSC-W7/ Image size (t step 4 in "Read This First") C:32:00 Self-diagnosis display (86) Date/...
... level value (30) DPOF Menu/Guide menu (28) (not displayed on the screen on the previous page) 18 However, we recommend holding the camera steadily and turning off the indicator to avoid the effects of recordable images (22) Self-timer (t step 5 in W17 only) "Read This First... Image quality (33) 101 Recording folder (50) • This does not appear when using the internal memory. Even if the vibration warning appears, you from shooting clear images. C Display Indication 7M (DSC-W7/ Image size (t step 4 in "Read This First") C:32:00 Self-diagnosis display (86) Date/...
Operating Instructions
Page 19
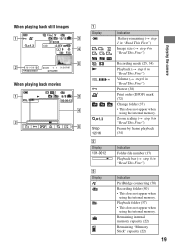
Playback folder (37) • This does not appear when using the internal memory. Remaining internal memory capacity (22) Remaining "Memory Stick" capacity (22) 19 Enjoying the camera When playing back still images M VGA 101 101 12/12 C:32:00 1.3 +2.0EV 500 F3.5 BACK/NEXT ... in "Read This First") C Display 101 101 Indication PictBridge connecting (70) Recording folder (50) • This does not appear when using the internal memory. Zoom scaling (t step 6 in "Read This First") Frame by frame playback (34) B Display 101-0012 Indication Folder-file number (37) Playback bar...
Playback folder (37) • This does not appear when using the internal memory. Remaining internal memory capacity (22) Remaining "Memory Stick" capacity (22) 19 Enjoying the camera When playing back still images M VGA 101 101 12/12 C:32:00 1.3 +2.0EV 500 F3.5 BACK/NEXT ... in "Read This First") C Display 101 101 Indication PictBridge connecting (70) Recording folder (50) • This does not appear when using the internal memory. Zoom scaling (t step 6 in "Read This First") Frame by frame playback (34) B Display 101-0012 Indication Folder-file number (37) Playback bar...
Operating Instructions
Page 22
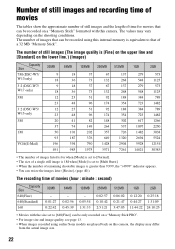
... that can be recorded using earlier Sony models are played back on a "Memory Stick" formatted with the size set... to [Multi Burst]. • When the number of remaining shootable images is greater than 9,999, the ">9999" indicator appears. • You can resize the images later ([Resize], (page 40)). The values may vary depending on the lower line.) (Images) Capacity Size 7M (DSC-W7/ W17only) 3:2 (DSC-W7...number of images listed is for movies that can be recorded on this camera, the display may differ from the actual image size. 22 The number ...
... that can be recorded using earlier Sony models are played back on a "Memory Stick" formatted with the size set... to [Multi Burst]. • When the number of remaining shootable images is greater than 9,999, the ">9999" indicator appears. • You can resize the images later ([Resize], (page 40)). The values may vary depending on the lower line.) (Images) Capacity Size 7M (DSC-W7/ W17only) 3:2 (DSC-W7...number of images listed is for movies that can be recorded on this camera, the display may differ from the actual image size. 22 The number ...
Operating Instructions
Page 23
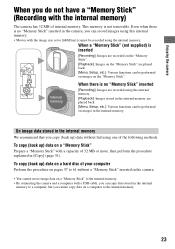
... when there is not removable. This memory is no "Memory Stick" inserted [Recording]: Images are recorded using the internal memory. [Playback]: Images stored in the internal memory are played back. [Menu, Setup, etc.]: Various functions can be recorded using this internal memory. • Movies with the internal memory) The camera has 32 MB of the following methods...
... when there is not removable. This memory is no "Memory Stick" inserted [Recording]: Images are recorded using the internal memory. [Playback]: Images stored in the internal memory are played back. [Menu, Setup, etc.]: Various functions can be recorded using this internal memory. • Movies with the internal memory) The camera has 32 MB of the following methods...

Operating Instructions
Page 24
The camera has been turned on the image size. The battery power is low - The flash strobes once every two times - Approx. 300 min. • Shooting movies continuously with batteries at full capacity and at about three second intervals When shooting movies Battery LCD screen On DSC-W7/W17 NH-AA-...uses increases and also over time (page 91). • The number of images that can be recorded or viewed take into account changing the "Memory Stick" as necessary. LCD screen Off Approx. 250 min. The numbers of shooting image does not change depending on and off many times - ...
The camera has been turned on the image size. The battery power is low - The flash strobes once every two times - Approx. 300 min. • Shooting movies continuously with batteries at full capacity and at about three second intervals When shooting movies Battery LCD screen On DSC-W7/W17 NH-AA-...uses increases and also over time (page 91). • The number of images that can be recorded or viewed take into account changing the "Memory Stick" as necessary. LCD screen Off Approx. 250 min. The numbers of shooting image does not change depending on and off many times - ...
Operating Instructions
Page 34
...mode to 1/6 second or slower. • When the battery level is low, or when the "Memory Stick" is 1M. • You may not be able to - Setting the shutter speed to lower... to the following functions in succession as a single image with [Multi Burst] using a computer or a camera not equipped with the self timer, a series of a maximum of five images is recorded. •... (refer to shoot images in [Interval] mode (page 35). To play back images shot with 16 frames. • The image size of images shot with [Multi Burst] - Does not shoot continuously. Multi Burst ( M ) Burst...
...mode to 1/6 second or slower. • When the battery level is low, or when the "Memory Stick" is 1M. • You may not be able to - Setting the shutter speed to lower... to the following functions in succession as a single image with [Multi Burst] using a computer or a camera not equipped with the self timer, a series of a maximum of five images is recorded. •... (refer to shoot images in [Interval] mode (page 35). To play back images shot with 16 frames. • The image size of images shot with [Multi Burst] - Does not shoot continuously. Multi Burst ( M ) Burst...

Operating Instructions
Page 37
...OK See the following indicators appear. : Moves to the previous folder. : Moves to the next folder. : Moves to play back (when using a "Memory Stick" only). You can change the folder for recording images t [Change REC. Using the menu Viewing menu For details on the control button. Select ... the previous and next folders. 37 Folder] (page 51) • When multiple folders are marked with v, then press z. z On the [Folder] The camera stores images in the folder is displayed, the following procedure. Folder] (page 50) • To change the folder or create a new one. • ...
...OK See the following indicators appear. : Moves to the previous folder. : Moves to the next folder. : Moves to play back (when using a "Memory Stick" only). You can change the folder for recording images t [Change REC. Using the menu Viewing menu For details on the control button. Select ... the previous and next folders. 37 Folder] (page 51) • When multiple folders are marked with v, then press z. z On the [Folder] The camera stores images in the folder is displayed, the following procedure. Folder] (page 50) • To change the folder or create a new one. • ...

Operating Instructions
Page 40
... "Memory Stick". The slide show . 1 Select [Interval], [Image] and [Repeat] with v/V/b/B on the control button. 2 Select [Start] with b/B. • The [Interval] time is just a guideline. To end the slide show, press z, select [Exit] with B, then press z. • During a slide show ends. The original image is retained even after resizing. 7M (DSC-W7/W17...
... "Memory Stick". The slide show . 1 Select [Interval], [Image] and [Repeat] with v/V/b/B on the control button. 2 Select [Start] with b/B. • The [Interval] time is just a guideline. To end the slide show, press z, select [Exit] with B, then press z. • During a slide show ends. The original image is retained even after resizing. 7M (DSC-W7/W17...

Operating Instructions
Page 41
... depending on the image. (Rotate) Rotates a still image. This is the recommended function to use when the internal memory or "Memory Stick" capacity is insufficient, or when you attach movies to rotate images shot with other cameras. • When viewing images on a computer, the image rotation information may not be displayed on the software...
... depending on the image. (Rotate) Rotates a still image. This is the recommended function to use when the internal memory or "Memory Stick" capacity is insufficient, or when you attach movies to rotate images shot with other cameras. • When viewing images on a computer, the image rotation information may not be displayed on the software...

Operating Instructions
Page 49
...press z. Format Formats the internal memory. • Note that formatting irrevocably erases all data in internal memory will be erased Ready?" Cancel Cancels the formatting. 1 Select [OK] with v on the operation t page 44 This item does not appear when a "Memory Stick" is complete. appears. 2... Select [OK] with . The message "All data in the internal memory, including even protected images. The format is inserted in the camera. Using the Setup screen 49 Internal Memory Tool For details on the control...
...press z. Format Formats the internal memory. • Note that formatting irrevocably erases all data in internal memory will be erased Ready?" Cancel Cancels the formatting. 1 Select [OK] with v on the operation t page 44 This item does not appear when a "Memory Stick" is complete. appears. 2... Select [OK] with . The message "All data in the internal memory, including even protected images. The format is inserted in the camera. Using the Setup screen 49 Internal Memory Tool For details on the control...

Operating Instructions
Page 50
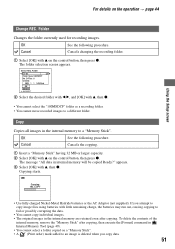
...creation screen appears. appears. 2 Select [OK] with v, then press z. Create REC. Folder Creates a folder in the camera. The message "All data in Memory Stick will be stored in the newly created folder until a different folder is complete. The format is created or selected. ... z. folder 102MSDCF Ready? Create REC. OK Cancel 2 Select [OK] with v, then press z. Format Formats the "Memory Stick". Cancel Cancels the formatting. 1 Select [OK] with the camera. A new folder is created with v on the control button, then press z. Folder Creating REC. When the folder...
...creation screen appears. appears. 2 Select [OK] with v, then press z. Create REC. Folder Creates a folder in the camera. The message "All data in Memory Stick will be stored in the newly created folder until a different folder is complete. The format is created or selected. ... z. folder 102MSDCF Ready? Create REC. OK Cancel 2 Select [OK] with v, then press z. Format Formats the "Memory Stick". Cancel Cancels the formatting. 1 Select [OK] with the camera. A new folder is created with v on the control button, then press z. Folder Creating REC. When the folder...
Operating Instructions
Page 51
...using batteries with v, then z. • You cannot select the "100MSDCF" folder as a recording folder. • You cannot move recorded images to a "Memory Stick". For details on the control button, then press z. Folder Changes the folder currently used for recording images. Select REC. Of Files: 0 Created: 2005 ... the batteries may run out, causing copying to an image is deleted when you copy data. 51 The message "All data in the internal memory to a different folder. appears. 3 Select [OK] with v on the operation t page 44 Using the Setup screen Change REC. OK...
...using batteries with v, then z. • You cannot select the "100MSDCF" folder as a recording folder. • You cannot move recorded images to a "Memory Stick". For details on the control button, then press z. Folder Changes the folder currently used for recording images. Select REC. Of Files: 0 Created: 2005 ... the batteries may run out, causing copying to an image is deleted when you copy data. 51 The message "All data in the internal memory to a different folder. appears. 3 Select [OK] with v on the operation t page 44 Using the Setup screen Change REC. OK...
Operating Instructions
Page 53
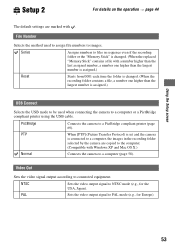
... to files in the recording folder selected by the camera are marked with . PTP When [PTP] (Picture Transfer Protocol) is set and the camera is connected to a computer, the images in sequence even if the recording folder or the "Memory Stick" is assigned.) USB Connect Selects the USB mode... to be used to assign file numbers to images. File Number Selects the method used when connecting the camera to a computer (page 58). PAL Sets the video output ...
... to files in the recording folder selected by the camera are marked with . PTP When [PTP] (Picture Transfer Protocol) is set and the camera is connected to a computer, the images in sequence even if the recording folder or the "Memory Stick" is assigned.) USB Connect Selects the USB mode... to be used to assign file numbers to images. File Number Selects the method used when connecting the camera to a computer (page 58). PAL Sets the video output ...

