Cyber-shot® Handbook
Page 2
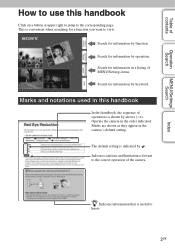
This is useful to know. 2GB Search for information by function. Search for information by keyword. Operate the camera in a listing of operations is indicated by arrows (t). Marks are shown as they appear in this handbook In this handbook Click on a button at upper ... Index How to use this handbook, the sequence of MENU/Settings items. Search for information in the order indicated. Marks and notations used in the camera's default setting. Table of contents Table of the...
This is useful to know. 2GB Search for information by function. Search for information by keyword. Operate the camera in a listing of operations is indicated by arrows (t). Marks are shown as they appear in this handbook In this handbook Click on a button at upper ... Index How to use this handbook, the sequence of MENU/Settings items. Search for information in the order indicated. Marks and notations used in the camera's default setting. Table of contents Table of the...
Cyber-shot® Handbook
Page 3
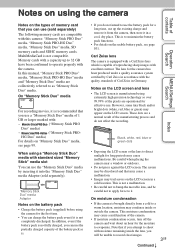
... warm location, moisture may condense inside the lens, you will be discolored and that may cause a malfunction. • Images may cause malfunctions. In this camera: "Memory Stick PRO Duo" media, "Memory Stick PRO-HG Duo" media, "Memory Stick Duo" media, SD memory cards and SDHC memory cards. Carl...: - ("Memory Stick PRO Duo" media) - ("Memory Stick PRO- Note that if you attempt to it is capable of reproducing sharp images with the camera. In addition, even if the battery pack is . • If you do not affect the recording. Black, white, red, blue or green dots ...
... warm location, moisture may condense inside the lens, you will be discolored and that may cause a malfunction. • Images may cause malfunctions. In this camera: "Memory Stick PRO Duo" media, "Memory Stick PRO-HG Duo" media, "Memory Stick Duo" media, SD memory cards and SDHC memory cards. Carl...: - ("Memory Stick PRO Duo" media) - ("Memory Stick PRO- Note that if you attempt to it is capable of reproducing sharp images with the camera. In addition, even if the battery pack is . • If you do not affect the recording. Black, white, red, blue or green dots ...
Cyber-shot® Handbook
Page 4
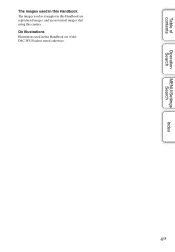
On Illustrations Illustrations used as examples in this Handbook are not actual images shot using this Handbook are reproduced images, and are of contents Operation Search MENU/Settings Search Index The images used in this Handbook The images used in this camera. Table of the DSC-W320 unless noted otherwise. 4GB
On Illustrations Illustrations used as examples in this Handbook are not actual images shot using this Handbook are reproduced images, and are of contents Operation Search MENU/Settings Search Index The images used in this Handbook The images used in this camera. Table of the DSC-W320 unless noted otherwise. 4GB
Cyber-shot® Handbook
Page 5
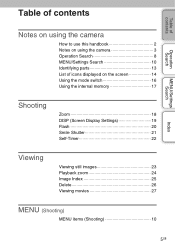
Table of contents Table of contents Operation Search MENU/Settings Search Index Notes on using the camera How to use this handbook 2 Notes on using the camera 3 Operation Search 8 MENU/Settings Search 10 Identifying parts 13 List of icons displayed on the screen 14 Using the mode switch 16 Using the internal memory 17 Shooting Zoom 18 DISP (Screen Display Settings 19 Flash 20 Smile Shutter 21 Self-Timer 22 Viewing Viewing still images 23 Playback zoom 24 Image Index 25 Delete 26 Viewing movies 27 MENU (Shooting) MENU items (Shooting 10 5GB
Table of contents Table of contents Operation Search MENU/Settings Search Index Notes on using the camera How to use this handbook 2 Notes on using the camera 3 Operation Search 8 MENU/Settings Search 10 Identifying parts 13 List of icons displayed on the screen 14 Using the mode switch 16 Using the internal memory 17 Shooting Zoom 18 DISP (Screen Display Settings 19 Flash 20 Smile Shutter 21 Self-Timer 22 Viewing Viewing still images 23 Playback zoom 24 Image Index 25 Delete 26 Viewing movies 27 MENU (Shooting) MENU items (Shooting 10 5GB

Cyber-shot® Handbook
Page 6
Table of contents MENU (Viewing) MENU items (Viewing 11 Settings Setting items 12 Operation Search TV Viewing images on a TV 77 MENU/Settings Search Computer Using with your computer 79 Using the software 80 Connecting the camera to the computer 82 Uploading images to a media service 84 Index Printing Printing still images 86 Troubleshooting Troubleshooting 88 Warning indicators and messages 96 Others "Memory Stick Duo" media 99 Battery pack 101 Battery charger 102 6GB
Table of contents MENU (Viewing) MENU items (Viewing 11 Settings Setting items 12 Operation Search TV Viewing images on a TV 77 MENU/Settings Search Computer Using with your computer 79 Using the software 80 Connecting the camera to the computer 82 Uploading images to a media service 84 Index Printing Printing still images 86 Troubleshooting Troubleshooting 88 Warning indicators and messages 96 Others "Memory Stick Duo" media 99 Battery pack 101 Battery charger 102 6GB
Cyber-shot® Handbook
Page 8
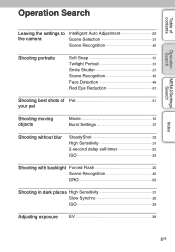
.../Settings Search Operation Search Leaving the settings to the camera Intelligent Auto Adjustment 29 Scene Selection 31 Scene Recognition 45 Shooting portraits Soft Snap 31 Twilight Portrait 31 Smile Shutter 21 Scene Recognition 45 Face Detection 48 Red Eye Reduction 61 Shooting best shots of Pet 31 your pet Shooting moving objects...
.../Settings Search Operation Search Leaving the settings to the camera Intelligent Auto Adjustment 29 Scene Selection 31 Scene Recognition 45 Shooting portraits Soft Snap 31 Twilight Portrait 31 Smile Shutter 21 Scene Recognition 45 Face Detection 48 Red Eye Reduction 61 Shooting best shots of Pet 31 your pet Shooting moving objects...
Cyber-shot® Handbook
Page 10
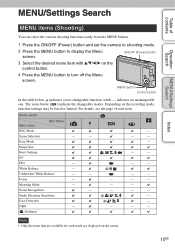
... Index MENU items (Shooting) You can select the various shooting functions easily from the MENU button. 1 Press the ON/OFF (Power) button and set the camera to shooting mode. 2 Press the MENU button to turn off the Menu screen. Easy Mode - Focus - - - - Scene Recognition - - - - White Balance - Face Detection - MENU button Control...
... Index MENU items (Shooting) You can select the various shooting functions easily from the MENU button. 1 Press the ON/OFF (Power) button and set the camera to shooting mode. 2 Press the MENU button to turn off the Menu screen. Easy Mode - Focus - - - - Scene Recognition - - - - White Balance - Face Detection - MENU button Control...
Cyber-shot® Handbook
Page 12
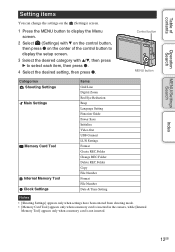
...desired setting, then press z. Control button MENU button Categories Shooting Settings Main Settings Memory Card Tool Internal Memory Tool Clock Settings Items Grid Line Digital Zoom Red Eye Reduction Beep Language Setting Function Guide Power Save Initialize Video Out USB Connect LUN Settings Format Create REC.Folder Change REC.Folder... Settings] appears only when settings have been entered from shooting mode. • [Memory Card Tool] appears only when a memory card is inserted in the camera, while [Internal Memory Tool] appears only when a memory card is not inserted. Index 12GB
...desired setting, then press z. Control button MENU button Categories Shooting Settings Main Settings Memory Card Tool Internal Memory Tool Clock Settings Items Grid Line Digital Zoom Red Eye Reduction Beep Language Setting Function Guide Power Save Initialize Video Out USB Connect LUN Settings Format Create REC.Folder Change REC.Folder... Settings] appears only when settings have been entered from shooting mode. • [Memory Card Tool] appears only when a memory card is inserted in the camera, while [Internal Memory Tool] appears only when a memory card is not inserted. Index 12GB
Cyber-shot® Handbook
Page 13
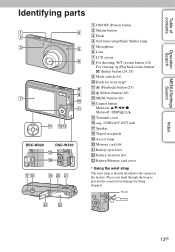
Table of contents Operation Search MENU/Settings Search Identifying parts DSC-W320 DSC-W330 A ON/OFF (Power) button B Shutter button C Flash D Self-timer lamp/Smile Shutter lamp E Microphone F Lens G LCD screen H For shooting: W/T (zoom) button (18) For viewing: (Playback ... card slot U Battery eject lever V Battery insertion slot W Battery/Memory card cover * Using the wrist strap The wrist strap is already attached to prevent the camera from damage by being dropped. Hook Index 13GB Place your hand through the loop to the...
Table of contents Operation Search MENU/Settings Search Identifying parts DSC-W320 DSC-W330 A ON/OFF (Power) button B Shutter button C Flash D Self-timer lamp/Smile Shutter lamp E Microphone F Lens G LCD screen H For shooting: W/T (zoom) button (18) For viewing: (Playback ... card slot U Battery eject lever V Battery insertion slot W Battery/Memory card cover * Using the wrist strap The wrist strap is already attached to prevent the camera from damage by being dropped. Hook Index 13GB Place your hand through the loop to the...

Cyber-shot® Handbook
Page 14
... scaling PictBridge connecting Protect Print order (DPOF) Playback zoom Index 14GB Continued r When shooting still images A Display Indication Battery remaining Low battery warning Image size • The icons are displayed on the screen to indicate the camera status. Table of contents Operation Search MENU/Settings Search List of icons displayed on the...
... scaling PictBridge connecting Protect Print order (DPOF) Playback zoom Index 14GB Continued r When shooting still images A Display Indication Battery remaining Low battery warning Image size • The icons are displayed on the screen to indicate the camera status. Table of contents Operation Search MENU/Settings Search List of icons displayed on the...
Cyber-shot® Handbook
Page 17
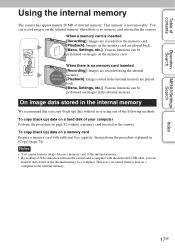
... are played back. [Menu, Settings, etc.]: Various functions can record images on the internal memory when there is no memory card inserted in the camera. To copy (back up ) data on a memory card Prepare a memory card with the dedicated USB cable, you cannot transfer data on the ...memory card. Table of contents Operation Search MENU/Settings Search Using the internal memory The camera has approximately 28 MB of your computer Perform the procedure on the memory card are recorded on a memory card to the internal memory. ...
... are played back. [Menu, Settings, etc.]: Various functions can record images on the internal memory when there is no memory card inserted in the camera. To copy (back up ) data on a memory card Prepare a memory card with the dedicated USB cable, you cannot transfer data on the ...memory card. Table of contents Operation Search MENU/Settings Search Using the internal memory The camera has approximately 28 MB of your computer Perform the procedure on the memory card are recorded on a memory card to the internal memory. ...
Cyber-shot® Handbook
Page 18
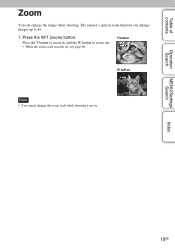
Table of contents Operation Search Zoom You can enlarge images up to zoom out. • When the zoom scale exceeds 4×, see page 60. MENU/Settings Search Index 18GB T button W button Note • You cannot change the zoom scale while shooting a movie. The camera's optical zoom function can enlarge the image when shooting. Press the T button to zoom in, and the W button to 4×. 1 Press the W/T (zoom) button.
Table of contents Operation Search Zoom You can enlarge images up to zoom out. • When the zoom scale exceeds 4×, see page 60. MENU/Settings Search Index 18GB T button W button Note • You cannot change the zoom scale while shooting a movie. The camera's optical zoom function can enlarge the image when shooting. Press the T button to zoom in, and the W button to 4×. 1 Press the W/T (zoom) button.
Cyber-shot® Handbook
Page 20
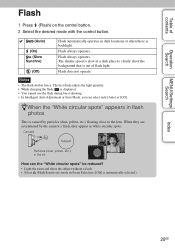
Flash does not operate. Flash always operates. When they appear as white circular spots. Camera Subject Particles (dust, pollen, etc.) in the air How can the "White circular spots" be reduced? • Light the room and shoot the subject without a .... • Select (High Sensitivity) mode in a dark place to the lens. zWhen the "White circular spots" appears in flash photos This is caused by the camera's flash, they are accentuated by particles (dust, pollen, etc.) floating close to clearly shoot the background that is out of contents Operation Search MENU/Settings...
Flash does not operate. Flash always operates. When they appear as white circular spots. Camera Subject Particles (dust, pollen, etc.) in the air How can the "White circular spots" be reduced? • Light the room and shoot the subject without a .... • Select (High Sensitivity) mode in a dark place to the lens. zWhen the "White circular spots" appears in flash photos This is caused by the camera's flash, they are accentuated by particles (dust, pollen, etc.) floating close to clearly shoot the background that is out of contents Operation Search MENU/Settings...
Cyber-shot® Handbook
Page 21
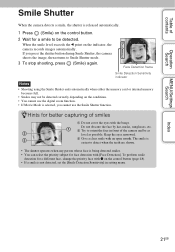
... mode. 3 To stop shooting, press (Smile) again. If you cannot use the digital zoom function. • If Movie Mode is selected, you press the shutter button during Smile Shutter, the camera shoots the image, then returns to orient the face in setting menu. Table of contents...Index 21GB To perform smile detection for face detection with [Face Detection]. The smile is easier to be detected correctly depending on the indicator, the camera records images automatically. Keep the eyes narrowed. 3 Give a clear smile with z on the control button (page 48). • If a ...
... mode. 3 To stop shooting, press (Smile) again. If you cannot use the digital zoom function. • If Movie Mode is selected, you press the shutter button during Smile Shutter, the camera shoots the image, then returns to orient the face in setting menu. Table of contents...Index 21GB To perform smile detection for face detection with [Face Detection]. The smile is easier to be detected correctly depending on the indicator, the camera records images automatically. Keep the eyes narrowed. 3 Give a clear smile with z on the control button (page 48). • If a ...
Cyber-shot® Handbook
Page 22
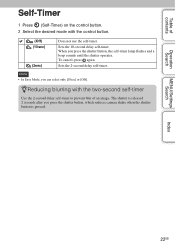
.... The shutter is pressed. MENU/Settings Search Index 22GB To cancel, press again. Note • In Easy Mode, you press the shutter button, which reduces camera shake when the shutter button is released 2 seconds after you can select only [10sec] or [Off]. When you press the shutter button, the self-timer...
.... The shutter is pressed. MENU/Settings Search Index 22GB To cancel, press again. Note • In Easy Mode, you press the shutter button, which reduces camera shake when the shutter button is released 2 seconds after you can select only [10sec] or [Off]. When you press the shutter button, the self-timer...
Cyber-shot® Handbook
Page 25
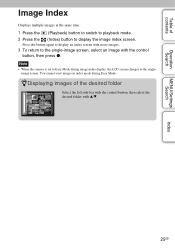
... same time. 1 Press the (Playback) button to switch to playback mode. 2 Press the (Index) button to display the image index screen. Note • When the camera is set to Easy Mode during Easy Mode. Press the button again to display an index screen with the control button, then press z. You cannot...
... same time. 1 Press the (Playback) button to switch to playback mode. 2 Press the (Index) button to display the image index screen. Note • When the camera is set to Easy Mode during Easy Mode. Press the button again to display an index screen with the control button, then press z. You cannot...
Cyber-shot® Handbook
Page 27
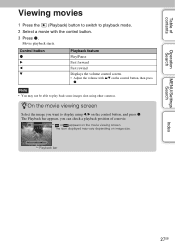
...to switch to playback mode. 2 Select a movie with v/V on the movie viewing screen. The Playback bar appears, you want to play back some images shot using b/B on image size. Control button z B b V Playback feature Play/Pause Fast forward Fast rewind Displays the volume control screen. • Adjust ... 3 Press z. or appears on the control button, then press z. The icon displayed may not be able to display using other cameras. Movie playback starts. Table of a movie. Note • You may vary depending on the control button, and press z. Playback bar Index 27GB
...to switch to playback mode. 2 Select a movie with v/V on the movie viewing screen. The Playback bar appears, you want to play back some images shot using b/B on image size. Control button z B b V Playback feature Play/Pause Fast forward Fast rewind Displays the volume control screen. • Adjust ... 3 Press z. or appears on the control button, then press z. The icon displayed may not be able to display using other cameras. Movie playback starts. Table of a movie. Note • You may vary depending on the control button, and press z. Playback bar Index 27GB
Cyber-shot® Handbook
Page 28
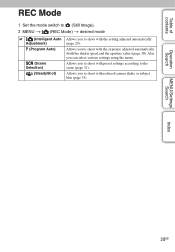
Allows you to shoot with preset settings according to shoot with reduced camera shake or subject blur (page 33). Allows you to the scene (page 31). Table of contents REC Mode 1 Set the mode switch to (Still Image). 2 MENU t (REC Mode) t desired mode (Intelligent Auto Adjustment) (Program Auto) (Scene Selection) (SteadyShot) Allows you...
Allows you to shoot with preset settings according to shoot with reduced camera shake or subject blur (page 33). Allows you to the scene (page 31). Table of contents REC Mode 1 Set the mode switch to (Still Image). 2 MENU t (REC Mode) t desired mode (Intelligent Auto Adjustment) (Program Auto) (Scene Selection) (SteadyShot) Allows you...
Cyber-shot® Handbook
Page 29
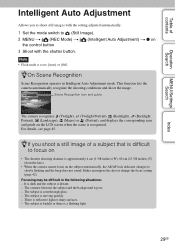
...and the subject is a flashing light. This function lets the camera automatically recognize the shooting conditions and shoot the image. Either recompose the shot or change the focus setting (page 42). zIf you to shoot still images with the setting adjusted automatically. 1 Set the mode ...switch to (Still Image). 2 MENU t (REC Mode) t the control button (Intelligent Auto Adjustment) t...
...and the subject is a flashing light. This function lets the camera automatically recognize the shooting conditions and shoot the image. Either recompose the shot or change the focus setting (page 42). zIf you to shoot still images with the setting adjusted automatically. 1 Set the mode ...switch to (Still Image). 2 MENU t (REC Mode) t the control button (Intelligent Auto Adjustment) t...
Cyber-shot® Handbook
Page 32
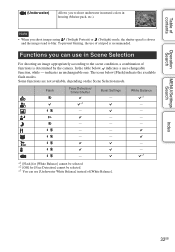
... shoot underwater in natural colors in Scene Selection For shooting an image appropriately according to the scene condition, a combination of functions is determined by the camera. Table of contents Operation Search MENU/Settings Search (Underwater) Allows you shoot images using (Twilight Portrait) or (Twilight) mode, the shutter speed is slower and...
... shoot underwater in natural colors in Scene Selection For shooting an image appropriately according to the scene condition, a combination of functions is determined by the camera. Table of contents Operation Search MENU/Settings Search (Underwater) Allows you shoot images using (Twilight Portrait) or (Twilight) mode, the shutter speed is slower and...


