Cyber-shot® Handbook
Page 11
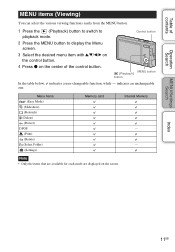
... display the Menu screen. 3 Select the desired menu item with v/V/b/B on the control button. 4 Press z on the screen. Table of the control button. (Playback) MENU button button In the table below, indicates a user-changeable function, while - Menu items (Easy Mode) (Slideshow) (Retouch) (Delete) (Protect) DPOF (Print) (Rotate) (Select Folder) (Settings) Memory card Internal Memory - - Note...
... display the Menu screen. 3 Select the desired menu item with v/V/b/B on the control button. 4 Press z on the screen. Table of the control button. (Playback) MENU button button In the table below, indicates a user-changeable function, while - Menu items (Easy Mode) (Slideshow) (Retouch) (Delete) (Protect) DPOF (Print) (Rotate) (Select Folder) (Settings) Memory card Internal Memory - - Note...
Cyber-shot® Handbook
Page 12
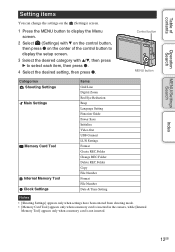
... button Categories Shooting Settings Main Settings Memory Card Tool Internal Memory Tool Clock Settings Items Grid Line Digital Zoom Red Eye Reduction Beep Language Setting Function Guide Power Save Initialize Video Out USB Connect LUN Settings Format Create REC.Folder Change REC.Folder Delete REC....Folder Copy File Number Format File Number Date & Time Setting Notes • [Shooting Settings] appears only when settings have been entered from shooting mode. • [Memory Card Tool] appears only when a memory card is inserted in the camera, while [Internal ...
... button Categories Shooting Settings Main Settings Memory Card Tool Internal Memory Tool Clock Settings Items Grid Line Digital Zoom Red Eye Reduction Beep Language Setting Function Guide Power Save Initialize Video Out USB Connect LUN Settings Format Create REC.Folder Change REC.Folder Delete REC....Folder Copy File Number Format File Number Date & Time Setting Notes • [Shooting Settings] appears only when settings have been entered from shooting mode. • [Memory Card Tool] appears only when a memory card is inserted in the camera, while [Internal ...
Cyber-shot® Handbook
Page 13
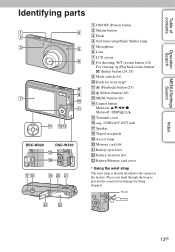
... MENU/Settings Search Identifying parts DSC-W320 DSC-W330 A ON/OFF (Power) button B Shutter button C Flash D Self-timer lamp/Smile Shutter lamp E Microphone F Lens G LCD screen H For shooting: W/T (zoom) button (18) For viewing: (Playback zoom) button/ (Index) button (24, 25) I Mode switch (16) J Hook for wrist strap* K (Playback) button (23) L (Delete) button (26) M MENU button (10) N Control button Menu on: v/V/b/B/z Menu off: DISP...
... MENU/Settings Search Identifying parts DSC-W320 DSC-W330 A ON/OFF (Power) button B Shutter button C Flash D Self-timer lamp/Smile Shutter lamp E Microphone F Lens G LCD screen H For shooting: W/T (zoom) button (18) For viewing: (Playback zoom) button/ (Index) button (24, 25) I Mode switch (16) J Hook for wrist strap* K (Playback) button (23) L (Delete) button (26) M MENU button (10) N Control button Menu on: v/V/b/B/z Menu off: DISP...

Cyber-shot® Handbook
Page 26
... in the selected folder at once. You can also delete images from the MENU button (page 54). 1 Press the (Playback) button to switch to select unwanted images for deletion. Allows you to playback mode. 2 (Delete) button t desired mode t z on the control button All in This Folder Multiple Images This Image Exit Deletes all images in single-image mode.
... in the selected folder at once. You can also delete images from the MENU button (page 54). 1 Press the (Playback) button to switch to select unwanted images for deletion. Allows you to playback mode. 2 (Delete) button t desired mode t z on the control button All in This Folder Multiple Images This Image Exit Deletes all images in single-image mode.

Cyber-shot® Handbook
Page 51
... Search Easy Mode When viewing still images in Easy Mode, the playback screen text becomes larger, and indicators become easier to see. 1 Press the 2 MENU t (Playback) button to switch to playback mode. (Easy Mode) t [OK] t z on the control button Notes • The battery charge is available. (Delete) button You can delete the currently displayed image with...
... Search Easy Mode When viewing still images in Easy Mode, the playback screen text becomes larger, and indicators become easier to see. 1 Press the 2 MENU t (Playback) button to switch to playback mode. (Easy Mode) t [OK] t z on the control button Notes • The battery charge is available. (Delete) button You can delete the currently displayed image with...

Cyber-shot® Handbook
Page 54
... the above steps until there are no more images to select unwanted images for deletion. MENU/Settings Search Index 54GB Table of contents Operation Search Delete Allows you can also delete images using the (Delete) button (page 26). 1 Press the 2 MENU t 3 [OK] t z (Playback) button to switch to release the mark. 2MENU t [OK] t z (All in This Folder...
... the above steps until there are no more images to select unwanted images for deletion. MENU/Settings Search Index 54GB Table of contents Operation Search Delete Allows you can also delete images using the (Delete) button (page 26). 1 Press the 2 MENU t 3 [OK] t z (Playback) button to switch to release the mark. 2MENU t [OK] t z (All in This Folder...
Cyber-shot® Handbook
Page 73
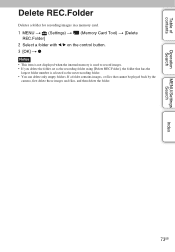
.... 1 MENU t (Settings) t REC.Folder] (Memory Card Tool) t [Delete 2 Select a folder with b/B on the control button. 3 [OK] t z Notes • This item is not displayed when the internal memory is selected as the recording folder using [Delete REC.Folder], the folder that cannot be played back by the camera, first delete these images and files, and then...
.... 1 MENU t (Settings) t REC.Folder] (Memory Card Tool) t [Delete 2 Select a folder with b/B on the control button. 3 [OK] t z Notes • This item is not displayed when the internal memory is selected as the recording folder using [Delete REC.Folder], the folder that cannot be played back by the camera, first delete these images and files, and then...
Cyber-shot® Handbook
Page 74
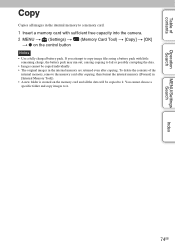
... charge, the battery pack may run out, causing copying to fail or possibly corrupting the data. • Images cannot be copied to it . To delete the contents of contents Copy Copies all the data will be copied individually. • The original images in the internal memory are retained even after...is created on the memory card and all images in the internal memory to a memory card. 1 Insert a memory card with sufficient free capacity into the camera. 2 MENU t (Settings) t t z on the control button (Memory Card Tool) t [Copy] t [OK] Notes • Use a fully charged battery pack.
... charge, the battery pack may run out, causing copying to fail or possibly corrupting the data. • Images cannot be copied to it . To delete the contents of contents Copy Copies all the data will be copied individually. • The original images in the internal memory are retained even after...is created on the memory card and all images in the internal memory to a memory card. 1 Insert a memory card with sufficient free capacity into the camera. 2 MENU t (Settings) t t z on the control button (Memory Card Tool) t [Copy] t [OK] Notes • Use a fully charged battery pack.
Cyber-shot® Handbook
Page 91
...; If an A/V cable is in index mode. • The camera is set to image processing. Cannot display images in USB mode. Delete unnecessary images (page 26). • The battery level is not a malfunction. The same image is shot several times. • [Burst Settings] is set to [Burst...] (page 37). • [Scene Recognition] is set to display images only. Cancel Easy Mode. Insert a charged battery pack. The date and time are not recorded. Press the DISP (Screen Display Settings) button to [Auto...
...; If an A/V cable is in index mode. • The camera is set to image processing. Cannot display images in USB mode. Delete unnecessary images (page 26). • The battery level is not a malfunction. The same image is shot several times. • [Burst Settings] is set to [Burst...] (page 37). • [Scene Recognition] is set to display images only. Cancel Easy Mode. Insert a charged battery pack. The date and time are not recorded. Press the DISP (Screen Display Settings) button to [Auto...

Cyber-shot® Handbook
Page 103
...19 Clock Settings 76 Computer 79 Importing images 82 Connecting Computer 82 Printer 86 TV 77 Control button 13 Copy 74 Create REC.Folder 71 D Date & Time Setting 76 Delete 26, 54 Delete REC.Folder 73 Digital Zoom 60 DISP 19 DPOF 56 DRO 50 E Easy Mode Shooting 34 Viewing 51 EV 38... Exposure 38 F Face Detection 48 File Number 75 Flash 20 Focus 42 Folder Changing 72 Creating 71 Deleting 73 Selecting 58 Format 70 Function...
...19 Clock Settings 76 Computer 79 Importing images 82 Connecting Computer 82 Printer 86 TV 77 Control button 13 Copy 74 Create REC.Folder 71 D Date & Time Setting 76 Delete 26, 54 Delete REC.Folder 73 Digital Zoom 60 DISP 19 DPOF 56 DRO 50 E Easy Mode Shooting 34 Viewing 51 EV 38... Exposure 38 F Face Detection 48 File Number 75 Flash 20 Focus 42 Folder Changing 72 Creating 71 Deleting 73 Selecting 58 Format 70 Function...

Instruction Manual
Page 11
... E Microphone F Lens GB G LCD screen 11 Otherwise, you cannot firmly secure the camera, and damage to the camera may occur. Identifying parts DSC-W320 DSC-W330 H For shooting: W/T (Zoom) button For viewing: (Playback zoom) button/ (Index) button I Mode switch J Hook for wrist strap K (Playback) button L (Delete) button M MENU button N Control button Menu on: v/V/b/B/z GB Menu off: DISP/ / / O Terminal cover P (USB)/A/V OUT jack Q Speaker...
... E Microphone F Lens GB G LCD screen 11 Otherwise, you cannot firmly secure the camera, and damage to the camera may occur. Identifying parts DSC-W320 DSC-W330 H For shooting: W/T (Zoom) button For viewing: (Playback zoom) button/ (Index) button I Mode switch J Hook for wrist strap K (Playback) button L (Delete) button M MENU button N Control button Menu on: v/V/b/B/z GB Menu off: DISP/ / / O Terminal cover P (USB)/A/V OUT jack Q Speaker...

Instruction Manual
Page 20
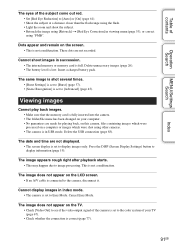
Viewing images 1 Press the (Playback) button. • The last image shot is displayed. (Playback) button x Selecting next/previous image Select an image with v on the control button. • Press z in the center of the control button to shooting images Press the shutter button halfway down. x Deleting an image 1 Press (Delete) button. 2 Select [This Image] with B (next)/b (previous) on the control button, then press z. x Returning to view movies. x Turning off the camera Press ON/OFF (Power) button. (Delete) button Control button GB 20
Viewing images 1 Press the (Playback) button. • The last image shot is displayed. (Playback) button x Selecting next/previous image Select an image with v on the control button. • Press z in the center of the control button to shooting images Press the shutter button halfway down. x Deleting an image 1 Press (Delete) button. 2 Select [This Image] with B (next)/b (previous) on the control button, then press z. x Returning to view movies. x Turning off the camera Press ON/OFF (Power) button. (Delete) button Control button GB 20


