Instruction Manual
Page 5
...can radiate radio frequency energy and, if not installed and used with the equipment in the EMC Directive for a digital device pursuant to conserve natural resources. The recycling of materials will help . [ CAUTION You are designed to the applicable collection... point for a Class B digital device, pursuant to discontinue midway (fail), restart the application or disconnect and connect the communication cable (USB, etc.) again. [ Disposal of Old Electrical & Electronic Equipment (Applicable GB in a residential ...
...can radiate radio frequency energy and, if not installed and used with the equipment in the EMC Directive for a digital device pursuant to conserve natural resources. The recycling of materials will help . [ CAUTION You are designed to the applicable collection... point for a Class B digital device, pursuant to discontinue midway (fail), restart the application or disconnect and connect the communication cable (USB, etc.) again. [ Disposal of Old Electrical & Electronic Equipment (Applicable GB in a residential ...
Instruction Manual
Page 7
... 2 Read this first 4 Notes on using the camera 8 Getting started 9 Checking the accessories supplied 9 1 Preparing the battery pack 10 2 Inserting the battery pack/a "Memory Stick Duo" (not supplied) ........ 11 3 Turning the camera on the screen 28 Battery life and memory capacity 30...still images/movies 34 Viewing images 35 Precautions 36 Specifications 37 7 HOME/Menu 21 Using the HOME screen 21 HOME items 22 GB Using menu items 23 Menu items 24 Enjoying your computer 26 Supported Operating Systems for USB connection and application software (supplied 26 Viewing "Cyber-shot...
... 2 Read this first 4 Notes on using the camera 8 Getting started 9 Checking the accessories supplied 9 1 Preparing the battery pack 10 2 Inserting the battery pack/a "Memory Stick Duo" (not supplied) ........ 11 3 Turning the camera on the screen 28 Battery life and memory capacity 30...still images/movies 34 Viewing images 35 Precautions 36 Specifications 37 7 HOME/Menu 21 Using the HOME screen 21 HOME items 22 GB Using menu items 23 Menu items 24 Enjoying your computer 26 Supported Operating Systems for USB connection and application software (supplied 26 Viewing "Cyber-shot...
Instruction Manual
Page 9
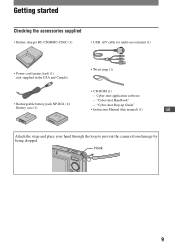
Getting started Checking the accessories supplied • Battery charger BC-CSGB/BC-CSGC (1) • USB, A/V cable for multi-use terminal (1) • Power cord (mains lead) (1) (not supplied in the USA and Canada) • Wrist strap (1) • CD-ROM (1) - "Cyber-shot Handbook" • Rechargeable battery pack NP-BG1 (1)/ - Hook 9 Cyber-shot application software - "Cyber-shot Step-up Guide" Battery case (1) • Instruction Manual (this manual) (1) GB Attach the strap and place your hand through the loop to prevent the camera from damage by being dropped.
Getting started Checking the accessories supplied • Battery charger BC-CSGB/BC-CSGC (1) • USB, A/V cable for multi-use terminal (1) • Power cord (mains lead) (1) (not supplied in the USA and Canada) • Wrist strap (1) • CD-ROM (1) - "Cyber-shot Handbook" • Rechargeable battery pack NP-BG1 (1)/ - Hook 9 Cyber-shot application software - "Cyber-shot Step-up Guide" Battery case (1) • Instruction Manual (this manual) (1) GB Attach the strap and place your hand through the loop to prevent the camera from damage by being dropped.
Instruction Manual
Page 19
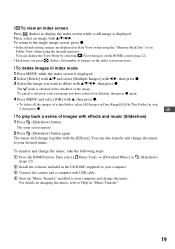
...). The setup screen appears. 2 Press (Slideshow) button again. To transfer and change together with USB cable. 4 Start up "Music Transfer" installed to the single image screen, press z. •... (Slideshow) button. [ To view an index screen Press (Index) to your computer. 3 Connect the camera and a computer with the [Effects]. The music will change the music, take the following steps. 1 ... the music, refer to Help in the CD-ROM (supplied) to display the index screen while a still image is displayed. 2 Select [Delete] with v/V and select [Multiple Images] with b/B, then press ...
...). The setup screen appears. 2 Press (Slideshow) button again. To transfer and change together with USB cable. 4 Start up "Music Transfer" installed to the single image screen, press z. •... (Slideshow) button. [ To view an index screen Press (Index) to your computer. 3 Connect the camera and a computer with the [Effects]. The music will change the music, take the following steps. 1 ... the music, refer to Help in the CD-ROM (supplied) to display the index screen while a still image is displayed. 2 Select [Delete] with v/V and select [Multiple Images] with b/B, then press ...
Instruction Manual
Page 22
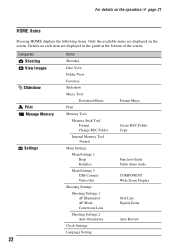
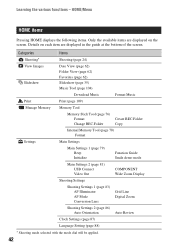
...Memory Tool Memory Stick Tool Format Change REC.Folder Internal Memory Tool Format Main Settings Main Settings 1 Beep Initialize Main Settings 2 USB Connect Video Out Shooting Settings Shooting Settings 1 AF Illuminator AF Mode Conversion Lens Shooting Settings 2 Auto Orientation Clock Settings Language ...Setting Format Music Create REC.Folder Copy Function Guide Smile demo mode COMPONENT Wide Zoom Display Grid Line Digital Zoom Auto Review For details on the operation 1 page 21 HOME items Pressing HOME displays the following items. Only the available...
...Memory Tool Memory Stick Tool Format Change REC.Folder Internal Memory Tool Format Main Settings Main Settings 1 Beep Initialize Main Settings 2 USB Connect Video Out Shooting Settings Shooting Settings 1 AF Illuminator AF Mode Conversion Lens Shooting Settings 2 Auto Orientation Clock Settings Language ...Setting Format Music Create REC.Folder Copy Function Guide Smile demo mode COMPONENT Wide Zoom Display Grid Line Digital Zoom Auto Review For details on the operation 1 page 21 HOME items Pressing HOME displays the following items. Only the available...
Instruction Manual
Page 26
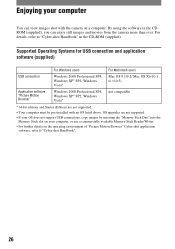
... USB connections, copy images by inserting the "Memory Stick Duo" into the Memory Stick slot on your computer You can enjoy still images and movies from the camera more than ever. OS upgrades are not supported. • Your computer must be pre-installed with the camera on the operating environment of "Picture Motion Browser" Cyber-shot...
... USB connections, copy images by inserting the "Memory Stick Duo" into the Memory Stick slot on your computer You can enjoy still images and movies from the camera more than ever. OS upgrades are not supported. • Your computer must be pre-installed with the camera on the operating environment of "Picture Motion Browser" Cyber-shot...
Instruction Manual
Page 35
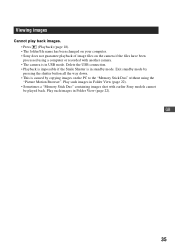
.... • Playback is impossible if the Smile Shutter is in Folder View (page 22). Play such images in standby mode. Play such images in USB mode. GB 35 Viewing images Cannot play back images. • Press (Playback) (page 18). • The folder/file name has been changed on...the PC to the "Memory Stick Duo" without using a computer or recorded with another camera. • The camera is in Folder View (page 22). • Sometimes a "Memory Stick Duo" containing images shot with earlier Sony models cannot be played back. Exit standby mode by pressing the shutter button all the way...
.... • Playback is impossible if the Smile Shutter is in Folder View (page 22). Play such images in standby mode. Play such images in USB mode. GB 35 Viewing images Cannot play back images. • Press (Playback) (page 18). • The folder/file name has been changed on...the PC to the "Memory Stick Duo" without using a computer or recorded with another camera. • The camera is in Folder View (page 22). • Sometimes a "Memory Stick Duo" containing images shot with earlier Sony models cannot be played back. Exit standby mode by pressing the shutter button all the way...
Instruction Manual
Page 37
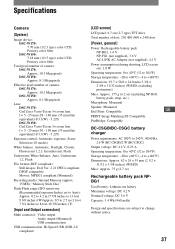
...camera: DSC-W170: Approx. 10.3 Megapixels DSC-W150: Approx. 8.3 Megapixels Effective pixel number of camera: DSC-W170: Approx. 10.1 Megapixels DSC-W150: Approx. 8.1 Megapixels Lens: DSC-W170: Carl Zeiss Vario-Tessar 5× zoom lens f = 5 - 25 mm (28 - 140 mm (35 mm film equivalent)) F3.3(W) - 5.2(T) DSC... 7 3/4 inches to 8 feet 10 3/8 inches) (T) [Input and Output connectors] Multi connector: Video output Audio output (Monaural) USB communication USB communication: Hi-Speed USB (USB 2.0 compliant) [LCD screen] LCD panel: 6.7 cm (2.7 type) TFT drive Total number of dots: 230 400 (960 ×...
...camera: DSC-W170: Approx. 10.3 Megapixels DSC-W150: Approx. 8.3 Megapixels Effective pixel number of camera: DSC-W170: Approx. 10.1 Megapixels DSC-W150: Approx. 8.1 Megapixels Lens: DSC-W170: Carl Zeiss Vario-Tessar 5× zoom lens f = 5 - 25 mm (28 - 140 mm (35 mm film equivalent)) F3.3(W) - 5.2(T) DSC... 7 3/4 inches to 8 feet 10 3/8 inches) (T) [Input and Output connectors] Multi connector: Video output Audio output (Monaural) USB communication USB communication: Hi-Speed USB (USB 2.0 compliant) [LCD screen] LCD panel: 6.7 cm (2.7 type) TFT drive Total number of dots: 230 400 (960 ×...
Cyber-shot® Handbook
Page 5
... stored on a computer with the camera copying to the "Memory Stick Duo 103 Using the "Music Transfer" (supplied 104 Using your Macintosh computer 105 Viewing "Cyber-shot Step-up Guide 107 5 Shooting Settings 1 83 AF Illuminator Grid Line AF Mode Digital Zoom Conversion Lens Shooting Settings - Main Settings 2 81 USB Connect COMPONENT Video Out Wide...
... stored on a computer with the camera copying to the "Memory Stick Duo 103 Using the "Music Transfer" (supplied 104 Using your Macintosh computer 105 Viewing "Cyber-shot Step-up Guide 107 5 Shooting Settings 1 83 AF Illuminator Grid Line AF Mode Digital Zoom Conversion Lens Shooting Settings - Main Settings 2 81 USB Connect COMPONENT Video Out Wide...

Cyber-shot® Handbook
Page 16
... S Battery eject lever 16 N Tripod receptacle • Use a tripod with a screw less than 5.5 mm (7/32 inch) long. Otherwise, you cannot firmly secure the camera, and damage to a PictBridge compliant printer. Identifying parts K Control button Menu on: v/V/b/B/z (43) Menu off: DISP/ / / (21, 26, 27) L (Slideshow...) button (35) M Multi connector Used in the following situations: • Making a USB connection between the camera and the computer. • Making a connection to audio/video input jacks on a TV. • Making a connection to the...
... S Battery eject lever 16 N Tripod receptacle • Use a tripod with a screw less than 5.5 mm (7/32 inch) long. Otherwise, you cannot firmly secure the camera, and damage to a PictBridge compliant printer. Identifying parts K Control button Menu on: v/V/b/B/z (43) Menu off: DISP/ / / (21, 26, 27) L (Slideshow...) button (35) M Multi connector Used in the following situations: • Making a USB connection between the camera and the computer. • Making a connection to audio/video input jacks on a TV. • Making a connection to the...

Cyber-shot® Handbook
Page 41
.... 3 Select an item with v/V, then press z. • You cannot display the HOME screen when a PictBridge connection or a USB connection is made. • The camera is the gateway screen for all the functions of the camera, and can be called up regardless of the mode setting (shooting/viewing). Basic Operations Learning the various functions...
.... 3 Select an item with v/V, then press z. • You cannot display the HOME screen when a PictBridge connection or a USB connection is made. • The camera is the gateway screen for all the functions of the camera, and can be called up regardless of the mode setting (shooting/viewing). Basic Operations Learning the various functions...
Cyber-shot® Handbook
Page 42
... Settings 1 (page 79) Beep Initialize Function Guide Smile demo mode Main Settings 2 (page 81) USB Connect Video Out COMPONENT Wide Zoom Display Shooting Settings Shooting Settings 1 (page 83) AF Illuminator AF Mode Conversion Lens Grid Line Digital Zoom Shooting Settings 2 (page 86) Auto Orientation Auto Review Clock Settings (page 87) Language Setting...
... Settings 1 (page 79) Beep Initialize Function Guide Smile demo mode Main Settings 2 (page 81) USB Connect Video Out COMPONENT Wide Zoom Display Shooting Settings Shooting Settings 1 (page 83) AF Illuminator AF Mode Conversion Lens Grid Line Digital Zoom Shooting Settings 2 (page 86) Auto Orientation Auto Review Clock Settings (page 87) Language Setting...
Cyber-shot® Handbook
Page 81
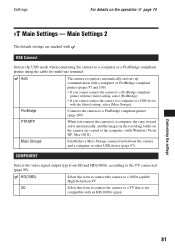
...]. • If you connect the camera to a computer, the copy wizard starts automatically, and the images in the recording folder on the operation 1 page 74 Main Settings - HD(1080i) Select this item to connect the camera to a computer or a USB device with the [Auto] setting, ...select [Mass Storage]. Customizing the settings 81 PictBridge Connects the camera to a 1080i-capable High Definition TV. USB Connect Selects the USB mode when connecting the camera to the TV connected (page 89). COMPONENT Selects the video signal output type from SD and...
...]. • If you connect the camera to a computer, the copy wizard starts automatically, and the images in the recording folder on the operation 1 page 74 Main Settings - HD(1080i) Select this item to connect the camera to a computer or a USB device with the [Auto] setting, ...select [Mass Storage]. Customizing the settings 81 PictBridge Connects the camera to a 1080i-capable High Definition TV. USB Connect Selects the USB mode when connecting the camera to the TV connected (page 89). COMPONENT Selects the video signal output type from SD and...

Cyber-shot® Handbook
Page 93
.../Windows Vista* • Operation is compatible with Hi-Speed USB (USB 2.0 compliant) allows advanced transfer (high speed transfer) as examples. Notes on an upgrade of USB devices you connect two or more USB devices to the camera. For details on the types of the operating systems described... above . • If you are using. • Operations are not guaranteed when using a USB hub. • Connecting the camera using "Picture Motion Browser" and "Music Transfer" OS (pre-installed): Microsoft Windows 2000 Professional SP4, Windows XP* SP2/Windows...
.../Windows Vista* • Operation is compatible with Hi-Speed USB (USB 2.0 compliant) allows advanced transfer (high speed transfer) as examples. Notes on an upgrade of USB devices you connect two or more USB devices to the camera. For details on the types of the operating systems described... above . • If you are using. • Operations are not guaranteed when using a USB hub. • Connecting the camera using "Picture Motion Browser" and "Music Transfer" OS (pre-installed): Microsoft Windows 2000 Professional SP4, Windows XP* SP2/Windows...

Cyber-shot® Handbook
Page 97
... using a battery pack with the AC Adaptor (not supplied) and the USB/AV/DC IN cable for multi-use terminal "Connecting..." Copying images to your computer using the "Picture Motion Browser" Preparing the camera and the computer Connecting the camera to your computer 1 Insert a "Memory Stick Duo" with recorded images ... if the battery pack shuts down too soon. 3 Turn on the computer, then press the (Playback) button. 2 To the multi connector 1 To a USB jack Cable for a while. * is displayed on the screen of the camera. Access indicators* Using your computer (Playback) button When...
... using a battery pack with the AC Adaptor (not supplied) and the USB/AV/DC IN cable for multi-use terminal "Connecting..." Copying images to your computer using the "Picture Motion Browser" Preparing the camera and the computer Connecting the camera to your computer 1 Insert a "Memory Stick Duo" with recorded images ... if the battery pack shuts down too soon. 3 Turn on the computer, then press the (Playback) button. 2 To the multi connector 1 To a USB jack Cable for a while. * is displayed on the screen of the camera. Access indicators* Using your computer (Playback) button When...

Cyber-shot® Handbook
Page 98
...USB connection, the [Import Media Files] screen of "Picture Motion Browser" appears automatically. Thumbnails of the imported images are imported into a folder created in "Pictures" (in "Viewed folders". Copying images to your computer using the "Picture Motion Browser" Copying images to a computer 1 Connects the camera... are displayed. • The "Pictures" (in Windows XP/2000, "My Pictures") folder is set as described in "Connecting the camera to view them. To start importing images, click the [Import] button. Viewing images on a calendar by shooting date to your computer...
...USB connection, the [Import Media Files] screen of "Picture Motion Browser" appears automatically. Thumbnails of the imported images are imported into a folder created in "Pictures" (in "Viewed folders". Copying images to your computer using the "Picture Motion Browser" Copying images to a computer 1 Connects the camera... are displayed. • The "Pictures" (in Windows XP/2000, "My Pictures") folder is set as described in "Connecting the camera to view them. To start importing images, click the [Import] button. Viewing images on a calendar by shooting date to your computer...
Cyber-shot® Handbook
Page 99
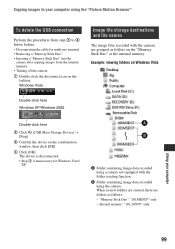
...-click the disconnect icon on the tasktray. A Folder containing image data recorded using the camera. Internal memory: "101_SONY" only Using your computer using the "Picture Motion Browser" To delete the USB connection Perform the procedures from step 1 to 4 below before: • Disconnecting the cable for Windows Vista/ XP. When no new folders...
...-click the disconnect icon on the tasktray. A Folder containing image data recorded using the camera. Internal memory: "101_SONY" only Using your computer using the "Picture Motion Browser" To delete the USB connection Perform the procedures from step 1 to 4 below before: • Disconnecting the cable for Windows Vista/ XP. When no new folders...
Cyber-shot® Handbook
Page 101
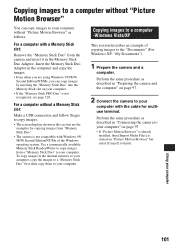
... to your computer. Copying images to a computer without "Picture Motion Browser" You can copy images to your computer without a Memory Stick slot: Make a USB connection and follow Stages to copy images. • The screen displays shown in this section are using Windows 95/98/98 Second Edition/NT/Me... computer" on page 97. • If "Picture Motion Browser" is already installed, then [Import Media Files] is started on page 97. 2 Connect the camera to your computer. • If the "Memory Stick PRO Duo" is not compatible with Windows 95/ 98/98 Second Edition/NT/Me of copying images...
... to your computer. Copying images to a computer without "Picture Motion Browser" You can copy images to your computer without a Memory Stick slot: Make a USB connection and follow Stages to copy images. • The screen displays shown in this section are using Windows 95/98/98 Second Edition/NT/Me... computer" on page 97. • If "Picture Motion Browser" is already installed, then [Import Media Files] is started on page 97. 2 Connect the camera to your computer. • If the "Memory Stick PRO Duo" is not compatible with Windows 95/ 98/98 Second Edition/NT/Me of copying images...
Cyber-shot® Handbook
Page 104
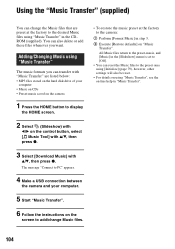
... listed below: • MP3 files stored on the hard disk drive of your computer • Music on CDs • Preset-music saved on the camera 1 Press the HOME button to display the HOME screen. 2 Select (Slideshow) with b/B on the control button, select [ Music Tool] with v/V, ...then press z. 3 Select [Download Music] with v/V, then press z. The message "Connect to PC" appears. 4 Make a USB connection between the camera and your computer. 5 Start "Music Transfer". 6 Follow the instructions on the screen to add/change Music files. • To restore the music preset at...
... listed below: • MP3 files stored on the hard disk drive of your computer • Music on CDs • Preset-music saved on the camera 1 Press the HOME button to display the HOME screen. 2 Select (Slideshow) with b/B on the control button, select [ Music Tool] with v/V, ...then press z. 3 Select [Download Music] with v/V, then press z. The message "Connect to PC" appears. 4 Make a USB connection between the camera and your computer. 5 Start "Music Transfer". 6 Follow the instructions on the screen to add/change Music files. • To restore the music preset at...
Cyber-shot® Handbook
Page 105
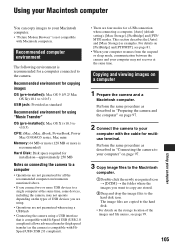
...the recommended computer environments mentioned above. • If you are using. • Operations are not guaranteed when using a USB hub. • Connecting the camera using "Music Transfer" OS (pre-installed): Mac OS X (v10.3 to v10.5) CPU: iMac, eMac, iBook,...Storage] as standard Recommended environment for using a USB interface that is compatible with Hi-Speed USB (USB 2.0 compliant) allows advanced transfer (high speed transfer) as the camera is compatible with HiSpeed USB (USB 2.0 compliant). • There are four modes for a USB connection when connecting a computer, [Auto] (...
...the recommended computer environments mentioned above. • If you are using. • Operations are not guaranteed when using a USB hub. • Connecting the camera using "Music Transfer" OS (pre-installed): Mac OS X (v10.3 to v10.5) CPU: iMac, eMac, iBook,...Storage] as standard Recommended environment for using a USB interface that is compatible with Hi-Speed USB (USB 2.0 compliant) allows advanced transfer (high speed transfer) as the camera is compatible with HiSpeed USB (USB 2.0 compliant). • There are four modes for a USB connection when connecting a computer, [Auto] (...


