Operating Instructions
Page 3
... 1363 is fitted to this equipment has a detachable fuse cover, be sure to power this camera. Notice If static electricity or electromagnetism causes data transfer to the collection and recycling... frequencies may regulate disposal of this product. For the Customers in Canada THIS CLASS B DIGITAL APPARATUS COMPLIES WITH CANADIAN ICES-003. If the plug supplied with the limits sets out ...this equipment for the customers in the United Kingdom A moulded plug complying with your nearest Sony service station. "Memory Stick" and battery pack N50 For the Customers in the plug...
... 1363 is fitted to this equipment has a detachable fuse cover, be sure to power this camera. Notice If static electricity or electromagnetism causes data transfer to the collection and recycling... frequencies may regulate disposal of this product. For the Customers in Canada THIS CLASS B DIGITAL APPARATUS COMPLIES WITH CANADIAN ICES-003. If the plug supplied with the limits sets out ...this equipment for the customers in the United Kingdom A moulded plug complying with your nearest Sony service station. "Memory Stick" and battery pack N50 For the Customers in the plug...

Operating Instructions
Page 4
... by the JEITA (Japan Electronics and Information Technology Industries Association). • Playback of images recorded with your camera on other equipment and playback of images recorded or edited with a power zoom lens. Unauthorized recording of such materials may be some tiny black points and/or bright points (white...the lens to direct sunlight for contents of the recording Contents of data loss, always copy (back up) data to a disk. The power zoom lens This camera is not a malfunction. Or it . However, there may be contrary to the provision of the copyright laws. 4 Do not shake or...
... by the JEITA (Japan Electronics and Information Technology Industries Association). • Playback of images recorded with your camera on other equipment and playback of images recorded or edited with a power zoom lens. Unauthorized recording of such materials may be some tiny black points and/or bright points (white...the lens to direct sunlight for contents of the recording Contents of data loss, always copy (back up) data to a disk. The power zoom lens This camera is not a malfunction. Or it . However, there may be contrary to the provision of the copyright laws. 4 Do not shake or...
Operating Instructions
Page 5
...; or ® marks are not actual images shot using this camera. The pictures used in this manual The photographs used as other countries. • Macintosh, Mac OS, QuickTime, iBook and Power Mac are trademarks or registered trademarks of Apple Computer, Inc. • Pentium is a trademark of Sony Corporation. • Microsoft and Windows are , in...
...; or ® marks are not actual images shot using this camera. The pictures used in this manual The photographs used as other countries. • Macintosh, Mac OS, QuickTime, iBook and Power Mac are trademarks or registered trademarks of Apple Computer, Inc. • Pentium is a trademark of Sony Corporation. • Microsoft and Windows are , in...
Operating Instructions
Page 6
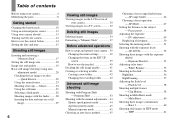
... size 18 Image size and quality 19 Basic still image shooting (using your camera 4 Identifying the parts 8 Getting started Charging the battery pack 10 Using an external power source 13 Using your camera abroad 13 Turning on the LCD screen of contents Before using auto adjustment mode... 20 Checking the last image you shot - TIFF 61 Multi Burst 60 Shooting three images continuously - Clip...
... size 18 Image size and quality 19 Basic still image shooting (using your camera 4 Identifying the parts 8 Getting started Charging the battery pack 10 Using an external power source 13 Using your camera abroad 13 Turning on the LCD screen of contents Before using auto adjustment mode... 20 Checking the last image you shot - TIFF 61 Multi Burst 60 Shooting three images continuously - Clip...
Operating Instructions
Page 8
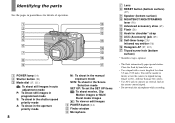
...camera. • Use ACC jack to connect an external flash or the remote control tripod. • Do not touch the microphone while recording. Close the flash by hand after use. • Use a tripod with a screw length of operation. 1 0 2 qa 3 qs 4 5 qd 6 qf 7 qg qh 8 9 qj A POWER... mode SET UP: To set the SET UP items : To shoot movies, Clip Motion images or Multi Burst mode images : To view or edit images D POWER button (14) E Finder window F Microphone G Lens H RESET button (bottom surface) (97) I Speaker (bottom surface) J NIGHTSHOT/NIGHTFRAMING lever (56) K Advanced ...
...camera. • Use ACC jack to connect an external flash or the remote control tripod. • Do not touch the microphone while recording. Close the flash by hand after use. • Use a tripod with a screw length of operation. 1 0 2 qa 3 qs 4 5 qd 6 qf 7 qg qh 8 9 qj A POWER... mode SET UP: To set the SET UP items : To shoot movies, Clip Motion images or Multi Burst mode images : To view or edit images D POWER button (14) E Finder window F Microphone G Lens H RESET button (bottom surface) (97) I Speaker (bottom surface) J NIGHTSHOT/NIGHTFRAMING lever (56) K Advanced ...
Operating Instructions
Page 11
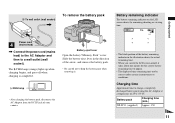
Getting started 2 To wall outlet (wall socket) 1 Power cord 4 (mains lead) , Connect the power cord (mains lead) to the AC Adaptor and then to appear. • The displayed time remaining may not be correct under certain circumstances or conditions. ... switch the LCD screen on the LCD screen shows the remaining shooting or viewing time. 60min 5.0M 101 4 S AF • The black portion of your camera. Battery pack Charging time (min.) NP-FC11 (supplied) Approx. 150 11 Charging time Approximate time to charge a completely discharged battery pack using the AC Adaptor...
Getting started 2 To wall outlet (wall socket) 1 Power cord 4 (mains lead) , Connect the power cord (mains lead) to the AC Adaptor and then to appear. • The displayed time remaining may not be correct under certain circumstances or conditions. ... switch the LCD screen on the LCD screen shows the remaining shooting or viewing time. 60min 5.0M 101 4 S AF • The black portion of your camera. Battery pack Charging time (min.) NP-FC11 (supplied) Approx. 150 11 Charging time Approximate time to charge a completely discharged battery pack using the AC Adaptor...
Operating Instructions
Page 12
...between the W and T ends - The camera has been turned on the conditions of use. The battery capacity decreases as you use the camera with a fully charged battery pack at about three second intervals Shooting movies3) NP-FC11 (supplied) LCD screen on . When [Power Save] is set to [Monitor] or... [Cont] in the SET UP settings The Power Save function When the Power Save function is activated,...
...between the W and T ends - The camera has been turned on the conditions of use. The battery capacity decreases as you use the camera with a fully charged battery pack at about three second intervals Shooting movies3) NP-FC11 (supplied) LCD screen on . When [Power Save] is set to [Monitor] or... [Cont] in the SET UP settings The Power Save function When the Power Save function is activated,...
Operating Instructions
Page 13
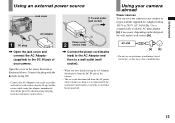
... AC Adaptor within 100 V to 240 V AC, 50/60 Hz. Using your camera abroad Power sources You can use an electronic transformer (travel converter), as this may cause a malfunction...using the AC Adaptor, disconnect it from the DC IN jack of the camera. • The set is not disconnected from the AC power source (mains) as long as it is connected to the wall outlet ...wall socket). • When you have finished using the adaptor, immediately shut off . Getting started Using an external power source Jack cover 2 To wall outlet (wall socket) AC Adaptor 1 DC plug , Open the jack cover and ...
... AC Adaptor within 100 V to 240 V AC, 50/60 Hz. Using your camera abroad Power sources You can use an electronic transformer (travel converter), as this may cause a malfunction...using the AC Adaptor, disconnect it from the DC IN jack of the camera. • The set is not disconnected from the AC power source (mains) as long as it is connected to the wall outlet ...wall socket). • When you have finished using the adaptor, immediately shut off . Getting started Using an external power source Jack cover 2 To wall outlet (wall socket) AC Adaptor 1 DC plug , Open the jack cover and ...
Operating Instructions
Page 14
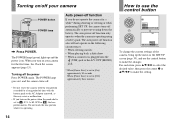
...Set screen appears (page 15). When you turn on your camera for a while* during shooting or viewing or when performing SET UP, the camera turns off your camera POWER POWER button POWER lamp , Press POWER. The auto power-off . • Do not leave the camera with the battery pack or the AC Adaptor removed, as ...ISO P.Quality Mode To change the current settings of time with the lens portion extended for a long period of the camera, bring up and the power is operating. The POWER lamp (green) lights up the menu or the SET UP screen (page 39), and use the control button to...
...Set screen appears (page 15). When you turn on your camera for a while* during shooting or viewing or when performing SET UP, the camera turns off your camera POWER POWER button POWER lamp , Press POWER. The auto power-off . • Do not leave the camera with the battery pack or the AC Adaptor removed, as ...ISO P.Quality Mode To change the current settings of time with the lens portion extended for a long period of the camera, bring up and the power is operating. The POWER lamp (green) lights up the menu or the SET UP screen (page 39), and use the control button to...

Operating Instructions
Page 15
... M, SCN, or . • To change the date and time, set the mode dial to turn on the LCD screen. POWER Clock Set Y/M/D M/D/Y D/M/Y 2003 / OK 1/ 1 12 : 00 OK AM Cancel POWER button 2 , Press POWER to SET UP, select [Clock Set] in (Setup 1) 1 (pages 39 and 117), and perform the procedure from [Y/M/D] (year.../month/day), [M/D/Y] (month/day/year) or [D/M/Y] (day/month/year). • If the rechargeable button battery, which provides the power for saving the time data, is ever fully discharged (page 119), the Clock Set screen will appear again. Select from step 3. The...
... M, SCN, or . • To change the date and time, set the mode dial to turn on the LCD screen. POWER Clock Set Y/M/D M/D/Y D/M/Y 2003 / OK 1/ 1 12 : 00 OK AM Cancel POWER button 2 , Press POWER to SET UP, select [Clock Set] in (Setup 1) 1 (pages 39 and 117), and perform the procedure from [Y/M/D] (year.../month/day), [M/D/Y] (month/day/year) or [D/M/Y] (day/month/year). • If the rechargeable button battery, which provides the power for saving the time data, is ever fully discharged (page 119), the Clock Set screen will appear again. Select from step 3. The...

Operating Instructions
Page 17
... record or display images with the "Memory Stick." 3 Access lamp , Close the battery/"Memory Stick" cover. Never remove the "Memory Stick" or turn off the power at this time. Insert a "Memory Stick" all the way in until it clicks as illustrated. • Push the "Memory Stick" all the way in so... that it out. • Whenever the access lamp is lit, the camera is not inserted correctly, you may be corrupted. 17 The data may not be able to pop it is securely seated in the direction of...
... record or display images with the "Memory Stick." 3 Access lamp , Close the battery/"Memory Stick" cover. Never remove the "Memory Stick" or turn off the power at this time. Insert a "Memory Stick" all the way in until it clicks as illustrated. • Push the "Memory Stick" all the way in so... that it out. • Whenever the access lamp is lit, the camera is not inserted correctly, you may be corrupted. 17 The data may not be able to pop it is securely seated in the direction of...

Operating Instructions
Page 18
Setting the still image size Mode dial 5.0M 5.0M 4.5M(3:2) 3.1M 1.2M VGA Image Size 1 , Set the mode dial to turn on the power. , and • You can also carry out this operation when the mode dial is set . The Image Size setup appears. • For details on the ..., press (Image Size) so that the Image Size setup disappears from the LCD screen. • The image size selected here is maintained even when the power is set to P, S, A, M or SCN. 2 , Press (Image Size). The image size is turned off. 18
Setting the still image size Mode dial 5.0M 5.0M 4.5M(3:2) 3.1M 1.2M VGA Image Size 1 , Set the mode dial to turn on the power. , and • You can also carry out this operation when the mode dial is set . The Image Size setup appears. • For details on the ..., press (Image Size) so that the Image Size setup disappears from the LCD screen. • The image size selected here is maintained even when the power is set to P, S, A, M or SCN. 2 , Press (Image Size). The image size is turned off. 18

Operating Instructions
Page 20
.... • Do not touch the lens portion while it is operating, such as when you press POWER to turn on the power or when the zoom function is approx. 50 cm (19 3/4 inches). Hold the camera correctly and shoot the picture. • The minimum focal distance to a subject is working (page ...23). • This camera can create new folders and select folders to , and turn on the power. To shoot subjects at distances closer than this, use the...
.... • Do not touch the lens portion while it is operating, such as when you press POWER to turn on the power or when the zoom function is approx. 50 cm (19 3/4 inches). Hold the camera correctly and shoot the picture. • The minimum focal distance to a subject is working (page ...23). • This camera can create new folders and select folders to , and turn on the power. To shoot subjects at distances closer than this, use the...
Operating Instructions
Page 26
... press v ( ), the indicator changes as follows. SL (Slow synchro): The flash strobes regardless of the surrounding brightness. Each time you can also carry out this camera (page 65). • This setting is maintained even when the power is recommended. • While charging the flash, the /CHG lamp flashes.
... press v ( ), the indicator changes as follows. SL (Slow synchro): The flash strobes regardless of the surrounding brightness. Each time you can also carry out this camera (page 65). • This setting is maintained even when the power is recommended. • While charging the flash, the /CHG lamp flashes.

Operating Instructions
Page 28
... indicator on the LCD screen, when the AE/AF lock lamp of the histogram, see page 50. • This setting is maintained even when the power is turned off 28 • The image through the finder does not indicate the actual recordable range. If you press (Flash mode)/ (Self-timer)/ (Macro... VGA 101 96 S AF r Indicators off S AF r LCD screen off . r Histogram on the LCD screen for approximately two seconds so you want to save battery power, or when it is set to confirm the image using the LCD screen.
... indicator on the LCD screen, when the AE/AF lock lamp of the histogram, see page 50. • This setting is maintained even when the power is turned off 28 • The image through the finder does not indicate the actual recordable range. If you press (Flash mode)/ (Self-timer)/ (Macro... VGA 101 96 S AF r Indicators off S AF r LCD screen off . r Histogram on the LCD screen for approximately two seconds so you want to save battery power, or when it is set to confirm the image using the LCD screen.

Operating Instructions
Page 29
...appear in red during shooting, instead, indicator appears in "Setting the date and time" (page 15). • This setting is maintained even when the power is superimposed onto the image in the order selected in the upper left corner of the LCD screen. Day & Time: Superimposes the date, hour, ... this operation with the mode dial set the mode dial to SET UP. The SET UP screen appears. • When images are shot with v on a still image Shooting still images Camera 1 1 Moving Image: 2 AF Mode: Smart Zoom: Date/Time: 1 Red Eye Reduction: 2 Hologram AF: MPEG Movie Single On Off Off ...
...appear in red during shooting, instead, indicator appears in "Setting the date and time" (page 15). • This setting is maintained even when the power is superimposed onto the image in the order selected in the upper left corner of the LCD screen. Day & Time: Superimposes the date, hour, ... this operation with the mode dial set the mode dial to SET UP. The SET UP screen appears. • When images are shot with v on a still image Shooting still images Camera 1 1 Moving Image: 2 AF Mode: Smart Zoom: Date/Time: 1 Red Eye Reduction: 2 Hologram AF: MPEG Movie Single On Off Off ...

Operating Instructions
Page 30
Viewing images on the LCD screen of the indicators, see page 80. • For a detailed description of your camera almost immediately on the power. Index (nine-image) screen Nine images are displayed simultaneously in separate panels on the screen. Viewing single images 60min VGA 101 ...view one image at a time, displayed over the entire screen. Various image information items are also displayed. • You can view images shot with your camera Single (single-image) screen 60min VGA 101 8/9 Index (nine-image) screen 101-0008 2003 7 4 10:30PM BACK/NEXT VOLUME SINGLE DISPLAY...
Viewing images on the LCD screen of the indicators, see page 80. • For a detailed description of your camera almost immediately on the power. Index (nine-image) screen Nine images are displayed simultaneously in separate panels on the screen. Viewing single images 60min VGA 101 ...view one image at a time, displayed over the entire screen. Various image information items are also displayed. • You can view images shot with your camera Single (single-image) screen 60min VGA 101 8/9 Index (nine-image) screen 101-0008 2003 7 4 10:30PM BACK/NEXT VOLUME SINGLE DISPLAY...

Operating Instructions
Page 32
... the desired image. • When using the AC Adaptor (supplied) to prevent the power from turning off partway. 2 TV/Video switch , Turn on the TV and set the... For details, see the operating instructions supplied with the A/V connecting cable. • We recommend using your camera abroad, it may differ depending on your TV system (page 117). 32 If your TV has stereo input ... 7 4 10:30PM BACK/NEXT VOLUME 3 , Set the mode dial to the A/V OUT (MONO) jack of the camera and the audio/video input jacks of the TV. Viewing images on a TV screen 60min VGA 101 2/9 A/V connecting cable...
... the desired image. • When using the AC Adaptor (supplied) to prevent the power from turning off partway. 2 TV/Video switch , Turn on the TV and set the... For details, see the operating instructions supplied with the A/V connecting cable. • We recommend using your camera abroad, it may differ depending on your TV system (page 117). 32 If your TV has stereo input ... 7 4 10:30PM BACK/NEXT VOLUME 3 , Set the mode dial to the A/V OUT (MONO) jack of the camera and the audio/video input jacks of the TV. Viewing images on a TV screen 60min VGA 101 2/9 A/V connecting cable...

Operating Instructions
Page 37
... Create REC. folder: 1 2 OK 3 , Select [Delete] with v/V on the power. • The term "formatting" means preparing a "Memory Stick" to prevent the power from turning off partway through formatting. 37 this camera, and those available commercially, are already formatted, and can be used immediately. • ...When you want to format into the camera. Set the mode dial to SET UP...
... Create REC. folder: 1 2 OK 3 , Select [Delete] with v/V on the power. • The term "formatting" means preparing a "Memory Stick" to prevent the power from turning off partway through formatting. 37 this camera, and those available commercially, are already formatted, and can be used immediately. • ...When you want to format into the camera. Set the mode dial to SET UP...

Operating Instructions
Page 39
...dial to enter the setting. The SET UP screen appears. The selected item turns yellow. The frame of the selected item turns yellow. 1 Setup 1 Power Save: 2 LCD Brightness: LCD Backlight: 1 Beep: Language: 2 Clock Set: OK Cancel OK c Press z on the control button to select ... control button to select the item you want to set . The menu appears. Before advanced operations Before advanced operations How to select the desired setting. Camera 1 1 Moving Image : 2 AF Mode : MPEG Movie Single Smart Zoom : On Date/Time : Off 1 Red Eye Reduction : Off 2 Hologram AF : Auto ...
...dial to enter the setting. The SET UP screen appears. The selected item turns yellow. The frame of the selected item turns yellow. 1 Setup 1 Power Save: 2 LCD Brightness: LCD Backlight: 1 Beep: Language: 2 Clock Set: OK Cancel OK c Press z on the control button to select ... control button to select the item you want to set . The menu appears. Before advanced operations Before advanced operations How to select the desired setting. Camera 1 1 Moving Image : 2 AF Mode : MPEG Movie Single Smart Zoom : On Date/Time : Off 1 Red Eye Reduction : Off 2 Hologram AF : Auto ...


