Operating Instructions
Page 3
... as the supplied one and approved by returning your local authority. 3 Notice for your nearest Sony service station. Attention for using connection cables shorter than 3 meters (9.8 feet). "Memory Stick" and battery pack N50 For the Customers in the EMC Directive for the Customers in ...camera. You can help preserve our environment by ASTA or BSI to attach the fuse cover after you should lose the fuse cover, please contact your safety and convenience. For the Customers in the U.S.A. Never use the plug without the fuse cover. For the Customers in Canada THIS CLASS B DIGITAL...
... as the supplied one and approved by returning your local authority. 3 Notice for your nearest Sony service station. Attention for using connection cables shorter than 3 meters (9.8 feet). "Memory Stick" and battery pack N50 For the Customers in the EMC Directive for the Customers in ...camera. You can help preserve our environment by ASTA or BSI to attach the fuse cover after you should lose the fuse cover, please contact your safety and convenience. For the Customers in the U.S.A. Never use the plug without the fuse cover. For the Customers in Canada THIS CLASS B DIGITAL...

Operating Instructions
Page 4
...playback of images recorded or edited with a power zoom lens. Notes on the flash surface to become discolored or to stick to your camera. Noise may cause irrecoverable damage to the flash surface, resulting in a cold location. Before using extremely high-precision technology so over 99.... for contents of the recording Contents of such materials may want to make a trial recording to record images, this may render the "Memory Stick" unusable or image data breakdown, damage or loss may cause malfunction. This is working correctly. Back up recommendation To avoid the potential...
...playback of images recorded or edited with a power zoom lens. Notes on the flash surface to become discolored or to stick to your camera. Noise may cause irrecoverable damage to the flash surface, resulting in a cold location. Before using extremely high-precision technology so over 99.... for contents of the recording Contents of such materials may want to make a trial recording to record images, this may render the "Memory Stick" unusable or image data breakdown, damage or loss may cause malfunction. This is working correctly. Back up recommendation To avoid the potential...
Operating Instructions
Page 5
...image. 5 About the Carl Zeiss lens This camera is equipped with a Carl Zeiss lens which is a trademark of Sony Corporation. • Microsoft and Windows are not actual images shot using this camera. Microsoft Corporation in the United States and other.... Trademarks • "Memory Stick," and "MagicGate Memory Stick" are trademarks of Sony Corporation. • "Memory Stick Duo" and are trademarks of Sony Corporation. • "Memory Stick PRO" and are trademarks of Sony Corporation. • "MagicGate" and are trademarks of Sony Corporation. • "InfoLITHIUM...
...image. 5 About the Carl Zeiss lens This camera is equipped with a Carl Zeiss lens which is a trademark of Sony Corporation. • Microsoft and Windows are not actual images shot using this camera. Microsoft Corporation in the United States and other.... Trademarks • "Memory Stick," and "MagicGate Memory Stick" are trademarks of Sony Corporation. • "Memory Stick Duo" and are trademarks of Sony Corporation. • "Memory Stick PRO" and are trademarks of Sony Corporation. • "MagicGate" and are trademarks of Sony Corporation. • "InfoLITHIUM...
Operating Instructions
Page 6
... 8 Getting started Charging the battery pack 10 Using an external power source 13 Using your camera abroad 13 Turning on a TV screen 32 Deleting still images Deleting images 34 Formatting a "Memory Stick 37 Before advanced operations How to use the control button 14 Setting the date and ...19 Basic still image shooting (using auto adjustment mode 20 Checking the last image you shot - Flash Level 58 Shooting multiple frames - TIFF 61 Table of your camera 30 Viewing images on /off your camera 14 How to the subject - Exposure Bracket 53 Adjusting color tones - Quick Review 22...
... 8 Getting started Charging the battery pack 10 Using an external power source 13 Using your camera abroad 13 Turning on a TV screen 32 Deleting still images Deleting images 34 Formatting a "Memory Stick 37 Before advanced operations How to use the control button 14 Setting the date and ...19 Basic still image shooting (using auto adjustment mode 20 Checking the last image you shot - Flash Level 58 Shooting multiple frames - TIFF 61 Table of your camera 30 Viewing images on /off your camera 14 How to the subject - Exposure Bracket 53 Adjusting color tones - Quick Review 22...

Operating Instructions
Page 7
Picture Effect 65 Using an external flash 65 Using the Sony flash (not supplied)....66 Using a commercially available external flash...images that can be saved or shooting time 109 Menu items 111 SET UP items 115 Precautions 118 On "Memory Stick 119 On "InfoLITHIUM" battery pack .........120 Specifications 122 The LCD screen 124 Index Index 128 7 Resize...Trimming 70 Playing back successive images - Slide Show 70 Rotating still images - Rotate 71 Playing back images shot in Multi Burst mode 72 Playing back continuously 72 Playing back frame by frame - Voice 62 Shooting ...
Picture Effect 65 Using an external flash 65 Using the Sony flash (not supplied)....66 Using a commercially available external flash...images that can be saved or shooting time 109 Menu items 111 SET UP items 115 Precautions 118 On "Memory Stick 119 On "InfoLITHIUM" battery pack .........120 Specifications 122 The LCD screen 124 Index Index 128 7 Resize...Trimming 70 Playing back successive images - Slide Show 70 Rotating still images - Rotate 71 Playing back images shot in Multi Burst mode 72 Playing back continuously 72 Playing back frame by frame - Voice 62 Shooting ...

Operating Instructions
Page 9
.../Index) button (49, 31) E Jack cover F (USB) jack (89) G A/V OUT (MONO) jack (32) H DC IN jack (10, 13) I LCD screen J MENU button (39, 111) K Battery/"Memory Stick" cover 9
.../Index) button (49, 31) E Jack cover F (USB) jack (89) G A/V OUT (MONO) jack (32) H DC IN jack (10, 13) I LCD screen J MENU button (39, 111) K Battery/"Memory Stick" cover 9

Operating Instructions
Page 10
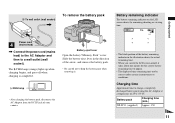
...• Clean the DC plug of your camera when charging the battery pack (page 14). • Your camera operates with the "InfoLITHIUM" NP-FC11 battery pack (C type) (supplied). Make sure the battery pack is firmly inserted all the way, then close the battery/"Memory Stick" cover. Insert the battery pack with... the front of the battery compartment down. 3 DC plug , Open the jack cover and connect the AC Adaptor (supplied) to turn off your camera. Slide the cover in the arrow direction as illustrated above. Open the cover in the direction of the AC Adaptor with a dry cotton bud....
...• Clean the DC plug of your camera when charging the battery pack (page 14). • Your camera operates with the "InfoLITHIUM" NP-FC11 battery pack (C type) (supplied). Make sure the battery pack is firmly inserted all the way, then close the battery/"Memory Stick" cover. Insert the battery pack with... the front of the battery compartment down. 3 DC plug , Open the jack cover and connect the AC Adaptor (supplied) to turn off your camera. Slide the cover in the arrow direction as illustrated above. Open the cover in the direction of the AC Adaptor with a dry cotton bud....
Operating Instructions
Page 11
To remove the battery pack Battery eject lever Open the battery/"Memory Stick" cover. Battery remaining indicator The battery remaining indicator on the LCD screen shows the remaining shooting or viewing time. 60min 5.0M 101 4 S AF • ... the power cord (mains lead) to the AC Adaptor and then to charge a completely discharged battery pack using the AC Adaptor at a temperature of your camera.
To remove the battery pack Battery eject lever Open the battery/"Memory Stick" cover. Battery remaining indicator The battery remaining indicator on the LCD screen shows the remaining shooting or viewing time. 60min 5.0M 101 4 S AF • ... the power cord (mains lead) to the AC Adaptor and then to charge a completely discharged battery pack using the AC Adaptor at a temperature of your camera.
Operating Instructions
Page 12
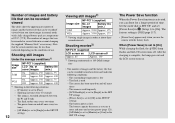
...to [Off] in the SET UP settings 12 Viewing still images2) NP-FC11 (supplied) Image size No. The camera has been turned on and off once every ten times - [AF Mode] is set to [Monitor] or ...is set to [Fine] - Note that the actual numbers may be recorded/ viewed when you use the camera with a fully charged battery pack at 160 (Mail) image size • The number of images and ...the battery life that can be recorded or viewed take into account changing the supplied "Memory Stick" as time passes (page 121). - [AF Mode] is set to [Single] in the SET UP...
...to [Off] in the SET UP settings 12 Viewing still images2) NP-FC11 (supplied) Image size No. The camera has been turned on and off once every ten times - [AF Mode] is set to [Monitor] or ...is set to [Fine] - Note that the actual numbers may be recorded/ viewed when you use the camera with a fully charged battery pack at 160 (Mail) image size • The number of images and ...the battery life that can be recorded or viewed take into account changing the supplied "Memory Stick" as time passes (page 121). - [AF Mode] is set to [Single] in the SET UP...

Operating Instructions
Page 17
..." all the way in until it clicks as illustrated. • Push the "Memory Stick" all the way in so that it out. • Whenever the access lamp is lit, the camera is not inserted correctly, you may be able to pop it is securely seated in the direction of the arrow. •...; For details on "Memory Stick," see page 119. 2 Terminal Side , Insert the "Memory Stick." Slide the cover in the connector.
..." all the way in until it clicks as illustrated. • Push the "Memory Stick" all the way in so that it out. • Whenever the access lamp is lit, the camera is not inserted correctly, you may be able to pop it is securely seated in the direction of the arrow. •...; For details on "Memory Stick," see page 119. 2 Terminal Side , Insert the "Memory Stick." Slide the cover in the connector.

Operating Instructions
Page 19
... to shoot (pages 18 and 41). You can resize the images later (Resize function, see page 41. • When images recorded using earlier Sony models are played back on this camera, the display may differ from the actual image size. • When the images are viewed on the LCD screen of the... Printing A4 size images 1.2M 1280×960 Printing postcard size images VGA 640×480 Creating home pages 1) This option records images in your "Memory Stick." Choose an image size and quality level appropriately for examples. The larger you make the image size and the higher you make the image...
... to shoot (pages 18 and 41). You can resize the images later (Resize function, see page 41. • When images recorded using earlier Sony models are played back on this camera, the display may differ from the actual image size. • When the images are viewed on the LCD screen of the... Printing A4 size images 1.2M 1280×960 Printing postcard size images VGA 640×480 Creating home pages 1) This option records images in your "Memory Stick." Choose an image size and quality level appropriately for examples. The larger you make the image size and the higher you make the image...

Operating Instructions
Page 20
...• The minimum focal distance to , and turn on the power or when the zoom function is working (page 23). • This camera can create new folders and select folders to be stored in the center of the folder where the image will be careful so that your... 24). 20 Basic still image shooting (using auto adjustment mode) Holding the camera correctly Mode dial When shooting pictures with both hands and position the subject in the "Memory Stick" (page 41). 2 , Hold the camera steadily with the camera, be recorded appears on the LCD screen for approximately five seconds. •...
...• The minimum focal distance to , and turn on the power or when the zoom function is working (page 23). • This camera can create new folders and select folders to be stored in the center of the folder where the image will be careful so that your... 24). 20 Basic still image shooting (using auto adjustment mode) Holding the camera correctly Mode dial When shooting pictures with both hands and position the subject in the "Memory Stick" (page 41). 2 , Hold the camera steadily with the camera, be recorded appears on the LCD screen for approximately five seconds. •...
Operating Instructions
Page 21
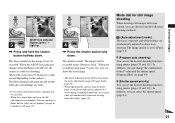
... on the LCD screen shows the focus adjustment range (AF range finder, page 46). • When operating the camera using menus (pages 39 and 111). You can set the desired shooting functions using a battery pack, if you ...30 AE/AF lock indicator 3 Flashes green t Light up and strobes when the surroundings are automatically adjusted to steadily lit, the camera is not yet recorded. The image quality is not set to prevent wearing down . S (Shutter speed priority) You can ... the shutter button fully down. The beep sounds but the AF is set properly (except in the "Memory Stick."
... on the LCD screen shows the focus adjustment range (AF range finder, page 46). • When operating the camera using menus (pages 39 and 111). You can set the desired shooting functions using a battery pack, if you ...30 AE/AF lock indicator 3 Flashes green t Light up and strobes when the surroundings are automatically adjusted to steadily lit, the camera is not yet recorded. The image quality is not set to prevent wearing down . S (Shutter speed priority) You can ... the shutter button fully down. The beep sounds but the AF is set properly (except in the "Memory Stick."

Operating Instructions
Page 34
Press b/B on the camera. Then, select [Delete] with b/B on the control button. The image has not yet been deleted at this point. • You cannot delete the protected image (... other images Display the image to delete. 2 , Press (Delete). To cancel deleting Select [Exit] with v on the control button, then press z. 34 When the message "Memory Stick access" disappears, the image has been deleted. Delete Exit OK BACK/NEXT 3 , Select [Delete] with V on the control button, then press z. Deleting images 60min...
Press b/B on the camera. Then, select [Delete] with b/B on the control button. The image has not yet been deleted at this point. • You cannot delete the protected image (... other images Display the image to delete. 2 , Press (Delete). To cancel deleting Select [Exit] with v on the control button, then press z. 34 When the message "Memory Stick access" disappears, the image has been deleted. Delete Exit OK BACK/NEXT 3 , Select [Delete] with V on the control button, then press z. Deleting images 60min...

Operating Instructions
Page 36
... Delete Exit 101-0002 2003 7 4 10:30PM OK BACK/NEXT 4 , Press (Delete) and select [OK] with b/B on the control button, then press z. When the message "Memory Stick access" disappears, the images have been deleted. To cancel deleting Select [Exit] with b on the control button, then press z. 1 , While an index (triple-image...
... Delete Exit 101-0002 2003 7 4 10:30PM OK BACK/NEXT 4 , Press (Delete) and select [OK] with b/B on the control button, then press z. When the message "Memory Stick access" disappears, the images have been deleted. To cancel deleting Select [Exit] with b on the control button, then press z. 1 , While an index (triple-image...

Operating Instructions
Page 37
...Insert the "Memory Stick" you format a "Memory Stick," be aware that all data including protected images in the "Memory Stick" will be permanently erased. 2 , Select (Memory Stick Tool) with V on the power. • The term "formatting" means preparing a "Memory Stick" to format into the camera. To cancel... deleting Select [Exit] with v/V on the control button, then press z. • Using the AC Adaptor is also called "initialization." this camera, and those available commercially, are already ...
...Insert the "Memory Stick" you format a "Memory Stick," be aware that all data including protected images in the "Memory Stick" will be permanently erased. 2 , Select (Memory Stick Tool) with V on the power. • The term "formatting" means preparing a "Memory Stick" to format into the camera. To cancel... deleting Select [Exit] with v/V on the control button, then press z. • Using the AC Adaptor is also called "initialization." this camera, and those available commercially, are already ...

Operating Instructions
Page 41
Before advanced operations Deciding the still image quality Mode dial: P/S/A/M/SCN You can create multiple folders within a "Memory Stick". c Select (P. You can select the folder used to 4000 images can be stored in one folder. Quality) with b/B, then select the desired image quality... P, S, A, M or SCN. Control button Mode dial MENU a Set the mode dial to "999MSDCF." The menu appears. Creating or selecting a folder Mode dial: SET UP Your camera can select the still image quality from [Fine] or [Standard]. You can also carry out this operation when the mode dial is set to (Multi...
Before advanced operations Deciding the still image quality Mode dial: P/S/A/M/SCN You can create multiple folders within a "Memory Stick". c Select (P. You can select the folder used to 4000 images can be stored in one folder. Quality) with b/B, then select the desired image quality... P, S, A, M or SCN. Control button Mode dial MENU a Set the mode dial to "999MSDCF." The menu appears. Creating or selecting a folder Mode dial: SET UP Your camera can select the still image quality from [Fine] or [Standard]. You can also carry out this operation when the mode dial is set to (Multi...

Operating Instructions
Page 42
... [Create REC. The following screen appears. 60min Create REC. To cancel folder creation Select [Cancel] in the "Memory Stick", and the folder becomes the recording folder. b Select (Memory Stick Tool) with the camera. • Images are recorded in the newly created folder until a different folder is stored in step 2 or ...] in the newly selected folder. The recording folder selection screen appears. Folder Creating REC. O K Cancel OK c Select [OK] with this camera. 42 Creating a new folder a Set the mode dial to SET UP. Folder] with B/v/V, and [OK] with B/v, then press z.
... [Create REC. The following screen appears. 60min Create REC. To cancel folder creation Select [Cancel] in the "Memory Stick", and the folder becomes the recording folder. b Select (Memory Stick Tool) with the camera. • Images are recorded in the newly created folder until a different folder is stored in step 2 or ...] in the newly selected folder. The recording folder selection screen appears. Folder Creating REC. O K Cancel OK c Select [OK] with this camera. 42 Creating a new folder a Set the mode dial to SET UP. Folder] with B/v/V, and [OK] with B/v, then press z.

Operating Instructions
Page 55
b Press MENU. When the white balance has been adjusted and stored in the memory, the indicator stops flashing. • The indicator means: Slow flashing: The white balance is not set or was not able to the shooting conditions. Quick ... Select [Auto] in WB (Flash) mode or (One push) mode). Lit steady: The white balance has been set. • Do not shake or strike the camera during quick flashing the indicator. • If the indicator keeps flashing even when you can manually adjust the white balance. c Select [WB] (White Bal) with...
b Press MENU. When the white balance has been adjusted and stored in the memory, the indicator stops flashing. • The indicator means: Slow flashing: The white balance is not set or was not able to the shooting conditions. Quick ... Select [Auto] in WB (Flash) mode or (One push) mode). Lit steady: The white balance has been set. • Do not shake or strike the camera during quick flashing the indicator. • If the indicator keeps flashing even when you can manually adjust the white balance. c Select [WB] (White Bal) with...

Operating Instructions
Page 59
b Press (Image Size). Control button Mode dial Shutter a Set the mode dial to shoot the next frame, then repeat this camera may appear different from [Normal] or [Mobile]. You can be displayed correctly. Press the shutter button to . f Press z. All the frame images ...; Note that can select from the actual image. • GIF files not created on the "Memory Stick". The Image Size setup appears. The frame images you shot are not recorded on the "Memory Stick" until you shot is selected in step 2, each time you repeat steps 1 through 3, the last frame you have...
b Press (Image Size). Control button Mode dial Shutter a Set the mode dial to shoot the next frame, then repeat this camera may appear different from [Normal] or [Mobile]. You can be displayed correctly. Press the shutter button to . f Press z. All the frame images ...; Note that can select from the actual image. • GIF files not created on the "Memory Stick". The Image Size setup appears. The frame images you shot are not recorded on the "Memory Stick" until you shot is selected in step 2, each time you repeat steps 1 through 3, the last frame you have...

