Operating Instructions
Page 1
...-311-11(1) Getting started Shooting still images Viewing still images Deleting still images Before advanced operations Advanced still image shooting Advanced still image viewing Still image editing Enjoying movies Enjoying images on the bottom. Model No. DSC-V1 Serial No. Record the serial number in the space provided below. Digital Still Camera Operating Instructions Before operating the unit, please read this product. Owner's Record The model and serial numbers are located on your Sony dealer regarding this manual thoroughly, and retain...
...-311-11(1) Getting started Shooting still images Viewing still images Deleting still images Before advanced operations Advanced still image shooting Advanced still image viewing Still image editing Enjoying movies Enjoying images on the bottom. Model No. DSC-V1 Serial No. Record the serial number in the space provided below. Digital Still Camera Operating Instructions Before operating the unit, please read this product. Owner's Record The model and serial numbers are located on your Sony dealer regarding this manual thoroughly, and retain...

Operating Instructions
Page 4
...-time events, you may be compensated for effective use the camera near a TV, radio, tuner. No compensation for Camera File system universal standard established by the JEITA (Japan Electronics and Information Technology Industries Association). • Playback of images recorded with an LCD finder) and lens • The LCD screen and the LCD finder are operational for if recording or playback is working correctly. Notes on image data compatibility • This camera...
...-time events, you may be compensated for effective use the camera near a TV, radio, tuner. No compensation for Camera File system universal standard established by the JEITA (Japan Electronics and Information Technology Industries Association). • Playback of images recorded with an LCD finder) and lens • The LCD screen and the LCD finder are operational for if recording or playback is working correctly. Notes on image data compatibility • This camera...
Operating Instructions
Page 6
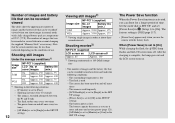
... Mode 47 Setting the distance to use the control button 14 Setting the date and time 15 Shooting still images Inserting and removing a "Memory Stick 17 Setting the still image size 18 Image size and quality 19 Basic still image shooting (using your camera 4 Identifying the parts 8 Getting started Charging the battery pack 10 Using an external power source 13 Using your camera abroad 13 Turning on a TV screen 32 Deleting still images Deleting images 34 Formatting a "Memory Stick 37 Before advanced operations How to setup and operate your camera 14...
... Mode 47 Setting the distance to use the control button 14 Setting the date and time 15 Shooting still images Inserting and removing a "Memory Stick 17 Setting the still image size 18 Image size and quality 19 Basic still image shooting (using your camera 4 Identifying the parts 8 Getting started Charging the battery pack 10 Using an external power source 13 Using your camera abroad 13 Turning on a TV screen 32 Deleting still images Deleting images 34 Formatting a "Memory Stick 37 Before advanced operations How to setup and operate your camera 14...

Operating Instructions
Page 7
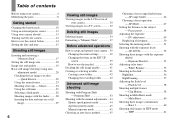
... external flash 65 Using the Sony flash (not supplied)....66 Using a commercially available external flash 66 Using a conversion lens 67 Advanced still image viewing Selecting the folder and playing back images - Jog playback 73 Still image editing Protecting images - Print (DPOF) mark 76 Enjoying movies Shooting movies 79 Viewing movies on your computer Copying images to your computer - Scene Selection 63 Adding special effects - Shooting still images for e-mail - For Macintosh users 95 Troubleshooting Troubleshooting 97 Warnings and messages 106 Self-diagnosis display...
... external flash 65 Using the Sony flash (not supplied)....66 Using a commercially available external flash 66 Using a conversion lens 67 Advanced still image viewing Selecting the folder and playing back images - Jog playback 73 Still image editing Protecting images - Print (DPOF) mark 76 Enjoying movies Shooting movies 79 Viewing movies on your computer Copying images to your computer - Scene Selection 63 Adding special effects - Shooting still images for e-mail - For Macintosh users 95 Troubleshooting Troubleshooting 97 Warnings and messages 106 Self-diagnosis display...
Operating Instructions
Page 11
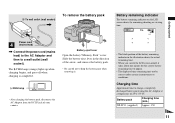
... time to appear. • The displayed time remaining may not be correct under certain circumstances or conditions. Slide the battery eject lever in the illustration shows the actual remaining time. • When you switch the LCD screen on the LCD screen shows the remaining shooting or viewing time. 60min 5.0M 101 4 S AF • The black portion of your camera. To remove the battery pack Battery eject lever Open the battery/"Memory...
... time to appear. • The displayed time remaining may not be correct under certain circumstances or conditions. Slide the battery eject lever in the illustration shows the actual remaining time. • When you switch the LCD screen on the LCD screen shows the remaining shooting or viewing time. 60min 5.0M 101 4 S AF • The black portion of your camera. To remove the battery pack Battery eject lever Open the battery/"Memory...
Operating Instructions
Page 12
...-FC11 (supplied) Image size No. The 1 factory setting is switched alternately between the W and T ends - Shooting still images Under the average conditions1) Image size 5.0M NP-FC11 (supplied) LCD No. Shooting one time every 30 seconds - The camera has been turned on . Number of images and battery life that can be recorded/ viewed The tables show the approximate number of images and the battery life that can be recorded/ viewed when you use it more...
...-FC11 (supplied) Image size No. The 1 factory setting is switched alternately between the W and T ends - Shooting still images Under the average conditions1) Image size 5.0M NP-FC11 (supplied) LCD No. Shooting one time every 30 seconds - The camera has been turned on . Number of images and battery life that can be recorded/ viewed The tables show the approximate number of images and the battery life that can be recorded/ viewed when you use it more...

Operating Instructions
Page 15
... out this happens, reset the date and time, by starting from [Y/M/D] (year/month/day), [M/D/Y] (month/day/year) or [D/M/Y] (day/month/year). • If the rechargeable button battery, which provides the power for saving the time data, is set to P, S, A, M, SCN, or . • To change the date and time, set the mode dial to turn on the power. The POWER lamp (green) lights up and the Clock Set screen appears on the control button, then press z.
... out this happens, reset the date and time, by starting from [Y/M/D] (year/month/day), [M/D/Y] (month/day/year) or [D/M/Y] (day/month/year). • If the rechargeable button battery, which provides the power for saving the time data, is set to P, S, A, M, SCN, or . • To change the date and time, set the mode dial to turn on the power. The POWER lamp (green) lights up and the Clock Set screen appears on the control button, then press z.
Operating Instructions
Page 21
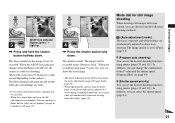
... shutter button halfway down the battery (page 14). You can continue to shoot, but the image is not set the desired shooting functions using menus (pages 39 and 111). P (Program auto shooting) You can set to [Fine] (page 41). Mode dial for a while during recording or playback, the camera turns off automatically to prevent wearing down . Shooting still images 60min VGA FINE 101 96 S AF 0EV F2.8 30 AE/AF lock indicator 3 Flashes green t Light...
... shutter button halfway down the battery (page 14). You can continue to shoot, but the image is not set the desired shooting functions using menus (pages 39 and 111). P (Program auto shooting) You can set to [Fine] (page 41). Mode dial for a while during recording or playback, the camera turns off automatically to prevent wearing down . Shooting still images 60min VGA FINE 101 96 S AF 0EV F2.8 30 AE/AF lock indicator 3 Flashes green t Light...
Operating Instructions
Page 23
... recorded image. • AF range finder is not needed, set [Smart Zoom] to focus on the LCD screen may look rough. The lever directions can be changed by setting the mode dial to the subject Approx. 50 cm (19 3/4 inches) from the lens surface • The zoom lever directions noted above are the factory settings. Zoom scaling indicator The T side of smart zoom x2.5 The maximum zoom scale depends on the image size...
... recorded image. • AF range finder is not needed, set [Smart Zoom] to focus on the LCD screen may look rough. The lever directions can be changed by setting the mode dial to the subject Approx. 50 cm (19 3/4 inches) from the lens surface • The zoom lever directions noted above are the factory settings. Zoom scaling indicator The T side of smart zoom x2.5 The maximum zoom scale depends on the image size...

Operating Instructions
Page 27
... frame is not displayed. The Hologram AF system uses gentler radiation than conventional highbrightness LEDs or lamps, thus satisfying Laser Class 1* specifications and maintaining higher safety for 30 000 seconds. 27 In this function, set [Hologram AF] to [Off] in dark places. Shooting still images Recording images with the hologram AF The hologram AF is fill light to focus more easily...
... frame is not displayed. The Hologram AF system uses gentler radiation than conventional highbrightness LEDs or lamps, thus satisfying Laser Class 1* specifications and maintaining higher safety for 30 000 seconds. 27 In this function, set [Hologram AF] to [Off] in dark places. Shooting still images Recording images with the hologram AF The hologram AF is fill light to focus more easily...

Operating Instructions
Page 67
... Sony HVL-IRM infrared light. • When shooting with the NightShot or NightFraming functions. • The camera automatically switches to the macro recording mode. We recommend using the built-in flash, the light from the built-in hologram AF cannot be blocked, causing the lens shadow to appear. • Set the most appropriate aperture value according to the guide number of the flash used . However, is not displayed. • The zoom...
... Sony HVL-IRM infrared light. • When shooting with the NightShot or NightFraming functions. • The camera automatically switches to the macro recording mode. We recommend using the built-in flash, the light from the built-in hologram AF cannot be blocked, causing the lens shadow to appear. • Set the most appropriate aperture value according to the guide number of the flash used . However, is not displayed. • The zoom...
Operating Instructions
Page 86
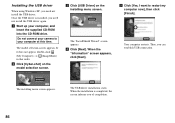
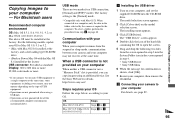
... USB driver When using Windows XP, you can establish USB connection. Once the USB driver is completed, the screen informs you need not install the USB driver. If it does not appear, double-click (My Computer) t (ImageMixer) in that order. b Click [Cyber-shot] on the installing menu screen. When the "Information" screen appears, click [Next]. The model selection screen appears. Then, you need not install the USB driver again. a Start up your computer at this time. The USB driver installation starts...
... USB driver When using Windows XP, you can establish USB connection. Once the USB driver is completed, the screen informs you need not install the USB driver. If it does not appear, double-click (My Computer) t (ImageMixer) in that order. b Click [Cyber-shot] on the installing menu screen. When the "Information" screen appears, click [Next]. The model selection screen appears. Then, you need not install the USB driver again. a Start up your computer at this time. The USB driver installation starts...
Operating Instructions
Page 95
... the icon of USB equipment. • Operations are not guaranteed when using an additional device. Communication with Mac OS X. http://www.sony.net/ Steps requires your OS Follow the steps below, according to open the screen. 5 Drag and drop the following models, update your computer - The model selection screen appears. 2 Click [Cyber-shot] on your OS. b Connecting your camera to a single computer at the same time, some...
... the icon of USB equipment. • Operations are not guaranteed when using an additional device. Communication with Mac OS X. http://www.sony.net/ Steps requires your OS Follow the steps below, according to open the screen. 5 Drag and drop the following models, update your computer - The model selection screen appears. 2 Click [Cyber-shot] on your OS. b Connecting your camera to a single computer at the same time, some...
Operating Instructions
Page 96
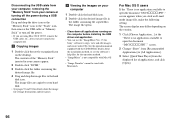
... can use the "ImageMixer Ver. 1.5 for Sony" software to copy, view and edit images, and create video CDs. Disconnecting the USB cable from your computer, removing the "Memory Stick" from your camera or turning off the power during a USB connection Drag and drop the drive icon or the "Memory Stick" icon to the "Trash" icon, then remove the USB cable or "Memory Stick" or turn off . See the operation manual supplied with Macintosh. screen. 2 Change "Show" from the displayed list...
... can use the "ImageMixer Ver. 1.5 for Sony" software to copy, view and edit images, and create video CDs. Disconnecting the USB cable from your computer, removing the "Memory Stick" from your camera or turning off the power during a USB connection Drag and drop the drive icon or the "Memory Stick" icon to the "Trash" icon, then remove the USB cable or "Memory Stick" or turn off . See the operation manual supplied with Macintosh. screen. 2 Change "Show" from the displayed list...
Operating Instructions
Page 98
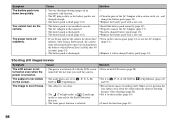
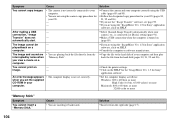
... the function (page 49). 98 You cannot turn on the LCD screen (page 28). Cause Solution • You are shooting/viewing images in the macro recording mode. p Replace the battery pack with a charged battery pack (page 10). Solution p Turn on the camera. Make sure to other modes (page 63). p Set it to prevent wearing down too quickly. The power turns off with a cotton swab, etc., and charge the battery pack (page 10). p Clean the pins of focus...
... the function (page 49). 98 You cannot turn on the LCD screen (page 28). Cause Solution • You are shooting/viewing images in the macro recording mode. p Replace the battery pack with a charged battery pack (page 10). Solution p Turn on the camera. Make sure to other modes (page 63). p Set it to prevent wearing down too quickly. The power turns off with a cotton swab, etc., and charge the battery pack (page 10). p Clean the pins of focus...
Operating Instructions
Page 103
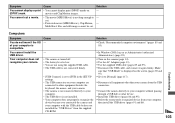
... . • Protected movie (MPEG Movie), Clip Motion, - Solution p Check "Recommended computer environment" (pages 85 and 95). p Set it again firmly. p Install the USB driver (pages 86 and 95). p In Windows 2000, log on the camera (page 14). Make sure that "USB Mode" is compatible. Symptom Cause Solution You cannot display a print • You cannot display print (DPOF) marks on the screen (pages 89 and 95). Multi Burst files and still images cannot...
... . • Protected movie (MPEG Movie), Clip Motion, - Solution p Check "Recommended computer environment" (pages 85 and 95). p Set it again firmly. p Install the USB driver (pages 86 and 95). p In Windows 2000, log on the camera (page 14). Make sure that "USB Mode" is compatible. Symptom Cause Solution You cannot display a print • You cannot display print (DPOF) marks on the screen (pages 89 and 95). Multi Burst files and still images cannot...
Operating Instructions
Page 104
...; The computer display is not set correctly. Cause • You are playing back the file directly from the "Memory Stick". p Connect the camera and your OS (pages 90, 91, 92 and 96). The image cannot be - connection, "Image Transfer" does not - p Consult the computer or software manufacturer. An error message appears when you are not using the USB cable (pages 89 and 95). p Follow the designated copy procedure for...
...; The computer display is not set correctly. Cause • You are playing back the file directly from the "Memory Stick". p Connect the camera and your OS (pages 90, 91, 92 and 96). The image cannot be - connection, "Image Transfer" does not - p Consult the computer or software manufacturer. An error message appears when you are not using the USB cable (pages 89 and 95). p Follow the designated copy procedure for...
Operating Instructions
Page 117
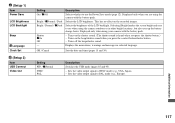
...). Displayed only when using your camera with the battery pack. Turns off the beep/shutter sound. OK / Cancel Sets the date and time (pages 15 and 39). Description Selects whether to see when using the camera with the battery pack. - Displayed only when you are using the camera outdoors or in selected language. Sets the video output signal to NTSC mode (e.g., USA, Japan). - (Setup 1) 1 Item Power Save LCD Brightness LCD Backlight Beep A Language Clock Set (Setup 2) 2 Item USB Connect Video Out Setting...
...). Displayed only when using your camera with the battery pack. Turns off the beep/shutter sound. OK / Cancel Sets the date and time (pages 15 and 39). Description Selects whether to see when using the camera with the battery pack. - Displayed only when you are using the camera outdoors or in selected language. Sets the video output signal to NTSC mode (e.g., USA, Japan). - (Setup 1) 1 Item Power Save LCD Brightness LCD Backlight Beep A Language Clock Set (Setup 2) 2 Item USB Connect Video Out Setting...
Operating Instructions
Page 119
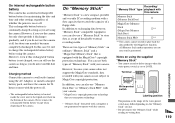
... button battery This camera has an internal rechargeable button battery for maintaining the date and time and other settings regardless of the write-protect switch may differ depending on the "Memory Stick" you use. • Do not remove the "Memory Stick" while reading or writing data. 119 Never remove the rechargeable button battery except when disposing of the camera. In this rechargeable button battery before using the supplied "Memory Stick" • You cannot record or delete images when the write-protect switch...
... button battery This camera has an internal rechargeable button battery for maintaining the date and time and other settings regardless of the write-protect switch may differ depending on the "Memory Stick" you use. • Do not remove the "Memory Stick" while reading or writing data. 119 Never remove the rechargeable button battery except when disposing of the camera. In this rechargeable button battery before using the supplied "Memory Stick" • You cannot record or delete images when the write-protect switch...

Operating Instructions
Page 129
... Picture effect 65 Playback zoom 69 Power AC Adaptor 10, 13 battery pack 10 on/off 14 Power Save 12, 117 Precautions 118 Print (DPOF) mark 76 Program auto shooting mode 21 Program Shift 43 Protect 74 Q Quick Review 22 R Red Eye Reduction 26 Remaining indicator 11 RESET button 97 Resize 76 Rotate 71 S Saturation 112 Scene Selection 63 SCN 22, 63 Self-diagnosis display 108 Self-timer 25 Setting date and time 15, 117 image size 18...
... Picture effect 65 Playback zoom 69 Power AC Adaptor 10, 13 battery pack 10 on/off 14 Power Save 12, 117 Precautions 118 Print (DPOF) mark 76 Program auto shooting mode 21 Program Shift 43 Protect 74 Q Quick Review 22 R Red Eye Reduction 26 Remaining indicator 11 RESET button 97 Resize 76 Rotate 71 S Saturation 112 Scene Selection 63 SCN 22, 63 Self-diagnosis display 108 Self-timer 25 Setting date and time 15, 117 image size 18...


