Instruction Manual
Page 2
... electric shock to the operating instructions. [ Polarization This set may be operated only from battery power, or other ). Model No. This symbol is intended to alert the user to have a suitable outlet installed. This is intended to alert the user to rain or moisture. Use [ Power Sources This set should still fail to fit, contact your Sony dealer regarding this manual for future reference. Do...
... electric shock to the operating instructions. [ Polarization This set may be operated only from battery power, or other ). Model No. This symbol is intended to alert the user to have a suitable outlet installed. This is intended to alert the user to rain or moisture. Use [ Power Sources This set should still fail to fit, contact your Sony dealer regarding this manual for future reference. Do...
Instruction Manual
Page 3
..., etc. [ Power-Cord Protection Route the power cord so that have fallen into the set. - Refer all servicing to qualified service personnel. [ Replacement parts When replacement parts are required, be sure the service technician has used replacement parts specified by the manufacturer that it from the wall outlet and disconnect the antenna or cable system. To ensure reliable operation of any service or repairs to the set, ask the service technician to...
..., etc. [ Power-Cord Protection Route the power cord so that have fallen into the set. - Refer all servicing to qualified service personnel. [ Replacement parts When replacement parts are required, be sure the service technician has used replacement parts specified by the manufacturer that it from the wall outlet and disconnect the antenna or cable system. To ensure reliable operation of any service or repairs to the set, ask the service technician to...
Instruction Manual
Page 5
... user is encouraged to try to correct the interference by turning the equipment off and on a circuit different from that to Subpart B of Part 15 of Conformity Trade Name: SONY Model No.: DSC-T900 Responsible Party: Sony Electronics Inc. For Customers in accordance with the instructions, may cause harmful interference to radio communications. This equipment generates, uses, and can be used...
... user is encouraged to try to correct the interference by turning the equipment off and on a circuit different from that to Subpart B of Part 15 of Conformity Trade Name: SONY Model No.: DSC-T900 Responsible Party: Sony Electronics Inc. For Customers in accordance with the instructions, may cause harmful interference to radio communications. This equipment generates, uses, and can be used...
Instruction Manual
Page 6
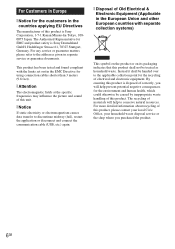
...this product, please contact your local Civic Office, your household waste disposal service or the shop where you will help prevent potential negative consequences for the environment and human health, which could ...set out in the EMC Directive for using connection cables shorter than 3 meters (9.8 feet). [ Attention The electromagnetic fields at the specific frequencies may influence the picture and sound of this unit. [ Notice If static electricity or electromagnetism causes data transfer to the addresses given in separate service or guarantee documents. By ensuring this product is Sony...
...this product, please contact your local Civic Office, your household waste disposal service or the shop where you will help prevent potential negative consequences for the environment and human health, which could ...set out in the EMC Directive for using connection cables shorter than 3 meters (9.8 feet). [ Attention The electromagnetic fields at the specific frequencies may influence the picture and sound of this unit. [ Notice If static electricity or electromagnetism causes data transfer to the addresses given in separate service or guarantee documents. By ensuring this product is Sony...

Instruction Manual
Page 8
... 12 Identifying parts 13 Charging the battery pack 15 Inserting the battery pack/a "Memory Stick Duo" media (sold separately 17 Setting the clock 19 Shooting/viewing images 20 Shooting images 20 Viewing images 21 Using shooting functions 22 Displaying minimum indicators (Easy Shooting 22 Detecting smiles and shooting automatically (Smile Shutter 23 Detecting the shooting conditions automatically (Scene Recognition) ... 24 Shooting close-ups (Macro/Close focus 26 Using the self-timer 26 Selecting a flash mode 27 Changing the screen display 28 Focusing on a specific point of...
... 12 Identifying parts 13 Charging the battery pack 15 Inserting the battery pack/a "Memory Stick Duo" media (sold separately 17 Setting the clock 19 Shooting/viewing images 20 Shooting images 20 Viewing images 21 Using shooting functions 22 Displaying minimum indicators (Easy Shooting 22 Detecting smiles and shooting automatically (Smile Shutter 23 Detecting the shooting conditions automatically (Scene Recognition) ... 24 Shooting close-ups (Macro/Close focus 26 Using the self-timer 26 Selecting a flash mode 27 Changing the screen display 28 Focusing on a specific point of...
Instruction Manual
Page 9
Deleting images 39 Deleting the currently displayed image 39 Deleting multiple images 39 Deleting all images (Format 40 Connecting to other devices 41 Viewing images on a TV 41 Printing still images 42 Using the camera with a computer 44 Changing camera settings 48 Changing the operation sounds 48 Using the HOME screen 48 Using the MENU items 51 Using functions in Program Auto mode 53 Others 54 List of icons displayed on the screen 54 Learning more about the camera ("Cyber-shot Handbook 56 Troubleshooting 57 Precautions 60 Specifications 61 9GB
Deleting images 39 Deleting the currently displayed image 39 Deleting multiple images 39 Deleting all images (Format 40 Connecting to other devices 41 Viewing images on a TV 41 Printing still images 42 Using the camera with a computer 44 Changing camera settings 48 Changing the operation sounds 48 Using the HOME screen 48 Using the MENU items 51 Using functions in Program Auto mode 53 Others 54 List of icons displayed on the screen 54 Learning more about the camera ("Cyber-shot Handbook 56 Troubleshooting 57 Precautions 60 Specifications 61 9GB
Instruction Manual
Page 10
... to continuous use . Leaving liquids on the LCD screen. Be sure to automatically create a management file. Notes on recording/playback • Before you use the camera near a location that the camera is working correctly. • The camera is lit. On image data compatibility • The camera conforms with a soft cloth. It may take some tiny black and/ or bright dots (white, red, blue or green) may be displayed on the LCD screen before using extremely...
... to continuous use . Leaving liquids on the LCD screen. Be sure to automatically create a management file. Notes on recording/playback • Before you use the camera near a location that the camera is working correctly. • The camera is lit. On image data compatibility • The camera conforms with a soft cloth. It may take some tiny black and/ or bright dots (white, red, blue or green) may be displayed on the LCD screen before using extremely...
Instruction Manual
Page 16
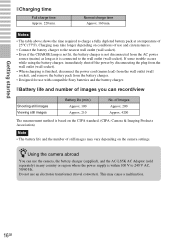
... can record/view Shooting still images Viewing still images Battery life (min.) Approx. 100 Approx. 210 No. Charging may take longer depending on conditions of use and circumstances. • Connect the battery charger to the nearest wall outlet (wall socket). • Even if the CHARGE lamp is not lit, the battery charger is based on the camera settings. Do not use with compatible Sony batteries and the battery charger. of images you can use the camera, the battery charger...
... can record/view Shooting still images Viewing still images Battery life (min.) Approx. 100 Approx. 210 No. Charging may take longer depending on conditions of use and circumstances. • Connect the battery charger to the nearest wall outlet (wall socket). • Even if the CHARGE lamp is not lit, the battery charger is based on the camera settings. Do not use with compatible Sony batteries and the battery charger. of images you can use the camera, the battery charger...
Instruction Manual
Page 18
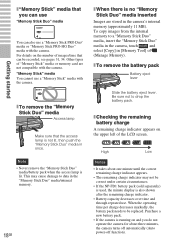
... push the "Memory Stick Duo" media in [Memory Tool] of "Memory Stick" media or memory card are stored in the camera's internal memory (approximately 11 MB). High Low Notes • It takes about three minutes, the camera turns off automatically (Auto power-off function). Note • Never remove the "Memory Stick Duo" media/battery pack when the access lamp is lit. To copy images from the internal memory to a "Memory Stick Duo...
... push the "Memory Stick Duo" media in [Memory Tool] of "Memory Stick" media or memory card are stored in the camera's internal memory (approximately 11 MB). High Low Notes • It takes about three minutes, the camera turns off automatically (Auto power-off function). Note • Never remove the "Memory Stick Duo" media/battery pack when the access lamp is lit. To copy images from the internal memory to a "Memory Stick Duo...
Instruction Manual
Page 25
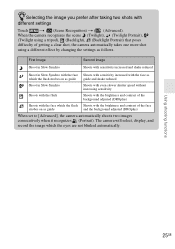
..., display, and record the image which the flash Shoots with different settings Touch t (Scene Recognition) t (Advanced). Using shooting functions 25GB First Image Second Image Shoot in Slow Synchro Shoots with sensitivity increased and shake reduced Shoot in Slow Synchro with the face Shoots with sensitivity increased with the face as which the flash strobes on as guide and the background adjusted (DROplus) When set to [Advanced], the camera automatically shoots two images...
..., display, and record the image which the flash Shoots with different settings Touch t (Scene Recognition) t (Advanced). Using shooting functions 25GB First Image Second Image Shoot in Slow Synchro Shoots with sensitivity increased and shake reduced Shoot in Slow Synchro with the face Shoots with sensitivity increased with the face as which the flash strobes on as guide and the background adjusted (DROplus) When set to [Advanced], the camera automatically shoots two images...

Instruction Manual
Page 26
... the image. Shooting close-ups (Macro/Close focus) You can shoot beautiful close-up images of small subjects such as insects or flowers. 1 Touch (Macro) t desired mode t . (Auto): The camera adjusts the focus automatically from distant subjects to close -up . Set Macro On when shooting close subjects. (Close focus enabled): Use this setting if you want to include yourself in Movie Mode or Smile Shutter. The self-timer lamp flashes and a beep sounds until the shutter operates...
... the image. Shooting close-ups (Macro/Close focus) You can shoot beautiful close-up images of small subjects such as insects or flowers. 1 Touch (Macro) t desired mode t . (Auto): The camera adjusts the focus automatically from distant subjects to close -up . Set Macro On when shooting close subjects. (Close focus enabled): Use this setting if you want to include yourself in Movie Mode or Smile Shutter. The self-timer lamp flashes and a beep sounds until the shutter operates...

Instruction Manual
Page 42
... start over the procedure from the camera. After the connection is printed. Printing still images If you have a PictBridge compliant printer, you want to the print shop. t (Manage Memory) t [Memory Tool] t t [Copy] For details, consult your photo printing service shop. 42GB zPrinting at a shop You cannot print images stored in the internal memory at a print shop directly from step 2. The image is made, the indicator appears. 4 Touch t (Print) t desired item t . (This Image): Print the currently displayed image. (Multiple Images...
... start over the procedure from the camera. After the connection is printed. Printing still images If you have a PictBridge compliant printer, you want to the print shop. t (Manage Memory) t [Memory Tool] t t [Copy] For details, consult your photo printing service shop. 42GB zPrinting at a shop You cannot print images stored in the internal memory at a print shop directly from step 2. The image is made, the indicator appears. 4 Touch t (Print) t desired item t . (This Image): Print the currently displayed image. (Multiple Images...
Instruction Manual
Page 45
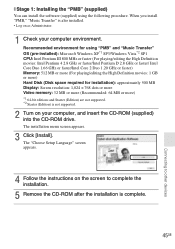
The installation menu screen appears. 3 Click [Install]. The "Choose Setup Language" screen appears. 4 Follow the instructions on the screen to other devices x Stage 1: Installing the "PMB" (supplied) You can install the software (supplied) using "PMB" and "Music Transfer" OS (pre-installed): Microsoft Windows XP*1 SP3/Windows Vista*2 SP1 CPU: Intel Pentium III 800 MHz or faster (For playing/editing the High Definition movies: Intel Pentium 4 2.8 GHz or faster/Intel Pentium...
The installation menu screen appears. 3 Click [Install]. The "Choose Setup Language" screen appears. 4 Follow the instructions on the screen to other devices x Stage 1: Installing the "PMB" (supplied) You can install the software (supplied) using "PMB" and "Music Transfer" OS (pre-installed): Microsoft Windows XP*1 SP3/Windows Vista*2 SP1 CPU: Intel Pentium III 800 MHz or faster (For playing/editing the High Definition movies: Intel Pentium 4 2.8 GHz or faster/Intel Pentium...
Instruction Manual
Page 47
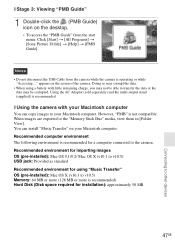
...-installed): Mac OS X (v10.3 to v10.5) Memory: 64 MB or more (128 MB or more is recommended) Hard Disk (Disk space required for using a battery with your Macintosh computer You can install "Music Transfer" on the screen of the camera. x Using the camera with little remaining charge, you may be corrupted. When images are exported to the camera. Notes • Do not disconnect the USB Cable from the start menu...
...-installed): Mac OS X (v10.3 to v10.5) Memory: 64 MB or more (128 MB or more is recommended) Hard Disk (Disk space required for using a battery with your Macintosh computer You can install "Music Transfer" on the screen of the camera. x Using the camera with little remaining charge, you may be corrupted. When images are exported to the camera. Notes • Do not disconnect the USB Cable from the start menu...
Instruction Manual
Page 49
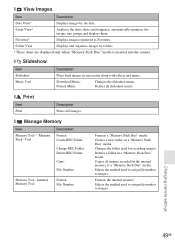
...Displays and organizes images by the date. Deletes all images recorded in the internal memory to a "Memory Stick Duo" media. Deletes a folder in succession along with effects and music. Selects the method used to assign file number to images. Event View* Analyzes the dates shots and frequency, automatically organizes the images into the camera. Download Music: Format Music: Changes the slideshow music. "Memory Stick" Tool Description Format: Create REC.Folder: Change REC.Folder: Delete REC.Folder: Copy: File Number: Memory Tool - Formats the internal memory. x Print...
...Displays and organizes images by the date. Deletes all images recorded in the internal memory to a "Memory Stick Duo" media. Deletes a folder in succession along with effects and music. Selects the method used to assign file number to images. Event View* Analyzes the dates shots and frequency, automatically organizes the images into the camera. Download Music: Format Music: Changes the slideshow music. "Memory Stick" Tool Description Format: Create REC.Folder: Change REC.Folder: Delete REC.Folder: Copy: File Number: Memory Tool - Formats the internal memory. x Print...
Instruction Manual
Page 51
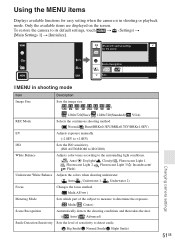
...) Changing camera settings 51GB Using the MENU items Displays available functions for easy setting when the camera is in shooting mode Item Image Size Description Sets the image size. (///////) ( 1280×720(Fine)/ 1280×720(Standard)/ VGA) REC Mode Selects the continuous shooting method. ( Normal/ Burst/BRK±0.3EV/BRK±0.7EV/BRK±1.0EV) EV Adjusts exposure manually. (-2.0EV to +2.0EV) ISO Sets the ISO sensitivity. (ISO AUTO/ISO80 to ISO3200) White Balance Adjusts color tones according to the surrounding light...
...) Changing camera settings 51GB Using the MENU items Displays available functions for easy setting when the camera is in shooting mode Item Image Size Description Sets the image size. (///////) ( 1280×720(Fine)/ 1280×720(Standard)/ VGA) REC Mode Selects the continuous shooting method. ( Normal/ Burst/BRK±0.3EV/BRK±0.7EV/BRK±1.0EV) EV Adjusts exposure manually. (-2.0EV to +2.0EV) ISO Sets the ISO sensitivity. (ISO AUTO/ISO80 to ISO3200) White Balance Adjusts color tones according to the surrounding light...

Instruction Manual
Page 53
... the ISO sensitivity. (ISO AUTO/ISO80 to ISO3200) Adjusts the exposure. (-2.0EV to each View Mode. Rotates a still image. Using functions in Date Range*) * The displayed text differs according to (Program Auto). Prevents accidental erasure. ( This Image/ Multiple Images/ Set All in Date Range*/ Remove All in Date Range*) * The displayed text differs according to each View Mode. Prints images using a PictBridge compliant printer. ( This Image/ Multiple Images/ All in Date Range*) * The displayed text differs according to each View Mode. Adjusts the volume. Item (Delete) (Protect...
... the ISO sensitivity. (ISO AUTO/ISO80 to ISO3200) Adjusts the exposure. (-2.0EV to each View Mode. Rotates a still image. Using functions in Date Range*) * The displayed text differs according to (Program Auto). Prevents accidental erasure. ( This Image/ Multiple Images/ Set All in Date Range*/ Remove All in Date Range*) * The displayed text differs according to each View Mode. Prints images using a PictBridge compliant printer. ( This Image/ Multiple Images/ All in Date Range*) * The displayed text differs according to each View Mode. Adjusts the volume. Item (Delete) (Protect...

Instruction Manual
Page 55
... a movie Recording time (m:s) Playback Playback bar Counter Folder-file number Recorded date/time of images recorded in selected folder Recordable time Recording/Playback Media ("Memory Stick Duo" media, internal memory) PictBridge connecting PictBridge connecting Changing folder Playback folder DRO White balance Recording mode Face Detection Metering Mode Focus Vibration warning Touch AF indicator Color mode Red-eye reduction Flash level Flash charging Indication AF range finder frame Display C:32:00 D Display 35° 37' 32" N 139° 44' 31" E z 125 F3.5 ISO400 +2.0EV Indication Self...
... a movie Recording time (m:s) Playback Playback bar Counter Folder-file number Recorded date/time of images recorded in selected folder Recordable time Recording/Playback Media ("Memory Stick Duo" media, internal memory) PictBridge connecting PictBridge connecting Changing folder Playback folder DRO White balance Recording mode Face Detection Metering Mode Focus Vibration warning Touch AF indicator Color mode Red-eye reduction Flash level Flash charging Indication AF range finder frame Display C:32:00 D Display 35° 37' 32" N 139° 44' 31" E z 125 F3.5 ISO400 +2.0EV Indication Self...
Instruction Manual
Page 57
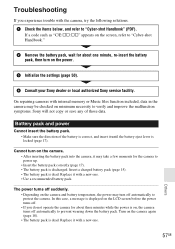
.... 57GB Others Replace it with a new one. • Use a recommended battery pack. If a code such as "C/E:ss:ss" appears on the screen, refer to "Cyber-shot Handbook" (PDF). Turn on the camera and battery temperature, the power may take a few moments for the camera to protect the camera. Battery pack and power Cannot insert the battery pack. • Make sure the direction of those data. Troubleshooting If you do not operate the camera for about one...
.... 57GB Others Replace it with a new one. • Use a recommended battery pack. If a code such as "C/E:ss:ss" appears on the screen, refer to "Cyber-shot Handbook" (PDF). Turn on the camera and battery temperature, the power may take a few moments for the camera to protect the camera. Battery pack and power Cannot insert the battery pack. • Make sure the direction of those data. Troubleshooting If you do not operate the camera for about one...

Instruction Manual
Page 58
...;F)). Change the "Memory Stick Duo" media. • You cannot record images while charging the flash. • Set the Mode switch to the correct mode. • Movies with a new one of the (screen display) is set to charge the battery. The remaining charge indicator is incorrect. • The battery charge will get used up quickly and the actual remaining battery charge will be lower than "Memory Stick PRO Duo" media, set the movie image size to [VGA]. • The camera is...
...;F)). Change the "Memory Stick Duo" media. • You cannot record images while charging the flash. • Set the Mode switch to the correct mode. • Movies with a new one of the (screen display) is set to charge the battery. The remaining charge indicator is incorrect. • The battery charge will get used up quickly and the actual remaining battery charge will be lower than "Memory Stick PRO Duo" media, set the movie image size to [VGA]. • The camera is...


