
Instruction Manual
Page 3
... sure the service technician has used replacement parts specified by the manufacturer. [ Ventilation The slots and openings in the cabinet are specified in damage and will prevent damage to the set due to lightning and power-line surges. Never place the set in a confined space, such as opening or removing covers may result in the operating instructions. Adjust only those controls that the set is...
... sure the service technician has used replacement parts specified by the manufacturer. [ Ventilation The slots and openings in the cabinet are specified in damage and will prevent damage to the set due to lightning and power-line surges. Never place the set in a confined space, such as opening or removing covers may result in the operating instructions. Adjust only those controls that the set is...

Instruction Manual
Page 5
... different from that interference will help . [ Note: This equipment has been tested and found compliant with the limits set out in the EMC Directive for using connection cables shorter than 3 meters (9.8 feet). [ Attention The electromagnetic fields at the specific frequencies may apply, See www.dtsc.ca.gov/hazardouswaste/perchlorate Perchlorate Material: Lithium battery contains perchlorate. However, there is...
... different from that interference will help . [ Note: This equipment has been tested and found compliant with the limits set out in the EMC Directive for using connection cables shorter than 3 meters (9.8 feet). [ Attention The electromagnetic fields at the specific frequencies may apply, See www.dtsc.ca.gov/hazardouswaste/perchlorate Perchlorate Material: Lithium battery contains perchlorate. However, there is...

Instruction Manual
Page 7
...Supported operating systems for USB connection and application software "Picture Motion Browser" (supplied 29 Viewing "Cyber-shot Handbook 30 Indicators on /setting the clock 14 Shooting images 16 Image size/Self-timer/Shooting mode/Flash/Macro/Display 18 Viewing/deleting images 21 Learning the various functions - Table of contents IMPORTANT SAFEGUARDS 2 Read this first 4 Notes on using the camera 8 Getting started 9 Checking the accessories supplied 9 1 Preparing the battery pack 11 2 Inserting the battery pack/a "Memory Stick Duo" (not supplied) ........ 12 3 Turning the camera...
...Supported operating systems for USB connection and application software "Picture Motion Browser" (supplied 29 Viewing "Cyber-shot Handbook 30 Indicators on /setting the clock 14 Shooting images 16 Image size/Self-timer/Shooting mode/Flash/Macro/Display 18 Viewing/deleting images 21 Learning the various functions - Table of contents IMPORTANT SAFEGUARDS 2 Read this first 4 Notes on using the camera 8 Getting started 9 Checking the accessories supplied 9 1 Preparing the battery pack 11 2 Inserting the battery pack/a "Memory Stick Duo" (not supplied) ........ 12 3 Turning the camera...
Instruction Manual
Page 8
... not be repaired. • Do not aim the camera at the sun or other materials may not properly record or play back images recorded with a soft cloth. Therefore, movies recorded using the camera [ Internal memory and "Memory Stick Duo" back up Do not turn off the screen with the camera. [ Note when playing movies on copyright Television programs, films, videotapes, and other bright light. These dots are operational for failure...
... not be repaired. • Do not aim the camera at the sun or other materials may not properly record or play back images recorded with a soft cloth. Therefore, movies recorded using the camera [ Internal memory and "Memory Stick Duo" back up Do not turn off the screen with the camera. [ Note when playing movies on copyright Television programs, films, videotapes, and other bright light. These dots are operational for failure...
Instruction Manual
Page 13
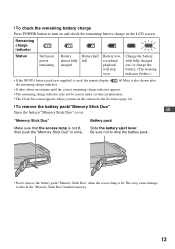
... Clock Set screen appears when you turn on and check the remaining battery charge on the camera for the first time (page 14). [ To remove the battery pack/"Memory Stick Duo" GB Open the battery/"Memory Stick Duo" cover. Be sure not to data in once. [ To check the remaining battery charge Press POWER button to turn on the LCD screen. Change the battery with fully charged one minute until the correct remaining charge indicator appears...
... Clock Set screen appears when you turn on and check the remaining battery charge on the camera for the first time (page 14). [ To remove the battery pack/"Memory Stick Duo" GB Open the battery/"Memory Stick Duo" cover. Be sure not to data in once. [ To check the remaining battery charge Press POWER button to turn on the LCD screen. Change the battery with fully charged one minute until the correct remaining charge indicator appears...
Instruction Manual
Page 14
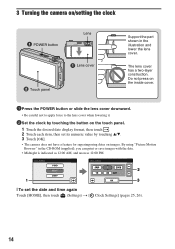
... the button on /setting the clock POWER button Lens Lens cover Touch panel Support the part shown in the CD-ROM (supplied), you can print or save images with the date. • Midnight is indicated as 12:00 AM, and noon as 12:00 PM. [ To set its numeric value by touching v/V. 3 Touch [OK]. • The camera does not have a feature for superimposing dates on images. The lens...
... the button on /setting the clock POWER button Lens Lens cover Touch panel Support the part shown in the CD-ROM (supplied), you can print or save images with the date. • Midnight is indicated as 12:00 AM, and noon as 12:00 PM. [ To set its numeric value by touching v/V. 3 Touch [OK]. • The camera does not have a feature for superimposing dates on images. The lens...

Instruction Manual
Page 18
... and printing up to A4(8×10") For viewing on HDTVs Movie 1280×720(Fine)* Shoot highest quality movie for display on HDTV 1280×720(Standard)* Shoot standard quality movie for display on HDTV VGA Shoot at an image size suitable for still images) E Macro/Close focus F DISP (Display Setup) [ / Changing the image size Touch the image size setting button on the touch panel. Image size/Self-timer/Shooting mode/Flash/Macro/Display This section describes the basic buttons that appear on the screen.
... and printing up to A4(8×10") For viewing on HDTVs Movie 1280×720(Fine)* Shoot highest quality movie for display on HDTV 1280×720(Standard)* Shoot standard quality movie for display on HDTV VGA Shoot at an image size suitable for still images) E Macro/Close focus F DISP (Display Setup) [ / Changing the image size Touch the image size setting button on the touch panel. Image size/Self-timer/Shooting mode/Flash/Macro/Display This section describes the basic buttons that appear on the screen.

Instruction Manual
Page 20
[ Flash (Selecting a flash mode for still images) Touch the flash mode setting button on the screen. : Flash Auto Flashes when there is insufficient light or backlight (default setting) : Flash forced on : Slow synchro (Flash forced on) The shutter speed is slow in a dark place to clearly shoot the background that is out of flash light. : Flash forced off [ Macro/Close focus enabled (Shooting close-up) Touch the Macro/Close focus mode setting button on the screen. : Macro Off : Macro On W side: Approx. 8 cm or farther (3 1/4 inches...
[ Flash (Selecting a flash mode for still images) Touch the flash mode setting button on the screen. : Flash Auto Flashes when there is insufficient light or backlight (default setting) : Flash forced on : Slow synchro (Flash forced on) The shutter speed is slow in a dark place to clearly shoot the background that is out of flash light. : Flash forced off [ Macro/Close focus enabled (Shooting close-up) Touch the Macro/Close focus mode setting button on the screen. : Macro Off : Macro On W side: Approx. 8 cm or farther (3 1/4 inches...

Instruction Manual
Page 28
...the color tones. Setup Selects the shooting settings. Adjusts the volume. 28 Prevents accidental erasure. Metering Mode Selects the metering mode. Flash Level Adjusts the amount of flash light. Viewing menu (Retouch) (Multi-Purpose Resize) (Wide Zoom Display) (Slideshow) (Delete) (Protect) (Print) (Rotate) (Select Folder) (Volume Settings) Retouches still images. Changes the image size according to reduce the red-eye phenomenon. Deletes images. Red Eye Reduction Sets to usage. EV Adjusts Exposure. Adds a Print order mark on the screen. Shooting menu REC...
...the color tones. Setup Selects the shooting settings. Adjusts the volume. 28 Prevents accidental erasure. Metering Mode Selects the metering mode. Flash Level Adjusts the amount of flash light. Viewing menu (Retouch) (Multi-Purpose Resize) (Wide Zoom Display) (Slideshow) (Delete) (Protect) (Print) (Rotate) (Select Folder) (Volume Settings) Retouches still images. Changes the image size according to reduce the red-eye phenomenon. Deletes images. Red Eye Reduction Sets to usage. EV Adjusts Exposure. Adds a Print order mark on the screen. Shooting menu REC...

Cyber-shot® Handbook
Page 28
... use the Face Detection function when you shoot images in the Macro or Close focus mode. The first flash adjusts the light quantity. • While charging the flash, is cancelled if you shoot images in the Close focus mode. • This mode is displayed. Macro • Setting the zoom all the way to shoot at even closer distances than Macro recording. • The Auto Focus speed becomes slower when you turn off • The flash strobes twice. Shooting still images Flash (Selecting a flash mode for still images...
... use the Face Detection function when you shoot images in the Macro or Close focus mode. The first flash adjusts the light quantity. • While charging the flash, is cancelled if you shoot images in the Close focus mode. • This mode is displayed. Macro • Setting the zoom all the way to shoot at even closer distances than Macro recording. • The Auto Focus speed becomes slower when you turn off • The flash strobes twice. Shooting still images Flash (Selecting a flash mode for still images...

Cyber-shot® Handbook
Page 41
...). : Program Auto Allows you to shoot with the setting adjusted automatically. : High Sensitivity Allows you to shoot movies using the menu. (For details on the functions available, see page 39.) The setting buttons for still images: Auto Adjustment, Program Auto, Scene Selection; Also you can switch the shooting mode. Movie mode : Auto Adjustment Allows you to shoot movies easily with the exposure adjusted automatically (both the shutter speed and the aperture value). and there are three shooting modes available for Focus, Metering mode, ISO and...
...). : Program Auto Allows you to shoot with the setting adjusted automatically. : High Sensitivity Allows you to shoot movies using the menu. (For details on the functions available, see page 39.) The setting buttons for still images: Auto Adjustment, Program Auto, Scene Selection; Also you can switch the shooting mode. Movie mode : Auto Adjustment Allows you to shoot movies easily with the exposure adjusted automatically (both the shutter speed and the aperture value). and there are three shooting modes available for Focus, Metering mode, ISO and...

Cyber-shot® Handbook
Page 93
... (Picture Motion Browser) icon on this camera. • You can retouch (Red Eye Correction, etc.), print, and send still images as software updates. Select [Start]. For details, refer to the "Memory Stick Duo" so they can be viewed on the desktop. Or, from the Start menu: Click [Start] t [All Programs] (in Windows 2000, [Programs]) t [Sony Picture Utility] t [Help] t [PMB Guide]. This function informs you of news, such as e-mail attachments, change the setting later. Starting...
... (Picture Motion Browser) icon on this camera. • You can retouch (Red Eye Correction, etc.), print, and send still images as software updates. Select [Start]. For details, refer to the "Memory Stick Duo" so they can be viewed on the desktop. Or, from the Start menu: Click [Start] t [All Programs] (in Windows 2000, [Programs]) t [Sony Picture Utility] t [Help] t [PMB Guide]. This function informs you of news, such as e-mail attachments, change the setting later. Starting...

Cyber-shot® Handbook
Page 97
... number within the range from 0001 to 9999. Still image files: DSC0ssss.JPG - Using your computer using the camera. When no new folders are created, there are folders as folders on Windows Vista B Folder containing image data recorded using a camera not equipped with the camera are grouped as follows: - Internal memory: 101_SONY C Folder containing movie data recorded using the "Picture Motion Browser" Image file storage destinations and file names The image files recorded with the folder creating function. Copying images to your computer 97 The images in movie mode...
... number within the range from 0001 to 9999. Still image files: DSC0ssss.JPG - Using your computer using the camera. When no new folders are created, there are folders as folders on Windows Vista B Folder containing image data recorded using a camera not equipped with the camera are grouped as follows: - Internal memory: 101_SONY C Folder containing movie data recorded using the "Picture Motion Browser" Image file storage destinations and file names The image files recorded with the folder creating function. Copying images to your computer 97 The images in movie mode...

Cyber-shot® Handbook
Page 100
... images depending on the image size. • Sony does not guarantee playback of image files on the camera if the files have been processed using a computer or recorded with another camera. • When there are no longer remains on a "Memory Stick Duo", you can view that image again on the camera by copying the image file on the computer settings. The extension for still images is JPG, and the extension for any number...
... images depending on the image size. • Sony does not guarantee playback of image files on the camera if the files have been processed using a computer or recorded with another camera. • When there are no longer remains on a "Memory Stick Duo", you can view that image again on the camera by copying the image file on the computer settings. The extension for still images is JPG, and the extension for any number...

Cyber-shot® Handbook
Page 103
...) into the camera after copying images from the internal memory. • Turning off the camera. The installation of the images and file names, see page 97. 4 View images on this product and answers to the hard disk icon. To add/change the Music files that image file. Adding/Changing Music using "Music Transfer"" on the storage location of the software starts. The image files are listed below: • MP3 files stored on the hard disk drive of...
...) into the camera after copying images from the internal memory. • Turning off the camera. The installation of the images and file names, see page 97. 4 View images on this product and answers to the hard disk icon. To add/change the Music files that image file. Adding/Changing Music using "Music Transfer"" on the storage location of the software starts. The image files are listed below: • MP3 files stored on the hard disk drive of...

Cyber-shot® Handbook
Page 121
... date or time. • Set the date and time again (page 81). 121 Troubleshooting However, the data on the printer. Others Cannot reset the file-number. • If you replace a recording medium, you cannot initialize file numbers with the power left off the camera and leave it . Insert a charged battery, and set aside for 24 hours or more with the camera. The Clock Set screen appears when you use paper of a different size after canceling printing...
... date or time. • Set the date and time again (page 81). 121 Troubleshooting However, the data on the printer. Others Cannot reset the file-number. • If you replace a recording medium, you cannot initialize file numbers with the power left off the camera and leave it . Insert a charged battery, and set aside for 24 hours or more with the camera. The Clock Set screen appears when you use paper of a different size after canceling printing...

Cyber-shot® Handbook
Page 122
... times, the camera may flash even though there are still 5 to 10 minutes of the alphabet appears, the self-diagnosis function on again. Warning indicators and messages Self-diagnosis display If a code starting with compatible battery only • The battery inserted is not an NP-BD1 (supplied)/NP-FD1 (not supplied) battery pack. For use or the type of battery pack, the indicator may need repair. If you cannot solve the problem...
... times, the camera may flash even though there are still 5 to 10 minutes of the alphabet appears, the self-diagnosis function on again. Warning indicators and messages Self-diagnosis display If a code starting with compatible battery only • The battery inserted is not an NP-BD1 (supplied)/NP-FD1 (not supplied) battery pack. For use or the type of battery pack, the indicator may need repair. If you cannot solve the problem...

Cyber-shot® Handbook
Page 133
Index S Scene Selection 42 Screen Changing the display .....22 Indicator 17 Select Folder 67 Self-diagnosis display.........122 Self-timer 27, 30 Sepia 54 Settings 37, 74 Setup 57 Shooting Movies 29 Still image 25 Shooting menu 50 Shooting Settings 1 78 Shooting Settings 2 80 Shutter speed 10 Single 79 Single image screen 31 Slideshow 61 Slow Synchro 28 Smart zoom 79 Snow 42 Soft Snap 42 Software 91, 93, 101 Spot AF 45 Spot metering 47 Spot metering...
Index S Scene Selection 42 Screen Changing the display .....22 Indicator 17 Select Folder 67 Self-diagnosis display.........122 Self-timer 27, 30 Sepia 54 Settings 37, 74 Setup 57 Shooting Movies 29 Still image 25 Shooting menu 50 Shooting Settings 1 78 Shooting Settings 2 80 Shutter speed 10 Single 79 Single image screen 31 Slideshow 61 Slow Synchro 28 Smart zoom 79 Snow 42 Soft Snap 42 Software 91, 93, 101 Spot AF 45 Spot metering 47 Spot metering...
Marketing Specifications
Page 1
... Zoom display PHOTOMUSIC feature In-Camera Retouching Tools Multi-Purpose Resize function Picture Motion Browser ver. 3.1 Photo modes include Auto, Program Auto, and Scene selections, such as upload them to Internet sharing sites8 to share with reduced red-eye. Stamina® Battery Power Provides extended battery life and shooting capacity when using a fullycharged lithium-ion battery. The DSC-T500 also boasts a large 3.5"2 LCD touch-screen display for shaky hands, minimizes blur, and allows flash-free shooting...
... Zoom display PHOTOMUSIC feature In-Camera Retouching Tools Multi-Purpose Resize function Picture Motion Browser ver. 3.1 Photo modes include Auto, Program Auto, and Scene selections, such as upload them to Internet sharing sites8 to share with reduced red-eye. Stamina® Battery Power Provides extended battery life and shooting capacity when using a fullycharged lithium-ion battery. The DSC-T500 also boasts a large 3.5"2 LCD touch-screen display for shaky hands, minimizes blur, and allows flash-free shooting...

Marketing Specifications
Page 2
... shooting a movie, still image size is prohibited. Sony, Cyber-shot, Cyber-shot Station, Clear Photo LCD Plus, SteadyShot, Memory Stick Duo, Memory Stick PRO Duo, HDNA, Super HAD, Stamina, Smile Shutter, BRAVIA, BRAVIA Sync, Optical SteadyShot, Clear Photo LCD Plus, PHOTOMUSIC, the Sony, Cyber-shot, SteadyShot, Face Detection, Full 1080 and HDNA logos are trademarks of recording time in the BRAVIA® TV instruction manual. 13. controls flash, focus, and exposure Power Battery Type: LITHIUM ION / InfoLITHIUM D type 3.6V Software Supplied Software: Picture...
... shooting a movie, still image size is prohibited. Sony, Cyber-shot, Cyber-shot Station, Clear Photo LCD Plus, SteadyShot, Memory Stick Duo, Memory Stick PRO Duo, HDNA, Super HAD, Stamina, Smile Shutter, BRAVIA, BRAVIA Sync, Optical SteadyShot, Clear Photo LCD Plus, PHOTOMUSIC, the Sony, Cyber-shot, SteadyShot, Face Detection, Full 1080 and HDNA logos are trademarks of recording time in the BRAVIA® TV instruction manual. 13. controls flash, focus, and exposure Power Battery Type: LITHIUM ION / InfoLITHIUM D type 3.6V Software Supplied Software: Picture...


