User Guide
Page 1
... questions can be found at our Customer Support Website. Record the serial number in Japan Digital Still Camera User's Guide/ Troubleshooting Operating Instructions Before operating the unit, please read this manual and "Read This First" (separate volume) thoroughly, and retain them for shooting/playback with your camera. 2-635-482-11(1) Enjoying the camera Using the menu Using the Setup screen Using your computer Printing still images Connecting your camera to your Sony dealer regarding this product and answers...
... questions can be found at our Customer Support Website. Record the serial number in Japan Digital Still Camera User's Guide/ Troubleshooting Operating Instructions Before operating the unit, please read this manual and "Read This First" (separate volume) thoroughly, and retain them for shooting/playback with your camera. 2-635-482-11(1) Enjoying the camera Using the menu Using the Setup screen Using your computer Printing still images Connecting your camera to your Sony dealer regarding this product and answers...
User Guide
Page 2
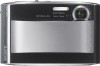
... authority to Part 15 of Conformity Trade Name: SONY Model No.: DSC-T5 Responsible Party: Sony Electronics Inc. Address: 16450 W. Telephone No.: 858-942-2230 This device complies with the instructions, may cause undesired operation. Note: ...installed and used rechargeable batteries to correct the interference by one or more information regarding recycling of rechargeable batteries, call : Sony Customer Information Services Center 1-800-222-SONY (7669) The number below is intended to alert the user to the presence of important operating and maintenance (servicing) instructions...
... authority to Part 15 of Conformity Trade Name: SONY Model No.: DSC-T5 Responsible Party: Sony Electronics Inc. Address: 16450 W. Telephone No.: 858-942-2230 This device complies with the instructions, may cause undesired operation. Note: ...installed and used rechargeable batteries to correct the interference by one or more information regarding recycling of rechargeable batteries, call : Sony Customer Information Services Center 1-800-222-SONY (7669) The number below is intended to alert the user to the presence of important operating and maintenance (servicing) instructions...
User Guide
Page 3
... of materials will help prevent potential negative consequences for your nearest Sony service station. 3 Never use the plug without the fuse cover. Attention The electromagnetic fields at the specific frequencies may influence the picture and sound of the same ...replaced, a fuse of this equipment has a detachable fuse cover, be used with the equipment in order to comply with the limits set out in the plug supplied need to the applicable collection point for help to discontinue midway (fail), restart the application or disconnect and connect the communication cable (USB...
... of materials will help prevent potential negative consequences for your nearest Sony service station. 3 Never use the plug without the fuse cover. Attention The electromagnetic fields at the specific frequencies may influence the picture and sound of the same ...replaced, a fuse of this equipment has a detachable fuse cover, be used with the equipment in order to comply with the limits set out in the plug supplied need to the applicable collection point for help to discontinue midway (fail), restart the application or disconnect and connect the communication cable (USB...
User Guide
Page 4
... charged, you can use the partially charged capacity of the battery pack as the internal memory data or "Memory Stick Duo" data may cause the malfunction of your camera. Internal memory and "Memory Stick Duo" back up copy. "Memory Stick Duo": you do not intend to a malfunction of your camera or recording media, etc. Other memory cards cannot be used by making a back up • Do not turn off the camera or remove the battery...
... charged, you can use the partially charged capacity of the battery pack as the internal memory data or "Memory Stick Duo" data may cause the malfunction of your camera. Internal memory and "Memory Stick Duo" back up copy. "Memory Stick Duo": you do not intend to a malfunction of your camera or recording media, etc. Other memory cards cannot be used by making a back up • Do not turn off the camera or remove the battery...
User Guide
Page 6
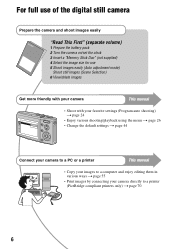
... volume) 1 Prepare the battery pack 2 Turn the camera on/set the clock 3 Insert a "Memory Stick Duo" (not supplied) 4 Select the image size for use 5 Shoot images easily (Auto adjustment mode) Shoot still images (Scene Selection) 6 View/delete images Get more friendly with your camera This manual • Shoot with your favorite settings (Program auto shooting) t page 24 • Enjoy various shooting/playback using the menu t page 26 • Change the default settings t page 44 Connect your camera to a PC or a printer This manual • Copy your images to...
... volume) 1 Prepare the battery pack 2 Turn the camera on/set the clock 3 Insert a "Memory Stick Duo" (not supplied) 4 Select the image size for use 5 Shoot images easily (Auto adjustment mode) Shoot still images (Scene Selection) 6 View/delete images Get more friendly with your camera This manual • Shoot with your favorite settings (Program auto shooting) t page 24 • Enjoy various shooting/playback using the menu t page 26 • Change the default settings t page 44 Connect your camera to a PC or a printer This manual • Copy your images to...
User Guide
Page 8
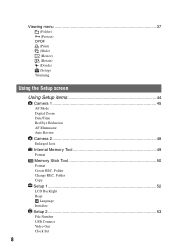
Folder Change REC. Folder Copy Setup 1 52 1 LCD Backlight Beep Language Initialize Setup 2 53 2 File Number USB Connect Video Out Clock Set 8 Viewing menu 37 (Folder) - (Protect) DPOF (Print) (Slide) (Resize) (Rotate) (Divide) (Setup) Trimming Using the Setup screen Using Setup items 44 Camera 1 45 1 AF Mode Digital Zoom Date/Time Red Eye Reduction AF Illuminator Auto Review Camera 2 48 2 Enlarged Icon Internal Memory Tool 49 Format Memory Stick Tool 50 Format Create REC.
Folder Change REC. Folder Copy Setup 1 52 1 LCD Backlight Beep Language Initialize Setup 2 53 2 File Number USB Connect Video Out Clock Set 8 Viewing menu 37 (Folder) - (Protect) DPOF (Print) (Slide) (Resize) (Rotate) (Divide) (Setup) Trimming Using the Setup screen Using Setup items 44 Camera 1 45 1 AF Mode Digital Zoom Date/Time Red Eye Reduction AF Illuminator Auto Review Camera 2 48 2 Enlarged Icon Internal Memory Tool 49 Format Memory Stick Tool 50 Format Create REC.

User Guide
Page 53
... USB mode to be connected when set to [Auto], change the setting to images. PictBridge Connects the camera to a computer or a PictBridge compliant printer using the cable for multi-use terminal. Series Assigns numbers to files in the recording folder on the operation t page 44 The default settings are copied to the computer. (Compatible with Windows XP and Mac OS X.) Mass Storage Establishes a Mass Storage connection between the camera and a computer or other USB device (page 59). Using the Setup screen Setup...
... USB mode to be connected when set to [Auto], change the setting to images. PictBridge Connects the camera to a computer or a PictBridge compliant printer using the cable for multi-use terminal. Series Assigns numbers to files in the recording folder on the operation t page 44 The default settings are copied to the computer. (Compatible with Windows XP and Mac OS X.) Mass Storage Establishes a Mass Storage connection between the camera and a computer or other USB device (page 59). Using the Setup screen Setup...
User Guide
Page 62
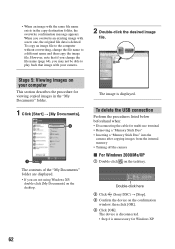
...-click here 2 Click (Sony DSC) t [Stop]. 3 Confirm the device on the desktop. The device is disconnected. • Step 4 is deleted. • When an image with your computer This section describes the procedure for multi-use terminal • Removing a "Memory Stick Duo" • Inserting a "Memory Stick Duo" into the camera after copying images from the internal memory • Turning off the camera x For Windows 2000/Me/XP...
...-click here 2 Click (Sony DSC) t [Stop]. 3 Confirm the device on the desktop. The device is disconnected. • Step 4 is deleted. • When an image with your computer This section describes the procedure for multi-use terminal • Removing a "Memory Stick Duo" • Inserting a "Memory Stick Duo" into the camera after copying images from the internal memory • Turning off the camera x For Windows 2000/Me/XP...

User Guide
Page 63
... of a movie file recorded in these folders are available only for any number within the range from a computer. Movie files: MOV0ssss.MPG - "Memory Stick Duo"; Image file storage destinations and file names The image files recorded with the folder creating function 63 If the access indicators have turned white, the device is disconnected from 0001 to 9999. ssss stands for viewing. • You cannot record/playback any images to the "MSSONY" folder. • Image files are...
... of a movie file recorded in these folders are available only for any number within the range from a computer. Movie files: MOV0ssss.MPG - "Memory Stick Duo"; Image file storage destinations and file names The image files recorded with the folder creating function 63 If the access indicators have turned white, the device is disconnected from 0001 to 9999. ssss stands for viewing. • You cannot record/playback any images to the "MSSONY" folder. • Image files are...
User Guide
Page 64
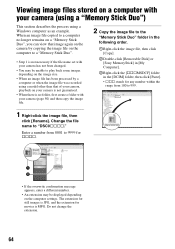
...-click the image file, then click [Copy]. 2Double-click [Removable Disk] or [Sony MemoryStick] in [My Computer]. 3Right-click the [sssMSDCF] folder in the [DCIM] folder, then click [Paste]. • sss stands for movies is not necessary if the file name set with your camera has not been changed. • You may be unable to "DSC0ssss." Viewing image files stored on a computer with your camera (using a "Memory Stick Duo...
...-click the image file, then click [Copy]. 2Double-click [Removable Disk] or [Sony MemoryStick] in [My Computer]. 3Right-click the [sssMSDCF] folder in the [DCIM] folder, then click [Paste]. • sss stands for movies is not necessary if the file name set with your camera has not been changed. • You may be unable to "DSC0ssss." Viewing image files stored on a computer with your camera (using a "Memory Stick Duo...
User Guide
Page 65
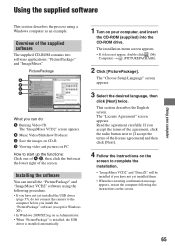
... English screen. If you install the "PicturePackage" software (except for Windows XP). • In Windows 2000/XP, log on as an example. Installing the software You can install the "PicturePackage" and "ImageMixer VCD2" software using a Windows computer as Administrator. • When "PicturePackage" is installed, the USB driver is installed automatically. 1 Turn on your computer This section describes the process using the following the instructions on the screen to start up the functions...
... English screen. If you install the "PicturePackage" software (except for Windows XP). • In Windows 2000/XP, log on as an example. Installing the software You can install the "PicturePackage" and "ImageMixer VCD2" software using a Windows computer as Administrator. • When "PicturePackage" is installed, the USB driver is installed automatically. 1 Turn on your computer This section describes the process using the following the instructions on the screen to start up the functions...

User Guide
Page 67
.../G5 series, Mac mini Memory: 128 MB or more (256 MB or more is recommended.) Notes on a computer 1 Prepare the camera and a Macintosh computer. Copying and viewing images on connecting your camera, may not operate depending on page 58. 2 Connect the cable for multi-use terminal. Perform the same procedure as standard Recommended environment for a USB connection when connecting a computer, [Auto] (default setting), [Mass Storage] and [PTP] modes. Perform...
.../G5 series, Mac mini Memory: 128 MB or more (256 MB or more is recommended.) Notes on a computer 1 Prepare the camera and a Macintosh computer. Copying and viewing images on connecting your camera, may not operate depending on page 58. 2 Connect the cable for multi-use terminal. Perform the same procedure as standard Recommended environment for a USB connection when connecting a computer, [Auto] (default setting), [Mass Storage] and [PTP] modes. Perform...
User Guide
Page 68
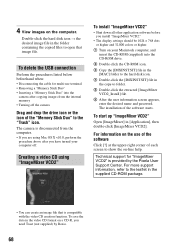
...,000 colors or higher. 1 Turn on -line help. 4 View images on the use terminal • Removing a "Memory Stick Duo" • Inserting a "Memory Stick Duo" into the CD-ROM drive. 2 Double-click the CD-ROM icon. 3 Copy the [IMXINST.SIT] file in the [MAC] folder to folder. 5 Double-click the extracted [ImageMixer VCD2_Install] file. 6 After the user information screen appears, enter the desired name and password. The installation of each screen to...
...,000 colors or higher. 1 Turn on -line help. 4 View images on the use terminal • Removing a "Memory Stick Duo" • Inserting a "Memory Stick Duo" into the CD-ROM drive. 2 Double-click the CD-ROM icon. 3 Copy the [IMXINST.SIT] file in the [MAC] folder to folder. 5 Double-click the extracted [ImageMixer VCD2_Install] file. 6 After the user information screen appears, enter the desired name and password. The installation of each screen to...

User Guide
Page 70
... (error notification), check the connected printer. 3 Select [ ] (Setup2) with V, then 2 select [USB Connect] with v/V/B. 4 Select [PictBridge] with the cable for multi-use a fully charged battery pack or an AC Adaptor (not supplied) to prevent the power from turning off partway through printing. 1 Press MENU to display the menu. 2 Press B on a printing sheet. The USB mode is set to a PictBridge compliant printer. • "PictBridge" is based on the CIPA standard. (CIPA: Camera & Imaging...
... (error notification), check the connected printer. 3 Select [ ] (Setup2) with V, then 2 select [USB Connect] with v/V/B. 4 Select [PictBridge] with the cable for multi-use a fully charged battery pack or an AC Adaptor (not supplied) to prevent the power from turning off partway through printing. 1 Press MENU to display the menu. 2 Press B on a printing sheet. The USB mode is set to a PictBridge compliant printer. • "PictBridge" is based on the CIPA standard. (CIPA: Camera & Imaging...

User Guide
Page 80
... 17). Delete unnecessary images (t step 6 in the Scene mode when shooting still images. • The Focus preset function is set to the LOCK position. Change the "Memory Stick Duo". • You are using the "Memory Stick Duo" with the write-protect switch, and the switch is selected. Recording takes a long time. • The NR slow shutter function is full, do one of focus. • The subject is set to [640(Fine)] when recording movies. Make sure to...
... 17). Delete unnecessary images (t step 6 in the Scene mode when shooting still images. • The Focus preset function is set to the LOCK position. Change the "Memory Stick Duo". • You are using the "Memory Stick Duo" with the write-protect switch, and the switch is selected. Recording takes a long time. • The NR slow shutter function is full, do one of focus. • The subject is set to [640(Fine)] when recording movies. Make sure to...
User Guide
Page 84
... low, install the charged battery pack (t step 1 in the (Setup) menu (page 53). • Disconnect all equipment other device (page 59). • The USB driver is not installed. Delete the erroneously recognized device from your computer to the camera. • Follow the procedure below to "TV". Set to display the menu, then click [Properties]. Make sure that "USB Mode Mass Storage" is displayed (page 59). • Set [USB Connect] to...
... low, install the charged battery pack (t step 1 in the (Setup) menu (page 53). • Disconnect all equipment other device (page 59). • The USB driver is not installed. Delete the erroneously recognized device from your computer to the camera. • Follow the procedure below to "TV". Set to display the menu, then click [Properties]. Make sure that "USB Mode Mass Storage" is displayed (page 59). • Set [USB Connect] to...

User Guide
Page 85
... start automatically. • Start up the "PicturePackage Menu" and check [Settings]. • Make the USB connection after the computer is full. You cannot copy images. • Connect the camera and your computer correctly using the supplied cable for multi-use terminal (page 59). • Follow the designated copy procedure for your OS (pages 59, 67). • When you shoot images with a "Memory Stick Duo" formatted by noise when you view a movie...
... start automatically. • Start up the "PicturePackage Menu" and check [Settings]. • Make the USB connection after the computer is full. You cannot copy images. • Connect the camera and your computer correctly using the supplied cable for multi-use terminal (page 59). • Follow the designated copy procedure for your OS (pages 59, 67). • When you shoot images with a "Memory Stick Duo" formatted by noise when you view a movie...
User Guide
Page 90
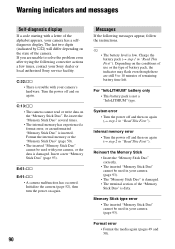
... use or the type of battery pack, the indicator may flash even though there are unable to 10 minutes of remaining battery time left. Warning indicators and messages Self-diagnosis display If a code starting with a letter of the alphabet appears, your camera, or the data is damaged. The last two digits (indicated by ss) will differ depending on again (t step 2 in "Read This First"). Internal memory error • Turn the power...
... use or the type of battery pack, the indicator may flash even though there are unable to 10 minutes of remaining battery time left. Warning indicators and messages Self-diagnosis display If a code starting with a letter of the alphabet appears, your camera, or the data is damaged. The last two digits (indicated by ss) will differ depending on again (t step 2 in "Read This First"). Internal memory error • Turn the power...
User Guide
Page 102
..." LCD Backlight 52 LCD screen ..........see "Screen" M M AF 45 Macintosh computer 67 Recommended environment 67 Macro t step 5 in "Read This First" Magnifying glass mode t step 5 in "Read This First" Mass Storage 53 "Memory Stick Duo 93 Insert/Remove t step 3 and 4 in "Read This First" Number of images/ recording time 21 Write-protect switch ..... 93 Memory Stick Tool 50 Menu 26 Items 27 Shooting 29 Viewing 37 Metering Mode 32 Mode 33...
..." LCD Backlight 52 LCD screen ..........see "Screen" M M AF 45 Macintosh computer 67 Recommended environment 67 Macro t step 5 in "Read This First" Magnifying glass mode t step 5 in "Read This First" Mass Storage 53 "Memory Stick Duo 93 Insert/Remove t step 3 and 4 in "Read This First" Number of images/ recording time 21 Write-protect switch ..... 93 Memory Stick Tool 50 Menu 26 Items 27 Shooting 29 Viewing 37 Metering Mode 32 Mode 33...

User Guide
Page 103
... a shop 74 Printing directly 70 Program auto shooting ..........24 Protect 38 PTP 53 Q Quick Review t step 5 in "Read This First" R REC Mode 33 Red Eye Reduction 46 Resize 40 Rewind/Fast forward t step 6 in "Read This First" Rotate 41 S S AF 45 Saturation 36 Scene Selection 25 t step 5 in "Read This First" Screen Changing the display .....20 Indicator 16 LCD Backlight 52 Self-diagnosis display...........90 Self-timer t step 5 in...
... a shop 74 Printing directly 70 Program auto shooting ..........24 Protect 38 PTP 53 Q Quick Review t step 5 in "Read This First" R REC Mode 33 Red Eye Reduction 46 Resize 40 Rewind/Fast forward t step 6 in "Read This First" Rotate 41 S S AF 45 Saturation 36 Scene Selection 25 t step 5 in "Read This First" Screen Changing the display .....20 Indicator 16 LCD Backlight 52 Self-diagnosis display...........90 Self-timer t step 5 in...


