Instruction Manual
Page 4
...may not cause harmful interference, and (2) this device must accept any changes or modifications not expressly approved in the U.S.A. This Class B digital apparatus complies with Part 15 of FCC Rules. 4 This equipment generates, uses, and can radiate radio frequency energy and, if not installed...an outlet on , the user is subject to the following two conditions: (1) This device may cause harmful interference to be determined by turning the equipment off and on a circuit different from that to the following two conditions: (1) This device may not cause harmful interference, ...
...may not cause harmful interference, and (2) this device must accept any changes or modifications not expressly approved in the U.S.A. This Class B digital apparatus complies with Part 15 of FCC Rules. 4 This equipment generates, uses, and can radiate radio frequency energy and, if not installed...an outlet on , the user is subject to the following two conditions: (1) This device may cause harmful interference to be determined by turning the equipment off and on a circuit different from that to the following two conditions: (1) This device may not cause harmful interference, ...
Instruction Manual
Page 7
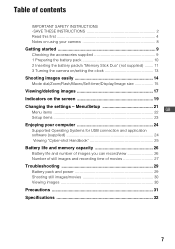
..." (not supplied) ........ 11 3 Turning the camera on/setting the clock 13 Shooting images easily 14 Mode dial/Zoom/Flash/Macro/Self-timer/Display/Image size 15 Viewing/deleting images 17 Indicators on using your computer 24 Supported Operating Systems for USB connection and application software (supplied 24 Viewing "Cyber-shot Handbook 25 Battery life...
..." (not supplied) ........ 11 3 Turning the camera on/setting the clock 13 Shooting images easily 14 Mode dial/Zoom/Flash/Macro/Self-timer/Display/Image size 15 Viewing/deleting images 17 Indicators on using your computer 24 Supported Operating Systems for USB connection and application software (supplied 24 Viewing "Cyber-shot Handbook 25 Battery life...

Instruction Manual
Page 8
... system) universal standard established by JEITA (Japan Electronics and Information Technology Industries Association). • Sony does not guarantee that the camera will play back images. • Using the camera in insufficient light emission. [ Notes on the flash surface to become unusable or image data may cause ...other bright light. Furthermore, the recording media may become discolored or to stick to protect your camera [ Internal memory and "Memory Stick Duo" back up Do not turn off the camera, remove the battery pack, or remove the "Memory Stick Duo" while the access lamp is...
... system) universal standard established by JEITA (Japan Electronics and Information Technology Industries Association). • Sony does not guarantee that the camera will play back images. • Using the camera in insufficient light emission. [ Notes on the flash surface to become unusable or image data may cause ...other bright light. Furthermore, the recording media may become discolored or to stick to protect your camera [ Internal memory and "Memory Stick Duo" back up Do not turn off the camera, remove the battery pack, or remove the "Memory Stick Duo" while the access lamp is...
Instruction Manual
Page 10
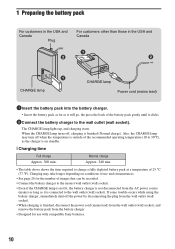
...• Insert the battery pack as far as it clicks. 2Connect the battery charger to the wall outlet (wall socket). When the CHARGE lamp turns off, charging is connected to the nearest wall outlet (wall socket). • Even if the CHARGE lamp is not lit, the battery charger is... not disconnected from the battery charger. • Designed for the number of use and circumstances. • See page 26 for use with compatible Sony batteries. 10 Also, the CHARGE lamp may take longer depending on standby. [ Charging time Full charge Approx. 300 min. Normal charge Approx. 240 min...
...• Insert the battery pack as far as it clicks. 2Connect the battery charger to the wall outlet (wall socket). When the CHARGE lamp turns off, charging is connected to the nearest wall outlet (wall socket). • Even if the CHARGE lamp is not lit, the battery charger is... not disconnected from the battery charger. • Designed for the number of use and circumstances. • See page 26 for use with compatible Sony batteries. 10 Also, the CHARGE lamp may take longer depending on standby. [ Charging time Full charge Approx. 300 min. Normal charge Approx. 240 min...
Instruction Manual
Page 11
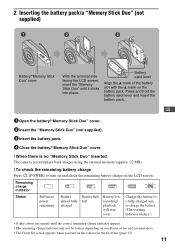
... lever and insert the battery pack. Change the battery to turn on the camera for the first time (page 13). 11 Battery eject lever Align the v mark of use and circumstances. • The Clock Set screen appears when you turn on and check the remaining battery charge on the LCD screen.... GB 1 Open the battery/"Memory Stick Duo" cover. 2 Insert the "Memory Stick Duo" (not supplied). 3 Insert the battery pack. 4 Close the battery/"Memory Stick Duo" cover. [ When there is no "Memory Stick Duo" inserted The camera records...
... lever and insert the battery pack. Change the battery to turn on the camera for the first time (page 13). 11 Battery eject lever Align the v mark of use and circumstances. • The Clock Set screen appears when you turn on and check the remaining battery charge on the LCD screen.... GB 1 Open the battery/"Memory Stick Duo" cover. 2 Insert the "Memory Stick Duo" (not supplied). 3 Insert the battery pack. 4 Close the battery/"Memory Stick Duo" cover. [ When there is no "Memory Stick Duo" inserted The camera records...
Instruction Manual
Page 13
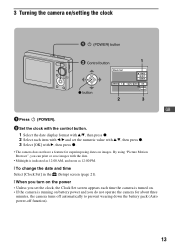
... Browser", you can print or save images with B, then press z. • The camera does not have a feature for about three minutes, the camera turns off automatically to prevent wearing down the battery pack (Auto power-off function). 13 3 Turning the camera on/setting the clock (POWER) button ɟ Control button 1 z button 2 ... change the date and time Select [Clock Set] in the (Setup) screen (page 21). [ When you turn on the power • Unless you do not operate the camera for superimposing dates on battery power and you set the clock, the Clock Set screen appears each time the...
... Browser", you can print or save images with B, then press z. • The camera does not have a feature for about three minutes, the camera turns off automatically to prevent wearing down the battery pack (Auto power-off function). 13 3 Turning the camera on/setting the clock (POWER) button ɟ Control button 1 z button 2 ... change the date and time Select [Clock Set] in the (Setup) screen (page 21). [ When you turn on the power • Unless you do not operate the camera for superimposing dates on battery power and you set the clock, the Clock Set screen appears each time the...
Instruction Manual
Page 16
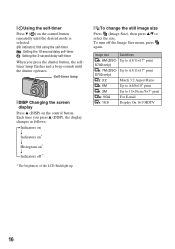
Image size Guidelines 8M: 8M (DSC- [ Using the self-timer Press V ( ) on the control button repeatedly until the shutter ...timer When you press v (DISP), the display changes as follows: Indicators on r Indicators on* r Histogram on the control button. To turn off * * The brightness of the LCD Backlight up [ To change the still image size Press (Image Size), then press v/V to... /5×7" print VGA : VGA For E-mail 16:9: 16:9 Display On 16:9 HDTV 16 Up to A3/11×17" print S750 only) 3:2: 3:2 Match 3:2 Aspect Ratio 5M : 5M Up to A4/8×10" print 3M : 3M Up to A3/11×...
Image size Guidelines 8M: 8M (DSC- [ Using the self-timer Press V ( ) on the control button repeatedly until the shutter ...timer When you press v (DISP), the display changes as follows: Indicators on r Indicators on* r Histogram on the control button. To turn off * * The brightness of the LCD Backlight up [ To change the still image size Press (Image Size), then press v/V to... /5×7" print VGA : VGA For E-mail 16:9: 16:9 Display On 16:9 HDTV 16 Up to A3/11×17" print S750 only) 3:2: 3:2 Match 3:2 Aspect Ratio 5M : 5M Up to A4/8×10" print 3M : 3M Up to A3/11×...
Instruction Manual
Page 17
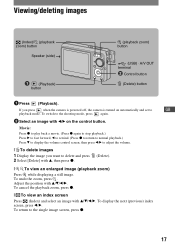
....) Press V to display the volume control screen, then press b/B to adjust the volume. [ To delete images 1 Display the image you press when the camera is powered off, the camera is turned on the control button. To undo the zoom, press . To cancel the playback zoom, press z. [ To view an index screen Press (Index...
....) Press V to display the volume control screen, then press b/B to adjust the volume. [ To delete images 1 Display the image you press when the camera is powered off, the camera is turned on the control button. To undo the zoom, press . To cancel the playback zoom, press z. [ To view an index screen Press (Index...

Instruction Manual
Page 21
...8226; If the desired item is zoomed and set the mode dial. Changing the settings - Different items are available depending on the camera, then set . 5 Press MENU to turn off the menu. [ To select a Setup item Press and hold MENU, or select (Setup) in playback mode, and press z.... then press z. 21 Playback: Press (Playback). Menu/Setup ɟ MENU button Mode dial ɠ Control button (Playback) button z button GB 1 Recording: Turn on the position of the mode dial and Recording/Playback mode. 2 Press MENU to set with v/V. The setting you select is invisible, keep pressing b/B until...
...8226; If the desired item is zoomed and set the mode dial. Changing the settings - Different items are available depending on the camera, then set . 5 Press MENU to turn off the menu. [ To select a Setup item Press and hold MENU, or select (Setup) in playback mode, and press z.... then press z. 21 Playback: Press (Playback). Menu/Setup ɟ MENU button Mode dial ɠ Control button (Playback) button z button GB 1 Recording: Turn on the position of the mode dial and Recording/Playback mode. 2 Press MENU to set with v/V. The setting you select is invisible, keep pressing b/B until...
Instruction Manual
Page 25
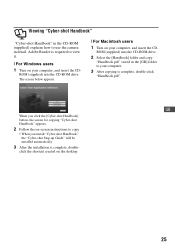
...on your computer, and insert the CD- Adobe Reader is required to view it. [ For Windows users 1 Turn on -screen instructions to copy. • When you install "Cyber-shot Handbook," the "Cyber-shot Step-up Guide" will be installed automatically. 3 After the installation is complete, double-click "Handbook.pdf". ... appears. [ For Macintosh users 1 Turn on the desktop. 25 ROM (supplied) into the CD-ROM drive. ROM (supplied) into the CD-ROM drive. 2 Select the [Handbook] folder and copy "Handbook.pdf" stored in the [GB] folder to use the camera in the CD-ROM (supplied) explains...
...on your computer, and insert the CD- Adobe Reader is required to view it. [ For Windows users 1 Turn on -screen instructions to copy. • When you install "Cyber-shot Handbook," the "Cyber-shot Step-up Guide" will be installed automatically. 3 After the installation is complete, double-click "Handbook.pdf". ... appears. [ For Macintosh users 1 Turn on the desktop. 25 ROM (supplied) into the CD-ROM drive. ROM (supplied) into the CD-ROM drive. 2 Select the [Handbook] folder and copy "Handbook.pdf" stored in the [GB] folder to use the camera in the CD-ROM (supplied) explains...
Instruction Manual
Page 26
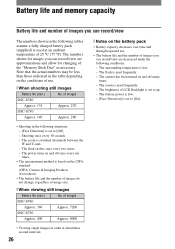
... are decreased under the following conditions: - The camera has been turned on the battery pack • Battery capacity decreases over time and through repeated use . [ When shooting still images Battery life (min.) No. The zoom is set to up. - of images DSC-S780 Approx. 360 Approx. 7200 DSC-S750 Approx. 400 Approx. 8000 • Viewing...
... are decreased under the following conditions: - The camera has been turned on the battery pack • Battery capacity decreases over time and through repeated use . [ When shooting still images Battery life (min.) No. The zoom is set to up. - of images DSC-S780 Approx. 360 Approx. 7200 DSC-S750 Approx. 400 Approx. 8000 • Viewing...
Instruction Manual
Page 29
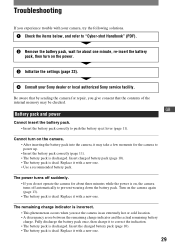
...Insert the battery pack correctly to "Cyber-shot Handbook" (PDF). 2 Remove the battery pack, wait for about one . • Use a recommended battery pack. Replace it may be checked. Cannot turn on the camera. • After inserting the battery pack into the camera, it with a new one ...incorrect. • This phenomenon occurs when you use the camera in an extremely hot or cold location. • A discrepancy arose between the remaining charge indicator and the actual remaining battery charge. Troubleshooting If you experience trouble with your Sony dealer or local authorized...
...Insert the battery pack correctly to "Cyber-shot Handbook" (PDF). 2 Remove the battery pack, wait for about one . • Use a recommended battery pack. Replace it may be checked. Cannot turn on the camera. • After inserting the battery pack into the camera, it with a new one ...incorrect. • This phenomenon occurs when you use the camera in an extremely hot or cold location. • A discrepancy arose between the remaining charge indicator and the actual remaining battery charge. Troubleshooting If you experience trouble with your Sony dealer or local authorized...
Instruction Manual
Page 31
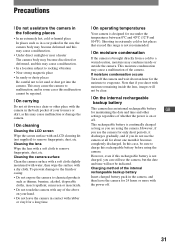
To prevent damage to the finish or casing: • Do not expose the camera to evaporate. If moisture condensation occurs Turn off the camera and wait about one month it discharges gradually, and if you can still use the camera, but the date and time will not be sure to let sand or dust get... into the camera. However, if you use the camera for 24 hours or more with...
To prevent damage to the finish or casing: • Do not expose the camera to evaporate. If moisture condensation occurs Turn off the camera and wait about one month it discharges gradually, and if you can still use the camera, but the date and time will not be sure to let sand or dust get... into the camera. However, if you use the camera for 24 hours or more with...


