
Operating Instructions
Page 3
...which could otherwise be determined by one or more detailed information about recycling of this camera. For Customers in Europe This product has been tested and found to comply with... 3 Note: This equipment has been tested and found compliant with the limits for a Class B digital device, pursuant to Part 15 of the FCC Rules. However, there is encouraged to try to radio... electromagnetic fields at the specific frequencies may cause harmful interference to correct the interference by turning the equipment off and on its packaging indicates that this product shall not be used...
...which could otherwise be determined by one or more detailed information about recycling of this camera. For Customers in Europe This product has been tested and found to comply with... 3 Note: This equipment has been tested and found compliant with the limits for a Class B digital device, pursuant to Part 15 of the FCC Rules. However, there is encouraged to try to radio... electromagnetic fields at the specific frequencies may cause harmful interference to correct the interference by turning the equipment off and on its packaging indicates that this product shall not be used...
Operating Instructions
Page 4
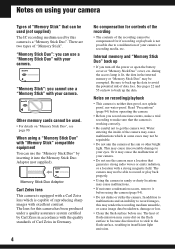
...may render the recording medium unusable, or cause image data breakdown, damage or loss. • Clean the flash surface before operating the camera. • Before you turn off the power or open the battery cover or "Memory Stick Duo" cover, etc. Read "Precautions" (page 94) before use the... camera near a location that the camera is working correctly. • Be careful not to record or play back properly. • Using the camera in Germany. 4 No...
...may render the recording medium unusable, or cause image data breakdown, damage or loss. • Clean the flash surface before operating the camera. • Before you turn off the power or open the battery cover or "Memory Stick Duo" cover, etc. Read "Precautions" (page 94) before use the... camera near a location that the camera is working correctly. • Be careful not to record or play back properly. • Using the camera in Germany. 4 No...
Operating Instructions
Page 6
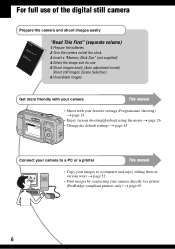
For full use of the digital still camera Prepare the camera and shoot images easily "Read This First" (separate volume) 1 Prepare the batteries 2 Turn the camera on/set the clock 3 Insert a "Memory Stick Duo" (not supplied) 4 Select the image size for use 5 Shoot images easily (Auto ...adjustment mode) Shoot still images (Scene Selection) 6 View/delete images Get more friendly with your camera This manual • Shoot with ...
For full use of the digital still camera Prepare the camera and shoot images easily "Read This First" (separate volume) 1 Prepare the batteries 2 Turn the camera on/set the clock 3 Insert a "Memory Stick Duo" (not supplied) 4 Select the image size for use 5 Shoot images easily (Auto ...adjustment mode) Shoot still images (Scene Selection) 6 View/delete images Get more friendly with your camera This manual • Shoot with ...

Operating Instructions
Page 23
...On Alkaline (supplied) Approx. 150 min. The flash is used frequently. - [AF Mode] is set to [Single]. - The camera has been turned on the CIPA standard. (CIPA: Camera & Imaging Products Association) 23 Shooting once every 30 seconds. - The flash strobes once every two times. - When shooting still images...: - (P.Quality) is set to [Fine]. - [AF Mode] is set to [Monitor]. - When viewing still images Battery No. Enjoying the camera Battery life and number of images that can be recorded/viewed The tables show the approximate number of images that can be recorded/viewed and...
...On Alkaline (supplied) Approx. 150 min. The flash is used frequently. - [AF Mode] is set to [Single]. - The camera has been turned on the CIPA standard. (CIPA: Camera & Imaging Products Association) 23 Shooting once every 30 seconds. - The flash strobes once every two times. - When shooting still images...: - (P.Quality) is set to [Fine]. - [AF Mode] is set to [Monitor]. - When viewing still images Battery No. Enjoying the camera Battery life and number of images that can be recorded/viewed The tables show the approximate number of images that can be recorded/viewed and...
Operating Instructions
Page 26
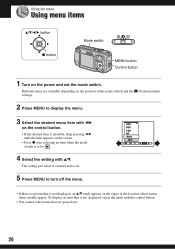
Using the menu Using menu items v/V/b/B button z button Mode switch MENU button Control button 1 Turn on the power and set . 5 Press MENU to turn off the menu. • If there is an item that are available depending on the screen. • Press z after selecting an item when the mode ... the control button. • You cannot select items that is not displayed, an v/V mark appears on the edges of the mode switch and the settings. (Camera) menu 2 Press MENU to display the menu. 3 Select the desired menu item with v/V. The setting you select is zoomed and is set to . 4 Select the...
Using the menu Using menu items v/V/b/B button z button Mode switch MENU button Control button 1 Turn on the power and set . 5 Press MENU to turn off the menu. • If there is an item that are available depending on the screen. • Press z after selecting an item when the mode ... the control button. • You cannot select items that is not displayed, an v/V mark appears on the edges of the mode switch and the settings. (Camera) menu 2 Press MENU to display the menu. 3 Select the desired menu item with v/V. The setting you select is zoomed and is set to . 4 Select the...

Operating Instructions
Page 33
Off No effect. • This setting is not maintained when the power is turned off. (Saturation) Adjusts the saturation of the image. +( ) Toward +: Enhances the contrast. B&W( ) Records the image in sepia (like an old photograph). Normal - ( -) Toward -: Makes the ...
Off No effect. • This setting is not maintained when the power is turned off. (Saturation) Adjusts the saturation of the image. +( ) Toward +: Enhances the contrast. B&W( ) Records the image in sepia (like an old photograph). Normal - ( -) Toward -: Makes the ...

Operating Instructions
Page 36
... the index screen. 2 Press MENU to display the menu. 3 Select - (Protect) with b/B on the operation t page 26 - (Protect) Protects images against accidental erasure. The - indicator turns white. For details on the control button, then press z. 4 Select [Select] with v/V, then press z. 5 Select the image you want to protect with v/V/b/B, then press z.
... the index screen. 2 Press MENU to display the menu. 3 Select - (Protect) with b/B on the operation t page 26 - (Protect) Protects images against accidental erasure. The - indicator turns white. For details on the control button, then press z. 4 Select [Select] with v/V, then press z. 5 Select the image you want to protect with v/V/b/B, then press z.

Operating Instructions
Page 37
... remove protection in step 5 of "To protect images in order (Slide show interval. 37 indicator gray. 3 Repeat the operation above for which you want to turn the -
... remove protection in step 5 of "To protect images in order (Slide show interval. 37 indicator gray. 3 Repeat the operation above for which you want to turn the -
Operating Instructions
Page 42
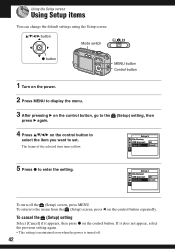
...) setting Select [Cancel] if it does not appear, select the previous setting again. • This setting is maintained even when the power is turned off the (Setup) screen, press MENU. To turn off . 42 If it appears, then press z on the control button. The frame of the selected item... the control button to select the item you want to set. To return to enter the setting. v/V/b/B button Mode switch z button MENU button Control button 1 Turn on the power. 2 Press MENU to display the menu. 3 After pressing B on the control button, go to the press B again. (Setup) setting, then 4 ...
...) setting Select [Cancel] if it does not appear, select the previous setting again. • This setting is maintained even when the power is turned off the (Setup) screen, press MENU. To turn off . 42 If it appears, then press z on the control button. The frame of the selected item... the control button to select the item you want to set. To return to enter the setting. v/V/b/B button Mode switch z button MENU button Control button 1 Turn on the power. 2 Press MENU to display the menu. 3 After pressing B on the control button, go to the press B again. (Setup) setting, then 4 ...
Operating Instructions
Page 49
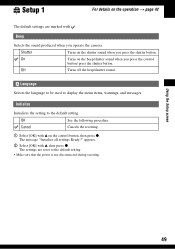
... the beep/shutter sound when you press the shutter button. OK See the following procedure. Off Turns off the beep/shutter sound. Shutter Turns on the shutter sound when you press the control button/ press the shutter button. The message "Initialize all ...1 Select [OK] with v, then press z. The settings are marked with . Using the Setup screen 49 Beep Selects the sound produced when you operate the camera. Initialize Initializes the setting to the default setting. appears. 2 Select [OK] with v on the control button, then press z. Setup 1 1 For details...
... the beep/shutter sound when you press the shutter button. OK See the following procedure. Off Turns off the beep/shutter sound. Shutter Turns on the shutter sound when you press the control button/ press the shutter button. The message "Initialize all ...1 Select [OK] with v, then press z. The settings are marked with . Using the Setup screen 49 Beep Selects the sound produced when you operate the camera. Initialize Initializes the setting to the default setting. appears. 2 Select [OK] with v on the control button, then press z. Setup 1 1 For details...

Operating Instructions
Page 54
... procedure. • When using Windows 2000/Me, do not connect the camera to the computer before installation. • In Windows 2000/XP, log on as Administrator. • When the supplied software is installed, the USB driver is installed automatically. 1 Turn on the screen. 5 Remove the CD-ROM after the installation is complete...
... procedure. • When using Windows 2000/Me, do not connect the camera to the computer before installation. • In Windows 2000/XP, log on as Administrator. • When the supplied software is installed, the USB driver is installed automatically. 1 Turn on the screen. 5 Remove the CD-ROM after the installation is complete...

Operating Instructions
Page 55
... connect the camera to a wall outlet (wall socket) with the AC Adaptor (not supplied). • When you copy images to your computer using batteries, copying may fail or image data may become corrupted if the batteries shut down too soon. 3 Set the mode switch to , then turn on pages 55 to... example. Insert the Memory Stick Duo Adaptor in the Memory Stick Duo Adaptor. You can copy images from the camera and insert it in the computer and copy the images. Stage 1: Preparing the camera and the computer 1 Insert a "Memory Stick Duo" with a "Memory Stick" slot Remove the "Memory Stick Duo" ...
... connect the camera to a wall outlet (wall socket) with the AC Adaptor (not supplied). • When you copy images to your computer using batteries, copying may fail or image data may become corrupted if the batteries shut down too soon. 3 Set the mode switch to , then turn on pages 55 to... example. Insert the Memory Stick Duo Adaptor in the Memory Stick Duo Adaptor. You can copy images from the camera and insert it in the computer and copy the images. Stage 1: Preparing the camera and the computer 1 Insert a "Memory Stick Duo" with a "Memory Stick" slot Remove the "Memory Stick Duo" ...

Operating Instructions
Page 56
Do not operate the computer until the indicators turn red. Wait for the first time, your computer USB cable 1To the (USB) jack 2To a USB connector • With Windows XP, the AutoPlay wizard appears on the screen of the camera. "USB Mode Mass Storage" appears on the ...desktop. This section describes an example of the camera appear. • If no "Memory Stick Duo" is established for a while. * During communication, the access indicators turn white. • If "USB Mode Mass Storage" does not appear, set [USB Connect] to a Computer" on...
Do not operate the computer until the indicators turn red. Wait for the first time, your computer USB cable 1To the (USB) jack 2To a USB connector • With Windows XP, the AutoPlay wizard appears on the screen of the camera. "USB Mode Mass Storage" appears on the ...desktop. This section describes an example of the camera appear. • If no "Memory Stick Duo" is established for a while. * During communication, the access indicators turn white. • If "USB Mode Mass Storage" does not appear, set [USB Connect] to a Computer" on...
Operating Instructions
Page 59
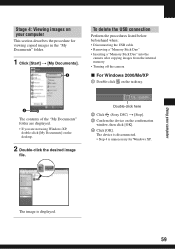
... when: • Disconnecting the USB cable • Removing a "Memory Stick Duo" • Inserting a "Memory Stick Duo" into the camera after copying images from the internal memory • Turning off the camera x For Windows 2000/Me/XP 1 Double-click on the tasktray. 1 The contents of the "My Documents" folder are displayed. •...on the confirmation window, then click [OK]. 4 Click [OK]. Using your computer This section describes the procedure for Windows XP. Double-click here 2 Click (Sony DSC) t [Stop]. 3 Confirm the device on the desktop. 2 Double-click the desired image file.
... when: • Disconnecting the USB cable • Removing a "Memory Stick Duo" • Inserting a "Memory Stick Duo" into the camera after copying images from the internal memory • Turning off the camera x For Windows 2000/Me/XP 1 Double-click on the tasktray. 1 The contents of the "My Documents" folder are displayed. •...on the confirmation window, then click [OK]. 4 Click [OK]. Using your computer This section describes the procedure for Windows XP. Double-click here 2 Click (Sony DSC) t [Stop]. 3 Confirm the device on the desktop. 2 Double-click the desired image file.
Operating Instructions
Page 67
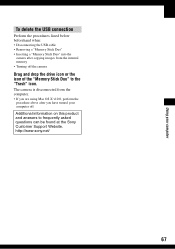
...the icon of the "Memory Stick Duo" to frequently asked questions can be found at the Sony Customer Support Website. Additional information on this product and answers to the "Trash" icon. The camera is disconnected from the computer. • If you are using Mac OS X v10.0, perform... the procedure above after you have turned your computer To delete the USB connection Perform the procedures listed below beforehand when:...
...the icon of the "Memory Stick Duo" to frequently asked questions can be found at the Sony Customer Support Website. Additional information on this product and answers to the "Trash" icon. The camera is disconnected from the computer. • If you are using Mac OS X v10.0, perform... the procedure above after you have turned your computer To delete the USB connection Perform the procedures listed below beforehand when:...

Operating Instructions
Page 69
... button Control Button • It is recommended to use batteries with enough capacity or an AC Adaptor (not supplied) to prevent the power from turning off partway through printing. 1 Press MENU to display the menu. 2 Press B on the control button to select (Setup). • An ...compliant printer Even if you do not have a computer, you can print images shot using your camera by connecting the camera directly to a PictBridge compliant printer. • "PictBridge" is based on the CIPA standard. (CIPA: Camera & Imaging Products Association) In single-image mode You can print several images ...
... button Control Button • It is recommended to use batteries with enough capacity or an AC Adaptor (not supplied) to prevent the power from turning off partway through printing. 1 Press MENU to display the menu. 2 Press B on the control button to select (Setup). • An ...compliant printer Even if you do not have a computer, you can print images shot using your camera by connecting the camera directly to a PictBridge compliant printer. • "PictBridge" is based on the CIPA standard. (CIPA: Camera & Imaging Products Association) In single-image mode You can print several images ...

Operating Instructions
Page 70
... select [This image] and set [Index] to print with the supplied USB cable. 1To the (USB) jack 2To the USB jack USB cable 2 Turn on your camera and the USB jack on the printer with b/B, then press z. After the connection is set of the same images as an index image. The... then press z. [This image] Prints a displayed image. • If you can print a set to the printer 1 Connect the (USB) jack on your camera and the printer. The camera is made, the indicator appears. Stage 2: Connecting the camera to playback mode, then an image and the print menu appear on the screen. 70
... select [This image] and set [Index] to print with the supplied USB cable. 1To the (USB) jack 2To the USB jack USB cable 2 Turn on your camera and the USB jack on the printer with b/B, then press z. After the connection is set of the same images as an index image. The... then press z. [This image] Prints a displayed image. • If you can print a set to the printer 1 Connect the (USB) jack on your camera and the printer. The camera is made, the indicator appears. Stage 2: Connecting the camera to playback mode, then an image and the print menu appear on the screen. 70

Operating Instructions
Page 71
...on a sheet as an index image. • The designated number of images may not be printed as follows. 1 Press (Index). Select [Cancel] to turn off the print menu, then proceed as a single image. When you want to print as an index image. 2 Select print settings with v/V/b/B. [Index] Select...perform from step 1. This function may not all fit onto a single sheet depending on the index screen Perform "Stage 1: Preparing the camera" (page 69) and "Stage 2: Connecting the camera to a printer, the print menu appears. When [Index] is set to [Off]: Select the number of sheets of an image ...
...on a sheet as an index image. • The designated number of images may not be printed as follows. 1 Press (Index). Select [Cancel] to turn off the print menu, then proceed as a single image. When you want to print as an index image. 2 Select print settings with v/V/b/B. [Index] Select...perform from step 1. This function may not all fit onto a single sheet depending on the index screen Perform "Stage 1: Preparing the camera" (page 69) and "Stage 2: Connecting the camera to a printer, the print menu appears. When [Index] is set to [Off]: Select the number of sheets of an image ...

Operating Instructions
Page 74
... other images. 7 Press MENU. 8 Select [OK] with B, then press z. Select [Off], then press z. 6 Repeat step 5 to remove the mark in step 5, then press z. The mark turns white. 74 To remove all the marks in the folder Select [All In This Folder] in step 8, then press z. Green mark To cancel, select [Cancel...
... other images. 7 Press MENU. 8 Select [OK] with B, then press z. Select [Off], then press z. 6 Repeat step 5 to remove the mark in step 5, then press z. The mark turns white. 74 To remove all the marks in the folder Select [All In This Folder] in step 8, then press z. Green mark To cancel, select [Cancel...

Operating Instructions
Page 75
Please understand that you give your consent that the contents of the internal memory may be checked when you experience trouble with your camera, try the following solutions. 1 Check the items on the power. 3 Initialize the settings (page 49). 4 Consult your camera to 86. Troubleshooting Troubleshooting If you send your Sony dealer or local authorized Sony service facility. If a code such as "C/E:ss:ss" appears on the screen, see page 87. 2 Remove batteries, and insert batteries again after about one minute, and turn on pages 76 to be repaired. 75 Troubleshooting
Please understand that you give your consent that the contents of the internal memory may be checked when you experience trouble with your camera, try the following solutions. 1 Check the items on the power. 3 Initialize the settings (page 49). 4 Consult your camera to 86. Troubleshooting Troubleshooting If you send your Sony dealer or local authorized Sony service facility. If a code such as "C/E:ss:ss" appears on the screen, see page 87. 2 Remove batteries, and insert batteries again after about one minute, and turn on pages 76 to be repaired. 75 Troubleshooting


