Marketing Specifications
Page 2
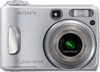
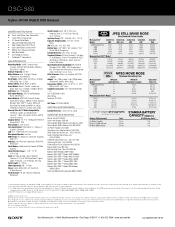
...Bernardo Drive • San Diego, CA 92127 • 1-800-222-7669 • www.sony.com/dn Last Updated 2005-06-20 ® DSC-S60 Cyber-shot® Digital Still Camera additional features 3 Cyber-shot Station Dock Compatible s 14-Bit DXP A/D Conversion s 3:2 Aspect Ratio Mode s Adjustable Color/... Microphone/Speaker: Yes/Yes USB Port(s): Yes (Multi-pin connector; Power is used for Sony v1.6 (Windows), Pixela™ ImageMixer VCD2 (Macintosh), USB Driver, Cyber-shot Life tutorial (Windows). Digital Zoom: Precision, 0-2.0X Range, 6X Total Focal Length: 6 - 18mm 35mm Equivalent: ...
...Bernardo Drive • San Diego, CA 92127 • 1-800-222-7669 • www.sony.com/dn Last Updated 2005-06-20 ® DSC-S60 Cyber-shot® Digital Still Camera additional features 3 Cyber-shot Station Dock Compatible s 14-Bit DXP A/D Conversion s 3:2 Aspect Ratio Mode s Adjustable Color/... Microphone/Speaker: Yes/Yes USB Port(s): Yes (Multi-pin connector; Power is used for Sony v1.6 (Windows), Pixela™ ImageMixer VCD2 (Macintosh), USB Driver, Cyber-shot Life tutorial (Windows). Digital Zoom: Precision, 0-2.0X Range, 6X Total Focal Length: 6 - 18mm 35mm Equivalent: ...

Operating Instructions
Page 56
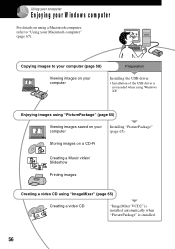
... your W indow s com puter For details on using a Macintosh computer, refer to your computer (page 58) Preparation Viewing images on your computer Installing the USB driver. • Installation of the USB driver is installed. 56 Enjoying images using "PicturePackage" (page 65) Viewing images saved on your Macintosh computer" (page 67).
... your W indow s com puter For details on using a Macintosh computer, refer to your computer (page 58) Preparation Viewing images on your computer Installing the USB driver. • Installation of the USB driver is installed. 56 Enjoying images using "PicturePackage" (page 65) Viewing images saved on your Macintosh computer" (page 67).
Operating Instructions
Page 57
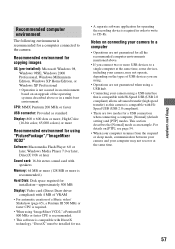
Using your camera to a computer • Operations are not guaranteed for all the recommended computer environments mentioned above or in order to write to CD-Rs. "DirectX" must be installed for use. • A separate software application for installation-approximately 500 MB Display: Video card (Direct Draw driver compliant) with 4 MB of VRAM •...
Using your camera to a computer • Operations are not guaranteed for all the recommended computer environments mentioned above or in order to write to CD-Rs. "DirectX" must be installed for use. • A separate software application for installation-approximately 500 MB Display: Video card (Direct Draw driver compliant) with 4 MB of VRAM •...

Operating Instructions
Page 58
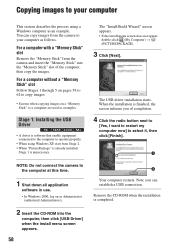
... 1 is finished, the screen informs you can copy images from the camera to your computer This section describes the process using Windows XP, start from the camera and insert the "Memory Stick" into the computer, then click [USB Driver] when the install menu screen appears. 58 2 Your computer restarts.... Now, you of the computer, then copy the images. The USB driver installation starts. Remove the CD-ROM ...
... 1 is finished, the screen informs you can copy images from the camera to your computer This section describes the process using Windows XP, start from the camera and insert the "Memory Stick" into the computer, then click [USB Driver] when the install menu screen appears. 58 2 Your computer restarts.... Now, you of the computer, then copy the images. The USB driver installation starts. Remove the CD-ROM ...
Operating Instructions
Page 65
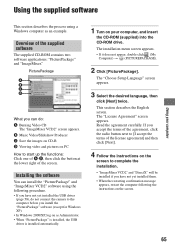
... the restarting confirmation message appears, restart the computer following procedure. • If you have not yet installed the USB driver (page 58), do not connect the camera to start up the functions: Click one of A-D, then click the button at the lower right of the supplied software... the "PicturePackage" and "ImageMixer VCD2" software using a Windows computer as Administrator. • When "PicturePackage" is installed, the USB driver is installed automatically. 1 Turn on your computer This section describes the process using the following the instructions on the screen. 65
... the restarting confirmation message appears, restart the computer following procedure. • If you have not yet installed the USB driver (page 58), do not connect the camera to start up the functions: Click one of A-D, then click the button at the lower right of the supplied software... the "PicturePackage" and "ImageMixer VCD2" software using a Windows computer as Administrator. • When "PicturePackage" is installed, the USB driver is installed automatically. 1 Turn on your computer This section describes the process using the following the instructions on the screen. 65

Operating Instructions
Page 82
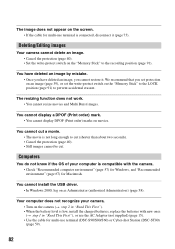
... resize movies and Multi Burst images. You cannot install the USB driver. • In Windows 2000, log on movies. Your computer ...protection (page 40). • Still images cannot be cut a movie. • The movie is low, install the charged batteries, replace the batteries with the camera. • Check "Recommended ...computer environment" (page 57) for Windows, and "Recommended environment" (page 67) for Macintosh. The image does not appear on the screen. • If the cable for multi-use terminal (DSC-S90/S80/S60) or Cyber-shot Station (DSC...
... resize movies and Multi Burst images. You cannot install the USB driver. • In Windows 2000, log on movies. Your computer ...protection (page 40). • Still images cannot be cut a movie. • The movie is low, install the charged batteries, replace the batteries with the camera. • Check "Recommended ...computer environment" (page 57) for Windows, and "Recommended environment" (page 67) for Macintosh. The image does not appear on the screen. • If the cable for multi-use terminal (DSC-S90/S80/S60) or Cyber-shot Station (DSC...

Operating Instructions
Page 83
... click on the computer screen when you installed the "USB Driver" from both the computer and the camera, and connect it again firmly. • Disconnect the cable for multi-use terminal (DSC-S90/S80/S60) or Cyber-shot Station (DSC-ST80) (page 59). • Follow the designated copy ...computer to the camera. • Follow the procedure below to display the menu, then click [Properties]. The "Device Manager" appears. 3 Right-click [ Sony DSC], then click [Uninstall] t [OK]. Make sure that "USB Mode Normal" is for multi-use terminal (DSC-S90/S80/S60) or Cyber-shot Station (DSCST80...
... click on the computer screen when you installed the "USB Driver" from both the computer and the camera, and connect it again firmly. • Disconnect the cable for multi-use terminal (DSC-S90/S80/S60) or Cyber-shot Station (DSC-ST80) (page 59). • Follow the designated copy ...computer to the camera. • Follow the procedure below to display the menu, then click [Properties]. The "Device Manager" appears. 3 Right-click [ Sony DSC], then click [Uninstall] t [OK]. Make sure that "USB Mode Normal" is for multi-use terminal (DSC-S90/S80/S60) or Cyber-shot Station (DSCST80...
Operating Instructions
Page 100
...77 TV 75 Twilight mode t step 5 in "Read This First" Twilight portrait mode t step 5 in "Read This First" U Underexposure 11 USB Connect 54 USB Driver 58 Using your camera abroad t step 1 in "Read This First" V VGA t step 4 in "Read This First" Video CD 65, 68 Video Out 54 Viewing Movie t step... 6 in "Read This First" Still image t step 6 in "Read This First" Viewing menu 38 Volume t step 6 in "Read This First" W Warning indicators and messages ...
...77 TV 75 Twilight mode t step 5 in "Read This First" Twilight portrait mode t step 5 in "Read This First" U Underexposure 11 USB Connect 54 USB Driver 58 Using your camera abroad t step 1 in "Read This First" V VGA t step 4 in "Read This First" Video CD 65, 68 Video Out 54 Viewing Movie t step... 6 in "Read This First" Still image t step 6 in "Read This First" Viewing menu 38 Volume t step 6 in "Read This First" W Warning indicators and messages ...
User Guide / Troubleshooting
Page 56
Copying images to "Using your computer Installing the USB driver. • Installation of the USB driver is installed. 56 Using your computer Enjoying your W indow s com puter For details on using Windows XP. Enjoying images using "PicturePackage" (page 65) Viewing images ...
Copying images to "Using your computer Installing the USB driver. • Installation of the USB driver is installed. 56 Using your computer Enjoying your W indow s com puter For details on using Windows XP. Enjoying images using "PicturePackage" (page 65) Viewing images ...

User Guide / Troubleshooting
Page 57
..."ImageMixer VCD2," a Pentium III 800 MHz or faster CPU is recommended. • This software is not assured in an environment based on connecting your camera to the camera. Notes on an upgrade of a Music video/ Slideshow (page 65), a Pentium III 500 MHz or faster CPU is required. • When using... MB or more (128 MB or more is recommended.) Hard Disk: Disk space required for installation-approximately 500 MB Display: Video card (Direct Draw driver compliant) with 4 MB of VRAM • For automatic creation of the operating systems described above . • If you connect two or more ...
..."ImageMixer VCD2," a Pentium III 800 MHz or faster CPU is recommended. • This software is not assured in an environment based on connecting your camera to the camera. Notes on an upgrade of a Music video/ Slideshow (page 65), a Pentium III 500 MHz or faster CPU is required. • When using... MB or more (128 MB or more is recommended.) Hard Disk: Disk space required for installation-approximately 500 MB Display: Video card (Direct Draw driver compliant) with 4 MB of VRAM • For automatic creation of the operating systems described above . • If you connect two or more ...
User Guide / Troubleshooting
Page 58
...select it, then click [Finish]. 1 NOTE: Do not connect the camera to your computer This section describes the process using Windows XP, start from the camera and insert the "Memory Stick" into the computer, then click [USB Driver] when the install menu screen appears. 58 2 Your computer restarts....already installed, Stage 1 is completed. The USB driver installation starts. Now, you of the computer, then copy the images. You can establish a USB connection. When the installation is finished, the screen informs you can copy images from the camera to the computer at this time. 1 Shut ...
...select it, then click [Finish]. 1 NOTE: Do not connect the camera to your computer This section describes the process using Windows XP, start from the camera and insert the "Memory Stick" into the computer, then click [USB Driver] when the install menu screen appears. 58 2 Your computer restarts....already installed, Stage 1 is completed. The USB driver installation starts. Now, you of the computer, then copy the images. You can establish a USB connection. When the installation is finished, the screen informs you can copy images from the camera to the computer at this time. 1 Shut ...

User Guide / Troubleshooting
Page 65
...You can install the "PicturePackage" and "ImageMixer VCD2" software using a Windows computer as Administrator. • When "PicturePackage" is installed, the USB driver is installed automatically. 1 Turn on your computer This section describes the process using the following the instructions on PC How to the computer before you... can do not connect the camera to start up the functions: Click one of A-D, then click the button at the lower right of the screen. This section...
...You can install the "PicturePackage" and "ImageMixer VCD2" software using a Windows computer as Administrator. • When "PicturePackage" is installed, the USB driver is installed automatically. 1 Turn on your computer This section describes the process using the following the instructions on PC How to the computer before you... can do not connect the camera to start up the functions: Click one of A-D, then click the button at the lower right of the screen. This section...
User Guide / Troubleshooting
Page 82
... you cannot restore it (page 75). You cannot install the USB driver. • In Windows 2000, log on the "Memory Stick" to... long enough to cut (shorter than about two seconds). • Cancel the protection (page 40). • Still images cannot be cut a movie. • The movie is connected, disconnect it . You have deleted an ...batteries, replace the batteries with the camera. • Check "Recommended computer environment" (page 57) for Windows, and "Recommended environment" (page 67) for multi-use terminal (DSC-S90/S80/S60) or Cyber-shot Station (DSC-ST80) (page 59). 82 You...
... you cannot restore it (page 75). You cannot install the USB driver. • In Windows 2000, log on the "Memory Stick" to... long enough to cut (shorter than about two seconds). • Cancel the protection (page 40). • Still images cannot be cut a movie. • The movie is connected, disconnect it . You have deleted an ...batteries, replace the batteries with the camera. • Check "Recommended computer environment" (page 57) for Windows, and "Recommended environment" (page 67) for multi-use terminal (DSC-S90/S80/S60) or Cyber-shot Station (DSC-ST80) (page 59). 82 You...
User Guide / Troubleshooting
Page 83
...59). • The USB driver is turned on (page 59). The device is for multi-use terminal (DSC-S90/S80/S60) or Cyber-shot Station (DSC-ST80) before you connect your computer to the camera. • Follow the ...Driver" from your camera (page 51). Delete the erroneously recognized device from the supplied CD-ROM. After making a USB connection, "PicturePackage" does not start automatically. • Start up the "PicturePackage Menu" and check [Settings]. • Make the USB connection after the computer is not installed. The "Device Manager" appears. 3 Right-click [ Sony DSC...
...59). • The USB driver is turned on (page 59). The device is for multi-use terminal (DSC-S90/S80/S60) or Cyber-shot Station (DSC-ST80) before you connect your computer to the camera. • Follow the ...Driver" from your camera (page 51). Delete the erroneously recognized device from the supplied CD-ROM. After making a USB connection, "PicturePackage" does not start automatically. • Start up the "PicturePackage Menu" and check [Settings]. • Make the USB connection after the computer is not installed. The "Device Manager" appears. 3 Right-click [ Sony DSC...

User Guide / Troubleshooting
Page 100
...77 TV 75 Twilight mode t step 5 in "Read This First" Twilight portrait mode t step 5 in "Read This First" U Underexposure 11 USB Connect 54 USB Driver 58 Using your camera abroad t step 1 in "Read This First" V VGA t step 4 in "Read This First" Video CD 65, 68 Video Out 54 Viewing Movie t step... 6 in "Read This First" Still image t step 6 in "Read This First" Viewing menu 38 Volume t step 6 in "Read This First" W Warning indicators and messages ...
...77 TV 75 Twilight mode t step 5 in "Read This First" Twilight portrait mode t step 5 in "Read This First" U Underexposure 11 USB Connect 54 USB Driver 58 Using your camera abroad t step 1 in "Read This First" V VGA t step 4 in "Read This First" Video CD 65, 68 Video Out 54 Viewing Movie t step... 6 in "Read This First" Still image t step 6 in "Read This First" Viewing menu 38 Volume t step 6 in "Read This First" W Warning indicators and messages ...


