Instruction Manual
Page 8
... condensation may condense inside the lens, you will be sure to charge this rechargeable battery is not charged, you can still use the camera for maintaining the date and time and other settings regardless of the internal rechargeable battery Insert batteries with the power off . How to prevent moisture condensation When bringing the...
... condensation may condense inside the lens, you will be sure to charge this rechargeable battery is not charged, you can still use the camera for maintaining the date and time and other settings regardless of the internal rechargeable battery Insert batteries with the power off . How to prevent moisture condensation When bringing the...
Instruction Manual
Page 13
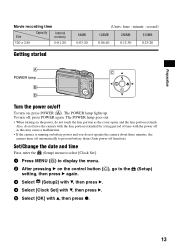
... with v, then press z. 13 Also, do not operate the camera about three minutes, the camera turns off automatically to the (Setup) setting, then press B again. 3 Select (Setup2) with V, then press B. 2 4 Select [Clock Set] with V, then press B. 5 Select [OK] with the power off function). Set/Change the date and time First, enter the (Setup) menu to select...
... with v, then press z. 13 Also, do not operate the camera about three minutes, the camera turns off automatically to the (Setup) setting, then press B again. 3 Select (Setup2) with V, then press B. 2 4 Select [Clock Set] with V, then press B. 5 Select [OK] with the power off function). Set/Change the date and time First, enter the (Setup) menu to select...

Instruction Manual
Page 14
...images to e-mail or creating web pages More Rough * Images are recorded in A5 size No. Select [Language] in "Set/Change the date and time." Change the language setting Open the (Setup) screen after performing step 1 and 2 in (Setup1), then choose your desired language. 1 Select ...the image size for still images The factory setting for image size is [6M]. Now you can adjust the date and time. 1 Select the desired date display format with v/V, then press z. 2 Select each item with b/B and set the numeric value with v/V, then press z. 3 Select [OK] with...
...images to e-mail or creating web pages More Rough * Images are recorded in A5 size No. Select [Language] in "Set/Change the date and time." Change the language setting Open the (Setup) screen after performing step 1 and 2 in (Setup1), then choose your desired language. 1 Select ...the image size for still images The factory setting for image size is [6M]. Now you can adjust the date and time. 1 Select the desired date display format with v/V, then press z. 2 Select each item with b/B and set the numeric value with v/V, then press z. 3 Select [OK] with...

Instruction Manual
Page 23
Shooting still images Your camera cannot record images. • Check the free capacity of focus. •...mode) is selected in the (Setup) menu to the LOCK position. Only during playback, the date and time are displayed. Set the switch to position the lens farther away from the subject than the recommended shooting distance using... the "Memory Stick Duo" with the write-protect switch, and the switch is set to [On]. • Shoot the subject at a distance closer than the shortest shooting distance, approximately 5 cm (2 inches)...
Shooting still images Your camera cannot record images. • Check the free capacity of focus. •...mode) is selected in the (Setup) menu to the LOCK position. Only during playback, the date and time are displayed. Set the switch to position the lens farther away from the subject than the recommended shooting distance using... the "Memory Stick Duo" with the write-protect switch, and the switch is set to [On]. • Shoot the subject at a distance closer than the shortest shooting distance, approximately 5 cm (2 inches)...

Instruction Manual
Page 24
Delete the USB connection. The image does not appear on the TV screen. • Check [Video Out] to see if the video output signal of your camera is set to the color system of your TV. • Check whether the connection is correct. • The USB cable is connected to (page 18). • The camera is turned off. The date and time are not displayed. • The (Screen status) button is in USB mode. Viewing images Your camera cannot play back images. • Set the mode dial to the USB jack. 24
Delete the USB connection. The image does not appear on the TV screen. • Check [Video Out] to see if the video output signal of your camera is set to the color system of your TV. • Check whether the connection is correct. • The USB cable is connected to (page 18). • The camera is turned off. The date and time are not displayed. • The (Screen status) button is in USB mode. Viewing images Your camera cannot play back images. • Set the mode dial to the USB jack. 24

Service Manual
Page 17
... from current page toward the previous pages, select the check box "Find Backward" and then click the "Find". 3. For example, find options as the set a range to be printed within a page, select the graphic selection tool and drag on the page to enclose a range to be applied to the Service... Manual depending on the date of issue. "Rotate" • Click rotate tool , and the page then rotates 90 degrees each. Click the Print button . 2. Finding a text 1. Moving with ...
... from current page toward the previous pages, select the check box "Find Backward" and then click the "Find". 3. For example, find options as the set a range to be printed within a page, select the graphic selection tool and drag on the page to enclose a range to be applied to the Service... Manual depending on the date of issue. "Rotate" • Click rotate tool , and the page then rotates 90 degrees each. Click the Print button . 2. Finding a text 1. Moving with ...

