Operating Instructions
Page 4
... manufacturing process and do not affect the recording in any interference received, including interference that the camera is for the two models of the DSC-S30 and the DSC-S50. If moisture condensation occurs, refer to page 54 and follow the instructions on how to remove... to a malfunction of your camera, etc. 4 Notes on image data compatibility • This camera conforms with the Design Rules for effective use your camera. • The illustrations in this manual show the DSC-S50. "Memory Stick" N50 For the Customers in CANADA This Class B digital apparatus complies with Part 15 ...
... manufacturing process and do not affect the recording in any interference received, including interference that the camera is for the two models of the DSC-S30 and the DSC-S50. If moisture condensation occurs, refer to page 54 and follow the instructions on how to remove... to a malfunction of your camera, etc. 4 Notes on image data compatibility • This camera conforms with the Design Rules for effective use your camera. • The illustrations in this manual show the DSC-S50. "Memory Stick" N50 For the Customers in CANADA This Class B digital apparatus complies with Part 15 ...

Operating Instructions
Page 5
...Identifying the parts 6 Preparing the power supply 8 Setting the date and time 13 Inserting the "Memory Stick 15 Basic operations B Recording Recording still images 16 Recording moving images (DSC-S50 only 20 B Playback Playing back still images 21 Playing back moving images 22 Viewing images using a... 29 How to use the control button 29 How to print (PRINT MARK 53 Additional information Precautions 54 On "Memory Sticks 55 Using your camera abroad 56 Troubleshooting 57 Warning and notice messages 61 Self-diagnosis display 62 Specifications 63 LCD screen indicators 64 Index 66...
...Identifying the parts 6 Preparing the power supply 8 Setting the date and time 13 Inserting the "Memory Stick 15 Basic operations B Recording Recording still images 16 Recording moving images (DSC-S50 only 20 B Playback Playing back still images 21 Playing back moving images 22 Viewing images using a... 29 How to use the control button 29 How to print (PRINT MARK 53 Additional information Precautions 54 On "Memory Sticks 55 Using your camera abroad 56 Troubleshooting 57 Warning and notice messages 61 Self-diagnosis display 62 Specifications 63 LCD screen indicators 64 Index 66...
Operating Instructions
Page 7
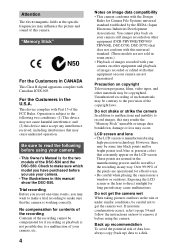
button VOLUME +/- button F PROGRAM AE button (42) G DISPLAY button H LCD screen I Hook for lens cap/strap J Zoom button K Access lamp (15) L Battery/"Memory Stick" cover M Battery eject lever (8) N OPEN switch O POWER switch P DC IN jack (9) (12) Q POWER lamp/BATT CHARGE lamp (9) (13) 7 Getting started Attaching the strap 1 2 9...BACKLIGHT BRIGHT/ NORMAL switch Usually set to see, but also uses up the battery faster. D Control button E PROGRAM AE +/- When you use the camera outdoors or in other bright places, setting this to BRIGHT makes the LCD screen bright and easy to NORMAL.
button VOLUME +/- button F PROGRAM AE button (42) G DISPLAY button H LCD screen I Hook for lens cap/strap J Zoom button K Access lamp (15) L Battery/"Memory Stick" cover M Battery eject lever (8) N OPEN switch O POWER switch P DC IN jack (9) (12) Q POWER lamp/BATT CHARGE lamp (9) (13) 7 Getting started Attaching the strap 1 2 9...BACKLIGHT BRIGHT/ NORMAL switch Usually set to see, but also uses up the battery faster. D Control button E PROGRAM AE +/- When you use the camera outdoors or in other bright places, setting this to BRIGHT makes the LCD screen bright and easy to NORMAL.
Operating Instructions
Page 8
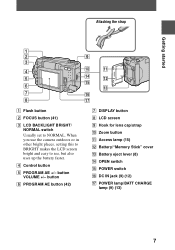
... OPEN switch in the direction of Sony Corporation. 8 This unit is "InfoLITHIUM"? "InfoLITHIUM" is a trademark of the arrow. 2 Install the battery pack. "InfoLITHIUM" M series battery packs have the mark. Preparing the power supply Installing the battery pack Your camera operates only with the "InfoLITHIUM" ... video equipment. You cannot use any other battery pack. To remove the battery pack Open the battery/"Memory Stick" cover. Battery eject lever 1 Open the battery/"Memory Stick" cover. Slide the battery eject lever downward, and remove the battery pack. Be careful not...
... OPEN switch in the direction of Sony Corporation. 8 This unit is "InfoLITHIUM"? "InfoLITHIUM" is a trademark of the arrow. 2 Install the battery pack. "InfoLITHIUM" M series battery packs have the mark. Preparing the power supply Installing the battery pack Your camera operates only with the "InfoLITHIUM" ... video equipment. You cannot use any other battery pack. To remove the battery pack Open the battery/"Memory Stick" cover. Battery eject lever 1 Open the battery/"Memory Stick" cover. Slide the battery eject lever downward, and remove the battery pack. Be careful not...

Operating Instructions
Page 11
The above figures are a guide when you use your camera at low temperatures, use the flash, repeatedly turn the power on/off or use the zoom. • The capacity of the "Memory Stick" is indicated but the power runs out soon, fully charge the battery so that the correct battery remaining time appears... water. 11 Getting started Notes • The battery life and number of images will be decreased if you continuously record/play back while replacing the "Memory Stick." • If sufficient battery remaining time is limited.
The above figures are a guide when you use your camera at low temperatures, use the flash, repeatedly turn the power on/off or use the zoom. • The capacity of the "Memory Stick" is indicated but the power runs out soon, fully charge the battery so that the correct battery remaining time appears... water. 11 Getting started Notes • The battery life and number of images will be decreased if you continuously record/play back while replacing the "Memory Stick." • If sufficient battery remaining time is limited.
Operating Instructions
Page 15
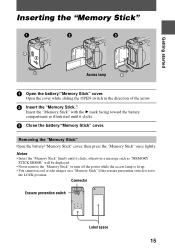
... position. Open the cover while sliding the OPEN switch in the direction of the arrow. 2 Insert the "Memory Stick." Notes • Insert the "Memory Stick" firmly until it clicks, otherwise a message such as illustrated until it clicks. 3 Close the battery/"Memory Stick" cover. Connector Erasure prevention switch OC Label space 15 Removing the...
... position. Open the cover while sliding the OPEN switch in the direction of the arrow. 2 Insert the "Memory Stick." Notes • Insert the "Memory Stick" firmly until it clicks, otherwise a message such as illustrated until it clicks. 3 Close the battery/"Memory Stick" cover. Connector Erasure prevention switch OC Label space 15 Removing the...
Operating Instructions
Page 16
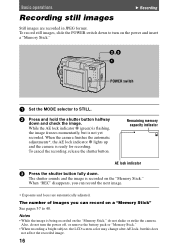
... not turn on the "Memory Stick." Basic operations Recording still images B Recording Still images are automatically adjusted. When "REC" disappears, you can record the next image. ∗ Exposure and focus are recorded in JPEG format. Also, do not shake or strike the camera. The number of images you... can record on a "Memory Stick" See pages 37 to turn the power off, or remove the battery pack or "Memory Stick." • When recording a bright subject, the LCD screen color ...
... not turn on the "Memory Stick." Basic operations Recording still images B Recording Still images are automatically adjusted. When "REC" disappears, you can record the next image. ∗ Exposure and focus are recorded in JPEG format. Also, do not shake or strike the camera. The number of images you... can record on a "Memory Stick" See pages 37 to turn the power off, or remove the battery pack or "Memory Stick." • When recording a bright subject, the LCD screen color ...

Operating Instructions
Page 20
... 18. See page 64 for up to 60 seconds. Recording moving images, slide the POWER switch down to turn on/off the indicators on the "Memory Stick." "REC" appears on the LCD screen, and the image and sound are recorded in MPEG format. You can change the recording time to 10... time is held down for a detailed description of the indicators. 20 DISPLAY POWER switch 1 Set the MODE selector to turn on the power and insert a "Memory Stick."
... 18. See page 64 for up to 60 seconds. Recording moving images, slide the POWER switch down to turn on/off the indicators on the "Memory Stick." "REC" appears on the LCD screen, and the image and sound are recorded in MPEG format. You can change the recording time to 10... time is held down for a detailed description of the indicators. 20 DISPLAY POWER switch 1 Set the MODE selector to turn on the power and insert a "Memory Stick."
Operating Instructions
Page 25
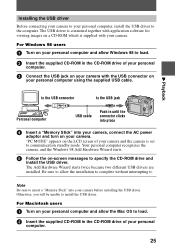
...Insert the supplied CD-ROM in until the connector clicks into place 4 Insert a "Memory Stick" into your personal computer, install the USB driver to the computer. Note Be sure to insert a "Memory Stick" into your camera, connect the AC power adaptor and turn on the LCD screen of your personal computer.... 25 "PC MODE" appears on your camera. The Add Hardware Wizard starts twice because two different USB drivers are...
...Insert the supplied CD-ROM in until the connector clicks into place 4 Insert a "Memory Stick" into your personal computer, install the USB driver to the computer. Note Be sure to insert a "Memory Stick" into your camera, connect the AC power adaptor and turn on the LCD screen of your personal computer.... 25 "PC MODE" appears on your camera. The Add Hardware Wizard starts twice because two different USB drivers are...
Operating Instructions
Page 26
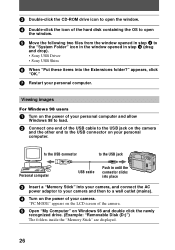
... from the window opened in step 3 to the "System Folder" icon in the window opened in until the connector clicks into place 3 Insert a "Memory Stick" into the Extensions folder?" Viewing images For Windows 98 users 1 Turn on the power of your personal computer. to the USB connector to the... USB jack Personal computer USB cable Push in step 4 (drag and drop). • Sony USB Driver • Sony USB Shim 6 When "Put these items into your camera, and connect the AC power adaptor to your camera and then to a wall outlet (mains). 4 Turn on the power of your personal computer. ...
... from the window opened in step 3 to the "System Folder" icon in the window opened in until the connector clicks into place 3 Insert a "Memory Stick" into the Extensions folder?" Viewing images For Windows 98 users 1 Turn on the power of your personal computer. to the USB connector to the... USB jack Personal computer USB cable Push in step 4 (drag and drop). • Sony USB Driver • Sony USB Shim 6 When "Put these items into your camera, and connect the AC power adaptor to your camera and then to a wall outlet (mains). 4 Turn on the power of your personal computer. ...
Operating Instructions
Page 27
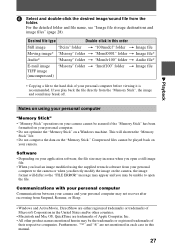
...folder t Image file TIFF image (uncompressed) ∗ Copying a file to the camera or when you may be assured if the "Memory Stick" has been formatted on your personal computer. • Do not optimize the "Memory Stick" on your application software, the file size may increase when you open ... image format will differ so the "FILE ERROR" message may appear and you directly modify the image on the "Memory Stick." Software • Depending on your camera. Furthermore, "™" and "®" are either registered trademarks or trademarks of Microsoft Corporation in this manual. 27...
...folder t Image file TIFF image (uncompressed) ∗ Copying a file to the camera or when you may be assured if the "Memory Stick" has been formatted on your personal computer. • Do not optimize the "Memory Stick" on your application software, the file size may increase when you open ... image format will differ so the "FILE ERROR" message may appear and you directly modify the image on the "Memory Stick." Software • Depending on your camera. Furthermore, "™" and "®" are either registered trademarks or trademarks of Microsoft Corporation in this manual. 27...

Operating Instructions
Page 32
...this to OFF to insert the date and time STILL DATE into the image (page 44). Resets the file numbering each time the "Memory Stick" is changed . Menu settings Menu items that can operate at the moment. MOVIE STILL PLAY ON Plays back images recorded with the... self-timer (page 18). SENSOR FILE NUMBER Setting Description MODE selector OK CANCEL Formats a "Memory Stick." Initial settings are indicated with x. (SELF TIMER) Records with the STILL camera on the setting of a "Memory Stick." This function does not work for images recorded in sequence even if the...
...this to OFF to insert the date and time STILL DATE into the image (page 44). Resets the file numbering each time the "Memory Stick" is changed . Menu settings Menu items that can operate at the moment. MOVIE STILL PLAY ON Plays back images recorded with the... self-timer (page 18). SENSOR FILE NUMBER Setting Description MODE selector OK CANCEL Formats a "Memory Stick." Initial settings are indicated with x. (SELF TIMER) Records with the STILL camera on the setting of a "Memory Stick." This function does not work for images recorded in sequence even if the...
Operating Instructions
Page 38
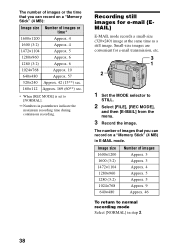
... indicate the maximum recording time during continuous recording. The number of images that you can record on a "Memory Stick" (4 MB) in E-MAIL mode. The number of images or the time that you can record on a "Memory Stick" (4 MB): Image size Number of images or time* 1600×1200 Approx. 4 1600 (3:2) Approx. 4 1472...
... indicate the maximum recording time during continuous recording. The number of images that you can record on a "Memory Stick" (4 MB) in E-MAIL mode. The number of images or the time that you can record on a "Memory Stick" (4 MB): Image size Number of images or time* 1600×1200 Approx. 4 1600 (3:2) Approx. 4 1472...
Operating Instructions
Page 39
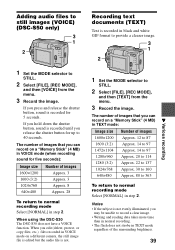
...TEXT] from the menu. 3 Record the image. The number of images that you can record on a "Memory Stick" (4 MB) in TEXT mode: Image size 1600×1200 1600 (3:2) 1472×1104 1280×... mode Select [NORMAL] in VOICE mode (when recording sound for 5 seconds. Adding audio files to still images (VOICE) (DSC-S50 only) 3 1 2 1 Set the MODE selector to STILL. 2 Select [FILE], [REC MODE], and then [VOICE]...; If the subject is not. The number of images that you can record on a different camera, the still image file is edited but the audio file is not evenly illuminated, you press...
...TEXT] from the menu. 3 Record the image. The number of images that you can record on a "Memory Stick" (4 MB) in TEXT mode: Image size 1600×1200 1600 (3:2) 1472×1104 1280×... mode Select [NORMAL] in VOICE mode (when recording sound for 5 seconds. Adding audio files to still images (VOICE) (DSC-S50 only) 3 1 2 1 Set the MODE selector to STILL. 2 Select [FILE], [REC MODE], and then [VOICE]...; If the subject is not. The number of images that you can record on a different camera, the still image file is edited but the audio file is not evenly illuminated, you press...
Operating Instructions
Page 40
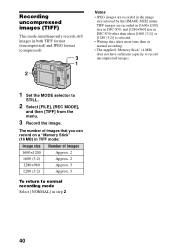
...are recorded in TIFF mode: Image size 1600×1200 1600 (3:2) 1280×960 1280 (3:2) Number of images that you can record on a "Memory Stick" (16 MB) in the image size selected by the [IMAGE SIZE] menu. Recording uncompressed images (TIFF) This mode simultaneously records still images...JPEG images are recorded in [1600×1200] size in DSC-S50, and [1280×960] size in DSC-S30 other than when [1600 (3:2)] or [1280 (3:2)] is selected. • Writing data takes more time than in normal recording. • The supplied "Memory Stick" (4 MB) does not have sufficient capacity to ...
...are recorded in TIFF mode: Image size 1600×1200 1600 (3:2) 1280×960 1280 (3:2) Number of images that you can record on a "Memory Stick" (16 MB) in the image size selected by the [IMAGE SIZE] menu. Recording uncompressed images (TIFF) This mode simultaneously records still images...JPEG images are recorded in [1600×1200] size in DSC-S50, and [1280×960] size in DSC-S30 other than when [1600 (3:2)] or [1280 (3:2)] is selected. • Writing data takes more time than in normal recording. • The supplied "Memory Stick" (4 MB) does not have sufficient capacity to ...
Operating Instructions
Page 49
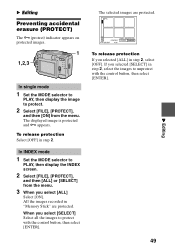
... the control button, then select [ENTER]. The selected images are protected. If you selected [ALL] in step 2. To release protection If you selected [SELECT] in "Memory Stick" are protected. In INDEX mode 1 Set the MODE selector to PLAY, then display the INDEX screen. 2 Select [FILE], [PROTECT], and then [ALL] or [SELECT...
... the control button, then select [ENTER]. The selected images are protected. If you selected [ALL] in step 2. To release protection If you selected [SELECT] in "Memory Stick" are protected. In INDEX mode 1 Set the MODE selector to PLAY, then display the INDEX screen. 2 Select [FILE], [PROTECT], and then [ALL] or [SELECT...
Operating Instructions
Page 50
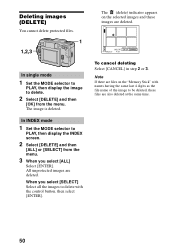
... Select [DELETE] and then [OK] from the menu. 3 When you select [SELECT] Select all the images to delete with names having the same last 4 digits as the file name of the image to PLAY, then display the INDEX screen. 2 Select [DELETE] and then [ALL] or [SELECT] from the menu. When... you select [ALL] Select [ENTER]. The (delete) indicator appears on the "Memory Stick" with the control button, then select [ENTER]. In INDEX mode 1 Set the MODE selector to be deleted, these images are deleted. All unprotected images...
... Select [DELETE] and then [OK] from the menu. 3 When you select [SELECT] Select all the images to delete with names having the same last 4 digits as the file name of the image to PLAY, then display the INDEX screen. 2 Select [DELETE] and then [ALL] or [SELECT] from the menu. When... you select [ALL] Select [ENTER]. The (delete) indicator appears on the "Memory Stick" with the control button, then select [ENTER]. In INDEX mode 1 Set the MODE selector to be deleted, these images are deleted. All unprotected images...
Operating Instructions
Page 51
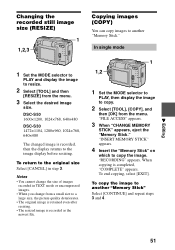
... To end copying, select [EXIT]. "RECORDING" appears. "INSERT MEMORY STICK" appears. 4 Insert the "Memory Stick" on which to copy. 2 Select [TOOL], [COPY], and then [OK] from the menu. Copying images (COPY) You can copy images to another "Memory Stick." DSC-S50 1600×1200, 1024×768, 640×480... DSC-S30 1472×1104, 1280×960, 1024×768, 640×480 The changed image is completed, "COMPLETE"...
... To end copying, select [EXIT]. "RECORDING" appears. "INSERT MEMORY STICK" appears. 4 Insert the "Memory Stick" on which to copy. 2 Select [TOOL], [COPY], and then [OK] from the menu. Copying images (COPY) You can copy images to another "Memory Stick." DSC-S50 1600×1200, 1024×768, 640×480... DSC-S30 1472×1104, 1280×960, 1024×768, 640×480 The changed image is completed, "COMPLETE"...
Operating Instructions
Page 52
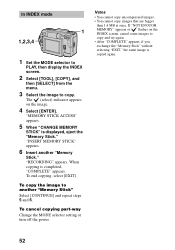
.... Notes • You cannot copy uncompressed images. • You cannot copy images that are bigger than 1.4 MB at once. When copying is displayed, eject the "Memory Stick." To end copying, select [EXIT]. In INDEX mode 1 1,2,3,4 1 Set the MODE selector to PLAY, then display the INDEX screen. 2 Select [TOOL], [COPY...], and then [SELECT] from the menu. 3 Select the image to another "Memory Stick." To cancel copying part-way Change the MODE selector setting or turn off the power. If "NOT ENOUGH...
.... Notes • You cannot copy uncompressed images. • You cannot copy images that are bigger than 1.4 MB at once. When copying is displayed, eject the "Memory Stick." To end copying, select [EXIT]. In INDEX mode 1 1,2,3,4 1 Set the MODE selector to PLAY, then display the INDEX screen. 2 Select [TOOL], [COPY...], and then [SELECT] from the menu. 3 Select the image to another "Memory Stick." To cancel copying part-way Change the MODE selector setting or turn off the power. If "NOT ENOUGH...
Operating Instructions
Page 55
... the battery pack dry. • Do not expose the battery pack to any problem occurs, unplug your camera and contact your nearest Sony dealer. On "Memory Sticks" "Memory Stick" is constantly charged as long as you are equipped with the MagicGate* copyright protection technology. If any... remains does not affect the original battery capacity. On internal rechargeable button battery This camera has an internal rechargeable button battery for exchanging and sharing digital data among "Memory Stick" compatible products. Because it is specially designed for maintaining the date and time...
... the battery pack dry. • Do not expose the battery pack to any problem occurs, unplug your camera and contact your nearest Sony dealer. On "Memory Sticks" "Memory Stick" is constantly charged as long as you are equipped with the MagicGate* copyright protection technology. If any... remains does not affect the original battery capacity. On internal rechargeable button battery This camera has an internal rechargeable button battery for exchanging and sharing digital data among "Memory Stick" compatible products. Because it is specially designed for maintaining the date and time...


