
Instruction Manual
Page 5
... found to comply with Part15 of Conformity Trade Name: SONY Model No.: DSC-RX100 Responsible Party: Sony Electronics Inc. This equipment generates, uses, and can be used in a particular installation. Reorient or relocate the receiving antenna. - For Customers in a residential installation. The number below is encouraged to try to provide reasonable protection against harmful interference in the U.S.A. Increase the separation between...
... found to comply with Part15 of Conformity Trade Name: SONY Model No.: DSC-RX100 Responsible Party: Sony Electronics Inc. This equipment generates, uses, and can be used in a particular installation. Reorient or relocate the receiving antenna. - For Customers in a residential installation. The number below is encouraged to try to provide reasonable protection against harmful interference in the U.S.A. Increase the separation between...
Instruction Manual
Page 6
... communication cable (USB, etc.) again. [ Disposal of electrical and electronic equipment. This product has been tested and found compliant with the limits set out in the EMC Directive for using connection cables shorter than 3 meters (9.8 feet). [ Attention The electromagnetic fields at the specific frequencies may influence the picture and sound of this unit. [ Notice If static electricity or electromagnetism causes data transfer...
... communication cable (USB, etc.) again. [ Disposal of electrical and electronic equipment. This product has been tested and found compliant with the limits set out in the EMC Directive for using connection cables shorter than 3 meters (9.8 feet). [ Attention The electromagnetic fields at the specific frequencies may influence the picture and sound of this unit. [ Notice If static electricity or electromagnetism causes data transfer...
Instruction Manual
Page 8
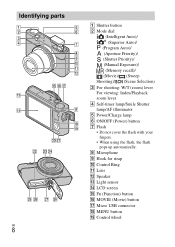
... M Light sensor N LCD screen O Fn (Function) button P MOVIE (Movie) button Q Micro USB connector R MENU button S Control wheel Identifying parts GB 8 A Shutter button B Mode dial (Intelligent Auto)/ (Superior Auto)/ (Program Auto)/ (Aperture Priority)/ (Shutter Priority)/ (Manual Exposure)/ (Memory recall)/ (Movie)/ (Sweep Shooting)/ (Scene Selection) C For shooting: W/T (zoom) lever For viewing: Index/Playback zoom lever D Self-timer lamp/Smile Shutter lamp/AF illuminator E Power/Charge lamp F ON/OFF (Power) button G Flash • Do not cover the flash with your fingers. • When using...
... M Light sensor N LCD screen O Fn (Function) button P MOVIE (Movie) button Q Micro USB connector R MENU button S Control wheel Identifying parts GB 8 A Shutter button B Mode dial (Intelligent Auto)/ (Superior Auto)/ (Program Auto)/ (Aperture Priority)/ (Shutter Priority)/ (Manual Exposure)/ (Memory recall)/ (Movie)/ (Sweep Shooting)/ (Scene Selection) C For shooting: W/T (zoom) lever For viewing: Index/Playback zoom lever D Self-timer lamp/Smile Shutter lamp/AF illuminator E Power/Charge lamp F ON/OFF (Power) button G Flash • Do not cover the flash with your fingers. • When using...
Instruction Manual
Page 9
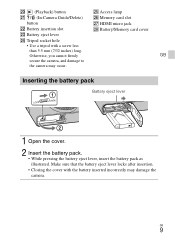
... the battery pack as illustrated. T (Playback) button Y Access lamp U / (In-Camera Guide/Delete) Z Memory card slot button V Battery insertion slot W Battery eject lever wj HDMI micro jack wk Battery/Memory card cover X Tripod socket hole • Use a tripod with the battery inserted incorrectly may occur. Otherwise, you cannot firmly GB secure the camera, and damage to the camera may damage the camera. Make sure that the battery eject lever locks after insertion...
... the battery pack as illustrated. T (Playback) button Y Access lamp U / (In-Camera Guide/Delete) Z Memory card slot button V Battery insertion slot W Battery eject lever wj HDMI micro jack wk Battery/Memory card cover X Tripod socket hole • Use a tripod with the battery inserted incorrectly may occur. Otherwise, you cannot firmly GB secure the camera, and damage to the camera may damage the camera. Make sure that the battery eject lever locks after insertion...
Instruction Manual
Page 10
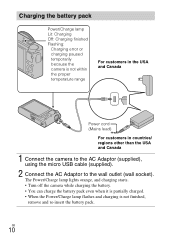
... and Canada Power cord (Mains lead) For customers in countries/ regions other than the USA and Canada 1 Connect the camera to the AC Adaptor (supplied), using the micro USB cable (supplied). 2 Connect the AC Adaptor to the wall outlet (wall socket). GB 10 Charging the battery pack Power/Charge lamp Lit: Charging Off: Charging finished Flashing: Charging error or charging paused temporarily because the camera is not finished, remove and...
... and Canada Power cord (Mains lead) For customers in countries/ regions other than the USA and Canada 1 Connect the camera to the AC Adaptor (supplied), using the micro USB cable (supplied). 2 Connect the AC Adaptor to the wall outlet (wall socket). GB 10 Charging the battery pack Power/Charge lamp Lit: Charging Off: Charging finished Flashing: Charging error or charging paused temporarily because the camera is not finished, remove and...
Instruction Manual
Page 13
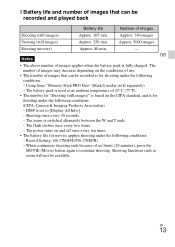
... conditions: (CIPA: Camera & Imaging Products Association) - The flash strobes once every two times. - When continuous shooting ends because of set to continue shooting. Using Sony "Memory Stick PRO Duo" (Mark2) media (sold separately) - Shooting functions such as zoom will not be available. GB 13 The number of images may decrease depending on and off once every ten times. • The battery life for shooting under the following conditions: - Record Setting: 60i 17M...
... conditions: (CIPA: Camera & Imaging Products Association) - The flash strobes once every two times. - When continuous shooting ends because of set to continue shooting. Using Sony "Memory Stick PRO Duo" (Mark2) media (sold separately) - Shooting functions such as zoom will not be available. GB 13 The number of images may decrease depending on and off once every ten times. • The battery life for shooting under the following conditions: - Record Setting: 60i 17M...
Instruction Manual
Page 16
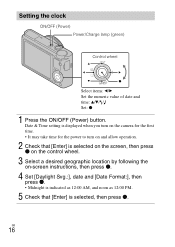
Date & Time setting is displayed when you turn on the camera for the first time. • It may take time for the power to turn on and allow operation. 2 Check that [Enter] is selected on the screen, then press z on the control wheel. 3 Select a desired geographic location by following the on-screen instructions, then press z. 4 Set [Daylight Svg.:], date and [Date Format:], then press z. • Midnight is indicated as 12:00 AM...
Date & Time setting is displayed when you turn on the camera for the first time. • It may take time for the power to turn on and allow operation. 2 Check that [Enter] is selected on the screen, then press z on the control wheel. 3 Select a desired geographic location by following the on-screen instructions, then press z. 4 Set [Daylight Svg.:], date and [Date Format:], then press z. • Midnight is indicated as 12:00 AM...
Instruction Manual
Page 17
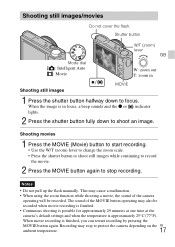
...; Use the W/T (zoom) lever to change the zoom scale. • Press the shutter button to shoot still images while continuing to record the movie. 2 Press the MOVIE button again to stop to focus. Recording may also be recorded. Shutter button W/T (zoom) lever GB Mode dial : Intelligent Auto : Movie W: zoom out T: zoom in focus, a beep sounds and the z or indicator lights. 2 Press the shutter button fully down to protect the camera depending on the GB ambient temperature. 17 Shooting still images/movies Do not cover the flash...
...; Use the W/T (zoom) lever to change the zoom scale. • Press the shutter button to shoot still images while continuing to record the movie. 2 Press the MOVIE button again to stop to focus. Recording may also be recorded. Shutter button W/T (zoom) lever GB Mode dial : Intelligent Auto : Movie W: zoom out T: zoom in focus, a beep sounds and the z or indicator lights. 2 Press the shutter button fully down to protect the camera depending on the GB ambient temperature. 17 Shooting still images/movies Do not cover the flash...
Instruction Manual
Page 19
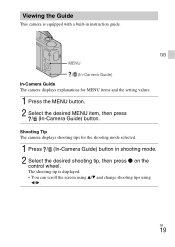
... the setting values. 1 Press the MENU button. 2 Select the desired MENU item, then press / (In-Camera Guide) button. The shooting tip is equipped with a built-in shooting mode. 2 Select the desired shooting tip, then press z on the control wheel. GB 19 Viewing the Guide This camera is displayed. • You can scroll the screen using v/V and change shooting tips using b/B. GB MENU / (In-Camera Guide) In-Camera Guide The camera displays explanations for the shooting mode selected. 1 Press / (In-Camera Guide) button in instruction guide.
... the setting values. 1 Press the MENU button. 2 Select the desired MENU item, then press / (In-Camera Guide) button. The shooting tip is equipped with a built-in shooting mode. 2 Select the desired shooting tip, then press z on the control wheel. GB 19 Viewing the Guide This camera is displayed. • You can scroll the screen using v/V and change shooting tips using b/B. GB MENU / (In-Camera Guide) In-Camera Guide The camera displays explanations for the shooting mode selected. 1 Press / (In-Camera Guide) button in instruction guide.
Instruction Manual
Page 21
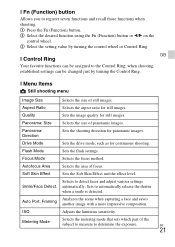
... 21 Quality Sets the image quality for panoramic images. Panorama: Direction Sets the shooting direction for still images. Sets to determine the exposure. x Menu Items Still shooting menu Image Size Selects the size of panoramic images. Focus Mode Selects the focus method. Auto Port. Flash Mode Sets the flash settings. Autofocus Area Selects the area of the subject to measure to automatically release the shutter when a smile is detected. Aspect Ratio Selects the aspect ratio for continuous shooting. Drive Mode Sets the drive mode, such...
... 21 Quality Sets the image quality for panoramic images. Panorama: Direction Sets the shooting direction for still images. Sets to determine the exposure. x Menu Items Still shooting menu Image Size Selects the size of panoramic images. Focus Mode Selects the focus method. Auto Port. Flash Mode Sets the flash settings. Autofocus Area Selects the area of the subject to measure to automatically release the shutter when a smile is detected. Aspect Ratio Selects the aspect ratio for continuous shooting. Drive Mode Sets the drive mode, such...
Instruction Manual
Page 23
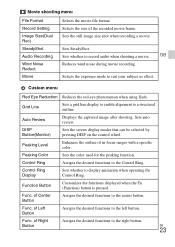
...shooting a movie. Auto Review Displays the captured image after shooting. DISP Button(Monitor) Sets the screen display modes that can be selected by pressing DISP on the control wheel. of Right Assigns the desired functions to display animation when operating the Control Ring. Function Button Customizes the functions displayed when the Fn (Function) button is pressed. Movie shooting menu File Format Record Setting Image Size(Dual Rec) SteadyShot Audio Recording Wind Noise Reduct. Selects the size of in-focus ranges with a specific color. Sets the still image size shot...
...shooting a movie. Auto Review Displays the captured image after shooting. DISP Button(Monitor) Sets the screen display modes that can be selected by pressing DISP on the control wheel. of Right Assigns the desired functions to display animation when operating the Control Ring. Function Button Customizes the functions displayed when the Fn (Function) button is pressed. Movie shooting menu File Format Record Setting Image Size(Dual Rec) SteadyShot Audio Recording Wind Noise Reduct. Selects the size of in-focus ranges with a specific color. Sets the still image size shot...
Instruction Manual
Page 24
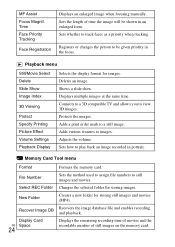
...form. Adds a print order mark to play back an image recorded in the focus. Sets how to a still image. Select REC Folder Changes the selected folder for images. Shows a slide show. Playback menu Still/Movie Select Delete Slide Show Image Index 3D Viewing Protect Specify Printing Picture Effect Volume Settings Playback Display Selects the display format for storing images. Adds various textures to view 3D images. Memory Card Tool menu Format Formats the memory card. Recover Image DB Recovers the image database file and enables recording and playback. Connects to a 3D...
...form. Adds a print order mark to play back an image recorded in the focus. Sets how to a still image. Select REC Folder Changes the selected folder for images. Shows a slide show. Playback menu Still/Movie Select Delete Slide Show Image Index 3D Viewing Protect Specify Printing Picture Effect Volume Settings Playback Display Selects the display format for storing images. Adds various textures to view 3D images. Memory Card Tool menu Format Formats the memory card. Recover Image DB Recovers the image database file and enables recording and playback. Connects to a 3D...
Instruction Manual
Page 25
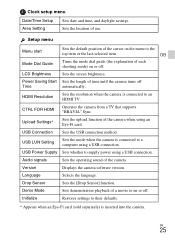
... operating sound of the cursor on or off Time automatically. GB 25 Setup menu Menu start Mode Dial Guide Sets the default position of the camera. Initialize Restores settings to supply power using an Eye-Fi card. GB Turns the mode dial guide (the explanation of time until the camera turns off . Power Saving Start Sets the length of each shooting mode) on the menu to an HDMI TV. CTRL FOR HDMI Operates the camera from a TV that supports "BRAVIA" Sync. USB Connection Sets the USB connection method. USB Power...
... operating sound of the cursor on or off Time automatically. GB 25 Setup menu Menu start Mode Dial Guide Sets the default position of the camera. Initialize Restores settings to supply power using an Eye-Fi card. GB Turns the mode dial guide (the explanation of time until the camera turns off . Power Saving Start Sets the length of each shooting mode) on the menu to an HDMI TV. CTRL FOR HDMI Operates the camera from a TV that supports "BRAVIA" Sync. USB Connection Sets the USB connection method. USB Power...
Instruction Manual
Page 26
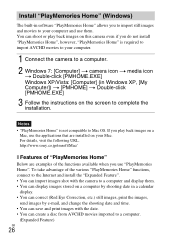
..." functions, connect to the Internet and install the "Expanded Feature". • You can import images shot with the camera to your computer and use them . • You can display images stored on a computer by shooting date in a calendar display. • You can correct (Red Eye Correction, etc.) still images, print the images, send images by e-mail, and change the shooting date and time. • You can save and print images with the date. • You can shoot or play...
..." functions, connect to the Internet and install the "Expanded Feature". • You can import images shot with the camera to your computer and use them . • You can display images stored on a computer by shooting date in a calendar display. • You can correct (Red Eye Correction, etc.) still images, print the images, send images by e-mail, and change the shooting date and time. • You can save and print images with the date. • You can shoot or play...
Instruction Manual
Page 27
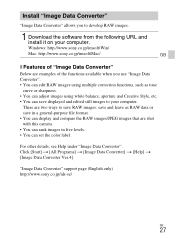
... "Image Data Converter". Click [Start] t [All Programs] t [Image Data Converter] t [Help] t [Image Data Converter Ver.4]. Install "Image Data Converter" "Image Data Converter" allows you use "Image Data Converter". • You can edit RAW images using white balance, aperture and Creative Style, etc. • You can save in a general-purpose file format. • You can display and compare the RAW images/JPEG images that are shot with this camera. • You can rank images in five levels. • You can adjust images using multiple correction functions...
... "Image Data Converter". Click [Start] t [All Programs] t [Image Data Converter] t [Help] t [Image Data Converter Ver.4]. Install "Image Data Converter" "Image Data Converter" allows you use "Image Data Converter". • You can edit RAW images using white balance, aperture and Creative Style, etc. • You can save in a general-purpose file format. • You can display and compare the RAW images/JPEG images that are shot with this camera. • You can rank images in five levels. • You can adjust images using multiple correction functions...

Instruction Manual
Page 29
... the shooting conditions, the subject or the image quality/size settings. When you record a fast-moving subject, the image is clearer but the recordable time is shorter because more realistic image. GB 29 Unlike standard recording modes up to now, which automatically adjusts image quality depending on the bottom of the camera. 1080 60i-compatible device: 60i 1080 50i-compatible device: 50i • This camera is compatible with...
... the shooting conditions, the subject or the image quality/size settings. When you record a fast-moving subject, the image is clearer but the recordable time is shorter because more realistic image. GB 29 Unlike standard recording modes up to now, which automatically adjusts image quality depending on the bottom of the camera. 1080 60i-compatible device: 60i 1080 50i-compatible device: 50i • This camera is compatible with...
Instruction Manual
Page 30
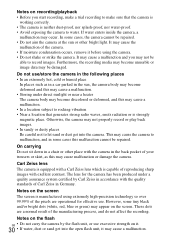
... manufactured using the camera. • Do not shake or strike the camera. Furthermore, the recording media may become discolored or deformed, and this malfunction cannot be repaired. • Do not aim the camera at the sun or other bright light. Notes on the screen The screen is strongly magnetic place. However, some tiny black and/or bright dots (white, red, blue or green...
... manufactured using the camera. • Do not shake or strike the camera. Furthermore, the recording media may become discolored or deformed, and this malfunction cannot be repaired. • Do not aim the camera at the sun or other bright light. Notes on the screen The screen is strongly magnetic place. However, some tiny black and/or bright dots (white, red, blue or green...

Instruction Manual
Page 32
... pixel number of camera: Approx. 20.9 Megapixels Effective pixel number of camera: Approx. 20.2 Megapixels Lens: Carl Zeiss Vario-Sonnar T* 3.6× zoom lens f = 10.4 mm - 37.1 mm (28 mm - 100 mm (35 mm film equivalent)) F1.8 (W) - Movies (MP4 format): Video: MPEG-4 AVC/H.264 Audio: MPEG-4 AAC-LC 2ch Recording media: "Memory Stick Duo" media, "Memory Stick Micro" media, SD cards, microSD memory cards Flash: Flash range (ISO sensitivity (Recommended Exposure Index) set to...
... pixel number of camera: Approx. 20.9 Megapixels Effective pixel number of camera: Approx. 20.2 Megapixels Lens: Carl Zeiss Vario-Sonnar T* 3.6× zoom lens f = 10.4 mm - 37.1 mm (28 mm - 100 mm (35 mm film equivalent)) F1.8 (W) - Movies (MP4 format): Video: MPEG-4 AVC/H.264 Audio: MPEG-4 AAC-LC 2ch Recording media: "Memory Stick Duo" media, "Memory Stick Micro" media, SD cards, microSD memory cards Flash: Flash range (ISO sensitivity (Recommended Exposure Index) set to...
Marketing Specifications
Page 1
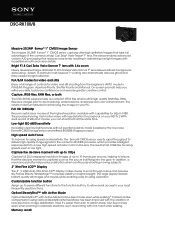
..., fast motion video with less distortion for playback on your confidence and exercise greater creative control. The large display delivers brilliant-quality still images and movies while enabling easy focusing operation. Memory recall Low-light ISO 6400 sensitivity Incredibly clear low-light pictures without sacrificing detail, made possible by light reflection. Customizable function button Assign up to 10 frames per second, helping to P/A/S/M: Program, Aperture Priority, Shutter Priority and Manual. Bright F1...
..., fast motion video with less distortion for playback on your confidence and exercise greater creative control. The large display delivers brilliant-quality still images and movies while enabling easy focusing operation. Memory recall Low-light ISO 6400 sensitivity Incredibly clear low-light pictures without sacrificing detail, made possible by light reflection. Customizable function button Assign up to 10 frames per second, helping to P/A/S/M: Program, Aperture Priority, Shutter Priority and Manual. Bright F1...
Marketing Specifications
Page 2
... Memory Stick PRO Duo, Memory Stick PRO Duo (High Speed), Memory Stick PRO-HG Duo, Memory Stick Micro*7, Memory Stick Micro (Mark2)*7, SD Memory Card, SDHC Memory Card, SDXC Memory Card, microSD Memory Card*7, microSDHC Memory Card*7 Still Image Mode Still Image Size 16:9 Still Image Size 3:2 Still Image Size 4:3 Panorama Still Image Size Video Format JPEG, RAW (Sony ARW 2.3 format) L: 17M (5472x3080); M: 7.5M (3648 x 2056); M: 10M (3648 x 2736); This enables quick switching of the user's preferred settings. M: 10M (3888 x 2592); S: 5.0M (2592 x 1944); Flash Flash Modes Auto/Fill-flash...
... Memory Stick PRO Duo, Memory Stick PRO Duo (High Speed), Memory Stick PRO-HG Duo, Memory Stick Micro*7, Memory Stick Micro (Mark2)*7, SD Memory Card, SDHC Memory Card, SDXC Memory Card, microSD Memory Card*7, microSDHC Memory Card*7 Still Image Mode Still Image Size 16:9 Still Image Size 3:2 Still Image Size 4:3 Panorama Still Image Size Video Format JPEG, RAW (Sony ARW 2.3 format) L: 17M (5472x3080); M: 7.5M (3648 x 2056); M: 10M (3648 x 2736); This enables quick switching of the user's preferred settings. M: 10M (3888 x 2592); S: 5.0M (2592 x 1944); Flash Flash Modes Auto/Fill-flash...


