
Instruction Manual
Page 2
... out of the reach of small children. • Keep the battery pack dry. • Replace only with the same or equivalent type recommended by Sony. • Dispose of in fire. • Do not handle damaged or leaking lithium ion batteries. • Be sure to charge the battery pack...dispose of used with this product. Refer to these numbers whenever you call your Sony dealer regarding this camera only, and should not be used battery packs promptly as hammering, dropping or stepping on the bottom. DSC-RX1 Serial No. Disconnect the AC Adaptor from the wall outlet (wall socket) ...
... out of the reach of small children. • Keep the battery pack dry. • Replace only with the same or equivalent type recommended by Sony. • Dispose of in fire. • Do not handle damaged or leaking lithium ion batteries. • Be sure to charge the battery pack...dispose of used with this product. Refer to these numbers whenever you call your Sony dealer regarding this camera only, and should not be used battery packs promptly as hammering, dropping or stepping on the bottom. DSC-RX1 Serial No. Disconnect the AC Adaptor from the wall outlet (wall socket) ...
Instruction Manual
Page 7
Table of contents Introduction of functions 9 Before use Notes on using your camera 11 Checking the supplied items 14 Identifying parts 15 Front side 15 Rear side/Sides 16 Top side ... using the Fn (Function) button 25 Functions that can be selected using the MENU button ... 27 Using the In-Camera Guide 35 Preparing the camera Charging the battery pack 36 Charging time (Full charge 38 Charging by connecting to a computer 39 Checking the remaining battery... Setting the date and time 43 Setting the date/time and area again 44 Shooting a clear movie without camera shake 45 GB 7
Table of contents Introduction of functions 9 Before use Notes on using your camera 11 Checking the supplied items 14 Identifying parts 15 Front side 15 Rear side/Sides 16 Top side ... using the Fn (Function) button 25 Functions that can be selected using the MENU button ... 27 Using the In-Camera Guide 35 Preparing the camera Charging the battery pack 36 Charging time (Full charge 38 Charging by connecting to a computer 39 Checking the remaining battery... Setting the date and time 43 Setting the date/time and area again 44 Shooting a clear movie without camera shake 45 GB 7
Instruction Manual
Page 8
... 59 Recommended computer environment (Windows) ... 60 Recommended computer environment (Mac 60 Installing "PlayMemories Home 61 Installing "Image Data Converter 63 Others Learning more about the camera ("Cyber-shot User Guide 64 Checking the number of images and recordable time of movies 65 Specifications 69 Index 73 GB 8
... 59 Recommended computer environment (Windows) ... 60 Recommended computer environment (Mac 60 Installing "PlayMemories Home 61 Installing "Image Data Converter 63 Others Learning more about the camera ("Cyber-shot User Guide 64 Checking the number of images and recordable time of movies 65 Specifications 69 Index 73 GB 8
Instruction Manual
Page 9
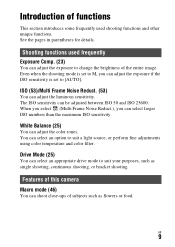
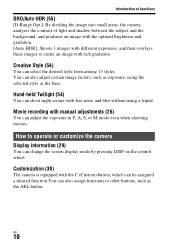
... appropriate drive mode to [AUTO]. See the pages in parentheses for details. GB 9 Shooting functions used shooting functions and other unique functions. Features of this camera Macro mode (46) You can shoot close-ups of subjects such as single shooting, continuous shooting, or bracket shooting. ISO (53)/Multi Frame Noise Reduct...
... appropriate drive mode to [AUTO]. See the pages in parentheses for details. GB 9 Shooting functions used shooting functions and other unique functions. Features of this camera Macro mode (46) You can shoot close-ups of subjects such as single shooting, continuous shooting, or bracket shooting. ISO (53)/Multi Frame Noise Reduct...
Instruction Manual
Page 10
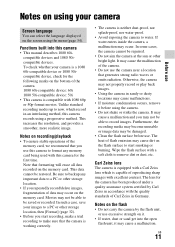
... such as the base. Movie recording with rich gradation. How to operate or customize the camera Display information (29) You can select the desired style from among 13 styles. Customization (30) The camera is equipped with less noise and blur without using the selected style as the AEL button.... Introduction of functions DRO/Auto HDR (55) [D-Range Opt.]: By dividing the image into small areas, the camera analyses the contrast of light and shadow between the subject and the background, and produces an image with the optimal brightness and gradation. [Auto...
... such as the base. Movie recording with rich gradation. How to operate or customize the camera Display information (29) You can select the desired style from among 13 styles. Customization (30) The camera is equipped with less noise and blur without using the selected style as the AEL button.... Introduction of functions DRO/Auto HDR (55) [D-Range Opt.]: By dividing the image into small areas, the camera analyses the contrast of light and shadow between the subject and the background, and produces an image with the optimal brightness and gradation. [Auto...
Instruction Manual
Page 11
... the open flash unit, it may cause malfunctions. • If moisture condensation occurs, remove it . • If water, dust or sand get into this camera to a PC or other bright light. In such a case, save your images to a PC or other storage location, then [Format] (page 32). •...check for the following marks on the bottom of data may not properly record or play back images. • Using the camera in an interlacing method, this camera for the camera has been produced under a quality assurance system certified by the flash unit, or use . It may cause the malfunction of...
... the open flash unit, it may cause malfunctions. • If moisture condensation occurs, remove it . • If water, dust or sand get into this camera to a PC or other bright light. In such a case, save your images to a PC or other storage location, then [Format] (page 32). •...check for the following marks on the bottom of data may not properly record or play back images. • Using the camera in an interlacing method, this camera for the camera has been produced under a quality assurance system certified by the flash unit, or use . It may cause the malfunction of...
Instruction Manual
Page 12
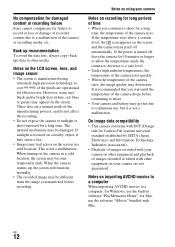
... • When the temperature of the camera rises, the image quality may become temporarily dark. Notes on the LCD screen, lens, and image sensor • The screen is not a malfunction. No compensation for damaged content or recording failure Sony cannot compensate for failure to record or loss... or damage of recorded content due to a malfunction of the manufacturing process, and do not affect the recording. • Do not expose the camera to sunlight or shoot sunward for a long ...
... • When the temperature of the camera rises, the image quality may become temporarily dark. Notes on the LCD screen, lens, and image sensor • The screen is not a malfunction. No compensation for damaged content or recording failure Sony cannot compensate for failure to record or loss... or damage of recorded content due to a malfunction of the manufacturing process, and do not affect the recording. • Do not expose the camera to sunlight or shoot sunward for a long ...
Instruction Manual
Page 13
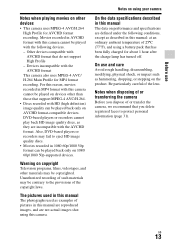
...Avoid rough handling, disassembling, modifying, physical shock, or impact such as hammering, dropping, or stepping on other devices • This camera uses MPEG-4 AVC/H.264 High Profile for AVCHD format recording. The pictures used in this manual are reproduced images, and are defined ...with the following conditions, except as described in this manual: at an ordinary ambient temperature of pictures in AVCHD format with this camera. Unauthorized recording of such materials may be played back only on performance and specifications are not actual images shot using a battery pack...
...Avoid rough handling, disassembling, modifying, physical shock, or impact such as hammering, dropping, or stepping on other devices • This camera uses MPEG-4 AVC/H.264 High Profile for AVCHD format recording. The pictures used in this manual are reproduced images, and are defined ...with the following conditions, except as described in this manual: at an ordinary ambient temperature of pictures in AVCHD format with this camera. Unauthorized recording of such materials may be played back only on performance and specifications are not actual images shot using a battery pack...
Instruction Manual
Page 14
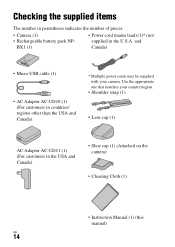
...; Micro USB cable (1) • AC Adaptor AC-UD10 (1) (For customers in the USA and Canada) • Shoe cap (1) (Attached on the camera) • Cleaning Cloth (1) • Instruction Manual (1) (this manual) GB 14 Use the appropriate one that matches your country/region. • Shoulder ...other than the USA and Canada) * Multiple power cords may be supplied with your camera. BX1 (1) • Power cord (mains lead) (1)* (not supplied in parentheses indicates the number of pieces. • Camera (1) • Rechargeable battery pack NP- Before use Checking the supplied items The number...
...; Micro USB cable (1) • AC Adaptor AC-UD10 (1) (For customers in the USA and Canada) • Shoe cap (1) (Attached on the camera) • Cleaning Cloth (1) • Instruction Manual (1) (this manual) GB 14 Use the appropriate one that matches your country/region. • Shoulder ...other than the USA and Canada) * Multiple power cords may be supplied with your camera. BX1 (1) • Power cord (mains lead) (1)* (not supplied in parentheses indicates the number of pieces. • Camera (1) • Rechargeable battery pack NP- Before use Checking the supplied items The number...
Instruction Manual
Page 15
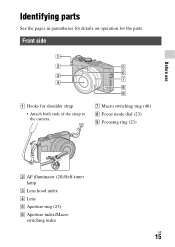
G Macro switching ring (46) H Focus mode dial (23) I Focusing ring (23) B AF illuminator (28)/Self-timer lamp C Lens hood index D Lens E Aperture ring (23) F Aperture index/Macro switching index GB 15 Identifying parts See the pages in parentheses for details on operation for shoulder strap • Attach both ends of the strap to the camera. Front side Before use A Hooks for the parts.
G Macro switching ring (46) H Focus mode dial (23) I Focusing ring (23) B AF illuminator (28)/Self-timer lamp C Lens hood index D Lens E Aperture ring (23) F Aperture index/Macro switching index GB 15 Identifying parts See the pages in parentheses for details on operation for shoulder strap • Attach both ends of the strap to the camera. Front side Before use A Hooks for the parts.
Instruction Manual
Page 16
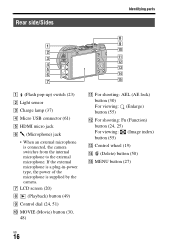
If the external microphone is a plug-in-power type, the power of the microphone is connected, the camera switches from the internal microphone to the external microphone. G LCD screen (20) H (Playback) button (49) I Control dial (24, 51) J MOVIE (Movie) button (30, 48) K For ...) switch (23) B Light sensor C Charge lamp (37) D Micro USB connector (61) E HDMI micro jack F m (Microphone) jack • When an external microphone is supplied by the camera.
If the external microphone is a plug-in-power type, the power of the microphone is connected, the camera switches from the internal microphone to the external microphone. G LCD screen (20) H (Playback) button (49) I Control dial (24, 51) J MOVIE (Movie) button (30, 48) K For ...) switch (23) B Light sensor C Charge lamp (37) D Micro USB connector (61) E HDMI micro jack F m (Microphone) jack • When an external microphone is supplied by the camera.
Instruction Manual
Page 17
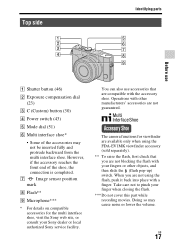
...However, if the accessory reaches the front end of the accessories may cause noise or lower the volume. The camera functions for the multi interface shoe, visit the Sony web site, or consult your finger when closing the flash. *** Do not cover this part while recording ...sold separately). ** To raise the flash, first check that are not guaranteed. Operations with a finger. Take care not to pinch your Sony dealer or local authorized Sony service facility. GB 17 G Image sensor position mark H Flash** I Microphone*** * For details on compatible accessories for viewfinder are available...
...However, if the accessory reaches the front end of the accessories may cause noise or lower the volume. The camera functions for the multi interface shoe, visit the Sony web site, or consult your finger when closing the flash. *** Do not cover this part while recording ...sold separately). ** To raise the flash, first check that are not guaranteed. Operations with a finger. Take care not to pinch your Sony dealer or local authorized Sony service facility. GB 17 G Image sensor position mark H Flash** I Microphone*** * For details on compatible accessories for viewfinder are available...
Instruction Manual
Page 18
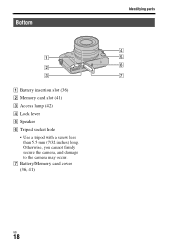
G Battery/Memory card cover (36, 41) GB 18 Otherwise, you cannot firmly secure the camera, and damage to the camera may occur. Bottom Identifying parts A Battery insertion slot (36) B Memory card slot (41) C Access lamp (42) D Lock lever E Speaker F Tripod socket hole • Use a tripod with a screw less than 5.5 mm (7/32 inches) long.
G Battery/Memory card cover (36, 41) GB 18 Otherwise, you cannot firmly secure the camera, and damage to the camera may occur. Bottom Identifying parts A Battery insertion slot (36) B Memory card slot (41) C Access lamp (42) D Lock lever E Speaker F Tripod socket hole • Use a tripod with a screw less than 5.5 mm (7/32 inches) long.
Instruction Manual
Page 23
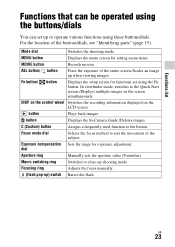
... can set using these buttons/dials. AEL button/ button Fixes the exposure of the buttons/dials, see "Identifying parts" (page 15). button Displays the In-Camera Guide./Deletes images. Focus mode dial Selects the focus method to the Quick Navi screen./Displays multiple images on the LCD screen. In viewfinder mode...
... can set using these buttons/dials. AEL button/ button Fixes the exposure of the buttons/dials, see "Identifying parts" (page 15). button Displays the In-Camera Guide./Deletes images. Focus mode dial Selects the focus method to the Quick Navi screen./Displays multiple images on the LCD screen. In viewfinder mode...
Instruction Manual
Page 26
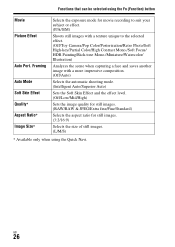
...* Selects the exposure mode for movie recording to suit your subject or effect. (P/A/S/M) Shoots still images with a texture unique to the selected effect. (Off/Toy Camera/Pop Color/Posterization/Retro Photo/Soft High-key/Partial Color/High Contrast Mono./Soft Focus/ HDR Painting/Rich-tone Mono./Miniature/Watercolor/ Illustration) Analyzes the...
...* Selects the exposure mode for movie recording to suit your subject or effect. (P/A/S/M) Shoots still images with a texture unique to the selected effect. (Off/Toy Camera/Pop Color/Posterization/Retro Photo/Soft High-key/Partial Color/High Contrast Mono./Soft Focus/ HDR Painting/Rich-tone Mono./Miniature/Watercolor/ Illustration) Analyzes the...
Instruction Manual
Page 27
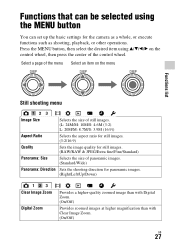
... images. (L: 24M/M: 10M/S: 4.6M (3:2) L: 20M/M: 8.7M/S: 3.9M (16:9)) Aspect Ratio Selects the aspect ratio for still images. (3:2/16:9) Quality Sets the image quality for the camera as a whole, or execute functions such as shooting, playback, or other operations.
... images. (L: 24M/M: 10M/S: 4.6M (3:2) L: 20M/M: 8.7M/S: 3.9M (16:9)) Aspect Ratio Selects the aspect ratio for still images. (3:2/16:9) Quality Sets the image quality for the camera as a whole, or execute functions such as shooting, playback, or other operations.
Instruction Manual
Page 33
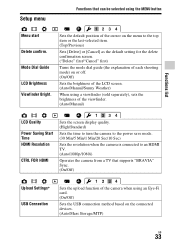
... Resolution CTRL FOR HDMI Sets the screen display quality. (High/Standard) Sets the time to turn the camera to the power save mode. (30 Min/5 Min/1 Min/20 Sec/10 Sec) Sets the resolution when the... camera is connected to an HDMI TV. (Auto/1080p/1080i) Operates the camera from a TV that can be selected using an Eye-Fi card. (On/Off) Sets the ... Functions that supports "BRAVIA" Sync. (On/Off) Upload Settings* USB Connection Sets the upload function of the camera when using the MENU button Menu start Delete confirm.
... Resolution CTRL FOR HDMI Sets the screen display quality. (High/Standard) Sets the time to turn the camera to the power save mode. (30 Min/5 Min/1 Min/20 Sec/10 Sec) Sets the resolution when the... camera is connected to an HDMI TV. (Auto/1080p/1080i) Operates the camera from a TV that can be selected using an Eye-Fi card. (On/Off) Sets the ... Functions that supports "BRAVIA" Sync. (On/Off) Upload Settings* USB Connection Sets the upload function of the camera when using the MENU button Menu start Delete confirm.
Instruction Manual
Page 34
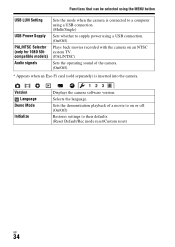
...On/Off) Restores settings to supply power using a USB connection. (On/Off) Plays back movies recorded with the camera on an NTSC system TV. (PAL/NTSC) Sets the operating sound of the camera. (On/Off) * Appears when an Eye-Fi card (sold separately) is connected to a computer using the...MENU button USB LUN Setting USB Power Supply PAL/NTSC Selector (only for 1080 50icompatible models) Audio signals Sets the mode when the camera is inserted into the camera. Functions that can be selected using a USB connection. (Multi/Single) Sets whether to their defaults. (Reset Default/Rec mode reset...
...On/Off) Restores settings to supply power using a USB connection. (On/Off) Plays back movies recorded with the camera on an NTSC system TV. (PAL/NTSC) Sets the operating sound of the camera. (On/Off) * Appears when an Eye-Fi card (sold separately) is connected to a computer using the...MENU button USB LUN Setting USB Power Supply PAL/NTSC Selector (only for 1080 50icompatible models) Audio signals Sets the mode when the camera is inserted into the camera. Functions that can be selected using a USB connection. (Multi/Single) Sets whether to their defaults. (Reset Default/Rec mode reset...
Instruction Manual
Page 35
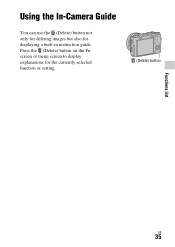
Press the (Delete) button on the Fn screen or menu screen to display explanations for displaying a built-in instruction guide. Using the In-Camera Guide You can use the (Delete) button not only for deleting images but also for the currently selected function or setting. (Delete) button Functions list GB 35
Press the (Delete) button on the Fn screen or menu screen to display explanations for displaying a built-in instruction guide. Using the In-Camera Guide You can use the (Delete) button not only for deleting images but also for the currently selected function or setting. (Delete) button Functions list GB 35
Instruction Manual
Page 36
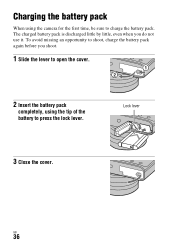
To avoid missing an opportunity to shoot, charge the battery pack again before you do not use it. Lock lever 3 Close the cover. Preparing the camera Charging the battery pack When using the tip of the battery to charge the battery pack. GB 36 The charged battery pack is discharged little by little, even when you shoot. 1 Slide the lever to open the cover. 2 Insert the battery pack completely, using the camera for the first time, be sure to press the lock lever.
To avoid missing an opportunity to shoot, charge the battery pack again before you do not use it. Lock lever 3 Close the cover. Preparing the camera Charging the battery pack When using the tip of the battery to charge the battery pack. GB 36 The charged battery pack is discharged little by little, even when you shoot. 1 Slide the lever to open the cover. 2 Insert the battery pack completely, using the camera for the first time, be sure to press the lock lever.


