Operating Instructions
Page 3
...or electromagnetism causes data transfer to provide reasonable protection against harmful interference in order to power this equipment does cause harmful interference to radio or television reception, which the receiver...communications. For the Customers in the U.S.A. If the plug supplied with your nearest Sony service station. Attention The electromagnetic fields at the specific frequencies may regulate disposal of... as the supplied one or more information regarding recycling of this digital camera. Certain countries or regions may influence the picture and sound of...
...or electromagnetism causes data transfer to provide reasonable protection against harmful interference in order to power this equipment does cause harmful interference to radio or television reception, which the receiver...communications. For the Customers in the U.S.A. If the plug supplied with your nearest Sony service station. Attention The electromagnetic fields at the specific frequencies may regulate disposal of... as the supplied one or more information regarding recycling of this digital camera. Certain countries or regions may influence the picture and sound of...
Operating Instructions
Page 5
... or emits radiation. The camera may cause a malfunction. Trademarks • is a trademark of Sony Corporation. • "Memory Stick," , "Memory Stick PRO," , "Memory Stick Duo," , "Memory Stick PRO Duo," , "MagicGate," are trademarks of Sony Corporation. • Picture Package is equipped with power zoom lens. The pictures ...the rain or under similar conditions, be careful not to apply force to get the camera wet. However, the ™ or ® marks are not actual images shot using the camera. Be careful not to bump the lens, and be careful not to it before...
... or emits radiation. The camera may cause a malfunction. Trademarks • is a trademark of Sony Corporation. • "Memory Stick," , "Memory Stick PRO," , "Memory Stick Duo," , "Memory Stick PRO Duo," , "MagicGate," are trademarks of Sony Corporation. • Picture Package is equipped with power zoom lens. The pictures ...the rain or under similar conditions, be careful not to apply force to get the camera wet. However, the ™ or ® marks are not actual images shot using the camera. Be careful not to bump the lens, and be careful not to it before...
Operating Instructions
Page 8
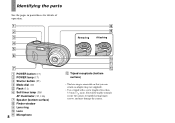
Removing Attaching A POWER button (17) B POWER lamp (17) C Shutter button (25) D Mode dial (10) E Flash (31) F Self-timer lamp (30)/ AF illuminator (32, 116) G Speaker (bottom surface) H Finder window I Lens ring J ... that you can attach an adaptor ring (not supplied). • Use a tripod with a screw length of operation. You will be unable to firmly secure the camera to tripods having longer screws, and may damage the camera. Identifying the parts See the pages in parentheses for details of less than 5.5 mm (7/32 inch).
Removing Attaching A POWER button (17) B POWER lamp (17) C Shutter button (25) D Mode dial (10) E Flash (31) F Self-timer lamp (30)/ AF illuminator (32, 116) G Speaker (bottom surface) H Finder window I Lens ring J ... that you can attach an adaptor ring (not supplied). • Use a tripod with a screw length of operation. You will be unable to firmly secure the camera to tripods having longer screws, and may damage the camera. Identifying the parts See the pages in parentheses for details of less than 5.5 mm (7/32 inch).
Operating Instructions
Page 10
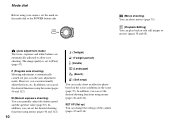
...) (Soft snap) You can easily shoot an effective photo based on the mode dial to the POWER button side. (Movie shooting) You can shoot movies (page 79). (Playback/Editing) You can change the settings of the camera (pages 47 and 116). M (Manual exposure shooting) You can set to allow easy shooting. ...SET UP (Set up) You can play back or edit still images or movies (pages 38 and 68). (Auto adjustment mode) The focus, ...
...) (Soft snap) You can easily shoot an effective photo based on the mode dial to the POWER button side. (Movie shooting) You can shoot movies (page 79). (Playback/Editing) You can change the settings of the camera (pages 47 and 116). M (Manual exposure shooting) You can set to allow easy shooting. ...SET UP (Set up) You can play back or edit still images or movies (pages 38 and 68). (Auto adjustment mode) The focus, ...
Operating Instructions
Page 11
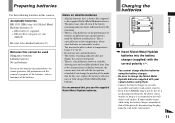
... the position of batteries made by different manufacturers. Getting started The power may not be used Manganese batteries Lithium batteries Ni-cad batteries If you use the batteries described above, we cannot guarantee full performance of the camera by . • Even if the CHARGE lamp is not lit... disconnecting the plug from the AC power source (mains) as long as it is recommend that cannot be able to the supplied Nickel-Metal Hydride batteries. Due to the wall outlet (wall socket). In this camera. Preparing batteries Use the following batteries in this case, replace the ...
... the position of batteries made by different manufacturers. Getting started The power may not be used Manganese batteries Lithium batteries Ni-cad batteries If you use the batteries described above, we cannot guarantee full performance of the camera by . • Even if the CHARGE lamp is not lit... disconnecting the plug from the AC power source (mains) as long as it is recommend that cannot be able to the supplied Nickel-Metal Hydride batteries. Due to the wall outlet (wall socket). In this camera. Preparing batteries Use the following batteries in this case, replace the ...
Operating Instructions
Page 12
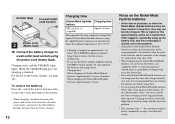
...NH-AA-DA × 2 (supplied) Approx. 6 hours This represents the time required to charge fully depleted Nickel-Metal Hydride batteries using the power cord (mains lead). If the +/- It is recommended that you use the battery case (supplied). metal terminals are shorted, there is a ...battery fully, and then recharging it, should correct the problem. * The "memory effect" - CHARGE lamp to a wall outlet (wall socket) 2 Power cord (Mains lead) , Connect the battery charger to a wall outlet (wall socket) using the supplied battery charger in an environment where the ambient...
...NH-AA-DA × 2 (supplied) Approx. 6 hours This represents the time required to charge fully depleted Nickel-Metal Hydride batteries using the power cord (mains lead). If the +/- It is recommended that you use the battery case (supplied). metal terminals are shorted, there is a ...battery fully, and then recharging it, should correct the problem. * The "memory effect" - CHARGE lamp to a wall outlet (wall socket) 2 Power cord (Mains lead) , Connect the battery charger to a wall outlet (wall socket) using the supplied battery charger in an environment where the ambient...
Operating Instructions
Page 14
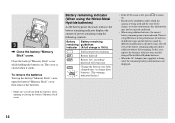
...batteries when opening or closing the battery/"Memory Stick" cover. Battery remaining indicator (When using the Nickel-Metal Hydride batteries) As the battery power decreases with new ones or fully charged Nickel-Metal Hydride batteries. • When the AC Adaptor (not supplied) is a big difference ...with use, the battery remaining indicator displays the amount of the charge, or on the conditions under which the camera is being used and the state of power remaining using alkaline batteries, the correct battery remaining time is not displayed. 14 Change the batteries for fully ...
...batteries when opening or closing the battery/"Memory Stick" cover. Battery remaining indicator (When using the Nickel-Metal Hydride batteries) As the battery power decreases with new ones or fully charged Nickel-Metal Hydride batteries. • When the AC Adaptor (not supplied) is a big difference ...with use, the battery remaining indicator displays the amount of the charge, or on the conditions under which the camera is being used and the state of power remaining using alkaline batteries, the correct battery remaining time is not displayed. 14 Change the batteries for fully ...
Operating Instructions
Page 15
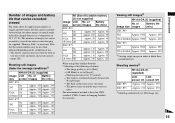
...numbers may be less than indicated depending on CIPA standard. (CIPA: Camera & Imaging Products Association) Viewing still images2) NH-AA-DA (2) (supplied) No. The zoom is based on the conditions of Battery size screen images life (min.) DSC-P93 On 5M Off Approx. 410 Approx. 205 Approx. 740 Approx. ... 80 Approx. 40 (E-Mail) Off Approx. 180 Approx. 90 DSC-P73 On 4M Off Approx. 110 Approx. 55 Approx. 240 Approx. 120 VGA On Approx. 110 Approx. 55 (E-Mail) Off Approx. 240 Approx. 120 When using Sony alkaline batteries 1) Shooting in normal mode with fully charged batteries at...
...numbers may be less than indicated depending on CIPA standard. (CIPA: Camera & Imaging Products Association) Viewing still images2) NH-AA-DA (2) (supplied) No. The zoom is based on the conditions of Battery size screen images life (min.) DSC-P93 On 5M Off Approx. 410 Approx. 205 Approx. 740 Approx. ... 80 Approx. 40 (E-Mail) Off Approx. 180 Approx. 90 DSC-P73 On 4M Off Approx. 110 Approx. 55 Approx. 240 Approx. 120 VGA On Approx. 110 Approx. 55 (E-Mail) Off Approx. 240 Approx. 120 When using Sony alkaline batteries 1) Shooting in normal mode with fully charged batteries at...
Operating Instructions
Page 16
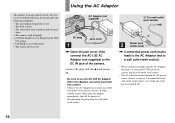
...socket). • The set to [Monitor] - Other AC adaptors cannot be recorded/viewed are decreased under the following conditions: - The camera has been turned on and off . 16 The battery power is low - AC Adaptor (not supplied) DC plug 1 Jack cover , Open the jack cover, then connect the AC-LS5 AC ...Adaptor (not supplied) to the DC IN jack of the camera. Connect the plug with this camera. • Connect the AC Adaptor to an easily accessible wall outlet (wall socket) close by disconnecting the plug from the AC power source (mains) as long as it is used - The flash is...
...socket). • The set to [Monitor] - Other AC adaptors cannot be recorded/viewed are decreased under the following conditions: - The camera has been turned on and off . 16 The battery power is low - AC Adaptor (not supplied) DC plug 1 Jack cover , Open the jack cover, then connect the AC-LS5 AC ...Adaptor (not supplied) to the DC IN jack of the camera. Connect the plug with this camera. • Connect the AC Adaptor to an easily accessible wall outlet (wall socket) close by disconnecting the plug from the AC power source (mains) as long as it is used - The flash is...
Operating Instructions
Page 17
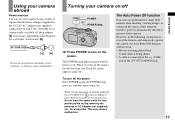
...any country or region with the battery charger (supplied) or the AC-LS5 AC Adaptor (not supplied) within 100 V to power the camera, the Auto Power Off function will not work. • Movies are performed for about three minutes when shooting, viewing images, or setting up the.... To turn off the power Press POWER again, the POWER lamp goes out, and the camera turns off POWER POWER lamp , Press POWER to move. Please be careful not to preserve battery power. Turning your camera on the design of the wall outlet (wall socket) [b]. Using your camera abroad Power sources You can use an...
...any country or region with the battery charger (supplied) or the AC-LS5 AC Adaptor (not supplied) within 100 V to power the camera, the Auto Power Off function will not work. • Movies are performed for about three minutes when shooting, viewing images, or setting up the.... To turn off the power Press POWER again, the POWER lamp goes out, and the camera turns off POWER POWER lamp , Press POWER to move. Please be careful not to preserve battery power. Turning your camera on the design of the wall outlet (wall socket) [b]. Using your camera abroad Power sources You can use an...
Operating Instructions
Page 18
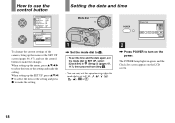
... time and the date again, set the mode dial to SET UP, select [Clock Set] in green and the Clock Set screen appears on the power. The POWER lamp lights in (Setup 2) (pages 47, 117), then proceed from Step 3. • You can carry out this operation even when the mode dial is.... When setting up the SET UP, press v/V/b/ B to select the item or the setting and press z to P, M or . How to use the control button Camera AF Mode: Digital Zoom: Date/Time: Red Eye Reduction: AF Illuminator: Auto Review: Single Smart Off Off Auto Off SELECT Setup 2 File Number: USB Connect: Video Out...
... time and the date again, set the mode dial to SET UP, select [Clock Set] in green and the Clock Set screen appears on the power. The POWER lamp lights in (Setup 2) (pages 47, 117), then proceed from Step 3. • You can carry out this operation even when the mode dial is.... When setting up the SET UP, press v/V/b/ B to select the item or the setting and press z to P, M or . How to use the control button Camera AF Mode: Digital Zoom: Date/Time: Red Eye Reduction: AF Illuminator: Auto Review: Single Smart Off Off Auto Off SELECT Setup 2 File Number: USB Connect: Video Out...

Operating Instructions
Page 19
... item. When this happens, reset the date and time by starting from [Y/M/D] (year/month/ day), [M/D/Y], and [D/M/Y]. • If the rechargeable button battery, which provides the power for noon. 19
... item. When this happens, reset the date and time by starting from [Y/M/D] (year/month/ day), [M/D/Y], and [D/M/Y]. • If the rechargeable button battery, which provides the power for noon. 19

Operating Instructions
Page 21
... Inserting and removing a "Memory Stick" Shooting still images Label side Terminal side Access lamp 1 , Open the battery/"Memory Stick" cover. Turn up the battery/"Memory ... the direction of the arrow. • Be careful not to pop it out. • Whenever the access lamp is lit, the camera is recording or reading out an image. If you insert a "Memory Stick," push it as far as it correctly, a proper recording...Memory Stick," see page 119. 2 , Insert the "Memory Stick." Never open the battery/"Memory Stick" cover or turn off the power at this time. The data may not be corrupted. 21
... Inserting and removing a "Memory Stick" Shooting still images Label side Terminal side Access lamp 1 , Open the battery/"Memory Stick" cover. Turn up the battery/"Memory ... the direction of the arrow. • Be careful not to pop it out. • Whenever the access lamp is lit, the camera is recording or reading out an image. If you insert a "Memory Stick," push it as far as it correctly, a proper recording...Memory Stick," see page 119. 2 , Insert the "Memory Stick." Never open the battery/"Memory Stick" cover or turn off the power at this time. The data may not be corrupted. 21
Operating Instructions
Page 22
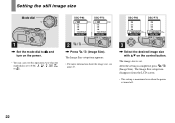
...is maintained even when the power is completed, press (Image Size). After the setting is turned off. 22 The image size is set to P, M, , , , , or . 2 , Press (Image Size). Setting the still image size Mode dial DSC-P93 5M 5M 3:2 3M 1M VGA(E-Mail) Image Size DSC-P73 4M 4M 3:2 3M... 1M VGA(E-Mail) Image Size DSC-P93 5M 3:2 3M 1M VGA(E-Mail) VGA Image Size DSC-P73 4M 3:2 3M 1M VGA(E-Mail) VGA Image Size 1 , Set the...
...is maintained even when the power is completed, press (Image Size). After the setting is turned off. 22 The image size is set to P, M, , , , , or . 2 , Press (Image Size). Setting the still image size Mode dial DSC-P93 5M 5M 3:2 3M 1M VGA(E-Mail) Image Size DSC-P73 4M 4M 3:2 3M... 1M VGA(E-Mail) Image Size DSC-P93 5M 3:2 3M 1M VGA(E-Mail) VGA Image Size DSC-P73 4M 3:2 3M 1M VGA(E-Mail) VGA Image Size 1 , Set the...
Operating Instructions
Page 25
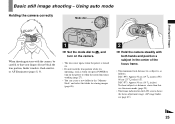
Using auto mode Holding the camera correctly Mode dial Shooting still images When shooting pictures with both hands and position a subject in the center of the focus frame. • The minimum focal distance to turn on the camera. • The lens cover opens when the power is turned on. • Do... not touch the lens portion while it is as when you press POWER to a subject is operating, such as follows: DSC-P93: Approx 50 cm (19 3/4 inches) (W)/ 60 cm ...
Using auto mode Holding the camera correctly Mode dial Shooting still images When shooting pictures with both hands and position a subject in the center of the focus frame. • The minimum focal distance to turn on the camera. • The lens cover opens when the power is turned on. • Do... not touch the lens portion while it is as when you press POWER to a subject is operating, such as follows: DSC-P93: Approx 50 cm (19 3/4 inches) (W)/ 60 cm ...
Operating Instructions
Page 26
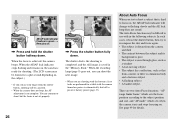
... on, power is hard to focus on , Press and hold the shutter button halfway down . When the focus is saved in the "Memory Stick." The shutter clicks, the shooting is completed, and the still image is achieved, the camera beeps. There are performed for a split second depending on the subject.)... two Auto Focus functions: "AF range finder frame" which sets when the camera starts and stops focusing on , the camera is ready for details. When the recording lamp (page 9) goes out, you can continue to recompose the shot and focus again. • The subject is distant from a mirror, or...
... on, power is hard to focus on , Press and hold the shutter button halfway down . When the focus is saved in the "Memory Stick." The shutter clicks, the shooting is completed, and the still image is achieved, the camera beeps. There are performed for a split second depending on the subject.)... two Auto Focus functions: "AF range finder frame" which sets when the camera starts and stops focusing on , the camera is ready for details. When the recording lamp (page 9) goes out, you can continue to recompose the shot and focus again. • The subject is distant from a mirror, or...
Operating Instructions
Page 31
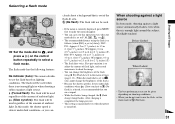
... the lamp goes out. • This setting is maintained even when the power is enough light around the subject. (Daylight synchro) Before flashed When flashed ... flash): The flash will be used regardless of the amount of ambient light. Selecting a flash mode Shooting still images VGA 101 98 SAF , Set the mode dial to , and press v ( ) on the ...2 1/2 inches) (T) • The flash fires twice. The flash mode has the following features. No indicator (Auto): The camera decides to use the flash, set to [Auto]): DSCP93: Approx. 0.2 m (7 7/8 inches) to 3.5 m (11 feet 5 7/8 inches) (W)/Approx....
... the lamp goes out. • This setting is maintained even when the power is enough light around the subject. (Daylight synchro) Before flashed When flashed ... flash): The flash will be used regardless of the amount of ambient light. Selecting a flash mode Shooting still images VGA 101 98 SAF , Set the mode dial to , and press v ( ) on the ...2 1/2 inches) (T) • The flash fires twice. The flash mode has the following features. No indicator (Auto): The camera decides to use the flash, set to [Auto]): DSCP93: Approx. 0.2 m (7 7/8 inches) to 3.5 m (11 feet 5 7/8 inches) (W)/Approx....

Operating Instructions
Page 33
The digital zoom does not function (page 27) - r Indicators off r LCD screen off r Indicators on • The ...screen, when the AE/AF lock lamp of the histogram, see page 56. • This setting is maintained even when the power is turned off. 33 This is set to [Single] (page 50) - AF mode is due to confirm the image using...The finder is convenient when you want to save battery power, or when it is difficult to the parallax effect. Each time you press , the display changes in the following order. Shooting still images Shooting images with the finder Finder Histogram on (Image...
The digital zoom does not function (page 27) - r Indicators off r LCD screen off r Indicators on • The ...screen, when the AE/AF lock lamp of the histogram, see page 56. • This setting is maintained even when the power is turned off. 33 This is set to [Single] (page 50) - AF mode is due to confirm the image using...The finder is convenient when you want to save battery power, or when it is difficult to the parallax effect. Each time you press , the display changes in the following order. Shooting still images Shooting images with the finder Finder Histogram on (Image...
Operating Instructions
Page 34
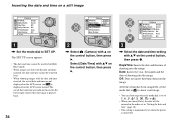
... v on the control button, then press B. Select [Date/Time] with v/V on the control button, then press z. Inserting the date and time on a still image Camera AF Mode: Digital Zoom: Date/Time: Red Eye Reduction: AF Illuminator: Auto Review: Single Smart Off Off Auto Off SELECT 1 , Set the mode dial to P, M, ,...• When images are shot with the date and time inserted, the date and time cannot be inserted in "Setting the date and time" (page 18). • This setting is maintained even when the power is played back. 34 Camera AF Mode: Day&Time Digital Zoom: Date Date/Time:...
... v on the control button, then press B. Select [Date/Time] with v/V on the control button, then press z. Inserting the date and time on a still image Camera AF Mode: Digital Zoom: Date/Time: Red Eye Reduction: AF Illuminator: Auto Review: Single Smart Off Off Auto Off SELECT 1 , Set the mode dial to P, M, ,...• When images are shot with the date and time inserted, the date and time cannot be inserted in "Setting the date and time" (page 18). • This setting is maintained even when the power is played back. 34 Camera AF Mode: Day&Time Digital Zoom: Date Date/Time:...
Operating Instructions
Page 97
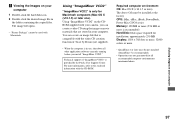
... hard disk icon. 2 Double-click the desired image file in use, shut down all recommended computer environments mentioned above OS must be used with your camera, you install "ImageMixer VCD2." The image file opens. • "Picture Package" cannot be pre-installed (QuickTime 5 is recommended). • Operations...containing the copied files. For more • QuickTime 4 or later must be installed at the factory CPU: iMac, eMac, iBook, PowerBook, Power Mac G3/G4 series Memory: 128 MB or more (256 MB or more is only for all other application software currently running before you can...
... hard disk icon. 2 Double-click the desired image file in use, shut down all recommended computer environments mentioned above OS must be used with your camera, you install "ImageMixer VCD2." The image file opens. • "Picture Package" cannot be pre-installed (QuickTime 5 is recommended). • Operations...containing the copied files. For more • QuickTime 4 or later must be installed at the factory CPU: iMac, eMac, iBook, PowerBook, Power Mac G3/G4 series Memory: 128 MB or more (256 MB or more is only for all other application software currently running before you can...


