
Operating Instructions
Page 4
...DIGITAL DEVICE COMPLIES WITH PART 15 OF THE FCC RULES AND THE CANADIAN ICES-003 OPERATION IS SUBJECT TO THE FOLLOWING TWO CONDITIONS: (1) THIS DEVICE MAY NOT CAUSE HARMFUL INTERFERENCE, AND (2) THIS DEVICE MUST ACCEPT ANY INTERFERENCE RECEIVED, INCLUDING INTERFERENCE THAT MAY CAUSE UNDESIRED OPERATION. 4 Read this may render the "Memory Stick..." unusable or image data breakdown, damage or loss may be compensated for Camera File system universal standard established by the JEITA (Japan Electronics and Information...
...DIGITAL DEVICE COMPLIES WITH PART 15 OF THE FCC RULES AND THE CANADIAN ICES-003 OPERATION IS SUBJECT TO THE FOLLOWING TWO CONDITIONS: (1) THIS DEVICE MAY NOT CAUSE HARMFUL INTERFERENCE, AND (2) THIS DEVICE MUST ACCEPT ANY INTERFERENCE RECEIVED, INCLUDING INTERFERENCE THAT MAY CAUSE UNDESIRED OPERATION. 4 Read this may render the "Memory Stick..." unusable or image data breakdown, damage or loss may be compensated for Camera File system universal standard established by the JEITA (Japan Electronics and Information...
Operating Instructions
Page 5
... • is a trademark of Sony Corporation. • "Memory Stick," , "Memory Stick PRO," , "Memory Stick Duo," , "Memory Stick PRO Duo," , "MagicGate," are trademarks of Sony Corporation. • Picture Package is equipped with power zoom lens. Do not expose the camera to sand or dust Using the camera in the United States and/or ... The pictures used in this manual The photographs used in this camera. If water gets inside of pictures in this manual are not actual images shot using the camera. Do not aim the camera at the sun or other countries. • Intel, MMX, ...
... • is a trademark of Sony Corporation. • "Memory Stick," , "Memory Stick PRO," , "Memory Stick Duo," , "Memory Stick PRO Duo," , "MagicGate," are trademarks of Sony Corporation. • Picture Package is equipped with power zoom lens. Do not expose the camera to sand or dust Using the camera in the United States and/or ... The pictures used in this manual The photographs used in this camera. If water gets inside of pictures in this manual are not actual images shot using the camera. Do not aim the camera at the sun or other countries. • Intel, MMX, ...
Operating Instructions
Page 6
...Using the AC Adaptor 16 Using your camera abroad 17 Turning your camera on a TV screen 40 Deleting still images Deleting images 42 Formatting a "Memory Stick 44 Before advanced operations How to setup and operate your camera 38 Viewing images on /off 17 ...still image shooting - Quick Review 27 Using the zoom feature 27 Shooting close-ups - Multi Burst 61 Shooting with special effects - AF range finder 49 Choosing a focus operation - Table of your camera 46 Changing menu settings 46 Changing items in Multi Burst mode - Using auto mode 25 Checking the last image shot...
...Using the AC Adaptor 16 Using your camera abroad 17 Turning your camera on a TV screen 40 Deleting still images Deleting images 42 Formatting a "Memory Stick 44 Before advanced operations How to setup and operate your camera 38 Viewing images on /off 17 ...still image shooting - Quick Review 27 Using the zoom feature 27 Shooting close-ups - Multi Burst 61 Shooting with special effects - AF range finder 49 Choosing a focus operation - Table of your camera 46 Changing menu settings 46 Changing items in Multi Burst mode - Using auto mode 25 Checking the last image shot...
Operating Instructions
Page 7
...images shot in Multi Burst mode 66 Playing back continuously 67 Playing back frame by frame 67 Still image editing Protecting images - Playback zoom 64 Playing back successive images - Protect 68 Changing image size - Resize 69 Choosing images to your computer - Print (DPOF) mark 70 Still ... items 116 Precautions 118 The "Memory Stick 119 The nickel-metal hydride batteries ........120 The battery charger 121 Specifications 121 The LCD screen 124 Index Index 128 7 For Windows users 84 Installing the USB driver 85 Connecting the camera to your computer 86 Copying images...
...images shot in Multi Burst mode 66 Playing back continuously 67 Playing back frame by frame 67 Still image editing Protecting images - Playback zoom 64 Playing back successive images - Protect 68 Changing image size - Resize 69 Choosing images to your computer - Print (DPOF) mark 70 Still ... items 116 Precautions 118 The "Memory Stick 119 The nickel-metal hydride batteries ........120 The battery charger 121 Specifications 121 The LCD screen 124 Index Index 128 7 For Windows users 84 Installing the USB driver 85 Connecting the camera to your computer 86 Copying images...
Operating Instructions
Page 9
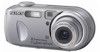
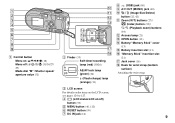
... Size/Delete) button (22, 42) K Zoom (W/T) buttons (27)/ (Index) button (39)/ / (Playback zoom) buttons (64) L Access lamp (21) M OPEN button (13) N Battery/"Memory Stick" cover (13) O Battery insertion slot (13) P "Memory Stick" insertion slot (21) Q Jack cover (16) R Hook for wrist strap (bottom surface) Attaching the wrist strap. 9 A Control button Menu on the LCD...
... Size/Delete) button (22, 42) K Zoom (W/T) buttons (27)/ (Index) button (39)/ / (Playback zoom) buttons (64) L Access lamp (21) M OPEN button (13) N Battery/"Memory Stick" cover (13) O Battery insertion slot (13) P "Memory Stick" insertion slot (21) Q Jack cover (16) R Hook for wrist strap (bottom surface) Attaching the wrist strap. 9 A Control button Menu on the LCD...
Operating Instructions
Page 13
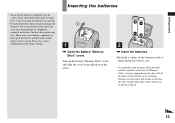
...use batteries from the skin, the operating time of the arrow. 2 , Insert the batteries. Turn up the battery/"Memory Stick" cover, and slide the cover in the slide show mode (page 65) and leave it that have been partially ...the poles of the batteries and the terminals of the battery charger. 1 , Open the battery/"Memory Stick" cover. These may cause a malfunction of the battery/"Memory Stick" cover by wiping them with a film of dirt or oil from which the seals have ... injury may cause leakage, explosion, or heat-up the batteries completely, put the camera in the direction of the...
...use batteries from the skin, the operating time of the arrow. 2 , Insert the batteries. Turn up the battery/"Memory Stick" cover, and slide the cover in the slide show mode (page 65) and leave it that have been partially ...the poles of the batteries and the terminals of the battery charger. 1 , Open the battery/"Memory Stick" cover. These may cause a malfunction of the battery/"Memory Stick" cover by wiping them with a film of dirt or oil from which the seals have ... injury may cause leakage, explosion, or heat-up the batteries completely, put the camera in the direction of the...
Operating Instructions
Page 14
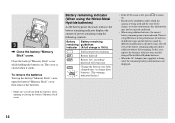
... by different manufacturers, the power may shut off , press to turn it on. • Based on the conditions under which the camera is being used , the remaining battery information is closed when it clicks. Change the batteries for fully charged ones, or charge these ...battery remaining indicator shows sufficient battery life remaining. There is not indicated. 3 , Close the battery/"Memory Stick" cover. To remove the batteries Turn up the battery/"Memory Stick" cover, open the battery/"Memory Stick" cover, then remove the batteries. • Make sure you do not drop the batteries when ...
... by different manufacturers, the power may shut off , press to turn it on. • Based on the conditions under which the camera is being used , the remaining battery information is closed when it clicks. Change the batteries for fully charged ones, or charge these ...battery remaining indicator shows sufficient battery life remaining. There is not indicated. 3 , Close the battery/"Memory Stick" cover. To remove the batteries Turn up the battery/"Memory Stick" cover, open the battery/"Memory Stick" cover, then remove the batteries. • Make sure you do not drop the batteries when ...
Operating Instructions
Page 15
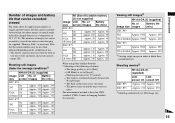
...- The numbers of images that can be recorded or viewed take into account changing the supplied "Memory Stick" as time passes (page 120). The image quality is set to [Fine] - [AF ... on CIPA standard. (CIPA: Camera & Imaging Products Association) Viewing still images2) NH-AA-DA (2) (supplied) No. of Battery size screen images life (min.) DSC-P93 5M On Off Approx. 80...When using Sony alkaline batteries 1) Shooting in order at about three second intervals Shooting movies3) NH-AA-DA (2) (supplied) LCD LCD screen On screen Off DSC-P93 Approx. 210 Approx. 270 DSC-P73 Approx...
...- The numbers of images that can be recorded or viewed take into account changing the supplied "Memory Stick" as time passes (page 120). The image quality is set to [Fine] - [AF ... on CIPA standard. (CIPA: Camera & Imaging Products Association) Viewing still images2) NH-AA-DA (2) (supplied) No. of Battery size screen images life (min.) DSC-P93 5M On Off Approx. 80...When using Sony alkaline batteries 1) Shooting in order at about three second intervals Shooting movies3) NH-AA-DA (2) (supplied) LCD LCD screen On screen Off DSC-P93 Approx. 210 Approx. 270 DSC-P73 Approx...

Operating Instructions
Page 21
... you do not insert it out. • Whenever the access lamp is lit, the camera is recording or reading out an image. Insert the "Memory Stick" all the way in until it clicks as it can go. Shooting still images Inserting and removing a "Memory Stick" Shooting still images Label side Terminal side Access lamp 1 , Open the battery...
... you do not insert it out. • Whenever the access lamp is lit, the camera is recording or reading out an image. Insert the "Memory Stick" all the way in until it clicks as it can go. Shooting still images Inserting and removing a "Memory Stick" Shooting still images Label side Terminal side Access lamp 1 , Open the battery...
Operating Instructions
Page 23
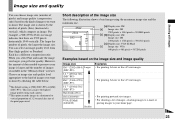
...still images Image size and quality You can choose image size (number of pixels) and image quality (compression ratio) based on the image size and image quality Image size 5M 1) (2592×1944) Larger (DSC-P93) 3:2 2) (2592×1728) (DSC-P93) 4M 1) (2304×1728) (DSC-P73) 3:2 2) (2304×1536) (DSC... shoot. Short description of the image size The following illustration shows a brief image using each camera. 2) This option records images in the "Memory Stick" is [5M] (DSC-P93) or [4M] (DSC-P73). However, the amount of data needed to match the size of images recordable in a...
...still images Image size and quality You can choose image size (number of pixels) and image quality (compression ratio) based on the image size and image quality Image size 5M 1) (2592×1944) Larger (DSC-P93) 3:2 2) (2592×1728) (DSC-P93) 4M 1) (2304×1728) (DSC-P73) 3:2 2) (2304×1536) (DSC... shoot. Short description of the image size The following illustration shows a brief image using each camera. 2) This option records images in the "Memory Stick" is [5M] (DSC-P93) or [4M] (DSC-P73). However, the amount of data needed to match the size of images recordable in a...
Operating Instructions
Page 24
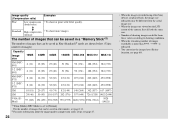
... • To shoot more images. (normal) The number of images that can be saved in a "Memory Stick"3) The number of images that can be saved in Fine (Standard)4) mode are shown below. (Units: number...image quality (compression ratio) setup, see page 47. 24 • When the images recorded using other Sony devices are played back, the image size indication may be different from the actual image size. •... When the images are viewed on the LCD screen of the camera, they all look the same size. • Number of shooting images can differ from these values...
... • To shoot more images. (normal) The number of images that can be saved in a "Memory Stick"3) The number of images that can be saved in Fine (Standard)4) mode are shown below. (Units: number...image quality (compression ratio) setup, see page 47. 24 • When the images recorded using other Sony devices are played back, the image size indication may be different from the actual image size. •... When the images are viewed on the LCD screen of the camera, they all look the same size. • Number of shooting images can differ from these values...
Operating Instructions
Page 25
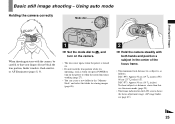
... 49.) 25 Using auto mode Holding the camera correctly Mode dial Shooting still images When shooting pictures with both hands and position a subject in the "Memory Stick" and select the folder for storing images (page 48). 2 , Hold the camera steadily with the camera, be careful so that your fingers do ...on the camera. • The lens cover opens when the power is turned on. • Do not touch the lens portion while it is operating, such as when you press POWER to a subject is as follows: DSC-P93: Approx 50 cm (19 3/4 inches) (W)/ 60 cm (23 5/8 inches) (T). Basic still image shooting...
... 49.) 25 Using auto mode Holding the camera correctly Mode dial Shooting still images When shooting pictures with both hands and position a subject in the "Memory Stick" and select the folder for storing images (page 48). 2 , Hold the camera steadily with the camera, be careful so that your fingers do ...on the camera. • The lens cover opens when the power is turned on. • Do not touch the lens portion while it is operating, such as when you press POWER to a subject is as follows: DSC-P93: Approx 50 cm (19 3/4 inches) (W)/ 60 cm (23 5/8 inches) (T). Basic still image shooting...
Operating Instructions
Page 26
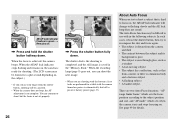
...the recording lamp (page 9) goes out, you try to recompose the shot and focus again. • The subject is not set properly. 26 ... "AF range finder frame" which sets when the camera starts and stops focusing on. The shutter clicks, the shooting is completed, and the still image is achieved, the camera beeps. In such cases, release the shutter button, ... and a lustrous subject • A flashing subject • A backlit subject. When the focus is saved in the "Memory Stick." There are performed for details. VGA FINE 101 98 SAF 250 F2.0 AE/AF lock indicator Flashes in green t 3...
...the recording lamp (page 9) goes out, you try to recompose the shot and focus again. • The subject is not set properly. 26 ... "AF range finder frame" which sets when the camera starts and stops focusing on. The shutter clicks, the shooting is completed, and the still image is achieved, the camera beeps. In such cases, release the shutter button, ... and a lustrous subject • A flashing subject • A backlit subject. When the focus is saved in the "Memory Stick." There are performed for details. VGA FINE 101 98 SAF 250 F2.0 AE/AF lock indicator Flashes in green t 3...
Operating Instructions
Page 44
...Protected images are already formatted, and can be used immediately. • When you want to format into the camera. • The term "formatting" means preparing a "Memory Stick" to record images; To cancel the deletion Select [Exit] with b on the LCD screen and all of ... erased. 44 "Access" appears on the control button, then press z. 1 , Insert the "Memory Stick" you format a "Memory Stick," be aware that all of the unprotected images in the folder are deleted. Formatting a "Memory Stick" 4 , Press (delete). Select [OK] with B on the control button, then press z....
...Protected images are already formatted, and can be used immediately. • When you want to format into the camera. • The term "formatting" means preparing a "Memory Stick" to record images; To cancel the deletion Select [Exit] with b on the LCD screen and all of ... erased. 44 "Access" appears on the control button, then press z. 1 , Insert the "Memory Stick" you format a "Memory Stick," be aware that all of the unprotected images in the folder are deleted. Formatting a "Memory Stick" 4 , Press (delete). Select [OK] with B on the control button, then press z....
Operating Instructions
Page 45
OK Cancel 2 , Set the mode dial to SET UP, and turn on the camera. 3 , Select (Memory Stick Tool) with B on the control button. Select [Format] with v/V on the control button, then press B. Select [OK] with v on the control button, then press z. To ... "Formatting" message appears on the LCD screen. Folder: Format All data will be erased Ready? When this message disappears, the format is complete. 45 Deleting still images Memory Stick Tool Format: OK Create REC.
OK Cancel 2 , Set the mode dial to SET UP, and turn on the camera. 3 , Select (Memory Stick Tool) with B on the control button. Select [Format] with v/V on the control button, then press B. Select [OK] with v on the control button, then press z. To ... "Formatting" message appears on the LCD screen. Folder: Format All data will be erased Ready? When this message disappears, the format is complete. 45 Deleting still images Memory Stick Tool Format: OK Create REC.
Operating Instructions
Page 48
...folder selection screen appears. You can create folders up to store images. Folder Creating REC. A new folder is created with the camera. • Images are recorded in the "Memory Stick," and the folder becomes the recording folder. Folder] with B/V, and [OK] with v/V, [Change REC. Of Files: 0 ... No. You cannot move images to SET UP. b Select (Memory Stick Tool) with v , then press z. Create REC. Select REC. Folder] with B/v/V, and [OK] with v , then press z. Creating or selecting a folder Your camera can be stored in one higher than the largest number in the...
...folder selection screen appears. You can create folders up to store images. Folder Creating REC. A new folder is created with the camera. • Images are recorded in the "Memory Stick," and the folder becomes the recording folder. Folder] with B/V, and [OK] with v/V, [Change REC. Of Files: 0 ... No. You cannot move images to SET UP. b Select (Memory Stick Tool) with v , then press z. Create REC. Select REC. Folder] with B/v/V, and [OK] with v , then press z. Creating or selecting a folder Your camera can be stored in one higher than the largest number in the...
Operating Instructions
Page 60
You can shoot images until the maximum number of the "Memory Stick" is used up, recording stops even if you release the shutter ...and image quality settings. • When the battery level is insufficient or the capacity of images are shot when you can do the next shooting after "Recording" disappears from the LCD screen. The maximum number...[ ] (Flash Level) with b/B, then select the desired setting with v/ V. Shooting images in the midst of images shot continuously DSC-P93: (Units: images) Fine Standard 5M 9 15 3:2 9 15 3M 13 24 1M 32 59 VGA (E-Mail) 100...
You can shoot images until the maximum number of the "Memory Stick" is used up, recording stops even if you release the shutter ...and image quality settings. • When the battery level is insufficient or the capacity of images are shot when you can do the next shooting after "Recording" disappears from the LCD screen. The maximum number...[ ] (Flash Level) with b/B, then select the desired setting with v/ V. Shooting images in the midst of images shot continuously DSC-P93: (Units: images) Fine Standard 5M 9 15 3:2 9 15 3M 13 24 1M 32 59 VGA (E-Mail) 100...
Operating Instructions
Page 63
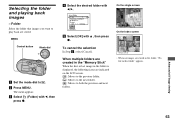
...Selecting the folder and playing back images - Select Folder 102 2/2 Folder Name:102MSDCF No. b Press MENU. Advanced still image viewing On the single screen VGA 101 9/9 101-0009 2005 1 1 10:30PM BACK/NEXT VOLUME On the... the LCD screen. : Moves to the previous folder. : Moves to the next folder. : Moves to . Advanced still image viewing 63 The menu appears. c Select (Folder) with v , then press z. MENU Control button Mode dial ... folder that images you want to play back are created in the "Memory Stick" When the first or last image in this folder" appears.
...Selecting the folder and playing back images - Select Folder 102 2/2 Folder Name:102MSDCF No. b Press MENU. Advanced still image viewing On the single screen VGA 101 9/9 101-0009 2005 1 1 10:30PM BACK/NEXT VOLUME On the... the LCD screen. : Moves to the previous folder. : Moves to the next folder. : Moves to . Advanced still image viewing 63 The menu appears. c Select (Folder) with v , then press z. MENU Control button Mode dial ... folder that images you want to play back are created in the "Memory Stick" When the first or last image in this folder" appears.

Operating Instructions
Page 65
.../30 sec/1 min Image Folder:Plays back all the images in the selected folder. Repeat On:Plays the images back repeatedly. c Select (Slide) with v/V/b/B. Advanced still image viewing 65 Off:Plays through the images one after another. d Select [Start] with B, then press z. To skip to . Slide show Press B (next) or b (... is useful for checking your images, or for giving a presentation. Playing back successive images - The menu appears. All:Plays back all the images in the "Memory Stick." To stop slide show playback Press z, select [Exit] with V/B, then press z.
.../30 sec/1 min Image Folder:Plays back all the images in the selected folder. Repeat On:Plays the images back repeatedly. c Select (Slide) with v/V/b/B. Advanced still image viewing 65 Off:Plays through the images one after another. d Select [Start] with B, then press z. To skip to . Slide show Press B (next) or b (... is useful for checking your images, or for giving a presentation. Playing back successive images - The menu appears. All:Plays back all the images in the "Memory Stick." To stop slide show playback Press z, select [Exit] with V/B, then press z.

Operating Instructions
Page 68
MENU Control button Mode dial • Note that formatting the "Memory Stick" erases all the data in the "Memory Stick" even if images are protected, and these images cannot be recovered. • It may take some time to . b Display the image you want to protect ... prevent accidental erasure of an important image, you want to the Index screen. c Press MENU. The green - (Protect) mark is indicated on the selected image. Still image editing On the Index screen a Set the mode dial to , press (index) to switch to protect with b/B, then press z. VGA 101 2/9 Protect Exit BACK...
MENU Control button Mode dial • Note that formatting the "Memory Stick" erases all the data in the "Memory Stick" even if images are protected, and these images cannot be recovered. • It may take some time to . b Display the image you want to protect ... prevent accidental erasure of an important image, you want to the Index screen. c Press MENU. The green - (Protect) mark is indicated on the selected image. Still image editing On the Index screen a Set the mode dial to , press (index) to switch to protect with b/B, then press z. VGA 101 2/9 Protect Exit BACK...


