Operating Instructions
Page 1
... provided below. Owner's Record The model and serial numbers are located on your Sony dealer regarding this manual thoroughly, and retain it for future reference. Model No. DSC-P73/P93 © 2004 Sony Corporation 3-091-340-12(1) Getting started Shooting still images Viewing still images Deleting still images Before advanced operations Advanced still image shooting Advanced still image viewing Still image editing Still image printing PictBridge printer) Enjoying movies Enjoying images on the bottom. Digital Still Camera Operating Instructions Before operating the unit...
... provided below. Owner's Record The model and serial numbers are located on your Sony dealer regarding this manual thoroughly, and retain it for future reference. Model No. DSC-P73/P93 © 2004 Sony Corporation 3-091-340-12(1) Getting started Shooting still images Viewing still images Deleting still images Before advanced operations Advanced still image shooting Advanced still image viewing Still image editing Still image printing PictBridge printer) Enjoying movies Enjoying images on the bottom. Digital Still Camera Operating Instructions Before operating the unit...
Operating Instructions
Page 3
... the picture and sound of FCC Rules. Please consult with the limits sets out in a particular installation. For more of rechargeable batteries, call toll free 1-800-822-8837, or visit http://www.rbrc.org/ Caution: Do not handle damaged or leaking Nickel Metal Hydride batteries. The supplied interface cable must be used with the equipment in the plug supplied need...
... the picture and sound of FCC Rules. Please consult with the limits sets out in a particular installation. For more of rechargeable batteries, call toll free 1-800-822-8837, or visit http://www.rbrc.org/ Caution: Do not handle damaged or leaking Nickel Metal Hydride batteries. The supplied interface cable must be used with the equipment in the plug supplied need...

Operating Instructions
Page 4
... camera or recording medium, etc. Exposing the LCD screen, the finder or the lens to direct sunlight for if recording or playback is not possible due to a malfunction of data loss, always copy (back up) data to record images, this first Trial recording Before you record one-time events, you may be some tiny black points and/or bright points (white, red, blue or green in a cold location. This is working...
... camera or recording medium, etc. Exposing the LCD screen, the finder or the lens to direct sunlight for if recording or playback is not possible due to a malfunction of data loss, always copy (back up) data to record images, this first Trial recording Before you record one-time events, you may be some tiny black points and/or bright points (white, red, blue or green in a cold location. This is working...
Operating Instructions
Page 6
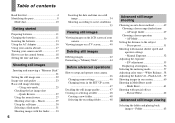
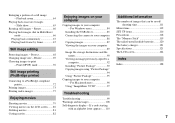
... camera 46 Changing menu settings 46 Changing items in Multi Burst mode - Manual Exposure 52 Adjusting the exposure - AF range finder 49 Choosing a focus operation - Picture Effect 62 Advanced still image viewing Selecting the folder and playing back images - Folder 63 AF Mode 50 Setting the distance to use the control button 18 Setting the date and time 18 Shooting still images Inserting and removing a "Memory Stick 21 Setting the still image size 22 Image size and quality 23 Basic still image shooting - Multi Burst 61 Shooting with manual shutter speed and aperture...
... camera 46 Changing menu settings 46 Changing items in Multi Burst mode - Manual Exposure 52 Adjusting the exposure - AF range finder 49 Choosing a focus operation - Picture Effect 62 Advanced still image viewing Selecting the folder and playing back images - Folder 63 AF Mode 50 Setting the distance to use the control button 18 Setting the date and time 18 Shooting still images Inserting and removing a "Memory Stick 21 Setting the still image size 22 Image size and quality 23 Basic still image shooting - Multi Burst 61 Shooting with manual shutter speed and aperture...
Operating Instructions
Page 7
... Using "Picture Package 95 Copying images to your computer - For Windows users 84 Installing the USB driver 85 Connecting the camera to your computer 86 Copying images 87 Viewing the images on your computer Copying images to print - Playback zoom 64 Playing back successive images - Slide show 65 Rotating still images - Protect 68 Changing image size - Resize 69 Choosing images to your computer - Enlarging a portion of images that can be saved/ shooting time 111 Menu items 112 SET UP items 116 Precautions 118 The "Memory Stick...
... Using "Picture Package 95 Copying images to your computer - For Windows users 84 Installing the USB driver 85 Connecting the camera to your computer 86 Copying images 87 Viewing the images on your computer Copying images to print - Playback zoom 64 Playing back successive images - Slide show 65 Rotating still images - Protect 68 Changing image size - Resize 69 Choosing images to your computer - Enlarging a portion of images that can be saved/ shooting time 111 Menu items 112 SET UP items 116 Precautions 118 The "Memory Stick...
Operating Instructions
Page 18
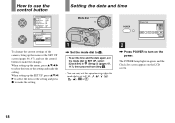
... press z to make the setting. When setting up the menu, press v/V/b/B to select the item or the setting and make the changes. How to use the control button Camera AF Mode: Digital Zoom: Date/Time: Red Eye Reduction: AF Illuminator: Auto Review: Single Smart Off Off Auto Off SELECT Setup 2 File Number: USB Connect: Video Out: OK Clock Set: Cancel To change the current settings of the camera, bring up the menu or the SET UP screen (pages 46, 47), and use the control button to make the setting.
... press z to make the setting. When setting up the menu, press v/V/b/B to select the item or the setting and make the changes. How to use the control button Camera AF Mode: Digital Zoom: Date/Time: Red Eye Reduction: AF Illuminator: Auto Review: Single Smart Off Off Auto Off SELECT Setup 2 File Number: USB Connect: Video Out: OK Clock Set: Cancel To change the current settings of the camera, bring up the menu or the SET UP screen (pages 46, 47), and use the control button to make the setting.
Operating Instructions
Page 47
... still image quality from [Fine] or [Standard]. c Select (P. Camera AF Mode: Digital Zoom: Date/Time: Red Eye Reduction: AF Illuminator: Auto Review: Single Smart Off Off Auto Off SELECT b Select the setting item you select turns yellow. Setup 2 File Number: USB Connect: Video Out: OK Clock Set: Cancel c Press z on the SET UP items, see page 116. b Press MENU. The menu appears. Quality) with b/B, then select the desired image quality with v/V/b/B on the control button. The SET UP screen appears. MENU Control button Mode...
... still image quality from [Fine] or [Standard]. c Select (P. Camera AF Mode: Digital Zoom: Date/Time: Red Eye Reduction: AF Illuminator: Auto Review: Single Smart Off Off Auto Off SELECT b Select the setting item you select turns yellow. Setup 2 File Number: USB Connect: Video Out: OK Clock Set: Cancel c Press z on the SET UP items, see page 116. b Press MENU. The menu appears. Quality) with b/B, then select the desired image quality with v/V/b/B on the control button. The SET UP screen appears. MENU Control button Mode...
Operating Instructions
Page 87
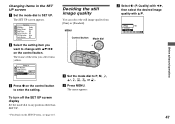
... file name, you copy it. Enjoying images on your computer P Disconnecting the USB cable, removing the "Memory Stick," or turning off the camera. Double-click here 2 Click (Sony DSC), then click [Stop]. 3 Confirm the device on the tasktray. c Right-click the image file to display the menu, then select [Paste] from the menu. Copying images - For Windows 98 or 98SE users Confirm that image with the camera, perform the operation on the screen are turned white...
... file name, you copy it. Enjoying images on your computer P Disconnecting the USB cable, removing the "Memory Stick," or turning off the camera. Double-click here 2 Click (Sony DSC), then click [Stop]. 3 Confirm the device on the tasktray. c Right-click the image file to display the menu, then select [Paste] from the menu. Copying images - For Windows 98 or 98SE users Confirm that image with the camera, perform the operation on the screen are turned white...
Operating Instructions
Page 92
... already deleted from [Removable Disk] or [Sony MemoryStick] in [My Computer]. 3 Right-click the [sssMSDCF] folder in use the "Picture Package" software on how to 999. Installing the "Picture Package" software installs the USB driver at the same time. • When the computer is no folder to a folder on the camera. • If the warning message for overwriting the data appears, enter other than this camera may be played back on the "Memory...
... already deleted from [Removable Disk] or [Sony MemoryStick] in [My Computer]. 3 Right-click the [sssMSDCF] folder in use the "Picture Package" software on how to 999. Installing the "Picture Package" software installs the USB driver at the same time. • When the computer is no folder to a folder on the camera. • If the warning message for overwriting the data appears, enter other than this camera may be played back on the "Memory...
Operating Instructions
Page 93
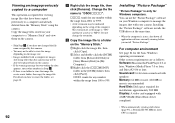
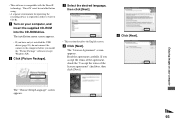
... carefully. a Turn on your computer, and insert the supplied CD-ROM into the CD-ROM drive. e Click [Next]. The "Choose Setup Language" screen appears. 93 d Click [Next]. If you install the "Picture Package" software (except Windows XP). b Click [Picture Package]. The "License Agreement" screen appears. The installation menu screen appears. • If you have not yet installed the USB driver (page 85), do not connect the camera to...
... carefully. a Turn on your computer, and insert the supplied CD-ROM into the CD-ROM drive. e Click [Next]. The "Choose Setup Language" screen appears. 93 d Click [Next]. If you install the "Picture Package" software (except Windows XP). b Click [Picture Package]. The "License Agreement" screen appears. The installation menu screen appears. • If you have not yet installed the USB driver (page 85), do not connect the camera to...
Operating Instructions
Page 100
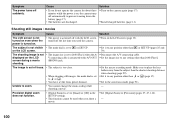
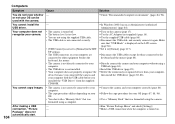
... auto focus mode (page 51). p Install charged batteries (page 11). turned on the LCD screen (page 33). p Set the macro recording mode. or SET UP (pages 25 and The shooting image is not displayed on the camera again (page 17). Precision digital zoom does not function. • [Digital Zoom] is connected to [Smart] or [Off] in the SET UP settings. • This function cannot be used the camera. Symptom The power turns off the last time you used when you do not operate the camera...
... auto focus mode (page 51). p Install charged batteries (page 11). turned on the LCD screen (page 33). p Set the macro recording mode. or SET UP (pages 25 and The shooting image is not displayed on the camera again (page 17). Precision digital zoom does not function. • [Digital Zoom] is connected to [Smart] or [Off] in the SET UP settings. • This function cannot be used the camera. Symptom The power turns off the last time you used when you do not operate the camera...
Operating Instructions
Page 101
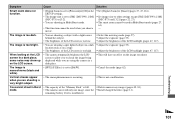
... used in Multi Burst mode (pages 27, 61). - p Adjust the exposure (page 55). p Cancel the mode (page 62). The image is occurring. You cannot shoot in Burst • The capacity of the LCD screen is too high. Symptom Cause Solution Smart zoom does not function. • [Digital Zoom] is set to [Precision]or [Off] in the SET UP settings. • The image size is full. The image is monochrome (black and white...
... used in Multi Burst mode (pages 27, 61). - p Adjust the exposure (page 55). p Cancel the mode (page 62). The image is occurring. You cannot shoot in Burst • The capacity of the LCD screen is too high. Symptom Cause Solution Smart zoom does not function. • [Digital Zoom] is set to [Precision]or [Off] in the SET UP settings. • The image size is full. The image is monochrome (black and white...

Operating Instructions
Page 102
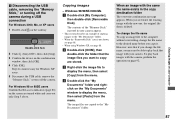
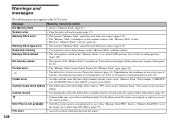
Recording takes a long time. • NR slow shutter function is not a malfunction. to (page 79). The eyes of the subject - come out red. on the "Memory Stick" is set to the LOCK position. • You cannot shoot while the flash is charging. • When you shoot a still image, the mode dial is set to or SET UP. • The mode dial is not set to when you want to shoot a movie. • The image size is...
Recording takes a long time. • NR slow shutter function is not a malfunction. to (page 79). The eyes of the subject - come out red. on the "Memory Stick" is set to the LOCK position. • You cannot shoot while the flash is charging. • When you shoot a still image, the mode dial is set to or SET UP. • The mode dial is not set to when you want to shoot a movie. • The image size is...
Operating Instructions
Page 104
... shot with a "Memory Stick" that was formatted using the camera. After making a USB connection, "Picture Package" does not automatically start. p In Windows 2000, log on the camera (page 17). p Connect the camera and your OS (pages 87, 88, 96). p Follow the copy procedure for those connected to the keyboard and the mouse (page 84). p Use a "Memory Stick" that "USB Mode" is turned on the LCD screen (page 86). p Make a USB connection when the computer is displayed on . Solution...
... shot with a "Memory Stick" that was formatted using the camera. After making a USB connection, "Picture Package" does not automatically start. p In Windows 2000, log on the camera (page 17). p Connect the camera and your OS (pages 87, 88, 96). p Follow the copy procedure for those connected to the keyboard and the mouse (page 84). p Use a "Memory Stick" that "USB Mode" is turned on the LCD screen (page 86). p Make a USB connection when the computer is displayed on . Solution...
Operating Instructions
Page 108
... create any more folders • The folder whose first three digits of remaining battery time left. • A folder with the same first three digits number already exists on the "Memory Stick." File error • An error occurred while playing back the image. 108 Format the "Memory Stick" again (page 44). Depending on the "Memory Stick" with your camera (page 119). Insert a "Memory Stick PRO" or set to insufficient light. Set it to...
... create any more folders • The folder whose first three digits of remaining battery time left. • A folder with the same first three digits number already exists on the "Memory Stick." File error • An error occurred while playing back the image. 108 Format the "Memory Stick" again (page 44). Depending on the "Memory Stick" with your camera (page 119). Insert a "Memory Stick PRO" or set to insufficient light. Set it to...
Operating Instructions
Page 116
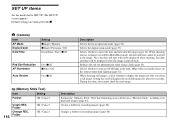
... cannot shoot the next image. (Memory Stick Tool) Item Format Setting OK / Cancel 116 Create REC. The SET UP screen appears. Also, the date and time will be displayed when shooting. Helps when it is played back. Default settings are indicated with x. (Camera) Item AF Mode Digital Zoom Date/Time Setting xSingle / Monitor xSmart / Precision / Off Day&Time / Date / xOff Red Eye Reduction AF Illuminator Auto Review On / xOff xAuto / Off On / xOff Description Selects the focus operation mode (page 50). Changes a folder for recording images...
... cannot shoot the next image. (Memory Stick Tool) Item Format Setting OK / Cancel 116 Create REC. The SET UP screen appears. Also, the date and time will be displayed when shooting. Helps when it is played back. Default settings are indicated with x. (Camera) Item AF Mode Digital Zoom Date/Time Setting xSingle / Monitor xSmart / Precision / Off Day&Time / Date / xOff Red Eye Reduction AF Illuminator Auto Review On / xOff xAuto / Off On / xOff Description Selects the focus operation mode (page 50). Changes a folder for recording images...
Operating Instructions
Page 119
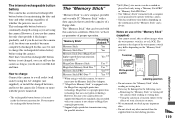
... the power turned off . The internal rechargeable button battery This camera has an internal rechargeable button battery for maintaining the date and time and other material than the supplied label on the labeling position. 119 Additional information However, we have no guarantee of the "Memory Stick" (supplied) • You cannot record, edit, or delete images when the write-protect switch is as you use of proper operation. Removing the "Memory Stick" or turning...
... the power turned off . The internal rechargeable button battery This camera has an internal rechargeable button battery for maintaining the date and time and other material than the supplied label on the labeling position. 119 Additional information However, we have no guarantee of the "Memory Stick" (supplied) • You cannot record, edit, or delete images when the write-protect switch is as you use of proper operation. Removing the "Memory Stick" or turning...
Operating Instructions
Page 128
... plug 16 Deleting movies 81 Deleting still images 42 Digital zoom 27 Divide 82 DPOF 70 E EV adjustment 55 F File names 90 File storage destinations 90 Finder 33 Flash 31 Flash Level 59 Fluorescent 58 Focus preset 51 Folder 48, 63 Format 44 H Histogram 56 Index I Image quality 47 Image size 22, 23 ImageMixer VCD2 97 Incandescent 58 Index screen 38 Inserting a "Memory Stick 21 Inserting the date and time 34 Installation 85...
... plug 16 Deleting movies 81 Deleting still images 42 Digital zoom 27 Divide 82 DPOF 70 E EV adjustment 55 F File names 90 File storage destinations 90 Finder 33 Flash 31 Flash Level 59 Fluorescent 58 Focus preset 51 Folder 48, 63 Format 44 H Histogram 56 Index I Image quality 47 Image size 22, 23 ImageMixer VCD2 97 Incandescent 58 Index screen 38 Inserting a "Memory Stick 21 Inserting the date and time 34 Installation 85...
Marketing Specifications
Page 1
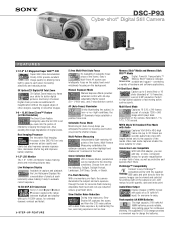
.... Manual Exposure Mode Manual Exposure Mode provides extended control with up to let you zoom into the portion of view, as well as sports. AF (Auto Focus) Illuminator Briefly illuminating the subject, in the DSC-P93 not only improves picture quality and clarity but also improves camera response time, decreases shutter lag and improves battery stamina. ➤1.5" LCD Monitor The 1.5" 123K LCD Monitor makes framing shots and reviewing pictures easy. Choose from the camera. Adjustable flash level and red-eye...
.... Manual Exposure Mode Manual Exposure Mode provides extended control with up to let you zoom into the portion of view, as well as sports. AF (Auto Focus) Illuminator Briefly illuminating the subject, in the DSC-P93 not only improves picture quality and clarity but also improves camera response time, decreases shutter lag and improves battery stamina. ➤1.5" LCD Monitor The 1.5" 123K LCD Monitor makes framing shots and reviewing pictures easy. Choose from the camera. Adjustable flash level and red-eye...
Marketing Specifications
Page 2
... support Access Control security function Compatible Battery: "AA" NiMH, Alkaline Supplied Software: Picture Package™ for data management functions. All rights reserved. Non-metric weights and measures are registered trademarks of CIPA. DSC-P93 Cyber-shot® Digital Still Camera ADDITIONAL FEATURES 3:2 Aspect Ratio Mode Adjustable Color/Saturation/Hue Auto Daylight Sychro Fill Flash Clear Color/Clear Luminance NR MPEG1 Cue, Review and Divide Supports High Speed USB 2.0 S P E C I F I C AT I O N S Imaging Device: 1/1.8" 5.1 Megapixel Super HAD™ CCD Recording Media: Memory...
... support Access Control security function Compatible Battery: "AA" NiMH, Alkaline Supplied Software: Picture Package™ for data management functions. All rights reserved. Non-metric weights and measures are registered trademarks of CIPA. DSC-P93 Cyber-shot® Digital Still Camera ADDITIONAL FEATURES 3:2 Aspect Ratio Mode Adjustable Color/Saturation/Hue Auto Daylight Sychro Fill Flash Clear Color/Clear Luminance NR MPEG1 Cue, Review and Divide Supports High Speed USB 2.0 S P E C I F I C AT I O N S Imaging Device: 1/1.8" 5.1 Megapixel Super HAD™ CCD Recording Media: Memory...


