
Operating Instructions
Page 3
...Kingdom A moulded plug complying with BS 1363 is connected. -Consult the dealer or an experienced radio/TV technician for your nearest Sony service station. If you change the fuse. CAUTION TO PREVENT ELECTRIC SHOCK, DO NOT USE THIS POLARIZED AC PLUG WITH AN EXTENSION...pursuant to radio communications. Should the fuse in this digital camera. The supplied interface cable must be used . Note: This equipment has been tested and found compliant with the instructions, may influence the picture and sound of rechargeable batteries, call toll free 1-800-822-8837, or visit ...
...Kingdom A moulded plug complying with BS 1363 is connected. -Consult the dealer or an experienced radio/TV technician for your nearest Sony service station. If you change the fuse. CAUTION TO PREVENT ELECTRIC SHOCK, DO NOT USE THIS POLARIZED AC PLUG WITH AN EXTENSION...pursuant to radio communications. Should the fuse in this digital camera. The supplied interface cable must be used . Note: This equipment has been tested and found compliant with the instructions, may influence the picture and sound of rechargeable batteries, call toll free 1-800-822-8837, or visit ...

Operating Instructions
Page 4
..., and be copyrighted. "Memory Stick" N50 For the Customers in any way. • Be careful when placing the camera near a window or outdoors. and Canada THIS CLASS B DIGITAL DEVICE COMPLIES WITH PART 15 OF THE FCC RULES AND THE CANADIAN ICES-003 OPERATION IS SUBJECT TO THE FOLLOWING TWO... normal in the manufacturing process and do not affect the recording in the U.S.A. Back up recommendation To avoid the potential risk of the battery used to a disk. LCD screen, LCD finder (only models with other materials may be some tiny black points and/or bright points (white,...
..., and be copyrighted. "Memory Stick" N50 For the Customers in any way. • Be careful when placing the camera near a window or outdoors. and Canada THIS CLASS B DIGITAL DEVICE COMPLIES WITH PART 15 OF THE FCC RULES AND THE CANADIAN ICES-003 OPERATION IS SUBJECT TO THE FOLLOWING TWO... normal in the manufacturing process and do not affect the recording in the U.S.A. Back up recommendation To avoid the potential risk of the battery used to a disk. LCD screen, LCD finder (only models with other materials may be some tiny black points and/or bright points (white,...

Operating Instructions
Page 6
...Flash level ....53 Shooting multiple frames - using your camera 4 Identifying the parts 8 Getting started Preparing batteries 14 Charging the batteries 14 Inserting the batteries 16 Using an external power source 19 Using your camera abroad 19 Turning your camera 45 Changing menu settings 45 Changing items in the ...images 40 Formatting a "Memory Stick 44 Before advanced operations How to setup and operate your camera on/off 20 How to scene conditions 58 Adding special effects - Macro (DSC-P72 only 30 Using the self-timer 31 Selecting a flash mode 32 Shooting with audio ...
...Flash level ....53 Shooting multiple frames - using your camera 4 Identifying the parts 8 Getting started Preparing batteries 14 Charging the batteries 14 Inserting the batteries 16 Using an external power source 19 Using your camera abroad 19 Turning your camera 45 Changing menu settings 45 Changing items in the ...images 40 Formatting a "Memory Stick 44 Before advanced operations How to setup and operate your camera on/off 20 How to scene conditions 58 Adding special effects - Macro (DSC-P72 only 30 Using the self-timer 31 Selecting a flash mode 32 Shooting with audio ...
Operating Instructions
Page 7
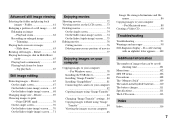
...Choosing images to your computer - For Windows users 78 Installing the USB driver 79 Installing "Image Transfer 80 Installing "ImageMixer 81 Connecting the camera to your computer 82 Copying images using "Image Transfer" 83 Changing "Image Transfer" settings .. 84 Copying images without using "Image Transfer.../ shooting time 101 Menu items 102 SET UP items 106 Precautions 108 The "Memory Stick 109 The nickel-metal hydride batteries ........110 The battery charger 111 Specifications 111 The LCD screen 113 Index Index 116 7 Rotate 64 Playing back images shot in Multi Burst ...
...Choosing images to your computer - For Windows users 78 Installing the USB driver 79 Installing "Image Transfer 80 Installing "ImageMixer 81 Connecting the camera to your computer 82 Copying images using "Image Transfer" 83 Changing "Image Transfer" settings .. 84 Copying images without using "Image Transfer.../ shooting time 101 Menu items 102 SET UP items 106 Precautions 108 The "Memory Stick 109 The nickel-metal hydride batteries ........110 The battery charger 111 Specifications 111 The LCD screen 113 Index Index 116 7 Rotate 64 Playing back images shot in Multi Burst ...
Operating Instructions
Page 9
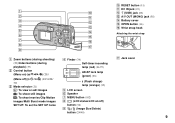
L (USB) jack (82) 2 qa M A/V OUT (MONO) jack (38) 3 4 N Battery cover qs O OPEN button (16) qd P Wrist strap hook 5 qf Attaching the wrist strap 6 qg 7 qh 8 qj 9 A Zoom buttons (during shooting) D Finder (34) Q Jack cover (...
L (USB) jack (82) 2 qa M A/V OUT (MONO) jack (38) 3 4 N Battery cover qs O OPEN button (16) qd P Wrist strap hook 5 qf Attaching the wrist strap 6 qg 7 qh 8 qj 9 A Zoom buttons (during shooting) D Finder (34) Q Jack cover (...

Operating Instructions
Page 11
L (USB) jack (82) 2 qa M A/V OUT (MONO) jack (38) 3 4 N Battery cover qs O OPEN button (16) qd P Wrist strap hook 5 qf Attaching the wrist strap 6 qg 7 qh 8 qj 9 A Zoom buttons (during shooting) D Finder (34) Q Jack cover (...
L (USB) jack (82) 2 qa M A/V OUT (MONO) jack (38) 3 4 N Battery cover qs O OPEN button (16) qd P Wrist strap hook 5 qf Attaching the wrist strap 6 qg 7 qh 8 qj 9 A Zoom buttons (during shooting) D Finder (34) Q Jack cover (...

Operating Instructions
Page 13
J RESET button (91) K DC IN jack (19) 1 q; L (USB) jack (82) 2 qa M A/V OUT (MONO) jack (38) 3 4 N Battery cover qs O OPEN button (16) qd P Wrist strap hook 5 qf Attaching the wrist strap 6 qg 7 qh 8 qj 9 A Zoom buttons (during shooting) D Finder (34) Q Jack cover (...
J RESET button (91) K DC IN jack (19) 1 q; L (USB) jack (82) 2 qa M A/V OUT (MONO) jack (38) 3 4 N Battery cover qs O OPEN button (16) qd P Wrist strap hook 5 qf Attaching the wrist strap 6 qg 7 qh 8 qj 9 A Zoom buttons (during shooting) D Finder (34) Q Jack cover (...
Operating Instructions
Page 14
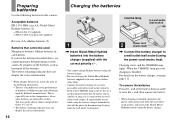
..., immediately shut off the power by property of the batteries, such as it is especially true in low temperatures, where some batteries are used Manganese batteries, lithium batteries, nicad batteries If you use the batteries described above, we cannot guarantee full performance of the camera by disconnecting the plug from the wall outlet (wall socket). 2 Power cord...
..., immediately shut off the power by property of the batteries, such as it is especially true in low temperatures, where some batteries are used Manganese batteries, lithium batteries, nicad batteries If you use the batteries described above, we cannot guarantee full performance of the camera by disconnecting the plug from the wall outlet (wall socket). 2 Power cord...
Operating Instructions
Page 15
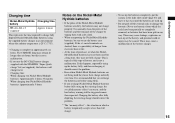
... not fully charge. If the +/- This is typical of danger from which a battery temporarily accepts a less than expected. Never use up the batteries completely, put the camera in the slide show mode (page 63) and leave it that you recharge the batteries just before using them with the STAMINA "Super Quick charge" kit (not...
... not fully charge. If the +/- This is typical of danger from which a battery temporarily accepts a less than expected. Never use up the batteries completely, put the camera in the slide show mode (page 63) and leave it that you recharge the batteries just before using them with the STAMINA "Super Quick charge" kit (not...
Operating Instructions
Page 16
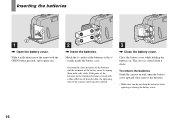
... greatly reduced. 1 3 , Close the battery cover. To remove the batteries Stand the camera on end, open the battery cover upward, then remove the batteries. • Make sure you do not drop the batteries when opening or closing the battery cover. 16 Close the battery cover while holding the batteries in the direction of the batteries or the terminals become covered...
... greatly reduced. 1 3 , Close the battery cover. To remove the batteries Stand the camera on end, open the battery cover upward, then remove the batteries. • Make sure you do not drop the batteries when opening or closing the battery cover. 16 Close the battery cover while holding the batteries in the direction of the batteries or the terminals become covered...
Operating Instructions
Page 17
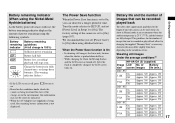
...270 VGA On Off Approx. 320 Approx. 160 Approx. 540 Approx. 270 DSC-P32 3.1M On Off Approx. 320 Approx. 160 Approx. 540 Approx. 270 VGA On Off Approx. 320 Approx. 160 Approx. 540 Approx. 270 17 Getting started Battery Battery remaining remaining guidelines indicator (A full charge is 25°C (77°F), and...selector to SET UP, and set to turn it on. • Based on the conditions under which the camera is being used and the state of the charge, or on . Battery life and the number of images that can shoot for changing the supplied "Memory Stick" as necessary. When the...
...270 VGA On Off Approx. 320 Approx. 160 Approx. 540 Approx. 270 DSC-P32 3.1M On Off Approx. 320 Approx. 160 Approx. 540 Approx. 270 VGA On Off Approx. 320 Approx. 160 Approx. 540 Approx. 270 17 Getting started Battery Battery remaining remaining guidelines indicator (A full charge is 25°C (77°F), and...selector to SET UP, and set to turn it on. • Based on the conditions under which the camera is being used and the state of the charge, or on . Battery life and the number of images that can shoot for changing the supplied "Memory Stick" as necessary. When the...
Operating Instructions
Page 18
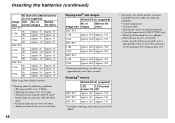
... of 160 (Mail) • The battery life and the number of images recordable decrease under the following conditions: - Turning on and off once in order, one image every 30 seconds. - Turning the camera on and off frequently. - When [...DSC-P32 3.1M Approx. 6000 Approx. 300 VGA Approx. 6000 Approx. 300 2) Showing single images in every ten shots. 18 Playing back2) still images NH-AA-DA (2) (supplied) No. Alternatively pressing the zoom W and T buttons fully for each shot (DSC-P72/P52 only). - Using the zoom heavily (DSC-P72/P52 only) - After using Sony alkaline batteries...
... of 160 (Mail) • The battery life and the number of images recordable decrease under the following conditions: - Turning on and off once in order, one image every 30 seconds. - Turning the camera on and off frequently. - When [...DSC-P32 3.1M Approx. 6000 Approx. 300 VGA Approx. 6000 Approx. 300 2) Showing single images in every ten shots. 18 Playing back2) still images NH-AA-DA (2) (supplied) No. Alternatively pressing the zoom W and T buttons fully for each shot (DSC-P72/P52 only). - Using the zoom heavily (DSC-P72/P52 only) - After using Sony alkaline batteries...

Operating Instructions
Page 19
... the LCD screen. • Be sure to use the AC-LS5 AC Adaptor. BC-CS2A/CS2B • Do not use your camera in any country or area with the supplied battery charger or AC Adaptor (not supplied) within 100 V to an easily accessible wall outlet (wall socket) close by. Using your... camera abroad Power sources You can use an electrical transformer (travel converter), as it is connected to the wall outlet (wall socket), even...
... the LCD screen. • Be sure to use the AC-LS5 AC Adaptor. BC-CS2A/CS2B • Do not use your camera in any country or area with the supplied battery charger or AC Adaptor (not supplied) within 100 V to an easily accessible wall outlet (wall socket) close by. Using your... camera abroad Power sources You can use an electrical transformer (travel converter), as it is connected to the wall outlet (wall socket), even...

Operating Instructions
Page 20
... green and the power is on. When you turn off the power Press POWER again, the POWER lamp goes out, and the camera turns off. • Do not remove the batteries or AC Adaptor with the mode selector set to [Off]: approximately three minutes How to use the control button Program Auto... Voice E-Mail Burst 2 Normal REC Mode To change the current settings of the camera, bring up the camera while using the batteries, power is set to or , the lens begins to move (DSC-P72 only). Please be careful not to touch the lens. 20 The Auto Power Off function If no tasks are being...
... green and the power is on. When you turn off the power Press POWER again, the POWER lamp goes out, and the camera turns off. • Do not remove the batteries or AC Adaptor with the mode selector set to [Off]: approximately three minutes How to use the control button Program Auto... Voice E-Mail Burst 2 Normal REC Mode To change the current settings of the camera, bring up the camera while using the batteries, power is set to or , the lens begins to move (DSC-P72 only). Please be careful not to touch the lens. 20 The Auto Power Off function If no tasks are being...
Operating Instructions
Page 21
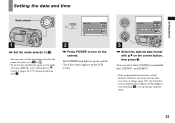
... selector to . • You can select from Step 3. 2 , Press POWER to turn on the camera. The POWER lamp lights in (Setup 1) (pages 45, 107), then proceed from [Y/M/D] (year/month/ day), [M/D/Y], and [D/M/Y]. • If the rechargeable button battery, which provides the power for saving the time data, ever loses its charge (page 109...
... selector to . • You can select from Step 3. 2 , Press POWER to turn on the camera. The POWER lamp lights in (Setup 1) (pages 45, 107), then proceed from [Y/M/D] (year/month/ day), [M/D/Y], and [D/M/Y]. • If the rechargeable button battery, which provides the power for saving the time data, ever loses its charge (page 109...

Operating Instructions
Page 27
... this mode automatically adjusts the focus, exposure, and white balance. To change the camera mode 1 Set the mode selector to . 2 Press MENU. 3 Select (Camera) with b on the control button. 4 Select the desired camera mode with the camera turned on, power is set to , the functions that can be selected change ...] See page 58. The shutter clicks, the shooting is completed, and the still image is set to (Camera) and [Mode] (REC Mode). The menu items you are shooting with the batteries, if no tasks are limited to [Multi AF], and the metering mode is saved in the menu settings ...
... this mode automatically adjusts the focus, exposure, and white balance. To change the camera mode 1 Set the mode selector to . 2 Press MENU. 3 Select (Camera) with b on the control button. 4 Select the desired camera mode with the camera turned on, power is set to , the functions that can be selected change ...] See page 58. The shutter clicks, the shooting is completed, and the still image is set to (Camera) and [Mode] (REC Mode). The menu items you are shooting with the batteries, if no tasks are limited to [Multi AF], and the metering mode is saved in the menu settings ...
Operating Instructions
Page 34
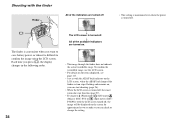
... LCD screen is turned off, the smart zoom does not function (page 29). • If you press (Flash mode)/ (Self-timer)/ (Macro) (DSC-P72) or (Spot meter) (DSCP52/P32) with the LCD screen turned off, the image will be displayed on the screen for approximately two seconds so you want to save... battery power, or when it is difficult to confirm the image using the LCD screen. To confirm the recordable range, use the LCD screen...
... LCD screen is turned off, the smart zoom does not function (page 29). • If you press (Flash mode)/ (Self-timer)/ (Macro) (DSC-P72) or (Spot meter) (DSCP52/P32) with the LCD screen turned off, the image will be displayed on the screen for approximately two seconds so you want to save... battery power, or when it is difficult to confirm the image using the LCD screen. To confirm the recordable range, use the LCD screen...

Operating Instructions
Page 82
... computer, connect the USB cable to the USB connector on the rear panel. • When using weak batteries, copying may fail or the data may be corrupted if the camera shuts off due to weak batteries. • For further details on the AC Adaptor, see page 19. • For further details on ...supplied USB cable to page 85. Proceed to the (USB) jack of the camera. When a USB connection is set to use fully charged nickel-metal hydride batteries or the AC Adaptor (not supplied). When you want to copy into the camera. • Be sure to [Normal] in the SET UP settings (page 107...
... computer, connect the USB cable to the USB connector on the rear panel. • When using weak batteries, copying may fail or the data may be corrupted if the camera shuts off due to weak batteries. • For further details on the AC Adaptor, see page 19. • For further details on ...supplied USB cable to page 85. Proceed to the (USB) jack of the camera. When a USB connection is set to use fully charged nickel-metal hydride batteries or the AC Adaptor (not supplied). When you want to copy into the camera. • Be sure to [Normal] in the SET UP settings (page 107...
Operating Instructions
Page 91
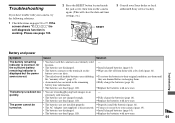
...Sony dealer or local authorized Sony service facility. Or the sufficient battery remaining indicator is disconnected. p Install charged batteries (page 14). • The batteries are not installed properly. p Replace the batteries with new ones. Troubleshooting Battery and power Symptom Cause Solution The battery... them . p Install charged batteries (page 14). p Fully charge the batteries (page 14). p To restore the batteries to your camera (page 19). • The batteries are drained before recharging them with new ones. 91 The battery runs down too quickly. &#...
...Sony dealer or local authorized Sony service facility. Or the sufficient battery remaining indicator is disconnected. p Install charged batteries (page 14). • The batteries are not installed properly. p Replace the batteries with new ones. Troubleshooting Battery and power Symptom Cause Solution The battery... them . p Install charged batteries (page 14). p Fully charge the batteries (page 14). p To restore the batteries to your camera (page 19). • The batteries are drained before recharging them with new ones. 91 The battery runs down too quickly. &#...
Operating Instructions
Page 92
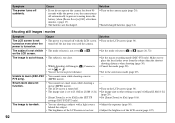
...The subject is not visible • The mode selector is [Off], after three minutes.) (page 17). • The batteries are shooting a subject with the LCD screen p Turn on , the camera turns off with a light source behind the subject. • The brightness of focus. • The subject is too ...the lens farther away from the subject than the shortest shooting distance when shooting (page 30). Make sure to zoom (DSC-P52/ • You cannot zoom while shooting a movie - settings (DSC-P52/P72 only). p Adjust the exposure (page 50). p Set to or (pages 26, 72). p Turn ...
...The subject is not visible • The mode selector is [Off], after three minutes.) (page 17). • The batteries are shooting a subject with the LCD screen p Turn on , the camera turns off with a light source behind the subject. • The brightness of focus. • The subject is too ...the lens farther away from the subject than the shortest shooting distance when shooting (page 30). Make sure to zoom (DSC-P52/ • You cannot zoom while shooting a movie - settings (DSC-P52/P72 only). p Adjust the exposure (page 50). p Set to or (pages 26, 72). p Turn ...


