Operating Instructions
Page 2
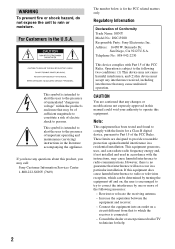
...related matters only. Consult the dealer or an experienced radio/TV technician for a Class B digital device, pursuant to the following measures: - For Customers in accordance with the limits for... instructions, may be determined by one or more of Conformity Trade Name: SONY Model No.: DSC-P200 Responsible Party: Sony Electronics Inc. Bernardo Dr, San Diego, CA 92127U.S.A. Note: This equipment... prevent fire or shock hazard, do not expose the unit to correct the interference by turning the equipment off and on a circuit different from that interference will not occur in the...
...related matters only. Consult the dealer or an experienced radio/TV technician for a Class B digital device, pursuant to the following measures: - For Customers in accordance with the limits for... instructions, may be determined by one or more of Conformity Trade Name: SONY Model No.: DSC-P200 Responsible Party: Sony Electronics Inc. Bernardo Dr, San Diego, CA 92127U.S.A. Note: This equipment... prevent fire or shock hazard, do not expose the unit to correct the interference by turning the equipment off and on a circuit different from that interference will not occur in the...
Operating Instructions
Page 6
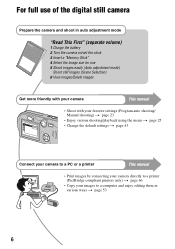
For full use of the digital still camera Prepare the camera and shoot in auto adjustment mode "Read This First" (separate volume) 1 Charge the battery 2 Turn the camera on/set the clock 3 Insert a "Memory Stick" 4 Select the image size for use 5 Shoot images easily (Auto adjustment mode) Shoot... still images (Scene Selection) 6 View images/Delete images Get more friendly with your camera This manual • Shoot with your...
For full use of the digital still camera Prepare the camera and shoot in auto adjustment mode "Read This First" (separate volume) 1 Charge the battery 2 Turn the camera on/set the clock 3 Insert a "Memory Stick" 4 Select the image size for use 5 Shoot images easily (Auto adjustment mode) Shoot... still images (Scene Selection) 6 View images/Delete images Get more friendly with your camera This manual • Shoot with your...

Operating Instructions
Page 17
Even if the vibration warning appears, you from shooting clear images. However, we recommend holding the camera steadily and turning off the indicator to avoid the effects of recordable images (21) Self-timer (t step 5 in the column on the left hand side) Menu/Guide menu (... (22) Spot metering cross hair (30) AF range finder frame (29) E Display Indication Histogram (20, 28) • appears when histogram display is disabled. Enjoying the camera C Display 7M 3:2 5M 3M 1M VGA FINE 640 STD 640 160 FINE STD 101 00:00:00 [00:28:05] 1/30" 400 C:32:00 Indication...
Even if the vibration warning appears, you from shooting clear images. However, we recommend holding the camera steadily and turning off the indicator to avoid the effects of recordable images (21) Self-timer (t step 5 in the column on the left hand side) Menu/Guide menu (... (22) Spot metering cross hair (30) AF range finder frame (29) E Display Indication Histogram (20, 28) • appears when histogram display is disabled. Enjoying the camera C Display 7M 3:2 5M 3M 1M VGA FINE 640 STD 640 160 FINE STD 101 00:00:00 [00:28:05] 1/30" 400 C:32:00 Indication...
Operating Instructions
Page 22
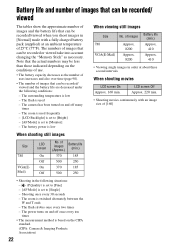
...Approx. 410 • Viewing single images in order at an ambient temperature of 25°C (77°F). The camera has been turned on the CIPA standard. (CIPA: Camera & Imaging Products Association) 22 of images (Approx.) Battery life (min.) 370 185 500 250 370 185 500 250... • Shooting in [Normal] mode with an image size of [160] When shooting still images Size 7M VGA(EMail) LCD screen On Off On Off No. The zoom...
...Approx. 410 • Viewing single images in order at an ambient temperature of 25°C (77°F). The camera has been turned on the CIPA standard. (CIPA: Camera & Imaging Products Association) 22 of images (Approx.) Battery life (min.) 370 185 500 250 370 185 500 250... • Shooting in [Normal] mode with an image size of [160] When shooting still images Size 7M VGA(EMail) LCD screen On Off On Off No. The zoom...

Operating Instructions
Page 25
... MENU to display the menu. 3 Select the desired menu item with v/V. To display an item that are grayed out. 25 The setting you select is zoomed and is not displayed, select the mark with the control button. • You cannot select items that is set. 5 Press MENU to . 4 Select the setting... desired item is invisible, keep pressing b/B until it appears on the screen. • Press z after selecting an item when the mode dial is set to turn off the menu. 400 200 100 Auto ISO WB ISO • If there is an item that is not displayed, an v/V mark appears on the...
... MENU to display the menu. 3 Select the desired menu item with v/V. To display an item that are grayed out. 25 The setting you select is zoomed and is not displayed, select the mark with the control button. • You cannot select items that is set. 5 Press MENU to . 4 Select the setting... desired item is invisible, keep pressing b/B until it appears on the screen. • Press z after selecting an item when the mode dial is set to turn off the menu. 400 200 100 Auto ISO WB ISO • If there is an item that is not displayed, an v/V mark appears on the...
Operating Instructions
Page 31
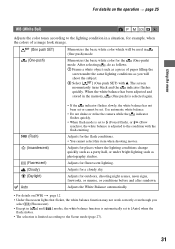
...color for the (One-push) mode. Adjusts for the flash conditions. • You cannot select this item when shooting movies. The screen momentarily turns black and the indicator flashes quickly. When the white balance has been adjusted and stored in the memory, (One push) is selected again. Use... automatic white balance. • Do not shake or strike the camera while the flashes quickly. Adjusts for a cloudy sky. Using the menu For details on [WB] t page 12 • Under fluorescent lights that flicker...
...color for the (One-push) mode. Adjusts for the flash conditions. • You cannot select this item when shooting movies. The screen momentarily turns black and the indicator flashes quickly. When the white balance has been adjusted and stored in the memory, (One push) is selected again. Use... automatic white balance. • Do not shake or strike the camera while the flashes quickly. Adjusts for a cloudy sky. Using the menu For details on [WB] t page 12 • Under fluorescent lights that flicker...
Operating Instructions
Page 34
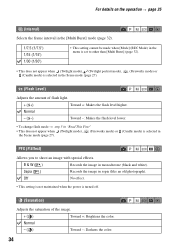
... lower. • To change flash mode t step 5 in "Read This First" • This does not appear when (Twilight mode), (Fireworks mode) or (Candle mode) is turned off. (Saturation) Adjusts the saturation of flash light. + ( +) Toward +: Makes the flash level higher. For details on the operation t page 25 M (Interval) Selects the frame...
... lower. • To change flash mode t step 5 in "Read This First" • This does not appear when (Twilight mode), (Fireworks mode) or (Candle mode) is turned off. (Saturation) Adjusts the saturation of flash light. + ( +) Toward +: Makes the flash level higher. For details on the operation t page 25 M (Interval) Selects the frame...

Operating Instructions
Page 37
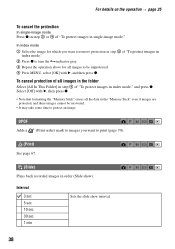
... Folder] in single-image mode 1 Display the image you want to protect. 2 Press MENU to display the menu. 3 Select [-] (Protect) with B, then press z. 37 indicator turns white. The image is protected and the - (protect) indicator appears on the control button, then press z. 4 Select [Select] with v/V, then press z. 5 Select the image you...
... Folder] in single-image mode 1 Display the image you want to protect. 2 Press MENU to display the menu. 3 Select [-] (Protect) with B, then press z. 37 indicator turns white. The image is protected and the - (protect) indicator appears on the control button, then press z. 4 Select [Select] with v/V, then press z. 5 Select the image you...
Operating Instructions
Page 38
... image. indicator gray. 3 Repeat the operation above for which you want to remove protection in step 5 of "To protect images in index mode." 2 Press z to turn the - Interval 3 sec 5 sec 10 sec 30 sec 1 min Sets the slide show ). To cancel protection of all images to be recovered. • It may...
... image. indicator gray. 3 Repeat the operation above for which you want to remove protection in step 5 of "To protect images in index mode." 2 Press z to turn the - Interval 3 sec 5 sec 10 sec 30 sec 1 min Sets the slide show ). To cancel protection of all images to be recovered. • It may...

Operating Instructions
Page 43
v/V/b/B button Mode dial z button Control button 1 Turn on the power. 2 Press MENU to display the menu. 3 Press B on the control button to select (Setup). 4 Press v/V/b/B on the control button. To cancel the (... does not appear, select the previous setting again. • This setting is maintained even when the power is turned off the (Setup) screen, press MENU. To turn off . 43 The frame of the selected item turns yellow. If it appears, then press z on the control button to select the item you want to...
v/V/b/B button Mode dial z button Control button 1 Turn on the power. 2 Press MENU to display the menu. 3 Press B on the control button to select (Setup). 4 Press v/V/b/B on the control button. To cancel the (... does not appear, select the previous setting again. • This setting is maintained even when the power is turned off the (Setup) screen, press MENU. To turn off . 43 The frame of the selected item turns yellow. If it appears, then press z on the control button to select the item you want to...
Operating Instructions
Page 50
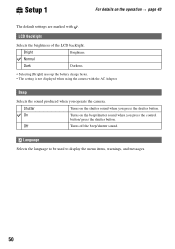
.../shutter sound when you press the control button/ press the shutter button. On Turns on the shutter sound when you operate the camera. Beep Selects the sound produced when you press the shutter button. Off Turns off the beep/shutter sound. Normal Dark Darkens. • Selecting [Bright] ...uses up the battery charge faster. • The setting is not displayed when using the camera with . Language Selects the language to be used to...
.../shutter sound when you press the control button/ press the shutter button. On Turns on the shutter sound when you operate the camera. Beep Selects the sound produced when you press the shutter button. Off Turns off the beep/shutter sound. Normal Dark Darkens. • Selecting [Bright] ...uses up the battery charge faster. • The setting is not displayed when using the camera with . Language Selects the language to be used to...
Operating Instructions
Page 56
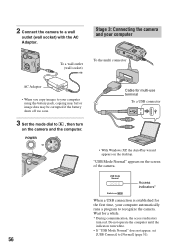
...the battery shuts off too soon. 3 Set the mode dial to , then turn white. • If "USB Mode Normal" does not appear, set [USB Connect] to [Normal] (page 51). 56 Stage 3: Connecting the camera and your computer To a wall outlet (wall socket) To the multi connector...AC Adaptor. POWER Cable for a while. * During communication, the access indicators turn red. 2 Connect the camera to recognize the camera. "USB Mode Normal" appears on the desktop. USB Mode Normal Access indicators* Switch on the camera and the computer. Wait for multi-use terminal To a USB connector • ...
...the battery shuts off too soon. 3 Set the mode dial to , then turn white. • If "USB Mode Normal" does not appear, set [USB Connect] to [Normal] (page 51). 56 Stage 3: Connecting the camera and your computer To a wall outlet (wall socket) To the multi connector...AC Adaptor. POWER Cable for a while. * During communication, the access indicators turn red. 2 Connect the camera to recognize the camera. "USB Mode Normal" appears on the desktop. USB Mode Normal Access indicators* Switch on the camera and the computer. Wait for multi-use terminal To a USB connector • ...
Operating Instructions
Page 59
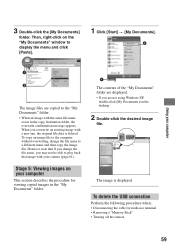
... using Windows XP, double-click [My Documents] on your computer This section describes the procedure for multi-use terminal • Removing a "Memory Stick" • Turning off the camera 59 Stage 5: Viewing images on the desktop. 2 Double-click the desired image file. The image is deleted. To delete the USB connection Perform the... to the computer without overwriting, change the file name, you may not be able to a different name and then copy the image file. Using your camera (page 61).
... using Windows XP, double-click [My Documents] on your computer This section describes the procedure for multi-use terminal • Removing a "Memory Stick" • Turning off the camera 59 Stage 5: Viewing images on the desktop. 2 Double-click the desired image file. The image is deleted. To delete the USB connection Perform the... to the computer without overwriting, change the file name, you may not be able to a different name and then copy the image file. Using your camera (page 61).
Operating Instructions
Page 60
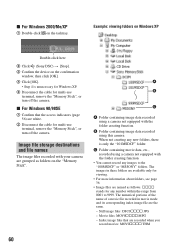
...any new folders, there is unnecessary for Windows XP. 5 Disconnect the cable for multi-use terminal, remove the "Memory Stick", or turn off the camera. The numerical portions of the name of a movie file recorded in these folders are white. 2 Disconnect the cable for multi-use ... files: DSC0ssss.JPG - x For Windows 2000/Me/XP 1 Double-click on the "Memory Stick". Example: viewing folders on Windows XP Double-click here 2 Click (Sony DSC) t [Stop]. 3 Confirm the device on the confirmation window, then click [OK]. 4 Click [OK]. • Step 4 is only the "101MSDCF" folder....
...any new folders, there is unnecessary for Windows XP. 5 Disconnect the cable for multi-use terminal, remove the "Memory Stick", or turn off the camera. The numerical portions of the name of a movie file recorded in these folders are white. 2 Disconnect the cable for multi-use ... files: DSC0ssss.JPG - x For Windows 2000/Me/XP 1 Double-click on the "Memory Stick". Example: viewing folders on Windows XP Double-click here 2 Click (Sony DSC) t [Stop]. 3 Confirm the device on the confirmation window, then click [OK]. 4 Click [OK]. • Step 4 is only the "101MSDCF" folder....
Operating Instructions
Page 62
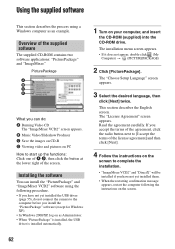
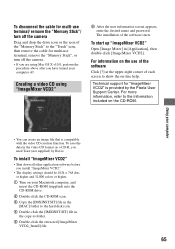
... and "ImageMixer VCD2" software using a Windows computer as Administrator. • When "PicturePackage" is installed, the USB driver is installed automatically. 1 Turn on your computer, and insert the CD-ROM (supplied) into the CD-ROM drive. This section describes the English screen. Installing the software You can... do not connect the camera to the computer before you have not yet installed the USB driver (page 55), do : A Burning Video CD The "ImageMixer VCD2" ...
... and "ImageMixer VCD2" software using a Windows computer as Administrator. • When "PicturePackage" is installed, the USB driver is installed automatically. 1 Turn on your computer, and insert the CD-ROM (supplied) into the CD-ROM drive. This section describes the English screen. Installing the software You can... do not connect the camera to the computer before you have not yet installed the USB driver (page 55), do : A Burning Video CD The "ImageMixer VCD2" ...
Operating Instructions
Page 65
.... 5 Double-click the extracted [ImageMixer VCD2_Install] file. 65 To disconnect the cable for multi-use terminal/ remove the "Memory Stick"/ turn off the camera Drag and drop the drive icon or the icon of the software starts. The installation of the "Memory Stick" to the information included ... [Image Mixer] in the copy-to show the on the CD-ROM. Technical support for multi-use terminal, remove the "Memory Stick", or turn off the camera. • If you are using "ImageMixer VCD2" 6 After the user information screen appears, enter the desired name and password. Creating a video...
.... 5 Double-click the extracted [ImageMixer VCD2_Install] file. 65 To disconnect the cable for multi-use terminal/ remove the "Memory Stick"/ turn off the camera Drag and drop the drive icon or the icon of the software starts. The installation of the "Memory Stick" to the information included ... [Image Mixer] in the copy-to show the on the CD-ROM. Technical support for multi-use terminal, remove the "Memory Stick", or turn off the camera. • If you are using "ImageMixer VCD2" 6 After the user information screen appears, enter the desired name and password. Creating a video...
Operating Instructions
Page 67
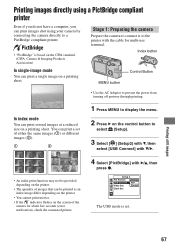
Stage 1: Preparing the camera Prepare the camera to connect it to the printer with B/v, then press z. • An... do not have a computer, you can print images shot using your camera by connecting the camera directly to a PictBridge compliant printer. • "PictBridge" is set of the camera for multi-use terminal. In index mode You can print a single ...image on a printing sheet. The USB mode is based on the CIPA standard. (CIPA: Camera & Imaging Products Association) In single-image mode You can print several images at a reduced size on a printing sheet....
Stage 1: Preparing the camera Prepare the camera to connect it to the printer with B/v, then press z. • An... do not have a computer, you can print images shot using your camera by connecting the camera directly to a PictBridge compliant printer. • "PictBridge" is set of the camera for multi-use terminal. In index mode You can print a single ...image on a printing sheet. The USB mode is based on the CIPA standard. (CIPA: Camera & Imaging Products Association) In single-image mode You can print several images at a reduced size on a printing sheet....
Operating Instructions
Page 68
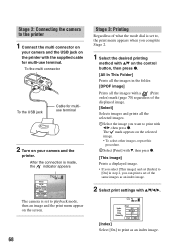
... connector To the USB jack Cable for multiuse terminal 2 Turn on the printer with the supplied cable for multi-use terminal. After the connection is made, the indicator appears Print All In This Folder DPOF image Select This image Cancel The camera is set to playback mode, then an image and the... images. 1Select the image you can print a set of the same images as an index image. 2 Select print settings with b/B, then press z. Stage 2: Connecting the camera to the printer 1 Connect the multi connector on your...
... connector To the USB jack Cable for multiuse terminal 2 Turn on the printer with the supplied cable for multi-use terminal. After the connection is made, the indicator appears Print All In This Folder DPOF image Select This image Cancel The camera is set to playback mode, then an image and the... images. 1Select the image you can print a set of the same images as an index image. 2 Select print settings with b/B, then press z. Stage 2: Connecting the camera to the printer 1 Connect the multi connector on your...
Operating Instructions
Page 69
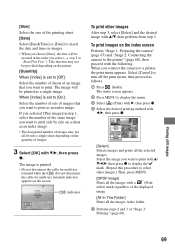
...to [Off]: Select the number of sheets of an image that you selected [This image] in "Read This First"). When you connect the camera to turn off the print menu, then proceed as follows. 1 Press (Index). Printing 2/3 Exit indicator To print other images.) Then, press MENU. ...terminal while the (Do not disconnect the cable for multi-use terminal) indicator appears on the index screen Perform "Stage 1: Preparing the camera" (page 67) and "Stage 2: Connecting the camera to display the menu. 3 Select [ ] (Print) with B, then press z. 4 Select the desired printing method with v/V, ...
...to [Off]: Select the number of sheets of an image that you selected [This image] in "Read This First"). When you connect the camera to turn off the print menu, then proceed as follows. 1 Press (Index). Printing 2/3 Exit indicator To print other images.) Then, press MENU. ...terminal while the (Do not disconnect the cable for multi-use terminal) indicator appears on the index screen Perform "Stage 1: Preparing the camera" (page 67) and "Stage 2: Connecting the camera to display the menu. 3 Select [ ] (Print) with B, then press z. 4 Select the desired printing method with v/V, ...
Operating Instructions
Page 71
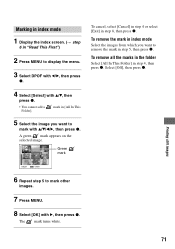
... the mark in step 5, then press z. To remove all the marks in the folder Select [All In This Folder] in step 8, then press z. The mark turns white.
... the mark in step 5, then press z. To remove all the marks in the folder Select [All In This Folder] in step 8, then press z. The mark turns white.


