Instruction Manual
Page 1
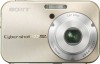
Owner's Record The model and serial numbers are located on the advanced operations, please refer to these numbers whenever you call upon your Sony dealer regarding this manual thoroughly, and retain it for future reference. Refer to "Cyber-shot Handbook (PDF)." Model No. DSC-N2 Serial No © 2006 Sony Corporation 2-887-191-12(1) Record the serial number in the space provided below. Operating Instructions Before operating the unit, please read this product. Digital Still Camera Instruction Manual GB DSC-N2 CD-ROM (supplied) For details on the bottom.
Owner's Record The model and serial numbers are located on the advanced operations, please refer to these numbers whenever you call upon your Sony dealer regarding this manual thoroughly, and retain it for future reference. Refer to "Cyber-shot Handbook (PDF)." Model No. DSC-N2 Serial No © 2006 Sony Corporation 2-887-191-12(1) Record the serial number in the space provided below. Operating Instructions Before operating the unit, please read this product. Digital Still Camera Instruction Manual GB DSC-N2 CD-ROM (supplied) For details on the bottom.
Instruction Manual
Page 6
... with the lens portion extended when the battery pack is manufactured using extremely high-precision technology so over 99.99% of your camera. • Do not use the camera near a location that constantly appear on the LCD screen. In addition to malfunctions and an inability to record or play back ... is neither dust-proof, nor splashproof, nor water-proof. However, there may be repairable. • Do not aim the camera at the sun or other equipment on your camera are normal in the manufacturing process and do not affect the recording in some cases may not be some tiny black...
... with the lens portion extended when the battery pack is manufactured using extremely high-precision technology so over 99.99% of your camera. • Do not use the camera near a location that constantly appear on the LCD screen. In addition to malfunctions and an inability to record or play back ... is neither dust-proof, nor splashproof, nor water-proof. However, there may be repairable. • Do not aim the camera at the sun or other equipment on your camera are normal in the manufacturing process and do not affect the recording in some cases may not be some tiny black...
Instruction Manual
Page 7
...29 Viewing images 29 Precautions 30 Specifications 31 7 Menu/Setup 20 Menu items 21 Setup items 22 Enjoying your camera 6 Getting started 8 Checking the accessories supplied 8 1 Preparing the battery pack 9 2 Inserting the battery pack/a "Memory Stick Duo" (...not supplied) ........ 10 3 Operating the touch panel 11 4 Turning the camera on/setting the clock 12 Shooting images easily 13 Viewing/deleting images 16 Indicators on using your computer 24 Supported Operating Systems...
...29 Viewing images 29 Precautions 30 Specifications 31 7 Menu/Setup 20 Menu items 21 Setup items 22 Enjoying your camera 6 Getting started 8 Checking the accessories supplied 8 1 Preparing the battery pack 9 2 Inserting the battery pack/a "Memory Stick Duo" (...not supplied) ........ 10 3 Operating the touch panel 11 4 Turning the camera on/setting the clock 12 Shooting images easily 13 Viewing/deleting images 16 Indicators on using your computer 24 Supported Operating Systems...
Instruction Manual
Page 8
Hook 8 Attach the strap to the wrist strap (shown right). • Do not carry the camera by being dropped, etc. The camera may fall off. Getting started Checking the accessories supplied • Battery charger BC-CSG/BC-CSGB (1) • Paint pen (1) • Power cord (mains lead) (1) (not ... the paint pen • You can paint or put stamps on still images with the paint pen. • Attach the paint pen to prevent the camera from damage by holding the paint pen.
Hook 8 Attach the strap to the wrist strap (shown right). • Do not carry the camera by being dropped, etc. The camera may fall off. Getting started Checking the accessories supplied • Battery charger BC-CSG/BC-CSGB (1) • Paint pen (1) • Power cord (mains lead) (1) (not ... the paint pen • You can paint or put stamps on still images with the paint pen. • Attach the paint pen to prevent the camera from damage by holding the paint pen.
Instruction Manual
Page 10
...; The displayed battery remaining indicator may not be correct under certain circumstances. • The Clock Set screen appears when the camera is no "Memory Stick Duo" inserted The camera records/plays back images using the internal memory (approx. 25 MB). [ To check the remaining battery time Press POWER button... to turn on and check the remaining battery on for the first time (page 12). 10 Change the battery with the tip ...
...; The displayed battery remaining indicator may not be correct under certain circumstances. • The Clock Set screen appears when the camera is no "Memory Stick Duo" inserted The camera records/plays back images using the internal memory (approx. 25 MB). [ To check the remaining battery time Press POWER button... to turn on and check the remaining battery on for the first time (page 12). 10 Change the battery with the tip ...
Instruction Manual
Page 12
... to be set, then set the clock, the Clock Set screen appears each time the camera is turned on. • If the camera is running on the screen. 1 Touch the desired date display format, then t. 4 Turning the camera on/setting the clock POWER button Mode switch Touch panel 1Select with v/V. 3 Touch [OK]. [ To... with the mode switch, then press the POWER button. 2Set the clock by touching the buttons on battery power and you do not operate the camera for about three minutes, the camera turns off automatically to prevent wearing down the battery pack (Auto power-off function). 12
... to be set, then set the clock, the Clock Set screen appears each time the camera is turned on. • If the camera is running on the screen. 1 Touch the desired date display format, then t. 4 Turning the camera on/setting the clock POWER button Mode switch Touch panel 1Select with v/V. 3 Touch [OK]. [ To... with the mode switch, then press the POWER button. 2Set the clock by touching the buttons on battery power and you do not operate the camera for about three minutes, the camera turns off automatically to prevent wearing down the battery pack (Auto power-off function). 12
Instruction Manual
Page 13
... Touch panel Tripod receptacle (bottom) Shutter button Zoom (W/T) button Mode switch (on the screen, those minimized copies of the focus frame. Movie: Select . 2 Hold the camera steadily, keeping your arms at your finger. 3 Shoot with the mode switch. Still image: 1 Press and hold the shutter button halfway down . AE/AF lock...
... Touch panel Tripod receptacle (bottom) Shutter button Zoom (W/T) button Mode switch (on the screen, those minimized copies of the focus frame. Movie: Select . 2 Hold the camera steadily, keeping your arms at your finger. 3 Shoot with the mode switch. Still image: 1 Press and hold the shutter button halfway down . AE/AF lock...
Instruction Manual
Page 14
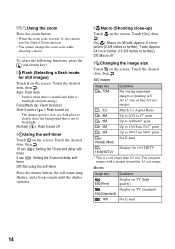
...( SL ): Flash forced on the screen. [ Using the zoom Press the zoom button. • When the zoom scale exceeds 3×, the camera uses the Digital Zoom function. • You cannot change the zoom scale while shooting a movie. Auto: Flash Auto Strobes when there is out of flash light.... . Movies Image size Guidelines : 640(Fine) Display on TV (high quality) : Display on the screen. Touch the desired item, then . 10 sec ( ): Setting the 10-second delay selftimer 2 sec ( ): Setting the 2-second delay selftimer Off: Not using the self-timer Press the shutter button, the self-timer ...
...( SL ): Flash forced on the screen. [ Using the zoom Press the zoom button. • When the zoom scale exceeds 3×, the camera uses the Digital Zoom function. • You cannot change the zoom scale while shooting a movie. Auto: Flash Auto Strobes when there is out of flash light.... . Movies Image size Guidelines : 640(Fine) Display on TV (high quality) : Display on the screen. Touch the desired item, then . 10 sec ( ): Setting the 10-second delay selftimer 2 sec ( ): Setting the 2-second delay selftimer Off: Not using the self-timer Press the shutter button, the self-timer ...
Instruction Manual
Page 15
...Allows you to shoot with preset settings according to the scene. [ Adjusting the exposure manually Set (Camera) to a setting other than [Auto], then touch . Toward -: Darkens an image. [ 9 Changing the focus method Set (Camera) to a setting other than [Auto] and [Manual], then touch . Center AF: Focuses automatically... shutter speed and the aperture value). Toward +: Brightens an image. 0EV: The exposure is determined automatically by the camera. Touch (EV). [ Selecting the still image shooting mode Touch on the screen, you can select various settings using the menu.
...Allows you to shoot with preset settings according to the scene. [ Adjusting the exposure manually Set (Camera) to a setting other than [Auto], then touch . Toward -: Darkens an image. [ 9 Changing the focus method Set (Camera) to a setting other than [Auto] and [Manual], then touch . Center AF: Focuses automatically... shutter speed and the aperture value). Toward +: Brightens an image. 0EV: The exposure is determined automatically by the camera. Touch (EV). [ Selecting the still image shooting mode Touch on the screen, you can select various settings using the menu.
Instruction Manual
Page 17
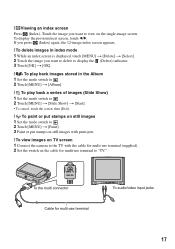
... the mode switch to . 2 Touch [MENU] t [Paint]. 3 Paint or put stamps on still images with paint pen. [ To view images on TV screen 1 Connect the camera to "TV." [ Viewing an index screen Press (Index). If you want to view on the cable for multi-use terminal to the TV with the...
... the mode switch to . 2 Touch [MENU] t [Paint]. 3 Paint or put stamps on still images with paint pen. [ To view images on TV screen 1 Connect the camera to "TV." [ Viewing an index screen Press (Index). If you want to view on the cable for multi-use terminal to the TV with the...
Instruction Manual
Page 18
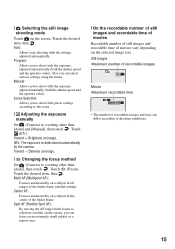
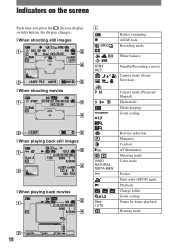
... changes. [ When shooting still images A z M BRK WB STBY REC [ When shooting movies SL 1.3 Battery remaining AE/AF lock Recording mode White balance Standby/Recording a movie Camera mode (Scene Selection) Camera mode (Program/ Manual) Flash mode Flash charging Zoom scaling [ When playing back still images [ When playing back movies ON VIVID NATURAL SEPIA B&W -
... changes. [ When shooting still images A z M BRK WB STBY REC [ When shooting movies SL 1.3 Battery remaining AE/AF lock Recording mode White balance Standby/Recording a movie Camera mode (Scene Selection) Camera mode (Program/ Manual) Flash mode Flash charging Zoom scaling [ When playing back still images [ When playing back movies ON VIVID NATURAL SEPIA B&W -

Instruction Manual
Page 20
... a Setup item Press (on -screen key) 1Set the mode switch. Different items are available depending on the position of the mode switch and the settings. (Camera) menu 2Press (on-screen key) to display the touch panel buttons. • When the mode switch is not visible, touch v/V until the item appears on...
... a Setup item Press (on -screen key) 1Set the mode switch. Different items are available depending on the position of the mode switch and the settings. (Camera) menu 2Press (on-screen key) to display the touch panel buttons. • When the mode switch is not visible, touch v/V until the item appears on...
Instruction Manual
Page 21
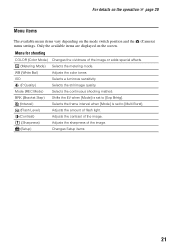
... items. 21 ISO Selects a luminous sensitivity. (P.Quality) Selects the still image quality. Only the available items are displayed on the mode switch position and the (Camera) menu settings. Mode (REC Mode) BRK (Bracket Step) M (Interval) Selects the continuous shooting method. Shifts the EV when [Mode] is set to [Multi Burst]. (Flash...
... items. 21 ISO Selects a luminous sensitivity. (P.Quality) Selects the still image quality. Only the available items are displayed on the mode switch position and the (Camera) menu settings. Mode (REC Mode) BRK (Bracket Step) M (Interval) Selects the continuous shooting method. Shifts the EV when [Mode] is set to [Multi Burst]. (Flash...

Instruction Manual
Page 22
Paints on the operation 1 page 20 Menu for approximately two seconds immediately after shooting a still image. Selects the folder for playback zoom.) Setup items Camera 1 AF Mode Digital Zoom Red Eye Reduction AF Illuminator Selects the auto focus operation mode. Changes the image size of images in the Album. Cuts movies. Reduces the...
Paints on the operation 1 page 20 Menu for approximately two seconds immediately after shooting a still image. Selects the folder for playback zoom.) Setup items Camera 1 AF Mode Digital Zoom Red Eye Reduction AF Illuminator Selects the auto focus operation mode. Changes the image size of images in the Album. Cuts movies. Reduces the...
Instruction Manual
Page 23
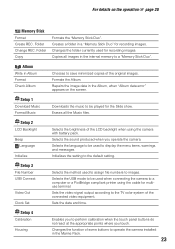
..." for recording images. Changes the folder currently used to display the menu items, warnings, and messages. Selects the language to operate the camera installed in Album Format Check Album Chooses to be used for recording images. Changes the function of the LCD backlight when using the cable for...be used to assign file numbers to perform calibration when the touch panel buttons do not react at the appropriate points where you operate the camera. Folder Change REC. Erases all images in the Album, when "Album data error" appears on the operation 1 page 20 Memory Stick...
..." for recording images. Changes the folder currently used to display the menu items, warnings, and messages. Selects the language to operate the camera installed in Album Format Check Album Chooses to be used for recording images. Changes the function of the LCD backlight when using the cable for...be used to assign file numbers to perform calibration when the touch panel buttons do not react at the appropriate points where you operate the camera. Folder Change REC. Erases all images in the Album, when "Album data error" appears on the operation 1 page 20 Memory Stick...
Instruction Manual
Page 24
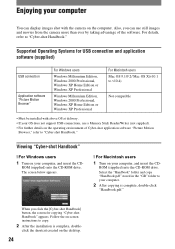
... images shot with above OS at delivery. • If your OS does not support USB connections, use still images and movies from the camera more than ever by taking advantage of Cyber-shot application software "Picture Motion Browser," refer to copy. 2 After the installation is complete, double...Home Edition or Windows XP Professional For Macintosh users Mac OS 9.1/9.2/ Mac OS X(v10.1 to v10.4) Not compatible • Must be installed with the camera on your computer, and insert the CD- Viewing "Cyber-shot Handbook" [ For Windows users 1 Turn on the computer. Enjoying your computer You ...
... images shot with above OS at delivery. • If your OS does not support USB connections, use still images and movies from the camera more than ever by taking advantage of Cyber-shot application software "Picture Motion Browser," refer to copy. 2 After the installation is complete, double...Home Edition or Windows XP Professional For Macintosh users Mac OS 9.1/9.2/ Mac OS X(v10.1 to v10.4) Not compatible • Must be installed with the camera on your computer, and insert the CD- Viewing "Cyber-shot Handbook" [ For Windows users 1 Turn on the computer. Enjoying your computer You ...
Instruction Manual
Page 25
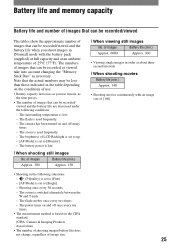
... continuously with the battery pack (supplied) at full capacity and at an ambient temperature of 25°C (77°F). Shooting once every 30 seconds. - The camera has been turned on the conditions of use. • Battery capacity decreases as you shoot images in [Normal] mode with an image size of [160... than those indicated in the table depending on and off once every ten times. • The measurement method is based on the CIPA standard. (CIPA: Camera & Imaging Products Association) • The number of shooting images/battery life does not change, regardless of image size. 25
... continuously with the battery pack (supplied) at full capacity and at an ambient temperature of 25°C (77°F). Shooting once every 30 seconds. - The camera has been turned on the conditions of use. • Battery capacity decreases as you shoot images in [Normal] mode with an image size of [160... than those indicated in the table depending on and off once every ten times. • The measurement method is based on the CIPA standard. (CIPA: Camera & Imaging Products Association) • The number of shooting images/battery life does not change, regardless of image size. 25
Instruction Manual
Page 26
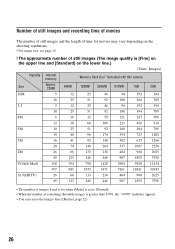
....) (Units: Images) Capacity Internal memory "Memory Stick Duo" formatted with this camera Size Approx. 25MB 64MB 128MB 256MB 512MB 1GB 2GB 10M 5 12 25 46 94 192 394 10 25 51 92 188 384 789 3:2 5 12 25 46 94 192 394 10 25 51 92 188 384 789 8M 6 16 32 59 121... 247 506 12 30 60 109 223 456 934 5M 10 25 51 92 188 384 789 19 48 96 174 354 723 1482 3M 16 41 82 148 302 617 1266 29 74 149 264 ...
....) (Units: Images) Capacity Internal memory "Memory Stick Duo" formatted with this camera Size Approx. 25MB 64MB 128MB 256MB 512MB 1GB 2GB 10M 5 12 25 46 94 192 394 10 25 51 92 188 384 789 3:2 5 12 25 46 94 192 394 10 25 51 92 188 384 789 8M 6 16 32 59 121... 247 506 12 30 60 109 223 456 934 5M 10 25 51 92 188 384 789 19 48 96 174 354 723 1482 3M 16 41 82 148 302 617 1266 29 74 149 264 ...
Instruction Manual
Page 27
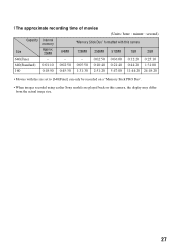
...: hour : minute : second) Capacity Internal memory "Memory Stick Duo" formatted with this camera Size Approx. 25MB 64MB 128MB 256MB 512MB 1GB 2GB 640(Fine) - - - 0:02:50 0:06:00 0:12:20 0:25:10 640(Standard) 0:01:10 0:02:50 0:05:50 0:10:40 0:21:40 0:44:20 1:31:00 160 0:18:50 0:45:30 1:31...:20 • Movies with the size set to [640(Fine)] can only be recorded on a "Memory Stick PRO Duo". • When images recorded using earlier Sony models are played back on this camera, the display may differ from the actual image size. 27
...: hour : minute : second) Capacity Internal memory "Memory Stick Duo" formatted with this camera Size Approx. 25MB 64MB 128MB 256MB 512MB 1GB 2GB 640(Fine) - - - 0:02:50 0:06:00 0:12:20 0:25:10 640(Standard) 0:01:10 0:02:50 0:05:50 0:10:40 0:21:40 0:44:20 1:31:00 160 0:18:50 0:45:30 1:31...:20 • Movies with the size set to [640(Fine)] can only be recorded on a "Memory Stick PRO Duo". • When images recorded using earlier Sony models are played back on this camera, the display may differ from the actual image size. 27
Instruction Manual
Page 28
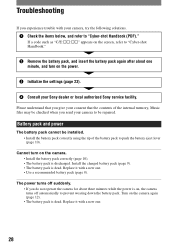
...minute, and turn on the power. 3 Initialize the settings (page 23). 4 Consult your Sony dealer or local authorized Sony service facility. Replace it with a new one . 28 Troubleshooting If you experience trouble with your camera, try the following solutions. 1 Check the items below, and refer to be repaired. ... to push the battery eject lever (page 10). Battery pack and power The battery pack cannot be installed. • Install the battery pack correctly using the tip of the internal memory, Music files may be checked when you send your camera to "Cyber-shot Handbook (PDF)." The ...
...minute, and turn on the power. 3 Initialize the settings (page 23). 4 Consult your Sony dealer or local authorized Sony service facility. Replace it with a new one . 28 Troubleshooting If you experience trouble with your camera, try the following solutions. 1 Check the items below, and refer to be repaired. ... to push the battery eject lever (page 10). Battery pack and power The battery pack cannot be installed. • Install the battery pack correctly using the tip of the internal memory, Music files may be checked when you send your camera to "Cyber-shot Handbook (PDF)." The ...


