Instruction Manual
Page 7
... Read this first 4 Notes on using the camera 8 Getting started 9 Checking the accessories supplied 9 Lens hood/Remote Control 10 1 Preparing the battery pack 12 2 Inserting the battery pack/a "Memory Stick Duo" (not supplied) ........ 13 3 Turning the camera on the screen 33 Battery life and memory capacity...items 28 Menu items 29 Enjoying your computer 31 Supported Operating Systems for USB connection and application software (supplied 31 Viewing "Cyber-shot Handbook 32 Indicators on /setting the clock 15 Shooting images easily 16 Mode dial/Zoom/Flash/Macro/Self-timer/Display 17...
... Read this first 4 Notes on using the camera 8 Getting started 9 Checking the accessories supplied 9 Lens hood/Remote Control 10 1 Preparing the battery pack 12 2 Inserting the battery pack/a "Memory Stick Duo" (not supplied) ........ 13 3 Turning the camera on the screen 33 Battery life and memory capacity...items 28 Menu items 29 Enjoying your computer 31 Supported Operating Systems for USB connection and application software (supplied 31 Viewing "Cyber-shot Handbook 32 Indicators on /setting the clock 15 Shooting images easily 16 Mode dial/Zoom/Flash/Macro/Self-timer/Display 17...
Instruction Manual
Page 8
...materials may be repaired. • Do not aim the camera at the sun or other equipment will play back images. • Using the camera in insufficient light emission. 8 [ Notes on the LCD screen, the LCD finder and lens • The LCD screen and the LCD finder are...screen. [ On image data compatibility • The camera conforms with DCF (Design rule for Camera File system) universal standard established by JEITA (Japan Electronics and Information Technology Industries Association). • Sony does not guarantee that the camera will play back images recorded or edited with other ...
...materials may be repaired. • Do not aim the camera at the sun or other equipment will play back images. • Using the camera in insufficient light emission. 8 [ Notes on the LCD screen, the LCD finder and lens • The LCD screen and the LCD finder are...screen. [ On image data compatibility • The camera conforms with DCF (Design rule for Camera File system) universal standard established by JEITA (Japan Electronics and Information Technology Industries Association). • Sony does not guarantee that the camera will play back images recorded or edited with other ...
Instruction Manual
Page 9
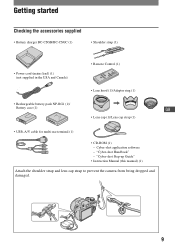
... Control (1) • Lens hood (1)/Adaptor ring (1) • Rechargeable battery pack NP-BG1 (1)/ Battery case (1) GB • Lens cap (1)/Lens cap strap (1) • USB, A/V cable for multi-use terminal (1) • CD-ROM (1) - "Cyber-shot Handbook" - "Cyber-shot Step-up Guide" • Instruction Manual (this manual) (1) Attach the shoulder strap and lens cap strap to prevent the camera from being dropped...
... Control (1) • Lens hood (1)/Adaptor ring (1) • Rechargeable battery pack NP-BG1 (1)/ Battery case (1) GB • Lens cap (1)/Lens cap strap (1) • USB, A/V cable for multi-use terminal (1) • CD-ROM (1) - "Cyber-shot Handbook" - "Cyber-shot Step-up Guide" • Instruction Manual (this manual) (1) Attach the shoulder strap and lens cap strap to prevent the camera from being dropped...
Instruction Manual
Page 10
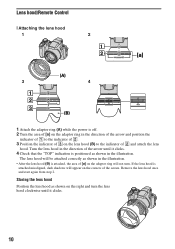
...direction of the arrow until it clicks. 4 Check that the "TOP" indication is positioned as shown in the illustration. • After the lens hood (B) is attached, the area of [a] on the adaptor ring will be attached correctly as shown in the direction of the arrow and ...indicator of 2 and attach the lens hood. Remove the lens hood once and start again from step 2. The lens hood will not turn the lens hood clockwise until it clicks. 10 Storing the lens hood Position the lens hood as shown on the right and turn . Lens hood/Remote Control [ Attaching the lens hood 1 2 3 4 1...
...direction of the arrow until it clicks. 4 Check that the "TOP" indication is positioned as shown in the illustration. • After the lens hood (B) is attached, the area of [a] on the adaptor ring will be attached correctly as shown in the direction of the arrow and ...indicator of 2 and attach the lens hood. Remove the lens hood once and start again from step 2. The lens hood will not turn the lens hood clockwise until it clicks. 10 Storing the lens hood Position the lens hood as shown on the right and turn . Lens hood/Remote Control [ Attaching the lens hood 1 2 3 4 1...
Instruction Manual
Page 13
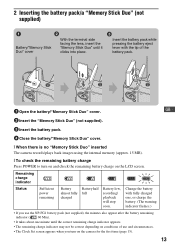
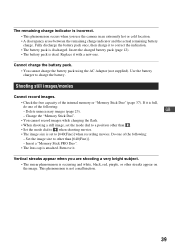
...supplied). 3 Insert the battery pack. 4 Close the battery/"Memory Stick Duo" cover. [ When there is no "Memory Stick Duo" inserted The camera records/plays back images using the internal memory (approx. 15 MB). [ To check the remaining battery charge Press POWER to turn on the LCD screen... 2 Inserting the battery pack/a "Memory Stick Duo" (not supplied) ɟ Battery/"Memory Stick Duo" cover With the terminal side facing the lens, insert the "Memory Stick Duo" until the correct remaining charge indicator appears. • The remaining charge indicator may not be correct depending on ...
...supplied). 3 Insert the battery pack. 4 Close the battery/"Memory Stick Duo" cover. [ When there is no "Memory Stick Duo" inserted The camera records/plays back images using the internal memory (approx. 15 MB). [ To check the remaining battery charge Press POWER to turn on the LCD screen... 2 Inserting the battery pack/a "Memory Stick Duo" (not supplied) ɟ Battery/"Memory Stick Duo" cover With the terminal side facing the lens, insert the "Memory Stick Duo" until the correct remaining charge indicator appears. • The remaining charge indicator may not be correct depending on ...
Instruction Manual
Page 16
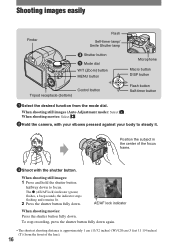
When shooting movies: Select . 2Hold the camera, with the shutter button. The z (AE/AF lock) indicator (green) flashes, a beep sounds, the indicator stops flashing and remains lit. 2 Press the shutter button fully ...) (T) (from the mode dial. AE/AF lock indicator When shooting movies: Press the shutter button fully down . Position the subject in the center of the lens). 16 When shooting still images (Auto Adjustment mode): Select .
When shooting movies: Select . 2Hold the camera, with the shutter button. The z (AE/AF lock) indicator (green) flashes, a beep sounds, the indicator stops flashing and remains lit. 2 Press the shutter button fully ...) (T) (from the mode dial. AE/AF lock indicator When shooting movies: Press the shutter button fully down . Position the subject in the center of the lens). 16 When shooting still images (Auto Adjustment mode): Select .
Instruction Manual
Page 27
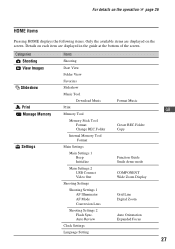
... Internal Memory Tool Format Main Settings Main Settings 1 Beep Initialize Main Settings 2 USB Connect Video Out Shooting Settings Shooting Settings 1 AF Illuminator AF Mode Conversion Lens Shooting Settings 2 Flash Sync. For details on the operation 1 page 26 HOME items Pressing HOME displays the following items. Only the available items are displayed... the screen. Auto Review Clock Settings Language Setting Format Music Create REC.Folder Copy Function Guide Smile demo mode COMPONENT Wide Zoom Display Grid Line Digital Zoom Auto Orientation Expanded Focus GB 27
... Internal Memory Tool Format Main Settings Main Settings 1 Beep Initialize Main Settings 2 USB Connect Video Out Shooting Settings Shooting Settings 1 AF Illuminator AF Mode Conversion Lens Shooting Settings 2 Flash Sync. For details on the operation 1 page 26 HOME items Pressing HOME displays the following items. Only the available items are displayed... the screen. Auto Review Clock Settings Language Setting Format Music Create REC.Folder Copy Function Guide Smile demo mode COMPONENT Wide Zoom Display Grid Line Digital Zoom Auto Orientation Expanded Focus GB 27
Instruction Manual
Page 34
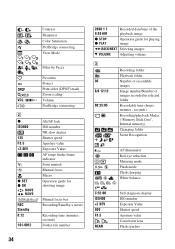
... Flash mode Flash charging White balance C:32:00 ISO400 +2.0EV 500 F3.5 REAR Self-diagnosis display ISO number Exposure Value Shutter speed Aperture value Conversion lens Flash synchro Contrast Sharpness Color Saturation PictBridge connecting View Mode VOL.
... Flash mode Flash charging White balance C:32:00 ISO400 +2.0EV 500 F3.5 REAR Self-diagnosis display ISO number Exposure Value Shutter speed Aperture value Conversion lens Flash synchro Contrast Sharpness Color Saturation PictBridge connecting View Mode VOL.
Instruction Manual
Page 39
...battery pack (page 12). • The battery pack is not a malfunction. 39 GB - Do one . Vertical streaks appear when you use the camera in an extremely hot or cold location. • A discrepancy arose between the remaining charge indicator and the actual remaining battery charge. Set the image ...image, set the mode dial to other streaks appear on the image. This phenomenon is dead. Insert a "Memory Stick PRO Duo". • The lens cap is full, do one of the internal memory or "Memory Stick Duo" (page 37). Use the battery charger to correct the indication. •...
...battery pack (page 12). • The battery pack is not a malfunction. 39 GB - Do one . Vertical streaks appear when you use the camera in an extremely hot or cold location. • A discrepancy arose between the remaining charge indicator and the actual remaining battery charge. Set the image ...image, set the mode dial to other streaks appear on the image. This phenomenon is dead. Insert a "Memory Stick PRO Duo". • The lens cap is full, do one of the internal memory or "Memory Stick Duo" (page 37). Use the battery charger to correct the indication. •...
Instruction Manual
Page 41
...to a warm location, moisture may condense inside the lens, images will not be clear. [ On the internal rechargeable backup battery The camera has an internal rechargeable battery for maintaining the date and time and other place with the camera in the back pocket of the internal rechargeable backup ...Turn off . 41 Note that exceed this may cause a malfunction of the above on or off. Cleaning the lens Wipe the lens with a dry cloth. However, if you use the camera for use under the temperatures between 0°C and 40°C (32°F and 104°F). Charging method...
...to a warm location, moisture may condense inside the lens, images will not be clear. [ On the internal rechargeable backup battery The camera has an internal rechargeable battery for maintaining the date and time and other place with the camera in the back pocket of the internal rechargeable backup ...Turn off . 41 Note that exceed this may cause a malfunction of the above on or off. Cleaning the lens Wipe the lens with a dry cloth. However, if you use the camera for use under the temperatures between 0°C and 40°C (32°F and 104°F). Charging method...
Instruction Manual
Page 42
... CCD, Primary color filter • Only 7.30 mm (1/2.5 type equivalent) area is used in the camera. Total pixel number of camera: Approx. 10.3 Megapixels Effective pixel number of camera: Approx. 9.1 Megapixels Lens: Carl Zeiss Vario-Tessar 15× zoom lens f = 5.2 - 78 mm (31 - 465 mm (35 mm film equivalent)) F2.7(W) - 4.5(T) Exposure control: Automatic exposure, Shutter...
... CCD, Primary color filter • Only 7.30 mm (1/2.5 type equivalent) area is used in the camera. Total pixel number of camera: Approx. 10.3 Megapixels Effective pixel number of camera: Approx. 9.1 Megapixels Lens: Carl Zeiss Vario-Tessar 15× zoom lens f = 5.2 - 78 mm (31 - 465 mm (35 mm film equivalent)) F2.7(W) - 4.5(T) Exposure control: Automatic exposure, Shutter...


