Instruction Manual
Page 6
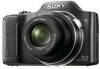
Table of contents Notes on using the camera 8 Getting started 10 Checking the accessories supplied 10 Identifying parts 11 Charging the battery pack 12 Inserting the battery pack/a "Memory Stick Duo" media (sold ...
Table of contents Notes on using the camera 8 Getting started 10 Checking the accessories supplied 10 Identifying parts 11 Charging the battery pack 12 Inserting the battery pack/a "Memory Stick Duo" media (sold ...
Instruction Manual
Page 7
Deleting images 36 Deleting images 36 Deleting all images (Format 37 Connecting to other devices 38 Viewing images on a TV 38 Printing still images 38 Using the camera with a computer 40 Changing camera settings 44 Changing the operation sounds 44 Using the MENU items 45 Using the (Settings) items 48 Others 50 List of icons displayed on the screen 50 Learning more about the camera ("Cyber-shot Handbook 53 Troubleshooting 54 Precautions 57 Specifications 58 7GB
Deleting images 36 Deleting images 36 Deleting all images (Format 37 Connecting to other devices 38 Viewing images on a TV 38 Printing still images 38 Using the camera with a computer 40 Changing camera settings 44 Changing the operation sounds 44 Using the MENU items 45 Using the (Settings) items 48 Others 50 List of icons displayed on the screen 50 Learning more about the camera ("Cyber-shot Handbook 53 Troubleshooting 54 Precautions 57 Specifications 58 7GB

Instruction Manual
Page 8
... Electronics and Information Technology Industries Association). • Sony does not guarantee that the camera will play back images. • Using the camera in insufficient light emission. 8GB Notes on the camera and battery temperature, you can perform the next operation. On image data compatibility • The camera conforms with other equipment, or that generates strong...
... Electronics and Information Technology Industries Association). • Sony does not guarantee that the camera will play back images. • Using the camera in insufficient light emission. 8GB Notes on the camera and battery temperature, you can perform the next operation. On image data compatibility • The camera conforms with other equipment, or that generates strong...

Instruction Manual
Page 9
No compensation for damaged content or recording failure Sony cannot compensate for failure to record or loss or damage of recorded content due to a malfunction of the camera or recording media, etc. 9GB
No compensation for damaged content or recording failure Sony cannot compensate for failure to record or loss or damage of recorded content due to a malfunction of the camera or recording media, etc. 9GB
Instruction Manual
Page 10
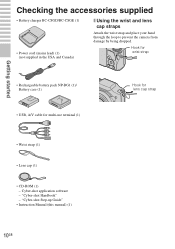
... Canada) x Using the wrist and lens cap straps Attach the wrist strap and place your hand through the loop to prevent the camera from damage by being dropped. Cyber-shot application software - "Cyber-shot Step-up Guide" • Instruction Manual (this manual) (1) 10GB "Cyber-shot Handbook" - Getting started • Wrist strap (1) • Lens cap (1) • CD-ROM (1) -
... Canada) x Using the wrist and lens cap straps Attach the wrist strap and place your hand through the loop to prevent the camera from damage by being dropped. Cyber-shot application software - "Cyber-shot Step-up Guide" • Instruction Manual (this manual) (1) 10GB "Cyber-shot Handbook" - Getting started • Wrist strap (1) • Lens cap (1) • CD-ROM (1) -

Instruction Manual
Page 11
Otherwise, you cannot firmly secure the camera, and damage to the camera may occur. S Battery/"Memory Stick Duo" media cover T Battery insertion slot U "Memory Stick Duo" media slot V Multi connector W Battery eject lever X Access lamp 11GB Getting ...
Otherwise, you cannot firmly secure the camera, and damage to the camera may occur. S Battery/"Memory Stick Duo" media cover T Battery insertion slot U "Memory Stick Duo" media slot V Multi connector W Battery eject lever X Access lamp 11GB Getting ...

Instruction Manual
Page 13
... 320 No. This may vary depending on the CIPA standard. (CIPA: Camera & Imaging Products Association) Note • The battery life and the number of the genuine Sony brand. Normal charge time Approx. 270 min. zUsing the camera abroad You can use an electronic transformer (travel converter). Notes • The... x Charging time Full charge time Approx. 330 min. x Battery life and number of 25°C (77°F). Do not use the camera, the battery charger (supplied), and the AC-LS5K AC Adaptor (sold separately) in any country or region where the power supply is based on...
... 320 No. This may vary depending on the CIPA standard. (CIPA: Camera & Imaging Products Association) Note • The battery life and the number of the genuine Sony brand. Normal charge time Approx. 270 min. zUsing the camera abroad You can use an electronic transformer (travel converter). Notes • The... x Charging time Full charge time Approx. 330 min. x Battery life and number of 25°C (77°F). Do not use the camera, the battery charger (supplied), and the AC-LS5K AC Adaptor (sold separately) in any country or region where the power supply is based on...

Instruction Manual
Page 15
...media in once. "Memory Stick" media You cannot use a "Memory Stick PRO Duo" media or "Memory Stick PRO-HG Duo" media with the camera. x When there is also shown after the remaining charge indicator. • Battery capacity decreases over time and through repeated use "Memory Stick Duo" ...remove the "Memory Stick Duo" media/battery pack when the access lamp is lit. x "Memory Stick" media that you do not operate the camera for about one minute until the correct remaining charge indicator appears. • The remaining charge indicator may cause damage to data in the "Memory ...
...media in once. "Memory Stick" media You cannot use a "Memory Stick PRO Duo" media or "Memory Stick PRO-HG Duo" media with the camera. x When there is also shown after the remaining charge indicator. • Battery capacity decreases over time and through repeated use "Memory Stick Duo" ...remove the "Memory Stick Duo" media/battery pack when the access lamp is lit. x "Memory Stick" media that you do not operate the camera for about one minute until the correct remaining charge indicator appears. • The remaining charge indicator may cause damage to data in the "Memory ...

Instruction Manual
Page 16
Daylight Savings: Select Daylight Savings On/Off. ON/OFF (Power) button Control button 3 Set the numeric value and desired settings with v/V/b/ B, then press z. • Midnight is turned on. • It may take time for the power to turn on and allow operation. 2 Select a setting item with v/ V on the control button, then press z. Date & Time: Sets the date and time. Getting started Setting the clock 1 Press the ON/OFF (Power) button. The camera is indicated as 12:00 AM, and noon as 12:00 PM. 16GB Date & Time Format: Select the date and time display format.
Daylight Savings: Select Daylight Savings On/Off. ON/OFF (Power) button Control button 3 Set the numeric value and desired settings with v/V/b/ B, then press z. • Midnight is turned on. • It may take time for the power to turn on and allow operation. 2 Select a setting item with v/ V on the control button, then press z. Date & Time: Sets the date and time. Getting started Setting the clock 1 Press the ON/OFF (Power) button. The camera is indicated as 12:00 AM, and noon as 12:00 PM. 16GB Date & Time Format: Select the date and time display format.
Instruction Manual
Page 17
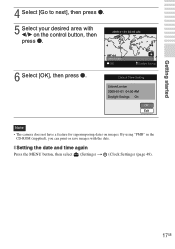
Note • The camera does not have a feature for superimposing dates on the control button, then press z. 6 Select [OK], then press z. Getting started 4 Select [Go to next], then press z. 5 Select your desired area with the date. x Setting the date and time again Press the MENU button, then select (Settings) t (Clock Settings) (page 49). 17GB By using "PMB" in the CD-ROM (supplied), you can print or save images with b/B on images.
Note • The camera does not have a feature for superimposing dates on the control button, then press z. 6 Select [OK], then press z. Getting started 4 Select [Go to next], then press z. 5 Select your desired area with the date. x Setting the date and time again Press the MENU button, then select (Settings) t (Clock Settings) (page 49). 17GB By using "PMB" in the CD-ROM (supplied), you can print or save images with b/B on images.

Instruction Manual
Page 18
.... W/T (Zoom) lever T side W side 3 Press the shutter button halfway down . ON/OFF (Power) button Mode dial 2 Hold the camera steady as illustrated. • Move the W/T (Zoom) lever towards T to indicate that SteadyShot is shot. is displayed to zoom in focus, a beep sounds and the z indicator lights. When the image is approximately 2 cm...
.... W/T (Zoom) lever T side W side 3 Press the shutter button halfway down . ON/OFF (Power) button Mode dial 2 Hold the camera steady as illustrated. • Move the W/T (Zoom) lever towards T to indicate that SteadyShot is shot. is displayed to zoom in focus, a beep sounds and the z indicator lights. When the image is approximately 2 cm...
Instruction Manual
Page 19
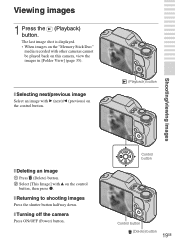
...images 1 Press the (Playback) button. x Returning to shooting images Press the shutter button halfway down. The last image shot is displayed. • When images on the "Memory Stick Duo" media recorded with v on this camera, view the images in [Folder View] (page 35). Control button Control button (Delete) button 19GB x Selecting next... image with B (next)/b (previous) on the control button. (Playback) button Shooting/viewing images x Deleting an image 1 Press (Delete) button. 2 Select [This Image] with other cameras cannot be played back on the control button, then press z.
...images 1 Press the (Playback) button. x Returning to shooting images Press the shutter button halfway down. The last image shot is displayed. • When images on the "Memory Stick Duo" media recorded with v on this camera, view the images in [Folder View] (page 35). Control button Control button (Delete) button 19GB x Selecting next... image with B (next)/b (previous) on the control button. (Playback) button Shooting/viewing images x Deleting an image 1 Press (Delete) button. 2 Select [This Image] with other cameras cannot be played back on the control button, then press z.
Instruction Manual
Page 21
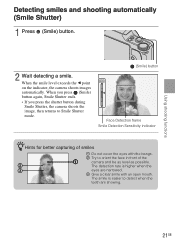
... the image, then returns to Smile Shutter mode. (Smile) button Face Detection frame Smile Detection Sensitivity indicator zHints for better capturing of the camera and be as level as possible. The detection rate is easier to orient the face in front of smiles 1 Do not cover the eyes with ... functions Detecting smiles and shooting automatically (Smile Shutter) 1 Press (Smile) button. 2 Wait detecting a smile. When the smile level exceeds the b point on the indicator, the camera shoots images automatically.
... the image, then returns to Smile Shutter mode. (Smile) button Face Detection frame Smile Detection Sensitivity indicator zHints for better capturing of the camera and be as level as possible. The detection rate is easier to orient the face in front of smiles 1 Do not cover the eyes with ... functions Detecting smiles and shooting automatically (Smile Shutter) 1 Press (Smile) button. 2 Wait detecting a smile. When the smile level exceeds the b point on the indicator, the camera shoots images automatically.
Instruction Manual
Page 22
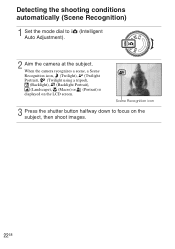
Scene Recognition icon 3 Press the shutter button halfway down to (Intelligent Auto Adjustment). 2 Aim the camera at the subject. Detecting the shooting conditions automatically (Scene Recognition) 1 Set the mode dial to focus on the LCD screen. When the camera recognizes a scene, a Scene Recognition icon, (Twilight), (Twilight Portrait), (Twilight using a tripod), (Backlight), (Backlight Portrait), (Landscape), (Macro) or (Portrait) is displayed on the subject, then shoot images. 22GB
Scene Recognition icon 3 Press the shutter button halfway down to (Intelligent Auto Adjustment). 2 Aim the camera at the subject. Detecting the shooting conditions automatically (Scene Recognition) 1 Set the mode dial to focus on the LCD screen. When the camera recognizes a scene, a Scene Recognition icon, (Twilight), (Twilight Portrait), (Twilight using a tripod), (Backlight), (Backlight Portrait), (Landscape), (Macro) or (Portrait) is displayed on the subject, then shoot images. 22GB
Instruction Manual
Page 23
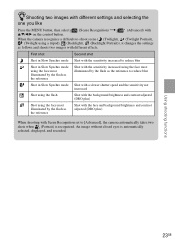
...selecting the one you like Press the MENU button, then select v/V/b/B on the control button. (Scene Recognition) t (Advanced) with When the camera recognizes a difficult-to-shoot scene ( (Twilight), (Twilight Portrait), (Twilight using the face most illuminated by the flash as follows and shoots ... increased to reduce blur Shot in Slow Synchro mode using the face most illuminated by the flash as the reference Shot with the sensitivity increased using the face most illuminated by the flash as the reference to [Advanced], the camera automatically takes two shots when (Portrait) is ...
...selecting the one you like Press the MENU button, then select v/V/b/B on the control button. (Scene Recognition) t (Advanced) with When the camera recognizes a difficult-to-shoot scene ( (Twilight), (Twilight Portrait), (Twilight using the face most illuminated by the flash as follows and shoots ... increased to reduce blur Shot in Slow Synchro mode using the face most illuminated by the flash as the reference Shot with the sensitivity increased using the face most illuminated by the flash as the reference to [Advanced], the camera automatically takes two shots when (Portrait) is ...
Instruction Manual
Page 24
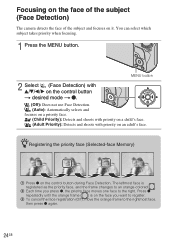
The leftmost face is on the control button during Face Detection. Focusing on the face of the subject (Face Detection) The camera detects the face of the subject and focuses on an adult's face. MENU button 2 Select (Face Detection) with v/V/b/B on the control button t desired mode t z. (Off): ...
The leftmost face is on the control button during Face Detection. Focusing on the face of the subject (Face Detection) The camera detects the face of the subject and focuses on an adult's face. MENU button 2 Select (Face Detection) with v/V/b/B on the control button t desired mode t z. (Off): ...

Instruction Manual
Page 25
...10sec): Shooting starts after a two-second delay. The self-timer lamp flashes and a beep sounds until the shutter operates. 25GB Normally, put the camera in this setting if you want to include yourself in Intelligent Auto Adjustment mode or Movie Mode. Note • Macro mode is fixed to [...Auto] when the camera is pressed. 2 Press the shutter button. Using shooting functions Shooting close-ups (Macro) You can shoot beautiful close-up images of small subjects...
...10sec): Shooting starts after a two-second delay. The self-timer lamp flashes and a beep sounds until the shutter operates. 25GB Normally, put the camera in this setting if you want to include yourself in Intelligent Auto Adjustment mode or Movie Mode. Note • Macro mode is fixed to [...Auto] when the camera is pressed. 2 Press the shutter button. Using shooting functions Shooting close-ups (Macro) You can shoot beautiful close-up images of small subjects...
Instruction Manual
Page 26
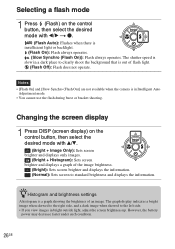
... there is in bright outside light, adjust the screen brightness up. Notes • [Flash On] and [Slow Synchro (Flash On)] are not available when the camera is insufficient light or backlight. (Flash On): Flash always operates. (Slow Synchro (Flash On)): Flash always operates. The shutter speed is slow in a dark place...
... there is in bright outside light, adjust the screen brightness up. Notes • [Flash On] and [Slow Synchro (Flash On)] are not available when the camera is insufficient light or backlight. (Flash On): Flash always operates. (Slow Synchro (Flash On)): Flash always operates. The shutter speed is slow in a dark place...
Instruction Manual
Page 28
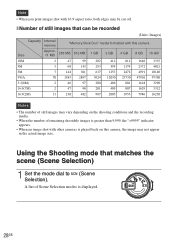
... Set the mode dial to (Scene Selection). A list of remaining shootable images is greater than 9,999, the ">9999" indicator appears. • When an image shot with this camera Size Approx. 11 MB 256 MB 512 MB 1 GB 2 GB 4 GB 8 GB 16 GB 10M 2 47 99 202 412 812 1640 3335 5M 3 68... images may vary depending on the shooting conditions and the recording media. • When the number of Scene Selection modes is played back on this camera, the image may be cut off. Using the Shooting mode that can be recorded (Units: Images) Capacity Internal memory "Memory Stick Duo" media...
... Set the mode dial to (Scene Selection). A list of remaining shootable images is greater than 9,999, the ">9999" indicator appears. • When an image shot with this camera Size Approx. 11 MB 256 MB 512 MB 1 GB 2 GB 4 GB 8 GB 16 GB 10M 2 47 99 202 412 812 1640 3335 5M 3 68... images may vary depending on the shooting conditions and the recording media. • When the number of Scene Selection modes is played back on this camera, the image may be cut off. Using the Shooting mode that can be recorded (Units: Images) Capacity Internal memory "Memory Stick Duo" media...

Instruction Manual
Page 31
... forward Fast rewind Displays the volume control screen. Using shooting functions The difference between the settings and proper exposure judged by the camera appears as the most suitable by the camera. Shooting movies 1 Set the mode dial to (Movie Mode). 2 Press the shutter button fully down to start recording. 3...sound of the lens or beep sound of buttons might be recorded while shooting a movie. • Even if you turn the lever fully, the camera zooms slowly while shooting a movie. Note • The flash is the value judged as an EV value on the control button to select a ...
... forward Fast rewind Displays the volume control screen. Using shooting functions The difference between the settings and proper exposure judged by the camera appears as the most suitable by the camera. Shooting movies 1 Set the mode dial to (Movie Mode). 2 Press the shutter button fully down to start recording. 3...sound of the lens or beep sound of buttons might be recorded while shooting a movie. • Even if you turn the lever fully, the camera zooms slowly while shooting a movie. Note • The flash is the value judged as an EV value on the control button to select a ...


