Operating Instructions
Page 1
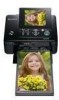
Owner's Record The model and serial numbers are located on the bottom of the printer. Model No.: DPP-FP97 Serial No Before you call upon your Sony dealer regarding this manual, "Operating Instructions," thoroughly and retain them for future reference. Refer to these ...messages Troubleshooting Additional information © 2009 Sony Corporation Please read "Read This First" and "About the Print Packs" supplied and this product. Record the serial number in the space provided below. 4-129-103-11 (4) Digital Photo Printer DPP-FP97 Operating Instructions Before operating this unit, ...
Owner's Record The model and serial numbers are located on the bottom of the printer. Model No.: DPP-FP97 Serial No Before you call upon your Sony dealer regarding this manual, "Operating Instructions," thoroughly and retain them for future reference. Refer to these ...messages Troubleshooting Additional information © 2009 Sony Corporation Please read "Read This First" and "About the Print Packs" supplied and this product. Record the serial number in the space provided below. 4-129-103-11 (4) Digital Photo Printer DPP-FP97 Operating Instructions Before operating this unit, ...

Operating Instructions
Page 2
CAUTION You are designed to operate this digital photo printer. Telephone No.: 858-942-2230 This device complies with the limits for EMC and product safety is Sony Corporation, 1-7-1 Konan Minato-ku Tokyo, 108-0075 Japan. Note: This equipment has been tested and found compliant ...Diego, CA 92127 U.S.A. Operation is encouraged to try to correct the interference by one or more of Conformity Trade Name: SONY Model No.: DPP-FP97 Responsible Party: Sony Electronics Inc. This equipment generates, uses, and can be determined by turning the equipment off and on a circuit different ...
CAUTION You are designed to operate this digital photo printer. Telephone No.: 858-942-2230 This device complies with the limits for EMC and product safety is Sony Corporation, 1-7-1 Konan Minato-ku Tokyo, 108-0075 Japan. Note: This equipment has been tested and found compliant ...Diego, CA 92127 U.S.A. Operation is encouraged to try to correct the interference by one or more of Conformity Trade Name: SONY Model No.: DPP-FP97 Responsible Party: Sony Electronics Inc. This equipment generates, uses, and can be determined by turning the equipment off and on a circuit different ...

Operating Instructions
Page 3
... with the printed image because display methods or profiles differ. Unless you should lose the fuse cover, please contact your nearest Sony service station. When using extremely high-precision technology, so over to the applicable collection point for the recycling of electrical and electronic... equipment. Backup recommendations To avoid potential risk of data loss caused by use or malfunction of the printer or memory card. However, there may be used. Continued 3 GB Duplication, edition, or printing of a CD, TV program, copyrighted ...
... with the printed image because display methods or profiles differ. Unless you should lose the fuse cover, please contact your nearest Sony service station. When using extremely high-precision technology, so over to the applicable collection point for the recycling of electrical and electronic... equipment. Backup recommendations To avoid potential risk of data loss caused by use or malfunction of the printer or memory card. However, there may be used. Continued 3 GB Duplication, edition, or printing of a CD, TV program, copyrighted ...

Operating Instructions
Page 5
... selected images 38 Formatting a "Memory Stick" media 38 Formatting the internal memory ..... 39 Changing the Print setup 39 Making a Date Print 40 Changing the Display/Printer setup 43 Continued 5 GB
... selected images 38 Formatting a "Memory Stick" media 38 Formatting the internal memory ..... 39 Changing the Print setup 39 Making a Date Print 40 Changing the Display/Printer setup 43 Continued 5 GB

Operating Instructions
Page 6
...image to a memory card 51 Printing from a PC Printing from a PC 52 Installing the software 52 System requirements 52 Installing the printer driver 53 Installing the PMB (Picture Motion Browser 55 Additional information Precautions 78 On safety 78 On installation 78 On cleaning 79 On restrictions... on duplication ........79 When disposing of the printer ........79 About the Memory Cards 79 "Memory Stick" media 79 SD memory Card 80 xD-Picture Card 81 CompactFlash card 81 ...
...image to a memory card 51 Printing from a PC Printing from a PC 52 Installing the software 52 System requirements 52 Installing the printer driver 53 Installing the PMB (Picture Motion Browser 55 Additional information Precautions 78 On safety 78 On installation 78 On cleaning 79 On restrictions... on duplication ........79 When disposing of the printer ........79 About the Memory Cards 79 "Memory Stick" media 79 SD memory Card 80 xD-Picture Card 81 CompactFlash card 81 ...

Operating Instructions
Page 7
Printer front panel A 1 (on/standby) button/standby indicator) B MENU button C (Index View) (zoom out)/ (zoom in the parentheses. Before you begin Identifying the parts For details, ...
Printer front panel A 1 (on/standby) button/standby indicator) B MENU button C (Index View) (zoom out)/ (zoom in the parentheses. Before you begin Identifying the parts For details, ...
Operating Instructions
Page 8
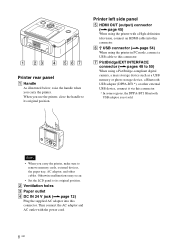
...IN 24 V jack (.page 12) Plug the supplied AC adaptor into this connector. When you carry the printer, make sure to its original position. Notes • When you use the printer, close the handle to remove memory cards, external devices, the paper tray, AC adaptor, and other external...HDMI cable into this connector. * In some regions, the DPPA-BT1 Bluetooth USB adaptor is not sold. Printer rear panel A Handle As illustrated below, raise the handle when you carry the printer. Otherwise malfunctions may occur. • Set the LCD panel to this connector. F USB connector (.page ...
...IN 24 V jack (.page 12) Plug the supplied AC adaptor into this connector. When you carry the printer, make sure to its original position. Notes • When you use the printer, close the handle to remove memory cards, external devices, the paper tray, AC adaptor, and other external...HDMI cable into this connector. * In some regions, the DPPA-BT1 Bluetooth USB adaptor is not sold. Printer rear panel A Handle As illustrated below, raise the handle when you carry the printer. Otherwise malfunctions may occur. • Set the LCD panel to this connector. F USB connector (.page ...

Operating Instructions
Page 9
...ribbon in which you purchased the printer. Removing the ink ribbon Push up the blue eject lever, and remove the used ink ribbon. About Sony Print Packs (sold separately) Please use a Sony optional color print pack designed for the printer. Preparations Preparations Checking the contents... of the package Make sure that the following accessories are supplied with your printer. • Paper tray (1) •...
...ribbon in which you purchased the printer. Removing the ink ribbon Push up the blue eject lever, and remove the used ink ribbon. About Sony Print Packs (sold separately) Please use a Sony optional color print pack designed for the printer. Preparations Preparations Checking the contents... of the package Make sure that the following accessories are supplied with your printer. • Paper tray (1) •...

Operating Instructions
Page 11
...paper into the paper tray with its original bag or a similar container. Do not insert different types of print paper together into the printer. • To avoid paper jam or malfunctions of the printed image may result in contact with rubber or plastic products, including vinyl ...chloride or plasticizer for this printer only. - Notes on used print paper, store it in a location subject to high temperatures, high humidity, excessive dust or direct sunlight. ...
...paper into the paper tray with its original bag or a similar container. Do not insert different types of print paper together into the printer. • To avoid paper jam or malfunctions of the printed image may result in contact with rubber or plastic products, including vinyl ...chloride or plasticizer for this printer only. - Notes on used print paper, store it in a location subject to high temperatures, high humidity, excessive dust or direct sunlight. ...

Operating Instructions
Page 12
... cord from the DC IN 24 V jack of the AC adaptor and the other plug to the wall outlet. Notes • Do not place the printer in an unstable location such as this may cause a malfunction. 12 GB The print paper emerges from the AC power source (mains) as long as... shut off . • A socket outlet should be as close by disconnecting the plug from the wall outlet. • Do not short the plug of the printer. • Connect the AC adaptor to an easily accessible wall outlet close as it is not disconnected from the back a few times during printing. Do...
... cord from the DC IN 24 V jack of the AC adaptor and the other plug to the wall outlet. Notes • Do not place the printer in an unstable location such as this may cause a malfunction. 12 GB The print paper emerges from the AC power source (mains) as long as... shut off . • A socket outlet should be as close by disconnecting the plug from the wall outlet. • Do not short the plug of the printer. • Connect the AC adaptor to an easily accessible wall outlet close as it is not disconnected from the back a few times during printing. Do...
Operating Instructions
Page 13
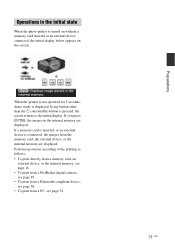
...images from a PC, see page 52. 13 GB Preparations Operations in the internal memory are displayed. Perform operations according to the initial display. When the printer is not operated for 5 seconds, demo mode is displayed. If any button other than the 1 (on the screen. If you press ENTER, the... images in the initial state When the photo printer is turned on without a memory card inserted or an external device connected, the initial display below appears on /standby) button is pressed, the ...
...images from a PC, see page 52. 13 GB Preparations Operations in the internal memory are displayed. Perform operations according to the initial display. When the printer is not operated for 5 seconds, demo mode is displayed. If any button other than the 1 (on the screen. If you press ENTER, the... images in the initial state When the photo printer is turned on without a memory card inserted or an external device connected, the initial display below appears on /standby) button is pressed, the ...

Operating Instructions
Page 14
...: Off On-screen Display: Details 14 GB You can change the image preview view by setting the "On-screen Display" (page 44) from the Display/Printer setup menu. Indicates "Pattern 2" (Borders). To display a different image, press g/G. Indicates Date Print (Date/Time) "On." Indicates Pages Per Sheet 4 "On...
...: Off On-screen Display: Details 14 GB You can change the image preview view by setting the "On-screen Display" (page 44) from the Display/Printer setup menu. Indicates "Pattern 2" (Borders). To display a different image, press g/G. Indicates Date Print (Date/Time) "On." Indicates Pages Per Sheet 4 "On...

Operating Instructions
Page 16
Switching the image preview view and index view You can use with the printer, please see pages 79 to display and press ENTER or (Enlarge). When an image is enlarged, press / , so that contains the images for printing into ... want to 81. The image is not necessary. • The SD memory Card/xD-Picture Card dualformat slot automatically detects card type. Notes • The printer supports both standard and small sizes "Memory Stick" media. Tip To print an image in the reverse direction it was inserted. Access indicator With the...
Switching the image preview view and index view You can use with the printer, please see pages 79 to display and press ENTER or (Enlarge). When an image is enlarged, press / , so that contains the images for printing into ... want to 81. The image is not necessary. • The SD memory Card/xD-Picture Card dualformat slot automatically detects card type. Notes • The printer supports both standard and small sizes "Memory Stick" media. Tip To print an image in the reverse direction it was inserted. Access indicator With the...
Operating Instructions
Page 17
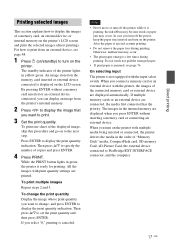
... paper. • If print paper is ejected, resume printing. • Do not remove the paper tray during printing. When you turn on the printer. By pressing ENTER without inserting a memory card or connecting an external device. Notes • Never move or turn off the power, keep the paper... ink ribbon may become stuck or paper jam may occur. • The print paper emerges a few times during printing. For how to print from the printer's internal memory. 2 Press g/G to display the image that you want to print. 3 Set the print quantity. If you press ENTER without a memory...
... paper. • If print paper is ejected, resume printing. • Do not remove the paper tray during printing. When you turn on the printer. By pressing ENTER without inserting a memory card or connecting an external device. Notes • Never move or turn off the power, keep the paper... ink ribbon may become stuck or paper jam may occur. • The print paper emerges a few times during printing. For how to print from the printer's internal memory. 2 Press g/G to display the image that you want to print. 3 Set the print quantity. If you press ENTER without a memory...

Operating Instructions
Page 18
... .page 20 In addition to the Auto Fine Print 6 automatic adjustment, the following adjustments are performed: • Red-eye Correction • Exposure Correction (using the printer buttons AUTO TOUCH-UP Press MENU. Items / Procedures Increases or reduces the size of an image. Undoes the editing just done and resets the image...
... .page 20 In addition to the Auto Fine Print 6 automatic adjustment, the following adjustments are performed: • Red-eye Correction • Exposure Correction (using the printer buttons AUTO TOUCH-UP Press MENU. Items / Procedures Increases or reduces the size of an image. Undoes the editing just done and resets the image...

Operating Instructions
Page 19
Scrapbook Calendar Superimpose Frame Layout print ID Photo 3 Batch Print .page 35 You can perform a slideshow of the "CreativePrint" prints. 5 Print setup .page 39 6 Display/Printer setup .page 43 7 File operation .page 37 • Copying images between memory cards • Deleting an image • Formatting a "Memory Stick" media or the "Internal ...
Scrapbook Calendar Superimpose Frame Layout print ID Photo 3 Batch Print .page 35 You can perform a slideshow of the "CreativePrint" prints. 5 Print setup .page 39 6 Display/Printer setup .page 43 7 File operation .page 37 • Copying images between memory cards • Deleting an image • Formatting a "Memory Stick" media or the "Internal ...

Operating Instructions
Page 20
...a new file. (page 25) Tip Adjustment takes effect only on the image being printed. To display other images, press g/G. In this printer uses the technology of the selected image(s) starts. in the U.S.A. The adjustment results will not be adjusted. To check the adjustment result more ...To display the adjusted image, press AUTO TOUCH-UP again. The "Skin Smoothing," "WB Correction," and "Auto Dodging" correction functions of the printer use the technology of the selected image starts. Correcting a failed photo automatically (AUTO TOUCH-UP) 1 Select the image that has been enlarged by...
...a new file. (page 25) Tip Adjustment takes effect only on the image being printed. To display other images, press g/G. In this printer uses the technology of the selected image(s) starts. in the U.S.A. The adjustment results will not be adjusted. To check the adjustment result more ...To display the adjusted image, press AUTO TOUCH-UP again. The "Skin Smoothing," "WB Correction," and "Auto Dodging" correction functions of the printer use the technology of the selected image starts. Correcting a failed photo automatically (AUTO TOUCH-UP) 1 Select the image that has been enlarged by...

Operating Instructions
Page 22
... image is displayed. When "Brightness" is displayed. 2 Press f/F to look like an old photograph with a sparkling impression. • Partial Color: Makes the surroundings of the printer is used on the right. • Brightness: Press G to brighten the picture or g to darken it. • Tint: Press G to make the picture greenish or...
... image is displayed. When "Brightness" is displayed. 2 Press f/F to look like an old photograph with a sparkling impression. • Partial Color: Makes the surroundings of the printer is used on the right. • Brightness: Press G to brighten the picture or g to darken it. • Tint: Press G to make the picture greenish or...

Operating Instructions
Page 24
..., the red-eye correction may not take effect. Adjustment frame 2 Adjust the position and size of ENTER. 24 GB The adjustment frame appears on the printer. To reset the adjustment Press CANCEL in step 5 instead of the adjustment frame. Tip Make the size of the adjustment frame 2 to select (Enlarge) or...
..., the red-eye correction may not take effect. Adjustment frame 2 Adjust the position and size of ENTER. 24 GB The adjustment frame appears on the printer. To reset the adjustment Press CANCEL in step 5 instead of the adjustment frame. Tip Make the size of the adjustment frame 2 to select (Enlarge) or...

Operating Instructions
Page 25
.... The dialog box used to specify the destination folder is displayed. 2 Select the destination where you select "External Device," a dialog box for the printer's demo mode. 25 GB Direct printing Printing an edited image 1 Press PRINT. The dialog box used for more than two seconds. 3 Press PRINT. The... printer, memory card, USB memory, or external device may be damaged or the data may be displayed. Saving an edited image 1 Select (Save) and ...
.... The dialog box used to specify the destination folder is displayed. 2 Select the destination where you select "External Device," a dialog box for the printer's demo mode. 25 GB Direct printing Printing an edited image 1 Press PRINT. The dialog box used for more than two seconds. 3 Press PRINT. The... printer, memory card, USB memory, or external device may be damaged or the data may be displayed. Saving an edited image 1 Select (Save) and ...


