
Handycam® Handbook
Page 3
... DCR-SR300. You also cannot play back both movies and still images other than the images recorded with a digital still camera, and may look different from a subject coming into the lens. 3 About language setting The on-screen displays in Germany, and Sony Corporation, and produces superior images. About the Carl Zeiss lens Your camcorder...
... DCR-SR300. You also cannot play back both movies and still images other than the images recorded with a digital still camera, and may look different from a subject coming into the lens. 3 About language setting The on-screen displays in Germany, and Sony Corporation, and produces superior images. About the Carl Zeiss lens Your camcorder...
Handycam® Handbook
Page 5
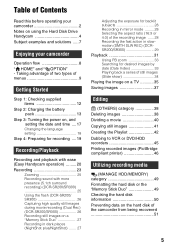
... Recording 23 Zooming 25 Recording sound with more presence (5.1ch surround recording) (DCR-SR200/SR300 25 Using the flash (DCR-SR200/ SR300 26 Capturing high quality still images during movie recording (Dual Rec) (DCR-SR200/SR300 26 Recording still images on a "Memory Stick Duo 27 Recording ...46 Utilizing recording media (MANAGE HDD/MEMORY) category 49 Formatting the hard disk or the "Memory Stick Duo 49 Checking the hard disk information 50 Preventing data on using the Hard Disk Drive Handycam 4 Subject examples and solutions ..... 7 Enjoying your camcorder 2 Notes on the hard ...
... Recording 23 Zooming 25 Recording sound with more presence (5.1ch surround recording) (DCR-SR200/SR300 25 Using the flash (DCR-SR200/ SR300 26 Capturing high quality still images during movie recording (Dual Rec) (DCR-SR200/SR300 26 Recording still images on a "Memory Stick Duo 27 Recording ...46 Utilizing recording media (MANAGE HDD/MEMORY) category 49 Formatting the hard disk or the "Memory Stick Duo 49 Checking the hard disk information 50 Preventing data on using the Hard Disk Drive Handycam 4 Subject examples and solutions ..... 7 Enjoying your camcorder 2 Notes on the hard ...
Handycam® Handbook
Page 9
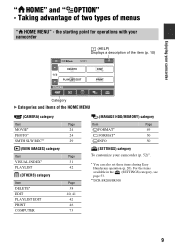
... set these items during Easy Handycam operation (p. 20). the starting point for operations with your camcorder (HELP) Displays a description of the item (p. 10) Enjoying your camcorder Category B Categories and items of menus " HOME MENU" - For the items available in the (SETTINGS) category, see page 53. **DCR-SR200/SR300 9 Taking advantage ... category Item DELETE* EDIT PLAYLIST EDIT PRINT COMPUTER Page 24 24 29 Page 31 42 Page 38 40, 41 42 46 73 (MANAGE HDD/MEMORY) category Item Page FORMAT* 49 FORMAT* 50 INFO 50 (SETTINGS) category To customize your camcorder OPTION" -
... set these items during Easy Handycam operation (p. 20). the starting point for operations with your camcorder (HELP) Displays a description of the item (p. 10) Enjoying your camcorder Category B Categories and items of menus " HOME MENU" - For the items available in the (SETTINGS) category, see page 53. **DCR-SR200/SR300 9 Taking advantage ... category Item DELETE* EDIT PLAYLIST EDIT PRINT COMPUTER Page 24 24 29 Page 31 42 Page 38 40, 41 42 46 73 (MANAGE HDD/MEMORY) category Item Page FORMAT* 49 FORMAT* 50 INFO 50 (SETTINGS) category To customize your camcorder OPTION" -
Handycam® Handbook
Page 12
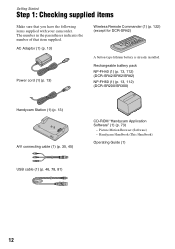
... have the following items supplied with your camcorder. AC Adaptor (1) (p. 13) Power cord (1) (p. 13) Wireless Remote Commander (1) (p. 122) (except for DCR-SR42) A button-type lithium battery is already installed. Rechargeable battery pack NP-FH40 (1) (p. 13, 112) (DCR-SR42/SR62/SR82) NP-FH60 (1) (p. 13, 112) (DCR-SR200/SR300) Handycam Station (1) (p. 13) A/V connecting cable (1) (p. 35, 45) CD...
... have the following items supplied with your camcorder. AC Adaptor (1) (p. 13) Power cord (1) (p. 13) Wireless Remote Commander (1) (p. 122) (except for DCR-SR42) A button-type lithium battery is already installed. Rechargeable battery pack NP-FH40 (1) (p. 13, 112) (DCR-SR42/SR62/SR82) NP-FH60 (1) (p. 13, 112) (DCR-SR200/SR300) Handycam Station (1) (p. 13) A/V connecting cable (1) (p. 35, 45) CD...
Handycam® Handbook
Page 16
...battery pack • Before changing the battery pack, turn the POWER switch to the DC IN jack of your camcorder. b Notes • All times measured with your camcorder or the Handycam Station, even when the power cord is disconnected from the wall outlet. • When attaching an optional video ...light, it is recommended that you use an NP-FH70/FH100 battery pack (except for DCR-SR42). DCR-SR42: Battery pack NP-FH40 ...
...battery pack • Before changing the battery pack, turn the POWER switch to the DC IN jack of your camcorder. b Notes • All times measured with your camcorder or the Handycam Station, even when the power cord is disconnected from the wall outlet. • When attaching an optional video ...light, it is recommended that you use an NP-FH70/FH100 battery pack (except for DCR-SR42). DCR-SR42: Battery pack NP-FH40 ...
Handycam® Handbook
Page 18
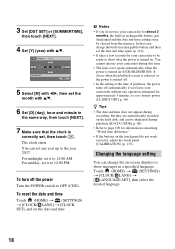
...to shoot after the power is turned on (DCR-SR200/SR300). In that the clock is correctly set the date and time. You cannot operate your camcorder during playback ([DATA CODE], p. 60). • Refer to page 109 for your camcorder without any year up to show messages in ... not appear during recording, but they are automatically recorded on the hard disk, and can change the on the touch panel do not use your camcorder for approximately 5 minutes, to OFF (CHG). 3 Set [DST SET] or [SUMMERTIME], then touch [NEXT]. 4 Set [Y] (year) with v/V. 5 Select [M] with b/B, then set ...
...to shoot after the power is turned on (DCR-SR200/SR300). In that the clock is correctly set the date and time. You cannot operate your camcorder during playback ([DATA CODE], p. 60). • Refer to page 109 for your camcorder without any year up to show messages in ... not appear during recording, but they are automatically recorded on the hard disk, and can change the on the touch panel do not use your camcorder for approximately 5 minutes, to OFF (CHG). 3 Set [DST SET] or [SUMMERTIME], then touch [NEXT]. 4 Set [Y] (year) with v/V. 5 Select [M] with b/B, then set ...

Handycam® Handbook
Page 19
...LCD screen. • The information is practical when you use your camcorder correctly. 2180 degrees 190 degrees to the (max.) camcorder To turn on the LCD frame accidentally when you can close the lens cover. • For DCR-SR200/SR300, the lens cover opens and closes automatically. Fastening the... grip belt Fasten the grip belt and hold DISP/BATT INFO for a few seconds until appears. 19 b Notes • Do not press the buttons on the LCD backlight, press and hold your camcorder in bright...
...LCD screen. • The information is practical when you use your camcorder correctly. 2180 degrees 190 degrees to the (max.) camcorder To turn on the LCD frame accidentally when you can close the lens cover. • For DCR-SR200/SR300, the lens cover opens and closes automatically. Fastening the... grip belt Fasten the grip belt and hold DISP/BATT INFO for a few seconds until appears. 19 b Notes • Do not press the buttons on the LCD backlight, press and hold your camcorder in bright...
Handycam® Handbook
Page 23
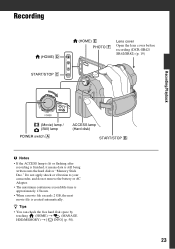
Recording/Playback Recording (HOME) D START/STOP C (HOME) E PHOTO F Lens cover Open the lens cover before recording (DCR-SR42/ SR62/SR82) (p. 19) Recording/Playback (Movie) lamp / (Still) lamp POWER switch A ACCESS lamp (Hard disk) START/STOP B b Notes • If the ...is created automatically. z Tips • You can check the free hard disk space by touching (HOME) t (MANAGE HDD/MEMORY) t [ INFO] (p. 50). 23 Do not apply shock or vibration to your camcorder, and do not remove the battery or AC Adaptor. • The maximum continuous recordable time is approximately 13 hours...
Recording/Playback Recording (HOME) D START/STOP C (HOME) E PHOTO F Lens cover Open the lens cover before recording (DCR-SR42/ SR62/SR82) (p. 19) Recording/Playback (Movie) lamp / (Still) lamp POWER switch A ACCESS lamp (Hard disk) START/STOP B b Notes • If the ...is created automatically. z Tips • You can check the free hard disk space by touching (HOME) t (MANAGE HDD/MEMORY) t [ INFO] (p. 50). 23 Do not apply shock or vibration to your camcorder, and do not remove the battery or AC Adaptor. • The maximum continuous recordable time is approximately 13 hours...
Handycam® Handbook
Page 24
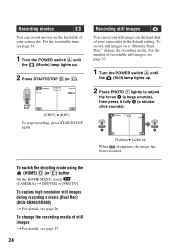
...D (or E) button On the HOME MENU, touch (CAMERA) t [MOVIE] or [PHOTO]. To capture high resolution still images during recording a movie (Dual Rec) (DCR-SR200/SR300) t For details, see page 57. 1 Turn the POWER switch A until the (Movie) lamp lights up When disappears, the image has been recorded. For... time, see page 27. 24 To change the recording media. Recording movies You can record still images on the hard disk of your camcorder in the default setting. Recording still images You can record movies on a "Memory Stick Duo," change the recording media of recordable still images...
...D (or E) button On the HOME MENU, touch (CAMERA) t [MOVIE] or [PHOTO]. To capture high resolution still images during recording a movie (Dual Rec) (DCR-SR200/SR300) t For details, see page 57. 1 Turn the POWER switch A until the (Movie) lamp lights up When disappears, the image has been recorded. For... time, see page 27. 24 To change the recording media. Recording movies You can record still images on the hard disk of your camcorder in the default setting. Recording still images You can record movies on a "Memory Stick Duo," change the recording media of recordable still images...
Handycam® Handbook
Page 25
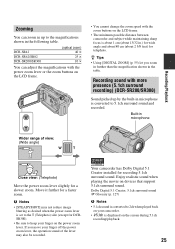
...frame. • You cannot change the zoom speed with more presence (5.1ch surround recording) (DCR-SR200/SR300) Sound picked up to 5.1ch surround sound and recorded. DCR-SR42 DCR-SR62/SR82 DCR-SR200/SR300 (optical zoom) 40 × 25 × 10 × You can ...recording/playback. 25 Built-in the following table. Your camcorder has Dolby Digital 5.1 Creator installed for a faster zoom. Dolby Digital 5.1 Creator, 5.1ch surround sound 1 Glossary (p. 127) b Notes • 5.1ch sound is converted to 2ch when played back on your camcorder. • is set to the T (Telephoto) ...
...frame. • You cannot change the zoom speed with more presence (5.1ch surround recording) (DCR-SR200/SR300) Sound picked up to 5.1ch surround sound and recorded. DCR-SR42 DCR-SR62/SR82 DCR-SR200/SR300 (optical zoom) 40 × 25 × 10 × You can ...recording/playback. 25 Built-in the following table. Your camcorder has Dolby Digital 5.1 Creator installed for a faster zoom. Dolby Digital 5.1 Creator, 5.1ch surround sound 1 Glossary (p. 127) b Notes • 5.1ch sound is converted to 2ch when played back on your camcorder. • is set to the T (Telephoto) ...
Handycam® Handbook
Page 26
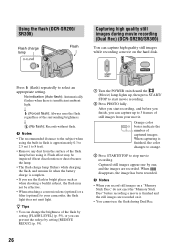
... may be effective. • When attaching a conversion lens (optional) or a filter (optional) to 8 feet). • Remove any dust from your camcorder, the flash light does not emit light. Captured still images appear one by setting [REDEYE REDUC] (p. 59). 1 Turn the POWER switch until the (...there is finished, the color changes to orange. 3 Press START/STOP to start movie recording. 2 Press PHOTO fully. Using the flash (DCR-SR200/ SR300) Flash charge lamp Flash Capturing high quality still images during Dual Rec. 26 b Notes • The recommended distance to select ...
... may be effective. • When attaching a conversion lens (optional) or a filter (optional) to 8 feet). • Remove any dust from your camcorder, the flash light does not emit light. Captured still images appear one by setting [REDEYE REDUC] (p. 59). 1 Turn the POWER switch until the (...there is finished, the color changes to orange. 3 Press START/STOP to start movie recording. 2 Press PHOTO fully. Using the flash (DCR-SR200/ SR300) Flash charge lamp Flash Capturing high quality still images during Dual Rec. 26 b Notes • The recommended distance to select ...
Handycam® Handbook
Page 27
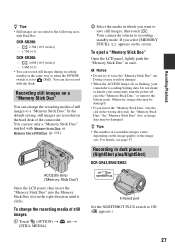
...Doing so may result in damage. • When the ACCESS lamp is lit or flashing, your camcorder, turn the power off, eject the "Memory Stick Duo," or remove the battery pack. DCR-SR200: - 2.3M (16:9 (wide)) - 1.7M (4:3) DCR-SR300: - 4.6M (16:9 (wide)) - 3.4M (4:3) • You can use only a...STILL MEDIA]. Recording still images on a "Memory Stick Duo" You can also record with Dual Rec. z Tips • The number of the camcorder. Your camcorder returns to force the "Memory Stick Duo" out. tab t Infrared port Set the NIGHTSHOT PLUS switch to (Still). Do not shake or knock ...
...Doing so may result in damage. • When the ACCESS lamp is lit or flashing, your camcorder, turn the power off, eject the "Memory Stick Duo," or remove the battery pack. DCR-SR200: - 2.3M (16:9 (wide)) - 1.7M (4:3) DCR-SR300: - 4.6M (16:9 (wide)) - 3.4M (4:3) • You can use only a...STILL MEDIA]. Recording still images on a "Memory Stick Duo" You can also record with Dual Rec. z Tips • The number of the camcorder. Your camcorder returns to force the "Memory Stick Duo" out. tab t Infrared port Set the NIGHTSHOT PLUS switch to (Still). Do not shake or knock ...

Handycam® Handbook
Page 28
...appears.) b Notes • The NightShot and Super NightShot functions use Color Slow Shutter function (p. 70). 28 Open the LCD panel 90 degrees to the camcorder (1), then rotate it 180 degrees to the original colors, use infrared light. This may cause a malfunction. z Tips • To record an image ...(p. 70). Recording in bright places. To cancel the back light function, press BACK LIGHT again. z Tips • A mirror-image of the movies DCR-SR42: 1 Turn the POWER switch until the (Movie) lamp lights up. To record an image more faithfully to the lens side (2). b Notes &#...
...appears.) b Notes • The NightShot and Super NightShot functions use Color Slow Shutter function (p. 70). 28 Open the LCD panel 90 degrees to the camcorder (1), then rotate it 180 degrees to the original colors, use infrared light. This may cause a malfunction. z Tips • To record an image ...(p. 70). Recording in bright places. To cancel the back light function, press BACK LIGHT again. z Tips • A mirror-image of the movies DCR-SR42: 1 Turn the POWER switch until the (Movie) lamp lights up. To record an image more faithfully to the lens side (2). b Notes &#...

Handycam® Handbook
Page 29
... to display the HOME MENU. 3 Touch (CAMERA). 4 Touch [SMTH SLW REC]. 29 Recording/Playback This is [ 4.6M] (16:9 (wide)) or [6.1M] (4:3) at maximum. • For DCR-SR300, the size of view between 16:9 (wide) and 4:3 vary depending on the zoom position. • When you view the movie on a TV, set [TV... [4:3] according to your TV (16:9/4:3) (p. 62). • When you view 16:9 (wide) images with [TV TYPE] set to [4:3], they may appear rough depending on the camcorder. 2 Press (HOME) A (or B) to select the desired screen aspect ratio.
... to display the HOME MENU. 3 Touch (CAMERA). 4 Touch [SMTH SLW REC]. 29 Recording/Playback This is [ 4.6M] (16:9 (wide)) or [6.1M] (4:3) at maximum. • For DCR-SR300, the size of view between 16:9 (wide) and 4:3 vary depending on the zoom position. • When you view the movie on a TV, set [TV... [4:3] according to your TV (16:9/4:3) (p. 62). • When you view 16:9 (wide) images with [TV TYPE] set to [4:3], they may appear rough depending on the camcorder. 2 Press (HOME) A (or B) to select the desired screen aspect ratio.

Handycam® Handbook
Page 50
...when the hard disk space is on your camcorder. 2 Insert the "Memory Stick Duo" to be slightly smaller than MB are also deleted. • Do not attempt the following operations when [Executing...] is displayed. To turn off the display Touch . DCR-SR42/SR62: 30 000 MB - b... disk space will be formatted into your camcorder. 3 On the (HOME MENU), touch (MANAGE HDD/MEMORY) t [ FORMAT]. 4 Touch [YES] t [YES]. 5 When [Completed.] appears, touch . On the (HOME MENU), touch (MANAGE HDD/MEMORY) t [ INFO]. The displayed size of free hard disk space. DCR-SR82: 60 000MB - Formatting the "...
...when the hard disk space is on your camcorder. 2 Insert the "Memory Stick Duo" to be slightly smaller than MB are also deleted. • Do not attempt the following operations when [Executing...] is displayed. To turn off the display Touch . DCR-SR42/SR62: 30 000 MB - b... disk space will be formatted into your camcorder. 3 On the (HOME MENU), touch (MANAGE HDD/MEMORY) t [ FORMAT]. 4 Touch [YES] t [YES]. 5 When [Completed.] appears, touch . On the (HOME MENU), touch (MANAGE HDD/MEMORY) t [ INFO]. The displayed size of free hard disk space. DCR-SR82: 60 000MB - Formatting the "...

Handycam® Handbook
Page 51
...While performing [ EMPTY], do not apply any original data. z Tips • You can perform this way, it is lit. 2 On the (HOME MENU), touch (MANAGE HDD/MEMORY) t [ FORMAT]. The [ EMPTY] screen appears. 4 Touch [YES] t [YES]. 5 When [Completed.] appears, touch . b Notes • The actual performing... become more difficult to write non important data onto the hard disk of the camcorder from being recovered [ EMPTY] allows you perform [ EMPTY], all cables except the AC Adaptor. DCR-SR82: approx. 60 minutes - DCR-SR200/SR300: approx. 40 minutes • If you stop performing [ EMPTY]...
...While performing [ EMPTY], do not apply any original data. z Tips • You can perform this way, it is lit. 2 On the (HOME MENU), touch (MANAGE HDD/MEMORY) t [ FORMAT]. The [ EMPTY] screen appears. 4 Touch [YES] t [YES]. 5 When [Completed.] appears, touch . b Notes • The actual performing... become more difficult to write non important data onto the hard disk of the camcorder from being recovered [ EMPTY] allows you perform [ EMPTY], all cables except the AC Adaptor. DCR-SR82: approx. 60 minutes - DCR-SR200/SR300: approx. 40 minutes • If you stop performing [ EMPTY]...

Handycam® Handbook
Page 53
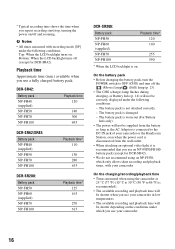
Customizing your camcorder List of the (SETTINGS) category items MOVIE SETTINGS (p. 54) Items Page REC MODE 54 NIGHTSHOT LIGHT 54 WIDE SELECT*1 54 DIGITAL ZOOM 55 STEADYSHOT 55 AUTO SLW SHUTTR 55 GUIDEFRAME*2 56 ZEBRA*2 56 REMAINING 56 FLASH LEVEL*2 59 REDEYE REDUC*2 59 ...63 GENERAL SET (p. 64) Items Page DEMO MODE 64 CALIBRATION 115 A.SHUT OFF 64 REMOTE CTRL*3 64 DROP SENSOR 64 *1 DCR-SR42 *2 DCR-SR200/SR300 *3 DCR-SR62/SR82/SR200/SR300 *4 You can set these items also during Easy Handycam operation (p. 20). *5 DCR-SR300 *6 [SOUND SETTINGS] (during Easy...
Customizing your camcorder List of the (SETTINGS) category items MOVIE SETTINGS (p. 54) Items Page REC MODE 54 NIGHTSHOT LIGHT 54 WIDE SELECT*1 54 DIGITAL ZOOM 55 STEADYSHOT 55 AUTO SLW SHUTTR 55 GUIDEFRAME*2 56 ZEBRA*2 56 REMAINING 56 FLASH LEVEL*2 59 REDEYE REDUC*2 59 ...63 GENERAL SET (p. 64) Items Page DEMO MODE 64 CALIBRATION 115 A.SHUT OFF 64 REMOTE CTRL*3 64 DROP SENSOR 64 *1 DCR-SR42 *2 DCR-SR200/SR300 *3 DCR-SR62/SR82/SR200/SR300 *4 You can set these items also during Easy Handycam operation (p. 20). *5 DCR-SR300 *6 [SOUND SETTINGS] (during Easy...

Handycam® Handbook
Page 55
...case you select the zooming level. b Notes • Set [TV TYPE] correctly according to 20 × zoom is performed digitally. The right side of the bar shows the digital zooming factor. DCR-SR300: B OFF Up to 10 × zoom is performed optically. 20 × Up to 10 × zoom is ...performed optically, and after that , up to the TV connected for camera shake (the default setting is [ON]). 55 Customizing your camcorder 16:9 WIDE ( )...
...case you select the zooming level. b Notes • Set [TV TYPE] correctly according to 20 × zoom is performed digitally. The right side of the bar shows the digital zooming factor. DCR-SR300: B OFF Up to 10 × zoom is performed optically. 20 × Up to 10 × zoom is ...performed optically, and after that , up to the TV connected for camera shake (the default setting is [ON]). 55 Customizing your camcorder 16:9 WIDE ( )...

Handycam® Handbook
Page 56
...stays on the HOME MENU. When you press DISP/BATT INFO to switch the indicator from off to make the frame disappear. When your camcorder recognizes the remaining hard disk capacity with the POWER switch is not displayed. 70 The zebra pattern appears at a screen brightness level of about...59. z Tips • Positioning the subject at the cross point of about 70 IRE. 100 The zebra pattern appears at a preset level. ZEBRA (DCR-SR200/SR300) Diagonal stripes appear in situations such as a guide when adjusting the brightness. The zebra pattern is at a screen brightness level of the guide...
...stays on the HOME MENU. When you press DISP/BATT INFO to switch the indicator from off to make the frame disappear. When your camcorder recognizes the remaining hard disk capacity with the POWER switch is not displayed. 70 The zebra pattern appears at a screen brightness level of about...59. z Tips • Positioning the subject at the cross point of about 70 IRE. 100 The zebra pattern appears at a preset level. ZEBRA (DCR-SR200/SR300) Diagonal stripes appear in situations such as a guide when adjusting the brightness. The zebra pattern is at a screen brightness level of the guide...

Handycam® Handbook
Page 57
... 56 64 74 105 135 160 185 76 100 115 130 190 250 295 335 57 Customizing your camcorder z Tips • The image size is set to be recorded. DCR-SR200: - [ 2.3M] (16:9 (wide)) - [1.7M] (4:3) DCR-SR300: - [ 4.6M] (16:9 (wide)) - [3.4M] (4:3) Capacity of the "Memory Stick Duo" (MB) and...) t page 65 The default settings are recorded in the aspect ratio 16:9 (wide). If the item is fixed to [ 0.7M] automatically in relatively clear quality. DCR-SR200: B 4.0M ( 4.0M ) Records still images clearly. 1.9M ( ) Allows you to be recorded. VGA (0.3M) ( ) Allows the maximum number of still...
... 56 64 74 105 135 160 185 76 100 115 130 190 250 295 335 57 Customizing your camcorder z Tips • The image size is set to be recorded. DCR-SR200: - [ 2.3M] (16:9 (wide)) - [1.7M] (4:3) DCR-SR300: - [ 4.6M] (16:9 (wide)) - [3.4M] (4:3) Capacity of the "Memory Stick Duo" (MB) and...) t page 65 The default settings are recorded in the aspect ratio 16:9 (wide). If the item is fixed to [ 0.7M] automatically in relatively clear quality. DCR-SR200: B 4.0M ( 4.0M ) Records still images clearly. 1.9M ( ) Allows you to be recorded. VGA (0.3M) ( ) Allows the maximum number of still...


