
Operating Guide
Page 3
... convenience receptacles beyond their capacity, since this manual for example, near water - Never cover the slots and openings with a polarized ac power cord (mains lead) plug (a plug having one way. Never place the set near a swimming pool, etc. Do not place the set in ...through openings as they may be equipped with a cloth or other sources, refer to be operated only from the appliance. Power cord (Mains lead) Protection Route the power cord (mains lead) so that could result in cabinet, unless proper ventilation is exposed to protect it is provided. - This...
... convenience receptacles beyond their capacity, since this manual for example, near water - Never cover the slots and openings with a polarized ac power cord (mains lead) plug (a plug having one way. Never place the set near a swimming pool, etc. Do not place the set in ...through openings as they may be equipped with a cloth or other sources, refer to be operated only from the appliance. Power cord (Mains lead) Protection Route the power cord (mains lead) so that could result in cabinet, unless proper ventilation is exposed to protect it is provided. - This...
Operating Guide
Page 4
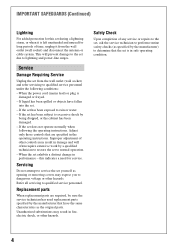
When the power cord (mains lead) or plug is in safe operating condition. 4 Replacement parts When replacement parts are specified in performance - If the set exhibits a distinct change in ... required, be sure the service technician has used replacement parts specified by the manufacturer) to determine that have fallen into the set to lightning and power-line surges. When the set has been exposed to qualified service personnel under the following the operating instructions. Service Damage Requiring Service Unplug the set...
When the power cord (mains lead) or plug is in safe operating condition. 4 Replacement parts When replacement parts are specified in performance - If the set exhibits a distinct change in ... required, be sure the service technician has used replacement parts specified by the manufacturer) to determine that have fallen into the set to lightning and power-line surges. When the set has been exposed to qualified service personnel under the following the operating instructions. Service Damage Requiring Service Unplug the set...
Operating Guide
Page 11
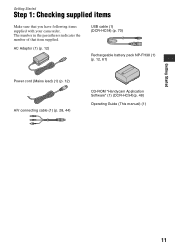
Getting Started Step 1: Checking supplied items Make sure that item supplied. The number in the parentheses indicates the number of that you have following items supplied with your camcorder. AC Adaptor (1) (p. 12) USB cable (1) (DCR-HC54) (p. 70) Rechargeable battery pack NP-FH30 (1) (p. 12, 61) Power cord (Mains lead) (1) (p. 12) A/V connecting cable (1) (p. 28, 44) CD-ROM "Handycam Application Software" (1) (DCR-HC54)(p. 48) Operating Guide (This manual) (1) Getting Started 11
Getting Started Step 1: Checking supplied items Make sure that item supplied. The number in the parentheses indicates the number of that you have following items supplied with your camcorder. AC Adaptor (1) (p. 12) USB cable (1) (DCR-HC54) (p. 70) Rechargeable battery pack NP-FH30 (1) (p. 12, 61) Power cord (Mains lead) (1) (p. 12) A/V connecting cable (1) (p. 28, 44) CD-ROM "Handycam Application Software" (1) (DCR-HC54)(p. 48) Operating Guide (This manual) (1) Getting Started 11
Operating Guide
Page 12
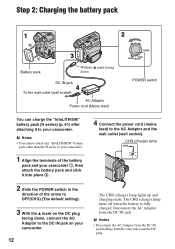
... AC Adaptor from the DC IN jack holding both the camcorder and the DC plug. Step 2: Charging the battery pack 1 2 2 1 Battery pack 3 With the v mark facing down DC IN jack 4 To the wall outlet (wall socket) AC Adaptor Power cord (Mains lead) POWER switch You can charge the "InfoLITHIUM" battery pack (H ... 3 With the v mark on the DC plug facing down, connect the AC Adaptor to the DC IN jack on your camcorder. 12 4 Connect the power cord (mains lead) to your camcorder 1, then attach the battery pack and click it to the AC Adaptor and the wall outlet (wall socket). The CHG (...
... AC Adaptor from the DC IN jack holding both the camcorder and the DC plug. Step 2: Charging the battery pack 1 2 2 1 Battery pack 3 With the v mark facing down DC IN jack 4 To the wall outlet (wall socket) AC Adaptor Power cord (Mains lead) POWER switch You can charge the "InfoLITHIUM" battery pack (H ... 3 With the v mark on the DC plug facing down, connect the AC Adaptor to the DC IN jack on your camcorder. 12 4 Connect the power cord (mains lead) to your camcorder 1, then attach the battery pack and click it to the AC Adaptor and the wall outlet (wall socket). The CHG (...

Operating Guide
Page 14
...not attached correctly. - The battery pack is disconnected from the wall outlet (wall socket). On the charging/recording/playback time • Times measured with the camcorder at 25 °C (77 °F). (10 °C to 30 °C (50 °F to 86 °F) is connected to the wall ...time will be shorter when you repeat recording start/stop, turning the power on the conditions under which you use your camcorder, even when the power cord (mains lead) is worn-out (for Battery Info only). • The power will not be correctly displayed under the following conditions. - Battery pack...
...not attached correctly. - The battery pack is disconnected from the wall outlet (wall socket). On the charging/recording/playback time • Times measured with the camcorder at 25 °C (77 °F). (10 °C to 30 °C (50 °F to 86 °F) is connected to the wall ...time will be shorter when you repeat recording start/stop, turning the power on the conditions under which you use your camcorder, even when the power cord (mains lead) is worn-out (for Battery Info only). • The power will not be correctly displayed under the following conditions. - Battery pack...
Operating Guide
Page 53
... from the compartment. • Make sure the power source (battery pack or AC Adaptor) is connected correctly (p. 12). • Moisture condensation has occurred inside the camcorder (p. 63). LCD screen/viewfinder A rippling effect appears on your Sony dealer. The battery pack discharges too quickly. &#...the LCD screen. Cassette tapes The cassette cannot be worn-out. • Attach the battery pack to the camcorder correctly (p. 12). • Connect the power cord (mains lead) to display the correct remaining battery time. The CHG (charge) lamp flashes while the battery pack...
... from the compartment. • Make sure the power source (battery pack or AC Adaptor) is connected correctly (p. 12). • Moisture condensation has occurred inside the camcorder (p. 63). LCD screen/viewfinder A rippling effect appears on your Sony dealer. The battery pack discharges too quickly. &#...the LCD screen. Cassette tapes The cassette cannot be worn-out. • Attach the battery pack to the camcorder correctly (p. 12). • Connect the power cord (mains lead) to display the correct remaining battery time. The CHG (charge) lamp flashes while the battery pack...
Operating Guide
Page 63
...sun. wash off your camcorder, and leave it for about 3 minutes. • Use up inside. • When disconnecting the power cord (mains lead), pull it by the plug and not the cord. • Do not damage the power cord (mains lead) such as by a Sony dealer before storing it...cable. Never leave them exposed to -4-pin cable (during DV dubbing). If your camcorder gets wet, it may malfunction. - consult your camcorder, [%Z Moisture condensation. Moisture condensation If your camcorder is moisture inside of the lens. • Keep the POWER switch setting to OFF(CHG) when you are met: ...
...sun. wash off your camcorder, and leave it for about 3 minutes. • Use up inside. • When disconnecting the power cord (mains lead), pull it by the plug and not the cord. • Do not damage the power cord (mains lead) such as by a Sony dealer before storing it...cable. Never leave them exposed to -4-pin cable (during DV dubbing). If your camcorder gets wet, it may malfunction. - consult your camcorder, [%Z Moisture condensation. Moisture condensation If your camcorder is moisture inside of the lens. • Keep the POWER switch setting to OFF(CHG) when you are met: ...
Operating Guide
Page 67
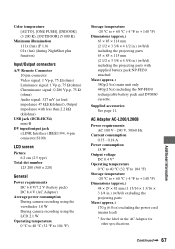
... parts 63 × 85 × 115 mm (2 1/2 × 3 3/8 × 4 5/8 in.) (w/h/d) including the projecting parts with less than 2.2 kΩ (kilohms) USB jack (DCR-HC54) mini-B DV input/output jack i.LINK Interface (IEEE1394, 4-pin connector S100) LCD screen Picture 6.2 cm (2.5 type) Total dot number 123 200 (560 × 220) General...°F) Dimensions (approx.) 48 × 29 × 81 mm (1 15/16 × 1 3/16 × 3 1/4 in.) (w/h/d) excluding the projecting parts Mass (approx.) 170 g (6.0 oz) excluding the power cord (mains lead) * See the label on the AC Adaptor for other specifications.
... parts 63 × 85 × 115 mm (2 1/2 × 3 3/8 × 4 5/8 in.) (w/h/d) including the projecting parts with less than 2.2 kΩ (kilohms) USB jack (DCR-HC54) mini-B DV input/output jack i.LINK Interface (IEEE1394, 4-pin connector S100) LCD screen Picture 6.2 cm (2.5 type) Total dot number 123 200 (560 × 220) General...°F) Dimensions (approx.) 48 × 29 × 81 mm (1 15/16 × 1 3/16 × 3 1/4 in.) (w/h/d) excluding the projecting parts Mass (approx.) 170 g (6.0 oz) excluding the power cord (mains lead) * See the label on the AC Adaptor for other specifications.


