Operating Guide
Page 2
... our environment by returning your used rechargeable batteries to the presence of Conformity Trade Name: SONY Model No.: DCR-HC21 Responsible Party: Sony Electronics Inc. This Class B digital apparatus complies with Part 15 of rechargeable batteries, call : Sony Customer Information Center 1-800-222SONY (7669). Regulatory Information Declaration of important operating and maintenance (servicing...
... our environment by returning your used rechargeable batteries to the presence of Conformity Trade Name: SONY Model No.: DCR-HC21 Responsible Party: Sony Electronics Inc. This Class B digital apparatus complies with Part 15 of rechargeable batteries, call : Sony Customer Information Center 1-800-222SONY (7669). Regulatory Information Declaration of important operating and maintenance (servicing...
Operating Guide
Page 3
... in order to comply with the instructions, may cause a malfunction of operations guides. - Connect the equipment into an outlet on use in your camcorder A mini DV cassette marked with (mini DV cassettes with the limits for help. Increase the separation between the equipment and receiver. - Refer to... that any changes or modifications not expressly approved in this manual could void your authority to these numbers whenever you call your Sony dealer regarding this product. DCR-HC21 Serial No. On using the supplied software (stored on the supplied CDROM) On the types of...
... in order to comply with the instructions, may cause a malfunction of operations guides. - Connect the equipment into an outlet on use in your camcorder A mini DV cassette marked with (mini DV cassettes with the limits for help. Increase the separation between the equipment and receiver. - Refer to... that any changes or modifications not expressly approved in this manual could void your authority to these numbers whenever you call your Sony dealer regarding this product. DCR-HC21 Serial No. On using the supplied software (stored on the supplied CDROM) On the types of...
Operating Guide
Page 4
... way. • Exposing the LCD screen, the viewfinder, or the lens to the copyright laws. On this manual • The images of the camcorder, storage media, etc. • TV color systems differ depending on -screen displays in low light conditions, such as at the sun. The number value indicates... problems. • Compensation for the contents of the pixels are normal results of the manufacturing process and do not affect the recording in Germany, and Sony Corporation, and produces superior images.
... way. • Exposing the LCD screen, the viewfinder, or the lens to the copyright laws. On this manual • The images of the camcorder, storage media, etc. • TV color systems differ depending on -screen displays in low light conditions, such as at the sun. The number value indicates... problems. • Compensation for the contents of the pixels are normal results of the manufacturing process and do not affect the recording in Germany, and Sony Corporation, and produces superior images.
Operating Guide
Page 6
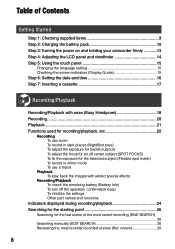
... Contents Getting Started Step 1: Checking supplied items 9 Step 2: Charging the battery pack 10 Step 3: Turning the power on and holding your camcorder firmly ...........13 Step 4: Adjusting the LCD panel and viewfinder 14 Step 5: Using the touch panel 15 Changing the language... (Display Guide 15 Step 6: Setting the date and time 16 Step 7: Inserting a cassette 17 Recording/Playback Recording/Playback with ease (Easy Handycam 18 Recording 20 Playback 21 Functions used for recording/playback, etc 22 Recording To use zoom To record in dark places (NightShot plus) To...
... Contents Getting Started Step 1: Checking supplied items 9 Step 2: Charging the battery pack 10 Step 3: Turning the power on and holding your camcorder firmly ...........13 Step 4: Adjusting the LCD panel and viewfinder 14 Step 5: Using the touch panel 15 Changing the language... (Display Guide 15 Step 6: Setting the date and time 16 Step 7: Inserting a cassette 17 Recording/Playback Recording/Playback with ease (Easy Handycam 18 Recording 20 Playback 21 Functions used for recording/playback, etc 22 Recording To use zoom To record in dark places (NightShot plus) To...
Operating Guide
Page 7
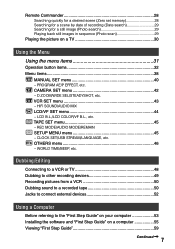
HiFi SOUND/AUDIO MIX LCD/VF SET menu 44 - WORLD TIME/BEEP, etc. Dubbing/Editing Connecting to a VCR or TV 48 Dubbing to other recording devices 49 Recording pictures from a VCR 50 Dubbing sound to a recorded tape 50 Jacks to connect external devices 52 Using a Computer Before referring to the "First Step Guide" on your computer 53 Installing the software and "First Step Guide" on a TV 30 Using the Menu Using the menu items 31 Operation button items 32 Menu items 38 MANUAL SET menu 40 - D ZOOM/WIDE SEL/STEADYSHOT, etc. LCD B.L./LCD COLOR/VF B.L., etc. CLOCK SET/USB STREAM/...
HiFi SOUND/AUDIO MIX LCD/VF SET menu 44 - WORLD TIME/BEEP, etc. Dubbing/Editing Connecting to a VCR or TV 48 Dubbing to other recording devices 49 Recording pictures from a VCR 50 Dubbing sound to a recorded tape 50 Jacks to connect external devices 52 Using a Computer Before referring to the "First Step Guide" on your computer 53 Installing the software and "First Step Guide" on a TV 30 Using the Menu Using the menu items 31 Operation button items 32 Menu items 38 MANUAL SET menu 40 - D ZOOM/WIDE SEL/STEADYSHOT, etc. LCD B.L./LCD COLOR/VF B.L., etc. CLOCK SET/USB STREAM/...

Operating Guide
Page 8
Creating a DVD (Direct Access to "Click to DVD 60 Troubleshooting Troubleshooting 63 Warning indicators and messages 74 Additional Information Using your camcorder abroad 77 Usable cassette tapes 78 About the "InfoLITHIUM" battery pack 79 About i.LINK 80 Maintenance and precautions 81 Using the Strap Belt as a wrist strap 84 Attaching the Shoulder Strap 85 Specifications 85 Index...87 8
Creating a DVD (Direct Access to "Click to DVD 60 Troubleshooting Troubleshooting 63 Warning indicators and messages 74 Additional Information Using your camcorder abroad 77 Usable cassette tapes 78 About the "InfoLITHIUM" battery pack 79 About i.LINK 80 Maintenance and precautions 81 Using the Strap Belt as a wrist strap 84 Attaching the Shoulder Strap 85 Specifications 85 Index...87 8
Operating Guide
Page 9
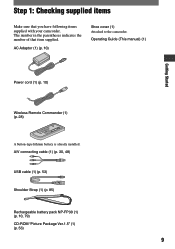
... manual) (1) Getting Started Power cord (1) (p. 10) Wireless Remote Commander (1) (p. 28) A button-type lithium battery is already installed. AC Adaptor (1) (p. 10) Shoe cover (1) Attached to the camcorder. The number in the parentheses indicates the number of that you have following items supplied with your...
... manual) (1) Getting Started Power cord (1) (p. 10) Wireless Remote Commander (1) (p. 28) A button-type lithium battery is already installed. AC Adaptor (1) (p. 10) Shoe cover (1) Attached to the camcorder. The number in the parentheses indicates the number of that you have following items supplied with your...

Operating Guide
Page 10
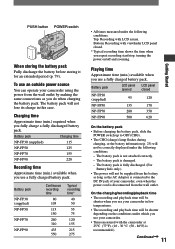
... and remove the battery pack. Disconnect the AC Adaptor from the DC IN jack. 3 Connect the AC Adaptor to the DC IN jack on your camcorder. POWER switch DC IN jack DC plug DC IN jack With the mark facing down 4 Connect the power cord to your... camcorder. 10 To remove the battery pack Turn off when the battery is fully charged. CHG (charge) lamp To the wall outlet AC Adaptor 1 Attach the ...
... and remove the battery pack. Disconnect the AC Adaptor from the DC IN jack. 3 Connect the AC Adaptor to the DC IN jack on your camcorder. POWER switch DC IN jack DC plug DC IN jack With the mark facing down 4 Connect the power cord to your... camcorder. 10 To remove the battery pack Turn off when the battery is fully charged. CHG (charge) lamp To the wall outlet AC Adaptor 1 Attach the ...
Operating Guide
Page 11
...8226; All times measured under the following conditions: Top: Recording with LCD screen. Charging time Approximate time (min.) required when you use your camcorder. • Times measured with viewfinder LCD panel closed NP-FP30 (supplied) 95 120 NP-FP50 135 170 NP-FP70 280 350.... PUSH button POWER switch When storing the battery pack Fully discharge the battery before storing it for an extended period (p. 79). Bottom: Recording with the camcorder at 25°C (77°F). (10 - 30 °C (50 - 86°F) is connected to OFF (CHG). • The CHG (charge) ...
...8226; All times measured under the following conditions: Top: Recording with LCD screen. Charging time Approximate time (min.) required when you use your camcorder. • Times measured with viewfinder LCD panel closed NP-FP30 (supplied) 95 120 NP-FP50 135 170 NP-FP70 280 350.... PUSH button POWER switch When storing the battery pack Fully discharge the battery before storing it for an extended period (p. 79). Bottom: Recording with the camcorder at 25°C (77°F). (10 - 30 °C (50 - 86°F) is connected to OFF (CHG). • The CHG (charge) ...
Operating Guide
Page 12
PRECAUTION • Even if your camcorder. • Do not use the AC Adaptor placed in a narrow space, such as between a wall and furniture. • Do not short-circuit the DC plug ... any malfunction occurs while using the AC Adaptor. This may cause a malfunction. On the AC Adaptor • Use the nearby wall outlet when using your camcorder is turned off, AC power (house current) is still supplied to it while connected to the wall outlet via the AC Adaptor. 12 Disconnect the...
PRECAUTION • Even if your camcorder. • Do not use the AC Adaptor placed in a narrow space, such as between a wall and furniture. • Do not short-circuit the DC plug ... any malfunction occurs while using the AC Adaptor. This may cause a malfunction. On the AC Adaptor • Use the nearby wall outlet when using your camcorder is turned off, AC power (house current) is still supplied to it while connected to the wall outlet via the AC Adaptor. 12 Disconnect the...
Operating Guide
Page 13
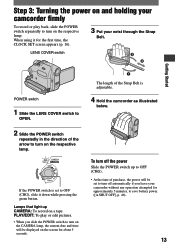
...purchase, the power will be set to OFF (CHG), slide it for the first time, the CLOCK SET screen appears (p. 16). 3 Put your camcorder without any operation attempted for approximately 5 minutes, to save battery power. ([A.SHUT OFF], p. 46). 13 To turn off automatically if you slide the POWER ...switch repeatedly in the direction of the Strap Belt is set to turn on the respective lamp. If the POWER switch is adjustable. 4 Hold the camcorder as illustrated below. The length of the arrow to turn off the power Slide the POWER switch up CAMERA: To record on a tape. Step ...
...purchase, the power will be set to OFF (CHG), slide it for the first time, the CLOCK SET screen appears (p. 16). 3 Put your camcorder without any operation attempted for approximately 5 minutes, to save battery power. ([A.SHUT OFF], p. 46). 13 To turn off automatically if you slide the POWER ...switch repeatedly in the direction of the Strap Belt is set to turn on the respective lamp. If the POWER switch is adjustable. 4 Hold the camcorder as illustrated below. The length of the arrow to turn off the power Slide the POWER switch up CAMERA: To record on a tape. Step ...
Operating Guide
Page 14
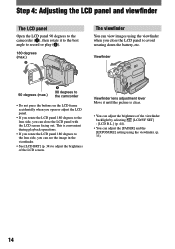
....) 2 The viewfinder You can view images using the viewfinder. (p. 33) 14 Viewfinder 90 degrees (max.) 1 90 degrees to the camcorder • Do not press the buttons on the LCD frame accidentally when you open or adjust the LCD panel. • If you rotate the LCD... wearing down the battery, etc. Step 4: Adjusting the LCD panel and viewfinder The LCD panel Open the LCD panel 90 degrees to the camcorder (), then rotate it until the picture is convenient during playback operations. • If you rotate the LCD panel 180 degrees to the lens side...
....) 2 The viewfinder You can view images using the viewfinder. (p. 33) 14 Viewfinder 90 degrees (max.) 1 90 degrees to the camcorder • Do not press the buttons on the LCD frame accidentally when you open or adjust the LCD panel. • If you rotate the LCD... wearing down the battery, etc. Step 4: Adjusting the LCD panel and viewfinder The LCD panel Open the LCD panel 90 degrees to the camcorder (), then rotate it until the picture is convenient during playback operations. • If you rotate the LCD panel 180 degrees to the lens side...
Operating Guide
Page 15
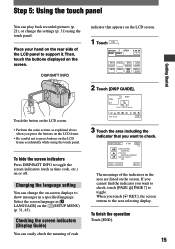
DISP/BATT INFO indicator that you touch [ RET.], the screen returns to the area selecting display. SCH SURE 2 Touch [DISP GUIDE]. DISP GUIDE END 3 Touch the area including the indicator that appears on the LCD screen. 1 Touch . 60min STBY PAGE1 PAGE2 0:00:00 SPOT FOCUS SPOT DISP FOCUS METER GUIDE MENU FADER END EXPO- Changing the language setting You can change the settings (p. 31) using the touch panel. If you cannot find the indicator you press the buttons on the LCD frame. • Be careful not to press buttons on the LCD frame accidentally while...
DISP/BATT INFO indicator that you touch [ RET.], the screen returns to the area selecting display. SCH SURE 2 Touch [DISP GUIDE]. DISP GUIDE END 3 Touch the area including the indicator that appears on the LCD screen. 1 Touch . 60min STBY PAGE1 PAGE2 0:00:00 SPOT FOCUS SPOT DISP FOCUS METER GUIDE MENU FADER END EXPO- Changing the language setting You can change the settings (p. 31) using the touch panel. If you cannot find the indicator you press the buttons on the LCD frame. • Be careful not to press buttons on the LCD frame accidentally while...

Operating Guide
Page 16
... touch . /, You can set the clock for the first time. EXEC RET. 16 POWER switch Skip to step 4 when you do not use your camcorder. • If you set any year up to the year 2079. For midday, set it to 12:00 AM. SETUP MENU CLOCK SET USB STREAM... --:--:-- In that case, charge the rechargeable battery and then set the date and time, the CLOCK SET screen appears every time you turn on your camcorder for about 3 months, the built-in rechargeable battery gets discharged and the date and time settings may be cleared from the memory. For midnight, set...
... touch . /, You can set the clock for the first time. EXEC RET. 16 POWER switch Skip to step 4 when you do not use your camcorder. • If you set any year up to the year 2079. For midday, set it to 12:00 AM. SETUP MENU CLOCK SET USB STREAM... --:--:-- In that case, charge the rechargeable battery and then set the date and time, the CLOCK SET screen appears every time you turn on your camcorder for about 3 months, the built-in rechargeable battery gets discharged and the date and time settings may be cleared from the memory. For midnight, set...

Operating Guide
Page 17
Window-side Push the center of the back of the cassette lightly. Step 7: Inserting a cassette You can use mini DV cassettes only (p. 78). • The recordable time varies depending on [REC MODE] (p. 45). lever OPEN/EJECT lever Lid Getting Started The cassette compartment automatically comes out and opens up. 2 Insert a cassette with the same steps as you would when inserting a cassette tape. 1 Slide the OPEN/EJECT and open the lid. The cassette compartment automatically slides back in. This may cause a malfunction. 3 Close the lid. 17 Do not force the cassette into the ...
Window-side Push the center of the back of the cassette lightly. Step 7: Inserting a cassette You can use mini DV cassettes only (p. 78). • The recordable time varies depending on [REC MODE] (p. 45). lever OPEN/EJECT lever Lid Getting Started The cassette compartment automatically comes out and opens up. 2 Insert a cassette with the same steps as you would when inserting a cassette tape. 1 Slide the OPEN/EJECT and open the lid. The cassette compartment automatically slides back in. This may cause a malfunction. 3 Close the lid. 17 Do not force the cassette into the ...
Operating Guide
Page 18
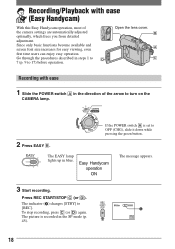
...direction of the camera settings are automatically adjusted optimally, which frees you from detailed adjustment. B A C Recording with ease (Easy Handycam) With this Easy Handycam operation, most of the arrow to OFF (CHG), slide it down while pressing the green button. 2 Press EASY . Press... REC START/STOP (or ). Easy Handycam operation ON The message appears. 3 Start recording. Since only basic functions become available and screen font size increases for easy viewing, even...
...direction of the camera settings are automatically adjusted optimally, which frees you from detailed adjustment. B A C Recording with ease (Easy Handycam) With this Easy Handycam operation, most of the arrow to OFF (CHG), slide it down while pressing the green button. 2 Press EASY . Press... REC START/STOP (or ). Easy Handycam operation ON The message appears. 3 Start recording. Since only basic functions become available and screen font size increases for easy viewing, even...
Operating Guide
Page 19
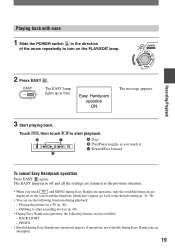
... situation. • When you touch it Rewind/Fast forward To cancel Easy Handycam operation Press EASY again. Dubbing to other recording devices (p. 49) • During Easy Handycam operation, the following functions during Easy Handycam are attempted. 19 Touch , then touch A C B to turn on a TV ... repeatedly to start playback. Stop Play/Pause toggles as you touch and MENU during Easy Handycam operation, only the available functions are not available: - Playing the picture on the PLAY/EDIT lamp. Recording/Playback 2 Press EASY &#...
... situation. • When you touch it Rewind/Fast forward To cancel Easy Handycam operation Press EASY again. Dubbing to other recording devices (p. 49) • During Easy Handycam operation, the following functions during Easy Handycam are attempted. 19 Touch , then touch A C B to turn on a TV ... repeatedly to start playback. Stop Play/Pause toggles as you touch and MENU during Easy Handycam operation, only the available functions are not available: - Playing the picture on the PLAY/EDIT lamp. Recording/Playback 2 Press EASY &#...

Operating Guide
Page 20
A The indicator () changes [STBY] to turn on the CAMERA lamp. Still images Press and hold PHOTO lightly to check the image (), then press it down while pressing the green button. 2 Start recording. To stop movie recording Press REC START/STOP again. • appears when the tape photo recording does not work. 20 PHOTO POWER switch REC START/ STOP REC START/ STOP 1 Slide the POWER switch in the direction of the arrow to [REC]. Indicator appears A CAPTURE B A shutter sound is heard, and the image is set to OPEN. Movies Press REC...
A The indicator () changes [STBY] to turn on the CAMERA lamp. Still images Press and hold PHOTO lightly to check the image (), then press it down while pressing the green button. 2 Start recording. To stop movie recording Press REC START/STOP again. • appears when the tape photo recording does not work. 20 PHOTO POWER switch REC START/ STOP REC START/ STOP 1 Slide the POWER switch in the direction of the arrow to [REC]. Indicator appears A CAPTURE B A shutter sound is heard, and the image is set to OPEN. Movies Press REC...

Operating Guide
Page 21
Recording/Playback 21 To search for more than 3 minutes. A C B Stop Play/Pause toggles as you touch it Rewind/Fast forward • Playback automatically stops if pause is engaged for a scene during playback Touch and hold / during playback (Picture Search), or / while fast forwarding or rewinding the tape (Skip Scan). • You can play back in the direction of the arrow repeatedly to start playback. Playback 1 Slide the POWER switch in various modes ([V SPD PLAY], p. 35). Touch , then touch to turn on the PLAY/EDIT lamp. 2 Start playing ...
Recording/Playback 21 To search for more than 3 minutes. A C B Stop Play/Pause toggles as you touch it Rewind/Fast forward • Playback automatically stops if pause is engaged for a scene during playback Touch and hold / during playback (Picture Search), or / while fast forwarding or rewinding the tape (Skip Scan). • You can play back in the direction of the arrow repeatedly to start playback. Playback 1 Slide the POWER switch in various modes ([V SPD PLAY], p. 35). Touch , then touch to turn on the PLAY/EDIT lamp. 2 Start playing ...
Operating Guide
Page 22
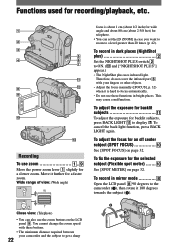
...] in mirror mode Open the LCD panel 90 degrees to a level greater than 20 times (p. 42). You cannot change the zoom speed with your camcorder and the subject to display . Functions used for recording/playback, etc. 1 2 3 5 4 6 7 qa 8 qs 9 0 qd Recording To use zoom Move ...58155; slightly for the selected subject (Flexible spot meter See [SPOT METER] on page 32. To record in case you want to zoom to the camcorder (), then rotate it further for backlit subjects, press BACK LIGHT to get a sharp 22 2 1 Wide range of view: (Wide...
...] in mirror mode Open the LCD panel 90 degrees to a level greater than 20 times (p. 42). You cannot change the zoom speed with your camcorder and the subject to display . Functions used for recording/playback, etc. 1 2 3 5 4 6 7 qa 8 qs 9 0 qd Recording To use zoom Move ...58155; slightly for the selected subject (Flexible spot meter See [SPOT METER] on page 32. To record in case you want to zoom to the camcorder (), then rotate it further for backlit subjects, press BACK LIGHT to get a sharp 22 2 1 Wide range of view: (Wide...
