Operating Instructions
Page 5
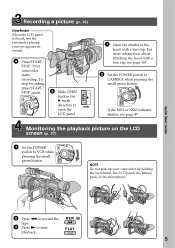
...rewind the tape. 3 Press N to open the LCD panel. OPEN MEMORY OFF CAMERA (CHG) VCR 1 Open the shutter of the hood with a lens cap, see page 47. Monitoring the playback picture on the LCD screen (p. 27) 1 Set the POWER VCR POWER MEMORY OFF CAMERA (CHG) switch to... green button. Recording a picture (p. 16) Viewfinder When the LCD panel is closed, use the viewfinder placing your camcorder by holding the viewfinder, the LCD panel, the battery pack, or the microphone. For more information about attaching the hood with a lens cap. Your camcorder starts recording. REW PLAY 5
...rewind the tape. 3 Press N to open the LCD panel. OPEN MEMORY OFF CAMERA (CHG) VCR 1 Open the shutter of the hood with a lens cap, see page 47. Monitoring the playback picture on the LCD screen (p. 27) 1 Set the POWER VCR POWER MEMORY OFF CAMERA (CHG) switch to... green button. Recording a picture (p. 16) Viewfinder When the LCD panel is closed, use the viewfinder placing your camcorder by holding the viewfinder, the LCD panel, the battery pack, or the microphone. For more information about attaching the hood with a lens cap. Your camcorder starts recording. REW PLAY 5

Operating Instructions
Page 8
Checking supplied accessories Make sure that the following accessories are supplied with your camcorder. 1 2 3 4 5 6 7 8 1 Wireless Remote Commander (1) (p. 170) 2 AC-L15A/L15B AC Adaptor (1), Power cord (1) (p. 10) 3 NP-F330 rechargeable battery pack (1) (p. 9, 10) 4 Size AA (R6) battery for Remote Commander (2) (p. 171) 5 "Memory Stick" (1) (p. 116) 6 A/V connecting cable (1) (p. 31, 74) 7 Shoulder strap (1) (p. 168) 8 Hood with a lens cap (1) (p. 167) 8
Checking supplied accessories Make sure that the following accessories are supplied with your camcorder. 1 2 3 4 5 6 7 8 1 Wireless Remote Commander (1) (p. 170) 2 AC-L15A/L15B AC Adaptor (1), Power cord (1) (p. 10) 3 NP-F330 rechargeable battery pack (1) (p. 9, 10) 4 Size AA (R6) battery for Remote Commander (2) (p. 171) 5 "Memory Stick" (1) (p. 116) 6 A/V connecting cable (1) (p. 31, 74) 7 Shoulder strap (1) (p. 168) 8 Hood with a lens cap (1) (p. 167) 8
Operating Instructions
Page 16
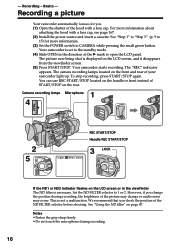
...recording, press START/STOP again. Recording a picture Your camcorder automatically focuses for more information about attaching the hood with a lens cap. The "REC" indicator appears. We recommend that you check the position of your camcorder light up. Your camcorder starts recording. The camera recording lamps located on the ... or in the viewfinder The ND filter is set to the standby mode. (4) Slide OPEN in the direction of the hood with a lens cap, see page 167. (2) Install the power source and insert a cassette. Notes •Fasten the grip strap firmly. •Do not...
...recording, press START/STOP again. Recording a picture Your camcorder automatically focuses for more information about attaching the hood with a lens cap. The "REC" indicator appears. We recommend that you check the position of your camcorder light up. Your camcorder starts recording. The camera recording lamps located on the ... or in the viewfinder The ND filter is set to the standby mode. (4) Slide OPEN in the direction of the hood with a lens cap, see page 167. (2) Install the power source and insert a cassette. Notes •Fasten the grip strap firmly. •Do not...
Operating Instructions
Page 163
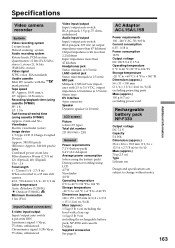
...(ø 3.5 mm) LANC control jack Stereo mini-minijack (ø 2.5 mm) MIC jack Minijack, 0.388 mV low impedance with a lens cap 1.6 kg (3 lb 9 oz) including the rechargeable battery pack, NP-F330 and cassette DVM60 Supplied accessories See page 8. Specifications Video camera...cassette DVM60) Approx. 2 min and 30 s Viewfinder Electric viewfinder (color) Image device 1/3 type CCD (3 Charge Coupled Device) Approx. 380 000 pixels (Effective: Approx. 340 000 pixels) Lens Combined power zoom lens Filter diameter 58 mm (2 3/8 in) 12× (Optical), 48× (Digital) F1.6 - 2.4 Focal length 6 - ...
...(ø 3.5 mm) LANC control jack Stereo mini-minijack (ø 2.5 mm) MIC jack Minijack, 0.388 mV low impedance with a lens cap 1.6 kg (3 lb 9 oz) including the rechargeable battery pack, NP-F330 and cassette DVM60 Supplied accessories See page 8. Specifications Video camera...cassette DVM60) Approx. 2 min and 30 s Viewfinder Electric viewfinder (color) Image device 1/3 type CCD (3 Charge Coupled Device) Approx. 380 000 pixels (Effective: Approx. 340 000 pixels) Lens Combined power zoom lens Filter diameter 58 mm (2 3/8 in) 12× (Optical), 48× (Digital) F1.6 - 2.4 Focal length 6 - ...

Operating Instructions
Page 166
... SLOW REC STOP REW PLAY AUDIO DUB FF PAUSE ek el r; Camera recording lamp (p. 16) ra REC START/STOP button (p. 19) rs Lens rd Hood with a lens cap (p. 167) rf Lens hood fixing screw 166 ra rs rd rf eg Handle zoom lever (p. 21) eh Handle zoom switch (p. 21) ej Video control buttons (p. 27...
... SLOW REC STOP REW PLAY AUDIO DUB FF PAUSE ek el r; Camera recording lamp (p. 16) ra REC START/STOP button (p. 19) rs Lens rd Hood with a lens cap (p. 167) rf Lens hood fixing screw 166 ra rs rd rf eg Handle zoom lever (p. 21) eh Handle zoom switch (p. 21) ej Video control buttons (p. 27...

Operating Instructions
Page 167
...the eyecup, pull lightly the upper edge of the hood with a lens cap, slide the knob to your fingers [a], insert a finger into the gap that you use Sony made filters. 167 When attaching the eyecup, fit it onto the camcorder slide it all the way along grooves until it stops. •...Do not pull the eyecup inward or with a lens cap counterclockwise. Doing so may damage the eyecup. [a] [b] [c] ...
...the eyecup, pull lightly the upper edge of the hood with a lens cap, slide the knob to your fingers [a], insert a finger into the gap that you use Sony made filters. 167 When attaching the eyecup, fit it onto the camcorder slide it all the way along grooves until it stops. •...Do not pull the eyecup inward or with a lens cap counterclockwise. Doing so may damage the eyecup. [a] [b] [c] ...


