Operating Instructions
Page 5
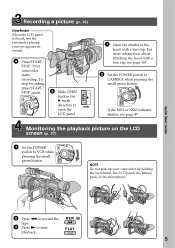
...CHG) VCR 1 Open the shutter of the hood with a lens cap, see page 47. Monitoring the playback picture on the LCD screen (p. 27) 1 Set the POWER VCR POWER MEMORY OFF CAMERA (CHG) switch to open the LCD panel. REW PLAY 5 Your camcorder starts recording. Recording a picture (p. 16) ...POWER If the ND1 or ND2 indicator flashes, see page 167. 2 Set the POWER switch to start playback. For more information about attaching the hood with a lens cap. MEMORY OFF CAMERA (CHG) VCR 4 Press START/ STOP. Quick Start Guide 2 Press m to rewind the tape. 3 Press N to ...
...CHG) VCR 1 Open the shutter of the hood with a lens cap, see page 47. Monitoring the playback picture on the LCD screen (p. 27) 1 Set the POWER VCR POWER MEMORY OFF CAMERA (CHG) switch to open the LCD panel. REW PLAY 5 Your camcorder starts recording. Recording a picture (p. 16) ...POWER If the ND1 or ND2 indicator flashes, see page 167. 2 Set the POWER switch to start playback. For more information about attaching the hood with a lens cap. MEMORY OFF CAMERA (CHG) VCR 4 Press START/ STOP. Quick Start Guide 2 Press m to rewind the tape. 3 Press N to ...

Operating Instructions
Page 8
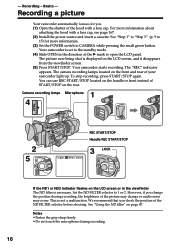
Checking supplied accessories Make sure that the following accessories are supplied with your camcorder. 1 2 3 4 5 6 7 8 1 Wireless Remote Commander (1) (p. 170) 2 AC-L15A/L15B AC Adaptor (1), Power cord (1) (p. 10) 3 NP-F330 rechargeable battery pack (1) (p. 9, 10) 4 Size AA (R6) battery for Remote Commander (2) (p. 171) 5 "Memory Stick" (1) (p. 116) 6 A/V connecting cable (1) (p. 31, 74) 7 Shoulder strap (1) (p. 168) 8 Hood with a lens cap (1) (p. 167) 8
Checking supplied accessories Make sure that the following accessories are supplied with your camcorder. 1 2 3 4 5 6 7 8 1 Wireless Remote Commander (1) (p. 170) 2 AC-L15A/L15B AC Adaptor (1), Power cord (1) (p. 10) 3 NP-F330 rechargeable battery pack (1) (p. 9, 10) 4 Size AA (R6) battery for Remote Commander (2) (p. 171) 5 "Memory Stick" (1) (p. 116) 6 A/V connecting cable (1) (p. 31, 74) 7 Shoulder strap (1) (p. 168) 8 Hood with a lens cap (1) (p. 167) 8
Operating Instructions
Page 16
...and it disappears from the viewfinder screen. (5) Press START/STOP. See "Using the ND filter" on the LCD screen or in the direction of your camcorder light up. See "Step 1" to "Step 3" (p. 9 to open the LCD panel. However, if you check the position of START/STOP on.... - Notes •Fasten the grip strap firmly. •Do not touch the microphone during recording, the brightness of the hood with a lens cap, see page 167. (2) Install the power source and insert a cassette. Recording a picture Your camcorder automatically focuses for more information about attaching the...
...and it disappears from the viewfinder screen. (5) Press START/STOP. See "Using the ND filter" on the LCD screen or in the direction of your camcorder light up. See "Step 1" to "Step 3" (p. 9 to open the LCD panel. However, if you check the position of START/STOP on.... - Notes •Fasten the grip strap firmly. •Do not touch the microphone during recording, the brightness of the hood with a lens cap, see page 167. (2) Install the power source and insert a cassette. Recording a picture Your camcorder automatically focuses for more information about attaching the...
Operating Instructions
Page 163
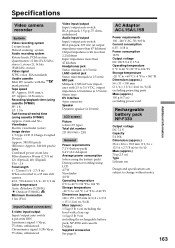
... Device) Approx. 380 000 pixels (Effective: Approx. 340 000 pixels) Lens Combined power zoom lens Filter diameter 58 mm (2 3/8 in) 12× (Optical), 48× (Digital) F1.6 - 2.4 Focal length 6 - 72 mm (1/4 - 2 7/8 in) When converted to a 35 mm still camera 43.2 - 518.4 mm (1 3/4 - 20 1/2 in ) (w/h/d) Mass (approx.) 1.5 kg (3 lb 6 oz) including the hood with a lens cap 1.6 kg...
... Device) Approx. 380 000 pixels (Effective: Approx. 340 000 pixels) Lens Combined power zoom lens Filter diameter 58 mm (2 3/8 in) 12× (Optical), 48× (Digital) F1.6 - 2.4 Focal length 6 - 72 mm (1/4 - 2 7/8 in) When converted to a 35 mm still camera 43.2 - 518.4 mm (1 3/4 - 20 1/2 in ) (w/h/d) Mass (approx.) 1.5 kg (3 lb 6 oz) including the hood with a lens cap 1.6 kg...

Operating Instructions
Page 166
Camera recording lamp (p. 16) ra REC START/STOP button (p. 19) rs Lens rd Hood with a lens cap (p. 167) rf Lens hood fixing screw 166 Identifying the parts and controls eg eh ej SLOW REC STOP REW PLAY AUDIO DUB FF PAUSE ek el r; ra rs rd ...
Camera recording lamp (p. 16) ra REC START/STOP button (p. 19) rs Lens rd Hood with a lens cap (p. 167) rf Lens hood fixing screw 166 Identifying the parts and controls eg eh ej SLOW REC STOP REW PLAY AUDIO DUB FF PAUSE ek el r; ra rs rd ...

Operating Instructions
Page 167
... it onto the camcorder slide it all the way along grooves until it . Identifying the parts and controls Attaching/removing the eyecup •When removing the eyecup, pull lightly the upper edge of the hood with a lens cap, slide the knob to your fingers [a], insert a finger into the gap that you use Sony made filters...
... it onto the camcorder slide it all the way along grooves until it . Identifying the parts and controls Attaching/removing the eyecup •When removing the eyecup, pull lightly the upper edge of the hood with a lens cap, slide the knob to your fingers [a], insert a finger into the gap that you use Sony made filters...


