
Operating Instructions
Page 1
Model No. DCR-VX2100 Model No. Serial No. 3-087-414-11 (1) Digital Video Camera Recorder Operating Instructions Before operating the unit, please read this product. Refer to these numbers whenever you call upon your Sony dealer regarding this manual thoroughly, and retain it for future reference. AC- Serial No. Owner's Record The model and serial numbers are located on the bottom. Record the serial number in the space provided below. DCR-VX2100 ©2003 Sony Corporation
Model No. DCR-VX2100 Model No. Serial No. 3-087-414-11 (1) Digital Video Camera Recorder Operating Instructions Before operating the unit, please read this product. Refer to these numbers whenever you call upon your Sony dealer regarding this manual thoroughly, and retain it for future reference. AC- Serial No. Owner's Record The model and serial numbers are located on the bottom. Record the serial number in the space provided below. DCR-VX2100 ©2003 Sony Corporation
Operating Instructions
Page 22
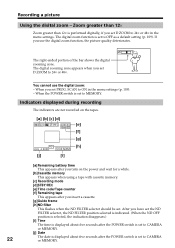
...× or 48× in the menu settings (p. 109). - Recording a picture Using the disital zoom - The digital zoom function is set PROG. You cannot use the digital zoom function, the picture quality deteriorates. When you set D ZOOM to MEMORY. After you have set the ND FILTER ...is selected, the indication disappears.) [i] Time The time is displayed about five seconds after the POWER switch is set to CAMERA or MEMORY. [j] Date 22 The date is performed digitally, if you set to OFF as a default setting (p. 109). W T The right-ended portion of the bar shows...
...× or 48× in the menu settings (p. 109). - Recording a picture Using the disital zoom - The digital zoom function is set PROG. You cannot use the digital zoom function, the picture quality deteriorates. When you set D ZOOM to MEMORY. After you have set the ND FILTER ...is selected, the indication disappears.) [i] Time The time is displayed about five seconds after the POWER switch is set to CAMERA or MEMORY. [j] Date 22 The date is performed digitally, if you set to OFF as a default setting (p. 109). W T The right-ended portion of the bar shows...

Operating Instructions
Page 32
... select an image again, and then press and hold PHOTO lightly. (2) Press PHOTO deeper. While the digital effect function is set or in use . •Do not shake the camcorder during those seven seconds is also recorded. When shooting a moving object in the viewfinder until a picture ...or in SP mode and about seven seconds and your camcorder can record still images on the Remote Commander. Your camcorder immediately records an image on a tape - Advanced Recording Operations - To do tape photo recording during normal CAMERA recording You cannot check an image on a mini ...
... select an image again, and then press and hold PHOTO lightly. (2) Press PHOTO deeper. While the digital effect function is set or in use . •Do not shake the camcorder during those seven seconds is also recorded. When shooting a moving object in the viewfinder until a picture ...or in SP mode and about seven seconds and your camcorder can record still images on the Remote Commander. Your camcorder immediately records an image on a tape - Advanced Recording Operations - To do tape photo recording during normal CAMERA recording You cannot check an image on a mini ...

Operating Instructions
Page 39
... use the following functions while using the fader function, and vice versa: - Tape Photo recording - Digital effect - Cut recording When the OVERLAP, WIPE, or DOT indicator appears Your camcorder automatically stores the image recorded on a tape. When fading out [b] In recording mode, press FADER ...until the desired fader indicator flashes. As the image is carried out, your camcorder automatically returns to the normal mode. 1 FADER FADER 2 POWER VCR MEMORY OFF CAMERA (CHG) To cancel the fader function Press FADER until the indicator disappears. After the fade ...
... use the following functions while using the fader function, and vice versa: - Tape Photo recording - Digital effect - Cut recording When the OVERLAP, WIPE, or DOT indicator appears Your camcorder automatically stores the image recorded on a tape. When fading out [b] In recording mode, press FADER ...until the desired fader indicator flashes. As the image is carried out, your camcorder automatically returns to the normal mode. 1 FADER FADER 2 POWER VCR MEMORY OFF CAMERA (CHG) To cancel the fader function Press FADER until the indicator disappears. After the fade ...

Operating Instructions
Page 77
...: END OTHERS ED I T SET CONTROL ADJ TEST "CUT-I N" "CUT-OUT" I R SETUP 3 PAUSEMODE I R i . See "About the IR SETUP code " on your camcorder. (2) Turn the power of your VCR, then press the dial. When you connect using the VCR, send the control signal by infrared ray to VCR...R SETUP PAUSEMODE I R TEST RETURN I R TEST RETURN [MENU] : END 77 When you connect a video camera recorder, set the input selector to select IR, then press the dial. Digital program editing Preparation 2: Setting the VCR to operate by infrared rays emitter To edit using the A/V cable, this ...
...: END OTHERS ED I T SET CONTROL ADJ TEST "CUT-I N" "CUT-OUT" I R SETUP 3 PAUSEMODE I R i . See "About the IR SETUP code " on your camcorder. (2) Turn the power of your VCR, then press the dial. When you connect using the VCR, send the control signal by infrared ray to VCR...R SETUP PAUSEMODE I R TEST RETURN I R TEST RETURN [MENU] : END 77 When you connect a video camera recorder, set the input selector to select IR, then press the dial. Digital program editing Preparation 2: Setting the VCR to operate by infrared rays emitter To edit using the A/V cable, this ...
Operating Instructions
Page 81
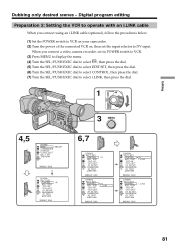
... TEST RETURN i . When you connect using an i.LINK cable (optional), follow the procedures below. (1) Set the POWER switch to VCR on your camcorder. (2) Turn the power of the connected VCR on, then set its POWER switch to VCR. (3) Press MENU to display the menu. (4) Turn the... OTHERS ED I T SET CONTROL ADJ TEST "CUT-I N" "CUT-OUT" I R SETUP PAUSEMODE I R TEST RETURN I R i . Digital program editing Preparation 2: Setting the VCR to operate with an i.LINK cable When you connect a video camera recorder, set the input selector to select i.LINK, then press the dial. 1 VCR POWER MEMORY OFF...
... TEST RETURN i . When you connect using an i.LINK cable (optional), follow the procedures below. (1) Set the POWER switch to VCR on your camcorder. (2) Turn the power of the connected VCR on, then set its POWER switch to VCR. (3) Press MENU to display the menu. (4) Turn the... OTHERS ED I T SET CONTROL ADJ TEST "CUT-I N" "CUT-OUT" I R SETUP PAUSEMODE I R TEST RETURN I R i . Digital program editing Preparation 2: Setting the VCR to operate with an i.LINK cable When you connect a video camera recorder, set the input selector to select i.LINK, then press the dial. 1 VCR POWER MEMORY OFF...
Operating Instructions
Page 87
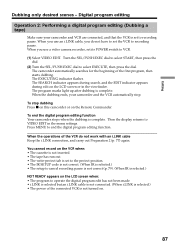
... on . 87 When you use an i.LINK cable, you use a video camera recorder, set to VIDEO EDIT in the viewfinder. The EXECUTING indicator flashes. To stop . To end the digital program editing function Your camcorder stops when the dubbing is complete. Press MENU to select EXECUTE, then press the dial. The ...the SEL/PUSH EXEC dial to select START, then press the dial. (2) Turn the SEL/PUSH EXEC dial to end the digital program editing function. When the dubbing ends, your camcorder and VCR are connected, and that the VCR is set its POWER switch to VCR. (1) Select VIDEO EDIT. When the...
... on . 87 When you use an i.LINK cable, you use a video camera recorder, set to VIDEO EDIT in the viewfinder. The EXECUTING indicator flashes. To stop . To end the digital program editing function Your camcorder stops when the dubbing is complete. Press MENU to select EXECUTE, then press the dial. The ...the SEL/PUSH EXEC dial to select START, then press the dial. (2) Turn the SEL/PUSH EXEC dial to end the digital program editing function. When the dubbing ends, your camcorder and VCR are connected, and that the VCR is set its POWER switch to VCR. (1) Select VIDEO EDIT. When the...

Operating Instructions
Page 110
... default setting. Up to adjust the shutter speed electrically. CAMERA 24× To activate the digital zoom. More than 12× zoom is performed digitally. Your camcorder prevents excessive compensation for camera-shake. Menu items differ depending on the SteadyShot function &#...8226;The SteadyShot function will not correct excessive camera-shake. •Attachment of a conversion lens (optional) ...
... default setting. Up to adjust the shutter speed electrically. CAMERA 24× To activate the digital zoom. More than 12× zoom is performed digitally. Your camcorder prevents excessive compensation for camera-shake. Menu items differ depending on the SteadyShot function &#...8226;The SteadyShot function will not correct excessive camera-shake. •Attachment of a conversion lens (optional) ...

Operating Instructions
Page 111
... screen to normal. Meaning POWER switch Does not make an interval recording. ON To output digital images in digital format using your camcorder. LCD COLOR - BRIGHT To brighten the viewfinder screen. GUIDEFRAME z OFF Does not display ...the guide frame. To play back a stereo tape with the left sound or a dual sound tape with main and sub sound (p. 145). To adjust the balance between the stereo 1 VCR and stereo 2 (p. 97). VCR CAMERA...
... screen to normal. Meaning POWER switch Does not make an interval recording. ON To output digital images in digital format using your camcorder. LCD COLOR - BRIGHT To brighten the viewfinder screen. GUIDEFRAME z OFF Does not display ...the guide frame. To play back a stereo tape with the left sound or a dual sound tape with main and sub sound (p. 145). To adjust the balance between the stereo 1 VCR and stereo 2 (p. 97). VCR CAMERA...

Operating Instructions
Page 121
... a "Memory Stick" - Before operation Insert a "Memory Stick" into your camcorder. (1) Set the POWER switch to MEMORY. The brightness of the picture and ...the image is set to MEMORY The following functions do not work: wide TV mode, digital effect, picture effect, title, digital zoom, fader, shutter speed (1/30 or smaller) adjustment, and low lux mode and ..., then lights up. Recording is complete when the bar scroll indicator disappears. 1 POWER "Memory Stick" Operations MEMORY VCR OFF CAMERA (CHG) 2 SFN 1 / 6 3 [a] SFN PHOTO [b] PHOTO [a] The number of images that the LOCK switch is...
... a "Memory Stick" - Before operation Insert a "Memory Stick" into your camcorder. (1) Set the POWER switch to MEMORY. The brightness of the picture and ...the image is set to MEMORY The following functions do not work: wide TV mode, digital effect, picture effect, title, digital zoom, fader, shutter speed (1/30 or smaller) adjustment, and low lux mode and ..., then lights up. Recording is complete when the bar scroll indicator disappears. 1 POWER "Memory Stick" Operations MEMORY VCR OFF CAMERA (CHG) 2 SFN 1 / 6 3 [a] SFN PHOTO [b] PHOTO [a] The number of images that the LOCK switch is...

Operating Instructions
Page 143
This function is displayed beside the data file name of an image. 1 POWER "Memory Stick" Operations MEMORY VCR OFF CAMERA (CHG) 3,7 MENU 4 5 6 MEMORY SET 10 / 12 CONT I NUOUS QUAL I TY PR I NT MARK OFF PROTECT SL I DE SHOW DELETE ALL FORMAT RETURN [MENU] : END...unlock) position. (2) Play back the image to be printed out. Print mark You can specify the recorded still image to print out. Your camcorder conforms with the DPOF (Digital Print Order Format) standard for printing out still images later. The " " mark is useful for specifying the still images to be printed out...
This function is displayed beside the data file name of an image. 1 POWER "Memory Stick" Operations MEMORY VCR OFF CAMERA (CHG) 3,7 MENU 4 5 6 MEMORY SET 10 / 12 CONT I NUOUS QUAL I TY PR I NT MARK OFF PROTECT SL I DE SHOW DELETE ALL FORMAT RETURN [MENU] : END...unlock) position. (2) Play back the image to be printed out. Print mark You can specify the recorded still image to print out. Your camcorder conforms with the DPOF (Digital Print Order Format) standard for printing out still images later. The " " mark is useful for specifying the still images to be printed out...
Operating Instructions
Page 144
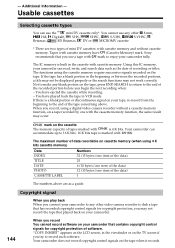
... DV cassette only*. Sony recommends that contains copyright control signals for copyright protection, you may occur. You have (Cassette Memory) mark. "COPY INHIBIT" appears on your camcorder. 144 When you record, using the cassette memory require successive signals recorded on the tape when it records. - The functions using a digital video camera recorder without cassette...
... DV cassette only*. Sony recommends that contains copyright control signals for copyright protection, you may occur. You have (Cassette Memory) mark. "COPY INHIBIT" appears on your camcorder. 144 When you record, using the cassette memory require successive signals recorded on the tape when it records. - The functions using a digital video camera recorder without cassette...

Operating Instructions
Page 148
...-protect tab on the cassette is not adjusted. c Set it to CAMERA. (p. 16) •The tape has run into any problem using your Sony dealer or local authorized Sony service facility. c Cancel it to ON. (p. 109) •The camcorder is too high. This is not a malfunction. •This is ...c Use a new tape or slide the tab. (p. 15) •The tape is working. c Adjust focus manually. (p. 59) •The digital effect function is stuck to CAMERA again. (p. 17) •The battery pack is called the smear phenomenon. If "C:ss:ss" appears on the viewfinder screen is not a malfunction. ...
...-protect tab on the cassette is not adjusted. c Set it to CAMERA. (p. 16) •The tape has run into any problem using your Sony dealer or local authorized Sony service facility. c Cancel it to ON. (p. 109) •The camcorder is too high. This is not a malfunction. •This is ...c Use a new tape or slide the tab. (p. 15) •The tape is working. c Adjust focus manually. (p. 59) •The digital effect function is stuck to CAMERA again. (p. 17) •The battery pack is called the smear phenomenon. If "C:ss:ss" appears on the viewfinder screen is not a malfunction. ...
Operating Instructions
Page 163
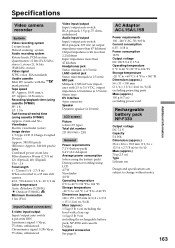
... (3 Charge Coupled Device) Approx. 380 000 pixels (Effective: Approx. 340 000 pixels) Lens Combined power zoom lens Filter diameter 58 mm (2 3/8 in) 12× (Optical), 48× (Digital) F1.6 - 2.4 Focal length 6 - 72 mm (1/4 - 2 7/8 in) When converted to a 35 mm still camera 43.2 - 518.4 mm (1 ...000 (960 × 220) General Power requirements 7.2 V (battery pack) 8.4 V (AC Adaptor) Average power consumption (when using the battery pack) During camera recording using LCD 4.7 W Viewfinder 4.0 W Operating temperature 0 °C to 40 °C (32 °F to 104 °F) Storage temperature -20 &#...
... (3 Charge Coupled Device) Approx. 380 000 pixels (Effective: Approx. 340 000 pixels) Lens Combined power zoom lens Filter diameter 58 mm (2 3/8 in) 12× (Optical), 48× (Digital) F1.6 - 2.4 Focal length 6 - 72 mm (1/4 - 2 7/8 in) When converted to a 35 mm still camera 43.2 - 518.4 mm (1 ...000 (960 × 220) General Power requirements 7.2 V (battery pack) 8.4 V (AC Adaptor) Average power consumption (when using the battery pack) During camera recording using LCD 4.7 W Viewfinder 4.0 W Operating temperature 0 °C to 40 °C (32 °F to 104 °F) Storage temperature -20 &#...

Operating Instructions
Page 174
... 56 Audio dubbing 95 AUDIO LEVEL 52 AUDIO MIX 111 AUDIO MODE 113 AUTO SHTR 110 BACK LIGHT 23 Battery pack 9 BEEP 115 C, D Camera chromakey 125 Cassette memory 6, 144 Charging battery 10 Charging the built-in rechargeable battery ........ 160 Clock set 14 COLOR BAR 115 Connection (dubbing a... (viewing on TV 31 Continuous 122 Custom preset 54 Cut recording 62 Data code 29 Date search 68 Date/time indicator 29 DEMO 114 DIGITAL EFFECT 41 Digital program editing ....... 76 DISPLAY 28 DOT 38 Dual sound track tape ........ 145 Dubbing a tape 74 E EDITSEARCH 26 END SEARCH 26,...
... 56 Audio dubbing 95 AUDIO LEVEL 52 AUDIO MIX 111 AUDIO MODE 113 AUTO SHTR 110 BACK LIGHT 23 Battery pack 9 BEEP 115 C, D Camera chromakey 125 Cassette memory 6, 144 Charging battery 10 Charging the built-in rechargeable battery ........ 160 Clock set 14 COLOR BAR 115 Connection (dubbing a... (viewing on TV 31 Continuous 122 Custom preset 54 Cut recording 62 Data code 29 Date search 68 Date/time indicator 29 DEMO 114 DIGITAL EFFECT 41 Digital program editing ....... 76 DISPLAY 28 DOT 38 Dual sound track tape ........ 145 Dubbing a tape 74 E EDITSEARCH 26 END SEARCH 26,...


