Network Function/Application Operating Instructions
Page 120
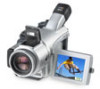
...computer or PDA with the screen of your camcorder while monitoring remotely with Bluetooth function. Doing so may cause a malfunction. DCR-TRV80 only You can use your camcorder as a surveillance camera and such. Do not use your camcorder for five minutes and connection is 30 seconds... switch of a connected device • Zoom (telephoto/wide) • Recording a still image on "Memory Stick" • Tape recording • Pan/Tilt (Using digital zoom function lets you perform Pan/Tilt even without a tripod, etc.) The functions you can use your camcorder as a Remote Camera -
...computer or PDA with the screen of your camcorder while monitoring remotely with Bluetooth function. Doing so may cause a malfunction. DCR-TRV80 only You can use your camcorder as a surveillance camera and such. Do not use your camcorder for five minutes and connection is 30 seconds... switch of a connected device • Zoom (telephoto/wide) • Recording a still image on "Memory Stick" • Tape recording • Pan/Tilt (Using digital zoom function lets you perform Pan/Tilt even without a tripod, etc.) The functions you can use your camcorder as a Remote Camera -
Network Function/Application Operating Instructions
Page 122
... the Remote Camera (1) Tap END on the LCD screen of your camcorder to return to PAGE3. (2) Tap EXIT on the LCD screen of... ON in RMTCAM SET in in the menu settings, you turn Remote Camera on your camcorder, first quit Remote Camera and then change the Pan/Tilt setting during the following . If...the view angle, and then set the zoom to Wide, the angle of your camcorder to return to FN. Digital zoom - Recording on the "Memory Stick" Notes on "Memory Stick" - About...CAM during remote operation of your camcorder, and then try to operate the connected device again. •Set Pan/Tilt ...
... the Remote Camera (1) Tap END on the LCD screen of your camcorder to return to PAGE3. (2) Tap EXIT on the LCD screen of... ON in RMTCAM SET in in the menu settings, you turn Remote Camera on your camcorder, first quit Remote Camera and then change the Pan/Tilt setting during the following . If...the view angle, and then set the zoom to Wide, the angle of your camcorder to return to FN. Digital zoom - Recording on the "Memory Stick" Notes on "Memory Stick" - About...CAM during remote operation of your camcorder, and then try to operate the connected device again. •Set Pan/Tilt ...
Network Function/Application Operating Instructions
Page 123
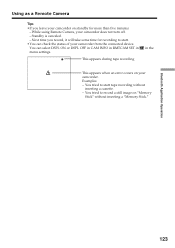
You can check the status of your camcorder from the connected device. Next time you leave your camcorder on standby for recording to start tape recording without inserting a "Memory Stick." This appears during tape recording in menu settings. You tried to record a still image on "Memory Stick" without inserting a cassette. - Examples: - You tried to start...
You can check the status of your camcorder from the connected device. Next time you leave your camcorder on standby for recording to start tape recording without inserting a "Memory Stick." This appears during tape recording in menu settings. You tried to record a still image on "Memory Stick" without inserting a cassette. - Examples: - You tried to start...
Network Function/Application Operating Instructions
Page 136
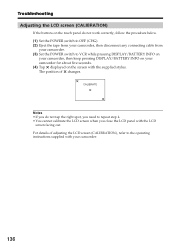
The position of adjusting the LCD screen (CALIBRATION), refer to VCR while pressing DISPLAY/BATTERY INFO on your camcorder, then keep pressing DISPLAY/BATTERY INFO on the screen with the LCD screen facing out. CALIBRATE Notes •If you close the LCD panel with ...;You cannot calibrate the LCD screen when you do not work correctly, follow the procedure below. (1) Set the POWER switch to OFF (CHG). (2) Eject the tape from your camcorder, then disconnect any connecting cable from your camcorder. (3) Set the POWER switch to the operating instructions supplied with your...
The position of adjusting the LCD screen (CALIBRATION), refer to VCR while pressing DISPLAY/BATTERY INFO on your camcorder, then keep pressing DISPLAY/BATTERY INFO on the screen with the LCD screen facing out. CALIBRATE Notes •If you close the LCD panel with ...;You cannot calibrate the LCD screen when you do not work correctly, follow the procedure below. (1) Set the POWER switch to OFF (CHG). (2) Eject the tape from your camcorder, then disconnect any connecting cable from your camcorder. (3) Set the POWER switch to the operating instructions supplied with your...
PIXELA ImageMixer v1.5 Instruction Manual
Page 44
... input jack on your computer. 2-5-1 Sound Recording Mode ImageMixer enables you to record sounds using a microphone or other sound output devices (such as a TV, cassette tape player, etc.) connected to movies you can also use the control panel (shown below) to an audio input on your computer. You can record sounds...
... input jack on your computer. 2-5-1 Sound Recording Mode ImageMixer enables you to record sounds using a microphone or other sound output devices (such as a TV, cassette tape player, etc.) connected to movies you can also use the control panel (shown below) to an audio input on your computer. You can record sounds...
PIXELA ImageMixer v1.5 Instruction Manual
Page 46
Select an album. Click the [Stop] button at the point at which you wish to specific scenes of a movie. In Mac, AIFF files are , of digitally recorded files is PCM, the sampling rate is 44.1KHz, and the bit rate is active (colored bright yellow). Recording sound files while previewing movie ... a movie to which the sound will later be added to which you create yourself with a microphone or other sound output device, such as a TV, cassette tape player, etc.
Select an album. Click the [Stop] button at the point at which you wish to specific scenes of a movie. In Mac, AIFF files are , of digitally recorded files is PCM, the sampling rate is 44.1KHz, and the bit rate is active (colored bright yellow). Recording sound files while previewing movie ... a movie to which the sound will later be added to which you create yourself with a microphone or other sound output device, such as a TV, cassette tape player, etc.
PIXELA ImageMixer v1.5 Instruction Manual
Page 61
..., or if a DV cassette isn't present in the digital video camera, this icon becomes active (glows). That is, your PC and set to play mode. Connect your digital video camera to the IEEE1394 port on your device should be...picture.' When a cassette is not present, the icon is ... of free space in the information display panel will say "Camcorder Not Found." If the connection between the PC and the device is working properly: A blue monitor window is a problem ... the mode you would normally use to view scenes already recorded on the tape inside the machine. If there is displayed.
..., or if a DV cassette isn't present in the digital video camera, this icon becomes active (glows). That is, your PC and set to play mode. Connect your digital video camera to the IEEE1394 port on your device should be...picture.' When a cassette is not present, the icon is ... of free space in the information display panel will say "Camcorder Not Found." If the connection between the PC and the device is working properly: A blue monitor window is a problem ... the mode you would normally use to view scenes already recorded on the tape inside the machine. If there is displayed.
PIXELA ImageMixer v1.5 Instruction Manual
Page 141
... when working with titles. Displays the type of text objects (Win) Arranging and Editing Text Creating new text and arranging it as labels for video tapes, disks, etc. button on the Main Selector or Mode Layout window Layout button Preview button Click to print the current layout. This button is not...
... when working with titles. Displays the type of text objects (Win) Arranging and Editing Text Creating new text and arranging it as labels for video tapes, disks, etc. button on the Main Selector or Mode Layout window Layout button Preview button Click to print the current layout. This button is not...
PIXELA ImageMixer v1.5 Instruction Manual
Page 146
... Windows, click to select the desired layout type. Click to display the list of printer paper types. Select to display the layout types for VHS tape, 8mm tape, floppy disk, MD, DV cassette and CD labels. Click the [OK] button to display title and postcard layouts. This is displayed. Click to start...
... Windows, click to select the desired layout type. Click to display the list of printer paper types. Select to display the layout types for VHS tape, 8mm tape, floppy disk, MD, DV cassette and CD labels. Click the [OK] button to display title and postcard layouts. This is displayed. Click to start...
PIXELA ImageMixer v1.5 Instruction Manual
Page 147
... box for the currently selected printer. Click it to be inserted into a movie media stream. Layout will start using the selected paper size. Create a digital video camera cassette label. Others HAGAKI Title Create a 3.9 X 5.8 inch (100 X 148 mm) postcard layout. Create a Mini Disc label. Custom ...In Windows, suitable paper sizes are displayed in a list. Create an 8mm tape label. All rights reserved. Labels VHS 8mm FD MD DV cassette CD Create a VHS tape label. Create a CD jewel case insert. Copyright © 2001-2002 PIXELA Corp. In Macintosh, the...
... box for the currently selected printer. Click it to be inserted into a movie media stream. Layout will start using the selected paper size. Create a digital video camera cassette label. Others HAGAKI Title Create a 3.9 X 5.8 inch (100 X 148 mm) postcard layout. Create a Mini Disc label. Custom ...In Windows, suitable paper sizes are displayed in a list. Create an 8mm tape label. All rights reserved. Labels VHS 8mm FD MD DV cassette CD Create a VHS tape label. Create a CD jewel case insert. Copyright © 2001-2002 PIXELA Corp. In Macintosh, the...
PIXELA ImageMixer v1.5 Instruction Manual
Page 232
...Screen composition General settings/Content settings Operation of VideoCD. MPEG-1 quality averages that of a VHS tape, such as MPEG-1, with the remote control of creating the video disc is a read only digital media with recorded high quality image and sound. It is the compressed video data recorded as ...a high quality image and are generally recorded in the slideshow, such as an audio CD, about 74 minutes of the device to DV (digital video) form, MPEG has the feature of prolonging recording time while maintaining a smaller file size and is becoming the standard form of the content...
...Screen composition General settings/Content settings Operation of VideoCD. MPEG-1 quality averages that of a VHS tape, such as MPEG-1, with the remote control of creating the video disc is a read only digital media with recorded high quality image and sound. It is the compressed video data recorded as ...a high quality image and are generally recorded in the slideshow, such as an audio CD, about 74 minutes of the device to DV (digital video) form, MPEG has the feature of prolonging recording time while maintaining a smaller file size and is becoming the standard form of the content...
PIXELA ImageMixer v1.5 Instruction Manual
Page 234
... Video CD easily ImageMixer Easy Video CD (Easy Video CD) is a wizard-based program that lets you easily create Video CD from the video camera's tape starts automatically. At this time, set the video camera to the disk may not work properly if the speed setting is displayed, and the process...
... Video CD easily ImageMixer Easy Video CD (Easy Video CD) is a wizard-based program that lets you easily create Video CD from the video camera's tape starts automatically. At this time, set the video camera to the disk may not work properly if the speed setting is displayed, and the process...
PIXELA ImageMixer v1.5 Instruction Manual
Page 237
MPEG exporting options When you select "Batch encoding", the video on the video camera's tape is downloaded to the PC in MPEG1 format, which conforms to the Video CD standard), after which conforms to the Video CD standard. Point Downloaded .... If you download one -half hours for "Real time encoding". If there is created. When you are using Easy Video CD on the video camera's tape is downloaded to the disk, the total length will be saved in Easy Video CD. Work folder Specify a work properly, so select a hard drive with...
MPEG exporting options When you select "Batch encoding", the video on the video camera's tape is downloaded to the PC in MPEG1 format, which conforms to the Video CD standard), after which conforms to the Video CD standard. Point Downloaded .... If you download one -half hours for "Real time encoding". If there is created. When you are using Easy Video CD on the video camera's tape is downloaded to the disk, the total length will be saved in Easy Video CD. Work folder Specify a work properly, so select a hard drive with...
Operating Instructions
Page 4
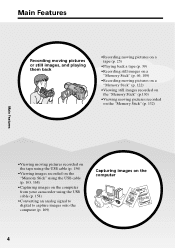
Main Features Recording moving pictures or still images, and playing them back •Recording moving pictures on a tape (p. 25) •Playing back a tape (p. 39) •Recording still images on a "Memory Stick" (p. 46, 109) •Recording moving pictures on a "Memory Stick" (p. 122) •Viewing ... recorded on the tape using the USB cable (p. 156) •Viewing images recorded on the "Memory Stick" using the USB cable (p. 163, 168) •Capturing images on the computer from your camcorder using the USB cable (p. 158) •Converting an analog signal to digital to capture images ...
Main Features Recording moving pictures or still images, and playing them back •Recording moving pictures on a tape (p. 25) •Playing back a tape (p. 39) •Recording still images on a "Memory Stick" (p. 46, 109) •Recording moving pictures on a "Memory Stick" (p. 122) •Viewing ... recorded on the tape using the USB cable (p. 156) •Viewing images recorded on the "Memory Stick" using the USB cable (p. 163, 168) •Capturing images on the computer from your camcorder using the USB cable (p. 158) •Converting an analog signal to digital to capture images ...

Operating Instructions
Page 5
... •Spot Focus (p. 65) Functions for giving a natural appearance to the Network Function/ Application Operating Instructions supplied with your camcorder. (DCR-TRV70 only) (p. 171) Main Features Other uses Functions for adjusting exposure during recording •Back light (p. 34) •NightShot/...•Tape PB ZOOM/Memory PB ZOOM (p. 73, 135) •Zero set memory (p. 74) •Title search (p. 75) •Digital program editing (p. 80, 127) 5 Getting Started Main Features Accessing the Internet via a USB device (optional) that supports your camcorder (DCR-TRV70 only) ...
... •Spot Focus (p. 65) Functions for giving a natural appearance to the Network Function/ Application Operating Instructions supplied with your camcorder. (DCR-TRV70 only) (p. 171) Main Features Other uses Functions for adjusting exposure during recording •Back light (p. 34) •NightShot/...•Tape PB ZOOM/Memory PB ZOOM (p. 73, 135) •Zero set memory (p. 74) •Title search (p. 75) •Digital program editing (p. 80, 127) 5 Getting Started Main Features Accessing the Internet via a USB device (optional) that supports your camcorder (DCR-TRV70 only) ...

Operating Instructions
Page 6
... images recorded on a "Memory Making your own titles 99 Stick" during tape recording Labeling a cassette with Cassette Memory 97 Recording still images on the tape Recording - Digital program editing (on a tape 8 - Back light function 34 Shooting in Cassette Memory Adjusting the white ... 25 Shooting backlit subjects - Flexible Spot Meter 62 - Table of the recorded tape by title - Recording on a tape 80 Recording video or TV programs ....... 89 Inserting a scene from a VCR - Digital effect ... 56 Selecting the quality and size of image Using PROGRAM AE 59 ...
... images recorded on a "Memory Making your own titles 99 Stick" during tape recording Labeling a cassette with Cassette Memory 97 Recording still images on the tape Recording - Digital program editing (on a tape 8 - Back light function 34 Shooting in Cassette Memory Adjusting the white ... 25 Shooting backlit subjects - Flexible Spot Meter 62 - Table of the recorded tape by title - Recording on a tape 80 Recording video or TV programs ....... 89 Inserting a scene from a VCR - Digital effect ... 56 Selecting the quality and size of image Using PROGRAM AE 59 ...
Operating Instructions
Page 7
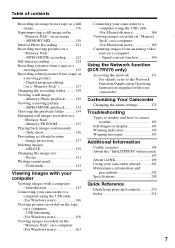
... - Introduction 143 Connecting your camcorder to a computer using the USB cable (For Windows users 146 Viewing pictures recorded on the tape on an image - Digital program editing (on a "Memory Stick" - Print mark 142 Viewing images with your camcorder abroad .......... 201 Maintenance information and...users 156 Viewing images recorded on the "Memory Stick" on a computer - Signal convert function 169 Using the Network function (DCR-TRV70 only) Accessing the network 171 For details, refer to correct trouble 183 Self-diagnosis display 191 Warning indicators 192 Warning messages...
... - Introduction 143 Connecting your camcorder to a computer using the USB cable (For Windows users 146 Viewing pictures recorded on the tape on an image - Digital program editing (on a "Memory Stick" - Print mark 142 Viewing images with your camcorder abroad .......... 201 Maintenance information and...users 156 Viewing images recorded on the "Memory Stick" on a computer - Signal convert function 169 Using the Network function (DCR-TRV70 only) Accessing the network 171 For details, refer to correct trouble 183 Self-diagnosis display 191 Warning indicators 192 Warning messages...
Operating Instructions
Page 8
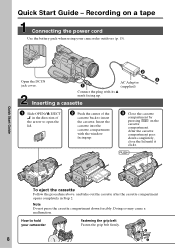
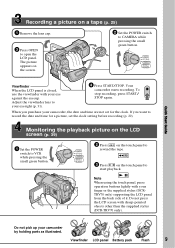
... the cassette compartment opens completely in the direction of the arrow to open the lid. 2 Push the center of the cassette back to hold your camcorder outdoors (p. 15). 2 Open the DC IN jack cover. 3 AC Adaptor 1 (supplied) Connect the plug with its v mark facing up. Doing ...cassette into the cassette compartment with the window facing up. 3 Close the cassette compartment by pressing on a tape Connecting the power cord Use the battery pack when using your camcorder Fastening the grip belt Fasten the grip belt firmly. 8 How to insert the cassette. Recording on the ...
... the cassette compartment opens completely in the direction of the arrow to open the lid. 2 Push the center of the cassette back to hold your camcorder outdoors (p. 15). 2 Open the DC IN jack cover. 3 AC Adaptor 1 (supplied) Connect the plug with its v mark facing up. Doing ...cassette into the cassette compartment with the window facing up. 3 Close the cassette compartment by pressing on a tape Connecting the power cord Use the battery pack when using your camcorder Fastening the grip belt Fasten the grip belt firmly. 8 How to insert the cassette. Recording on the ...
Operating Instructions
Page 9
... 2 Press on the touch panel to rewind the tape. 3 Press on the screen. 2 Set the POWER switch to your camcorder by holding parts as illustrated. Note When using the touch panel, press operation buttons lightly with sharp-pointed objects other than the supplied stylus (DCR-TRV70 only). The picture appears on the touch panel...
... 2 Press on the touch panel to rewind the tape. 3 Press on the screen. 2 Set the POWER switch to your camcorder by holding parts as illustrated. Note When using the touch panel, press operation buttons lightly with sharp-pointed objects other than the supplied stylus (DCR-TRV70 only). The picture appears on the touch panel...
Operating Instructions
Page 12
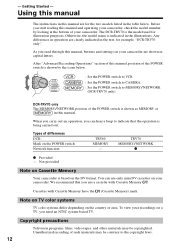
... country or area. Note on TV color systems TV color systems differ depending on your camcorder. Any differences in operation are shown in the table below . The DCR-TRV70 is based on a TV, you read through this manual, position of the POWER switch... manual. You can hear a beep to MEMORY/NETWORK (DCR-TRV70 only). Types of your camcorder are clearly indicated in the text, for the two models listed in capital letters. Copyright precautions Television programs, films, video tapes, and other materials may be copyrighted. Cassettes with Cassette Memory...
... country or area. Note on TV color systems TV color systems differ depending on your camcorder. Any differences in operation are shown in the table below . The DCR-TRV70 is based on a TV, you read through this manual, position of the POWER switch... manual. You can hear a beep to MEMORY/NETWORK (DCR-TRV70 only). Types of your camcorder are clearly indicated in the text, for the two models listed in capital letters. Copyright precautions Television programs, films, video tapes, and other materials may be copyrighted. Cassettes with Cassette Memory...


