Operating Instructions
Page 6
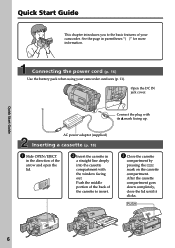
Open the DC IN jack cover. After the cassette compartment goes down completely, close the lid until it clicks. AC power adaptor (supplied) Inserting a cassette (p. 18) 1 Slide OPEN/EJECT in the direction of your camcorder outdoors (p. 11). Push the middle portion of the ...the plug with the window facing out. See the page in a straight line deeply into the cassette compartment with its v mark facing up. Connecting the power cord (p. 16) Use the battery pack when using your camcorder. Quick Start Guide 6 Quick Start Guide This chapter introduces you to insert. 3 Close the...
Open the DC IN jack cover. After the cassette compartment goes down completely, close the lid until it clicks. AC power adaptor (supplied) Inserting a cassette (p. 18) 1 Slide OPEN/EJECT in the direction of your camcorder outdoors (p. 11). Push the middle portion of the ...the plug with the window facing out. See the page in a straight line deeply into the cassette compartment with its v mark facing up. Connecting the power cord (p. 16) Use the battery pack when using your camcorder. Quick Start Guide 6 Quick Start Guide This chapter introduces you to insert. 3 Close the...
Operating Instructions
Page 10
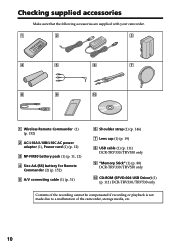
.../L10C AC power adaptor (1), Power cord (1) (p. 12) 3 NP-FM30 battery pack (1) (p. 11, 12) 4 Size AA (R6) battery for Remote Commander (2) (p. 152) 5 A/V connecting cable (1) (p. 31) 6 Shoulder strap (1) (p. 146) 7 Lens cap (1) (p. 19) 8 USB cable (1) (p. 111) DCR-TRV330/TRV530 only 9 "Memory Stick" (1) (p. 88) DCR-TRV330/TRV530 only 0 CD-ROM (SPVD-004 USB Driver) (1) (p. 111) DCR-TRV330/TRV530 only Contents of the recording cannot...
.../L10C AC power adaptor (1), Power cord (1) (p. 12) 3 NP-FM30 battery pack (1) (p. 11, 12) 4 Size AA (R6) battery for Remote Commander (2) (p. 152) 5 A/V connecting cable (1) (p. 31) 6 Shoulder strap (1) (p. 146) 7 Lens cap (1) (p. 19) 8 USB cable (1) (p. 111) DCR-TRV330/TRV530 only 9 "Memory Stick" (1) (p. 88) DCR-TRV330/TRV530 only 0 CD-ROM (SPVD-004 USB Driver) (1) (p. 111) DCR-TRV330/TRV530 only Contents of the recording cannot...
Operating Instructions
Page 12
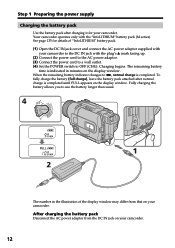
... remaining battery time is completed. Your camcorder operates only with the plug's v mark facing up. (2) Connect the power cord to the AC power adaptor. (3) Connect the power cord to a wall outlet. (4) Set the POWER switch to OFF (CHG). To fully charge the battery (full charge), leave the battery pack attached after charging it.... See page 135 for your camcorder. Charging begins. Fully charging the battery allows you to use the battery longer than usual. 4 V POWER 1 2 The number in the illustration of "InfoLITHIUM" battery pack. (1) Open the DC IN jack cover and connect the AC...
... remaining battery time is completed. Your camcorder operates only with the plug's v mark facing up. (2) Connect the power cord to the AC power adaptor. (3) Connect the power cord to a wall outlet. (4) Set the POWER switch to OFF (CHG). To fully charge the battery (full charge), leave the battery pack attached after charging it.... See page 135 for your camcorder. Charging begins. Fully charging the battery allows you to use the battery longer than usual. 4 V POWER 1 2 The number in the illustration of "InfoLITHIUM" battery pack. (1) Open the DC IN jack cover and connect the AC...

Operating Instructions
Page 16
Using a car battery Use Sony DC Adaptor/Charger (optional). 16 Notes • The AC power adaptor can supply power even if the battery pack is attached to your camcorder with the plug's v mark facing up. (2) Connect the power cord to the AC power adaptor. (3) Connect the power cord to a wall outlet. 1 2, 3 ... battery pack cannot supply any power if the power cord is connected to the DC IN jack, even when the power cord is not plugged into a wall outlet. Step 1 Preparing the power supply Connecting to a wall outlet When you power it from the AC power source (house current) as long...
Using a car battery Use Sony DC Adaptor/Charger (optional). 16 Notes • The AC power adaptor can supply power even if the battery pack is attached to your camcorder with the plug's v mark facing up. (2) Connect the power cord to the AC power adaptor. (3) Connect the power cord to a wall outlet. 1 2, 3 ... battery pack cannot supply any power if the power cord is connected to the DC IN jack, even when the power cord is not plugged into a wall outlet. Step 1 Preparing the power supply Connecting to a wall outlet When you power it from the AC power source (house current) as long...
Operating Instructions
Page 129
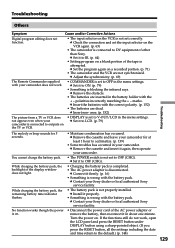
... Sony dealer or local authorized Sony service facility. • Disconnect the power cord of the display window does not light. Turn the power on. c Set it firmly. (p. 16) • Something is wrong with the battery pack. c Contact your camcorder. c Set the program again on a recorded portion... • Setting program on a blank portion of other than Sony. While charging the battery pack, the remaining battery time indicator flashes. Troubleshooting Others Symptom Cause and/or Corrective Actions Digital program editing does not function. • The input selector on ...
... Sony dealer or local authorized Sony service facility. • Disconnect the power cord of the display window does not light. Turn the power on. c Set it firmly. (p. 16) • Something is wrong with the battery pack. c Contact your camcorder. c Set the program again on a recorded portion... • Setting program on a blank portion of other than Sony. While charging the battery pack, the remaining battery time indicator flashes. Troubleshooting Others Symptom Cause and/or Corrective Actions Digital program editing does not function. • The input selector on ...

Operating Instructions
Page 130
... occurred. c Disconnect the power cord of your Sony dealer or local authorized Sony facility. c Use an "InfoLITHIUM" battery pack. (p. 135) • Moisture condensation has occurred. After reconnecting the power source, operate your Sony dealer or local authorized Sony service facility and inform them of your camcorder. This function displays the current condition of the 5-digit code. (example: E:61...
... occurred. c Disconnect the power cord of your Sony dealer or local authorized Sony facility. c Use an "InfoLITHIUM" battery pack. (p. 135) • Moisture condensation has occurred. After reconnecting the power source, operate your Sony dealer or local authorized Sony service facility and inform them of your camcorder. This function displays the current condition of the 5-digit code. (example: E:61...

Operating Instructions
Page 142
...section. We recommend turning on and operating the video camera recorder about once per month to keep it away from the wall outlet when you are : - AC power adaptor • Unplug the unit from AM receivers and video equipment. This will damage the cord and may be damaged. • Always keep... new Hi8 /Digital8 tape. • When inputting the image recorded by Hi8/standard 8 (analog) system into your computer, dub the image into a Digital8 or DV tape first, and then input it into your Sony VAIO. To disconnect the power cord, pull it out by Hi8/standard 8 system into contact with...
...section. We recommend turning on and operating the video camera recorder about once per month to keep it away from the wall outlet when you are : - AC power adaptor • Unplug the unit from AM receivers and video equipment. This will damage the cord and may be damaged. • Always keep... new Hi8 /Digital8 tape. • When inputting the image recorded by Hi8/standard 8 (analog) system into your computer, dub the image into a Digital8 or DV tape first, and then input it into your Sony VAIO. To disconnect the power cord, pull it out by Hi8/standard 8 system into contact with...
Operating Instructions
Page 145
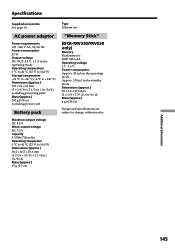
... × 39 × 62 mm (5 × 1 9/16 × 2 1/2 in. ) (w/h/d) excluding projecting parts Mass (approx.) 280 g (9.8 oz) excluding power cord Battery pack Maximun output voltage DC 8.4 V Mean output voltage DC 7.2 V Capacity 5.0 Wh (700 mAh) Operating temperatur 0 °C to 40 °C (32 °.../16 × 2 1/4 in.) (w/h/d) Mass (approx.) 65 g (2.3 oz) Type Lithium ion "Memory Stick" (DCR-TRV330/TRV530 only) Memory Flash memory 4MB: MSA-4A Operating voltage 2.7 - 3.6 V Power consumption Approx. 45 mA in the operating mode Approx. 130 µA in the standby mode Dimensions (approx.) 50 &#...
... × 39 × 62 mm (5 × 1 9/16 × 2 1/2 in. ) (w/h/d) excluding projecting parts Mass (approx.) 280 g (9.8 oz) excluding power cord Battery pack Maximun output voltage DC 8.4 V Mean output voltage DC 7.2 V Capacity 5.0 Wh (700 mAh) Operating temperatur 0 °C to 40 °C (32 °.../16 × 2 1/4 in.) (w/h/d) Mass (approx.) 65 g (2.3 oz) Type Lithium ion "Memory Stick" (DCR-TRV330/TRV530 only) Memory Flash memory 4MB: MSA-4A Operating voltage 2.7 - 3.6 V Power consumption Approx. 45 mA in the operating mode Approx. 130 µA in the standby mode Dimensions (approx.) 50 &#...


