Operating Instructions
Page 4
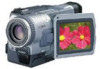
..., and playing them back • Recording a picture (p. 19) • Recording a still image on a tape (p. 33) • Playing back a tape (p. 27) • Recording still images on "Memory Stick" (p. 93) (DCR-TRV330/TRV530 only) • Viewing a still image recorded on "Memory Stick" (p. 107) (DCR-TRV330/TRV530 only) b Capturing images on your computer • Using with analog video unit and your computer (p. 74) •...
..., and playing them back • Recording a picture (p. 19) • Recording a still image on a tape (p. 33) • Playing back a tape (p. 27) • Recording still images on "Memory Stick" (p. 93) (DCR-TRV330/TRV530 only) • Viewing a still image recorded on "Memory Stick" (p. 107) (DCR-TRV330/TRV530 only) b Capturing images on your computer • Using with analog video unit and your computer (p. 74) •...
Operating Instructions
Page 5
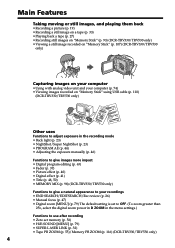
...-timer recording (DCR-TRV330/TRV530 only) ....... 25 Checking the recording - Photo save 105 Viewing a still image - Basics Recording a picture 19 Shooting backlit subjects - Tape PB ZOOM 55 Quickly locating a scene using your own titles 50 Inserting a scene 52 Editing Dubbing a tape 60 Dubbing only desired scenes - Memory PB ZOOM 116 Playing back images in a continuous loop - Digital program...
...-timer recording (DCR-TRV330/TRV530 only) ....... 25 Checking the recording - Photo save 105 Viewing a still image - Basics Recording a picture 19 Shooting backlit subjects - Tape PB ZOOM 55 Quickly locating a scene using your own titles 50 Inserting a scene 52 Editing Dubbing a tape 60 Dubbing only desired scenes - Memory PB ZOOM 116 Playing back images in a continuous loop - Digital program...
Operating Instructions
Page 7
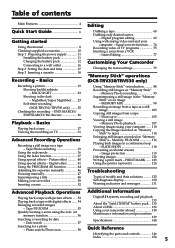
...the LCD screen (p. 27) 2 Press m to rewind the tape. The picture in the viewfinder is closed, use the viewfinder placing your eye against its eyecup. PLAY OFCFR(CHG) 1 Set the POWER switch to start playback. To stop recording, press START/STOP button again. REW 3 Press N to VCR...V POWER CAM M Note Do not pick up your camcorder, the clock setting is set the clock setting before recording (p. 17). When you want to record the date and time for a picture, set to CAMERA while pressing the small green button. V POWER OFCFR(CHG) E ERMAORY E ERMAORY CAM M Quick Start Guide ...
...the LCD screen (p. 27) 2 Press m to rewind the tape. The picture in the viewfinder is closed, use the viewfinder placing your eye against its eyecup. PLAY OFCFR(CHG) 1 Set the POWER switch to start playback. To stop recording, press START/STOP button again. REW 3 Press N to VCR...V POWER CAM M Note Do not pick up your camcorder, the clock setting is set the clock setting before recording (p. 17). When you want to record the date and time for a picture, set to CAMERA while pressing the small green button. V POWER OFCFR(CHG) E ERMAORY E ERMAORY CAM M Quick Start Guide ...
Operating Instructions
Page 8
...of such materials may be contrary to the provision of your camcorder plays back tapes recorded in the illustrations. See page 88 for example, "DCR-TRV530 only." To view your camcorder are for playback in the Digital8 system. e.g....recording of difference DCRMEMORY mark* (on a TV, you can hear a beep sound to country. When you carry out an operation, you read through this manual and operating your digital camcorder, you need an NTSC system-based TV. You, however, cannot use Hi8 /Digital8 video cassettes. Copyright precautions Television programs, films, video tapes...
...of such materials may be contrary to the provision of your camcorder plays back tapes recorded in the illustrations. See page 88 for example, "DCR-TRV530 only." To view your camcorder are for playback in the Digital8 system. e.g....recording of difference DCRMEMORY mark* (on a TV, you can hear a beep sound to country. When you carry out an operation, you read through this manual and operating your digital camcorder, you need an NTSC system-based TV. You, however, cannot use Hi8 /Digital8 video cassettes. Copyright precautions Television programs, films, video tapes...
Operating Instructions
Page 15
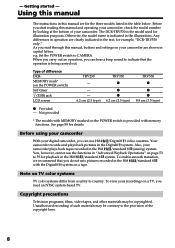
... the Hi8/standard 8 system is reduced by about 90 % of those of tapes recorded in the Digital8 system. The battery life will be shorter if you use your camcorder in a cold environment. The recording and playing times of a normally charged battery are about 20 %. 15 Getting started Step 1 Preparing the power supply ...-FM70 NP-FM90 NP-FM91 Playing time on LCD screen 75 125 265 400 465 Playing time with LCD closed 100 165 345 520 605 DCR-TRV530 Battery pack Playing time on LCD screen Playing time with LCD closed NP-FM30 (supplied) 70 100 NP-FM50 115 165 NP-FM70 245 345...
... the Hi8/standard 8 system is reduced by about 90 % of those of tapes recorded in the Digital8 system. The battery life will be shorter if you use your camcorder in a cold environment. The recording and playing times of a normally charged battery are about 20 %. 15 Getting started Step 1 Preparing the power supply ...-FM70 NP-FM90 NP-FM91 Playing time on LCD screen 75 125 265 400 465 Playing time with LCD closed 100 165 345 520 605 DCR-TRV530 Battery pack Playing time on LCD screen Playing time with LCD closed NP-FM30 (supplied) 70 100 NP-FM50 115 165 NP-FM70 245 345...
Operating Instructions
Page 17
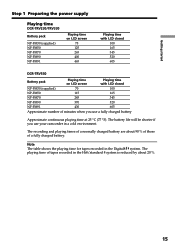
...will have been discharged (p. 141). The clock starts to move. (7) Press MENU to CAMERA/MEMORY (DCR-TRV330/TRV530 only) unless you do not set the date and time is recorded on the tape and the "Memory Stick". (DCR-TRV330/ TRV530 only) Note on the time indicator The internal clock of your camcorder operates on a ...first time. If you set the year, then the month, the day, the hour and then the minute. (1) Set the POWER switch to CAMERA or MEMORY (DCR-TRV330/TRV530 only), and then press MENU to display the menu settings. (2) Turn the SEL/PUSH EXEC dial to select , then press the dial. ...
...will have been discharged (p. 141). The clock starts to move. (7) Press MENU to CAMERA/MEMORY (DCR-TRV330/TRV530 only) unless you do not set the date and time is recorded on the tape and the "Memory Stick". (DCR-TRV330/ TRV530 only) Note on the time indicator The internal clock of your camcorder operates on a ...first time. If you set the year, then the month, the day, the hour and then the minute. (1) Set the POWER switch to CAMERA or MEMORY (DCR-TRV330/TRV530 only), and then press MENU to display the menu settings. (2) Turn the SEL/PUSH EXEC dial to select , then press the dial. ...
Operating Instructions
Page 18
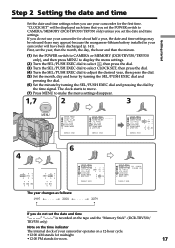
...3/4 of indicated time on Hi8 tape. •If you press any part of the arrow and open the lid. The cassette compartment automatically goes down. (5) After the cassette compartment going down . Step 3 Inserting a cassette We recommend using Hi8 /Digital8 video cassettes. (1) Prepare the power ... lifts up and opens. (3) Insert the cassette in the direction of the lid other DCR-TRV230/TRV330/TRV530). •The cassette compartment may cause malfunction. •Your camcorder records pictures in step 3. To prevent accidental erasure Slide the write-protect tab on the cassette...
...3/4 of indicated time on Hi8 tape. •If you press any part of the arrow and open the lid. The cassette compartment automatically goes down. (5) After the cassette compartment going down . Step 3 Inserting a cassette We recommend using Hi8 /Digital8 video cassettes. (1) Prepare the power ... lifts up and opens. (3) Insert the cassette in the direction of the lid other DCR-TRV230/TRV330/TRV530). •The cassette compartment may cause malfunction. •Your camcorder records pictures in step 3. To prevent accidental erasure Slide the write-protect tab on the cassette...
Operating Instructions
Page 19
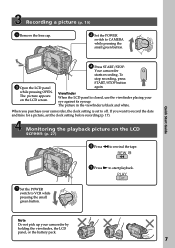
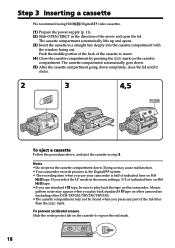
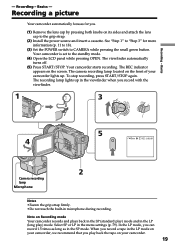
...Step 1" to "Step 3" for you play back the tape on Recording mode Your camcorder records and plays back in the SP (standard play) mode and in the LP (long play) mode. The camera recording lamp located on the screen. Recording - Basics - Your camcorder is set to the standby mode... Open the LCD panel while pressing OPEN. Your camcorder starts recording. The recording lamp lights up . In the LP mode, you record with the viewfinder. 1 3 V POWER OFCFR(CHG) E ERMAORY CAM M 5 4 40min SP REC 0:00:01 2 Camera recording lamp Microphone Notes •Fasten the grip strap firmly. &#...
...Step 1" to "Step 3" for you play back the tape on Recording mode Your camcorder records and plays back in the SP (standard play) mode and in the LP (long play) mode. The camera recording lamp located on the screen. Recording - Basics - Your camcorder is set to the standby mode... Open the LCD panel while pressing OPEN. Your camcorder starts recording. The recording lamp lights up . In the LP mode, you record with the viewfinder. 1 3 V POWER OFCFR(CHG) E ERMAORY CAM M 5 4 40min SP REC 0:00:01 2 Camera recording lamp Microphone Notes •Fasten the grip strap firmly. &#...
Operating Instructions
Page 20
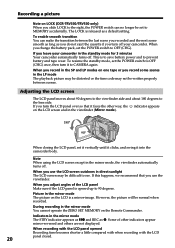
... may be set the POWER switch to OFF (CHG). When you record in the SP and LP modes on one tape or you record some scenes in the standby mode for 3 minutes Your camcorder automatically ... mirror-reversed and others are not displayed. During recording in the mirror mode The picture on the LCD is released as z. Recording a picture Note on LOCK (DCR-TRV330/TRV530 only) When you slide LOCK to the right... then turn the LCD panel over so that you leave your camcorder. When recording with the LCD panel opened up to CAMERA again. Some of the LCD panel Make sure if the LCD panel is ...
... may be set the POWER switch to OFF (CHG). When you record in the SP and LP modes on one tape or you record some scenes in the standby mode for 3 minutes Your camcorder automatically ... mirror-reversed and others are not displayed. During recording in the mirror mode The picture on the LCD is released as z. Recording a picture Note on LOCK (DCR-TRV330/TRV530 only) When you slide LOCK to the right... then turn the LCD panel over so that you leave your camcorder. When recording with the LCD panel opened up to CAMERA again. Some of the LCD panel Make sure if the LCD panel is ...
Operating Instructions
Page 22
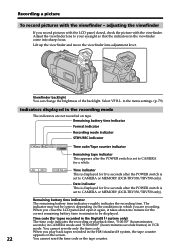
... time indicator Format indicator Recording mode indicator STBY/REC indicator 40min SP REC 0:00:01 Time code/Tape counter indicator JUL 4 2001 12:05:56 AM Remaining tape indicator This appears after the POWER switch is set to be correct, depending on the conditions in minutes to CAMERA or MEMORY (DCR-TRV330/TRV530 only). The indicator...
... time indicator Format indicator Recording mode indicator STBY/REC indicator 40min SP REC 0:00:01 Time code/Tape counter indicator JUL 4 2001 12:05:56 AM Remaining tape indicator This appears after the POWER switch is set to be correct, depending on the conditions in minutes to CAMERA or MEMORY (DCR-TRV330/TRV530 only). The indicator...
Operating Instructions
Page 26
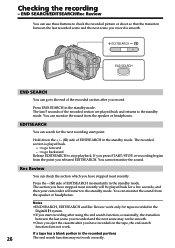
... the Digital8 system. •If you have stopped most recently. If a tape has a blank portion in the recorded portions 26 The end search function may not be played back for the next recording start recording after you released EDITSEARCH. You can check the section which you have stopped...: to go to the standby mode. The last 5 seconds of the recorded section after using the end search function, occasionally, the transition between the last recorded scene and the next scene you have recorded on the tape, the end search function does not work. Rec Review You can monitor ...
... the Digital8 system. •If you have stopped most recently. If a tape has a blank portion in the recorded portions 26 The end search function may not be played back for the next recording start recording after you released EDITSEARCH. You can check the section which you have stopped...: to go to the standby mode. The last 5 seconds of the recorded section after using the end search function, occasionally, the transition between the last recorded scene and the next scene you have recorded on the tape, the end search function does not work. Rec Review You can monitor ...
Operating Instructions
Page 27
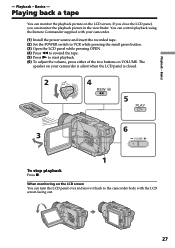
...using the Remote Commander supplied with the LCD screen facing out. 27 The speaker on your camcorder. (1) Install the power source and insert the recorded tape. (2) Set the POWER switch to VCR while pressing the small green button. (3) Open the LCD panel while pressing OPEN. (4) Press m to rewind...camcorder is silent when the LCD panel is closed. 2 V 4 OFCFR(CHG) POWER REW E ERMAORY CAM M 5 PLAY 6 3 VOLUME 1 To stop playback Press x. Playing back a tape You can turn the LCD panel over and move it back to start playback. (6) To adjust the volume, press either of the two buttons on...
...using the Remote Commander supplied with the LCD screen facing out. 27 The speaker on your camcorder. (1) Install the power source and insert the recorded tape. (2) Set the POWER switch to VCR while pressing the small green button. (3) Open the LCD panel while pressing OPEN. (4) Press m to rewind...camcorder is silent when the LCD panel is closed. 2 V 4 OFCFR(CHG) POWER REW E ERMAORY CAM M 5 PLAY 6 3 VOLUME 1 To stop playback Press x. Playing back a tape You can turn the LCD panel over and move it back to start playback. (6) To adjust the volume, press either of the two buttons on...
Operating Instructions
Page 28
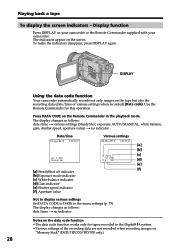
... works only for this operation. The indicators appear on "Memory Stick" (DCR-TRV330/TRV530 only). 28 Display function Press DISPLAY on the tape but also the recording data (date/time or various settings when recorded) (Data code). To make the indicators disappear, press DISPLAY again. The...Press DATA CODE on the Remote Commander in the menu settings (p. 79). Playing back a tape To display the screen indicators - Use the Remote Commander for tapes recorded in the Digital8 system. •Various settings of the recording data are not recorded when recording images on the screen.
... works only for this operation. The indicators appear on "Memory Stick" (DCR-TRV330/TRV530 only). 28 Display function Press DISPLAY on the tape but also the recording data (date/time or various settings when recorded) (Data code). To make the indicators disappear, press DISPLAY again. The...Press DATA CODE on the Remote Commander in the menu settings (p. 79). Playing back a tape To display the screen indicators - Use the Remote Commander for tapes recorded in the Digital8 system. •Various settings of the recording data are not recorded when recording images on the screen.
Operating Instructions
Page 29
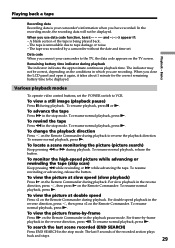
... LCD panel and open it again, it takes about 1 minute for the correct remaining battery time to tape damage or noise. - The indicator may not be displayed. When you have recorded. To locate a scene monitoring the picture (picture search) Keep pressing m or M during playback. For... the reverse direction, press c. A blank section of the recorded section plays back and stops. 29 The tape was recorded by -frame playback in which you use data code function, bars and --:--:--) appear if: - Various playback modes To operate video control buttons, set . To view the picture frame-by-...
... LCD panel and open it again, it takes about 1 minute for the correct remaining battery time to tape damage or noise. - The indicator may not be displayed. When you have recorded. To locate a scene monitoring the picture (picture search) Keep pressing m or M during playback. For... the reverse direction, press c. A blank section of the recorded section plays back and stops. 29 The tape was recorded by -frame playback in which you use data code function, bars and --:--:--) appear if: - Various playback modes To operate video control buttons, set . To view the picture frame-by-...
Operating Instructions
Page 30
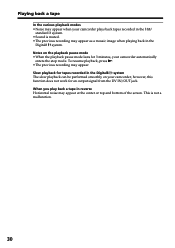
...the playback pause mode lasts for an output signal from the DV IN/OUT jack. Playing back a tape In the various playback modes • Noise may appear when your camcorder plays back tapes recorded in the Hi8/ standard 8 system. • Sound is not a malfunction. 30 This is muted.... • The previous recording may appear. To resume playback, press N. • The previous recording may appear as a mosaic image when playing back ...
...the playback pause mode lasts for an output signal from the DV IN/OUT jack. Playing back a tape In the various playback modes • Noise may appear when your camcorder plays back tapes recorded in the Hi8/ standard 8 system. • Sound is not a malfunction. 30 This is muted.... • The previous recording may appear. To resume playback, press N. • The previous recording may appear as a mosaic image when playing back ...
Operating Instructions
Page 32
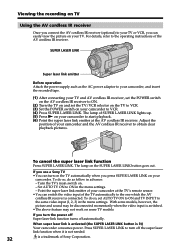
...your camcorder, and insert the recorded tape. (1) After connecting your camcorder and the AV cordless IR receiver to obtain clear playback pictures. To cancel the super laser link function Press SUPER LASER LINK. If you use a Sony TV • You can switch the video input of your camcorder at the...needed. 32 is connected. With some models, however, the picture and sound may be disconnected momentarily when the video input is lit) Your camcorder consumes power. Viewing the recording on TV Using the AV cordless IR receiver Once you connect the AV cordless IR receiver (optional) to ...
...your camcorder, and insert the recorded tape. (1) After connecting your camcorder and the AV cordless IR receiver to obtain clear playback pictures. To cancel the super laser link function Press SUPER LASER LINK. If you use a Sony TV • You can switch the video input of your camcorder at the...needed. 32 is connected. With some models, however, the picture and sound may be disconnected momentarily when the video input is lit) Your camcorder consumes power. Viewing the recording on TV Using the AV cordless IR receiver Once you connect the AV cordless IR receiver (optional) to ...
Operating Instructions
Page 33
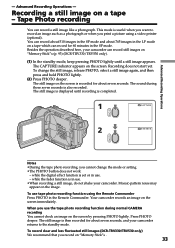
.... The still image is also recorded. while the digital effect function is useful when you use . - To use . •When recording a still image, do not shake your camcorder returns to record an image such as a photograph or when you record on a tape which can record still images on "Memory Stick"s (p. 93) (DCR-TRV330/TRV530 only). (1) In the standby mode...
.... The still image is also recorded. while the digital effect function is useful when you use . - To use . •When recording a still image, do not shake your camcorder returns to record an image such as a photograph or when you record on a tape which can record still images on "Memory Stick"s (p. 93) (DCR-TRV330/TRV530 only). (1) In the standby mode...

Operating Instructions
Page 34
...recording starts automatically. 6 PHOTO PHOTO 1,5 MENU 2-4 CAMERA SET SE L F T I MER OF F D ZOOM ON 1 6 : 9W I GHT F L A SH MODE FLASH LVL RETURN [ MENU ] : END To cancel self-timer recording Set SELFTIMER to OFF (CHG) or VCR. 34 S . L I DE S T E ADY SHOT N . Self-timer recording is automatically cancelled when: - You can record still images on a tape... - You cannot cancel the self-timer recording using the Remote Commander. DCR-TRV330/TRV530 only You can...
...recording starts automatically. 6 PHOTO PHOTO 1,5 MENU 2-4 CAMERA SET SE L F T I MER OF F D ZOOM ON 1 6 : 9W I GHT F L A SH MODE FLASH LVL RETURN [ MENU ] : END To cancel self-timer recording Set SELFTIMER to OFF (CHG) or VCR. 34 S . L I DE S T E ADY SHOT N . Self-timer recording is automatically cancelled when: - You can record still images on a tape... - You cannot cancel the self-timer recording using the Remote Commander. DCR-TRV330/TRV530 only You can...

Operating Instructions
Page 35
... the operating instructions of the video printer. 35 Connect the video printer using the video printer (optional). Tape Photo recording Printing the still image You can print a still image by using the A/V connecting cable supplied with S video input Use the S video connecting cable (optional). S VIDEO AUDIO / VIDEO Video printer LINE IN VIDEO S VIDEO : Signal flow If the video printer is equipped with your...
... the operating instructions of the video printer. 35 Connect the video printer using the video printer (optional). Tape Photo recording Printing the still image You can print a still image by using the A/V connecting cable supplied with S video input Use the S video connecting cable (optional). S VIDEO AUDIO / VIDEO Video printer LINE IN VIDEO S VIDEO : Signal flow If the video printer is equipped with your...

Operating Instructions
Page 38
... pressing START/STOP, press FADER until the indicator disappears. The fader indicator stops flashing. Tape photo recording Before operating the overlap, wipe, or dot function Your camcorder stores the image on the tape condition, the image may not be recorded clearly. Digital effect - Using the fader function (1) When fading in the Digital8 system. •You...
... pressing START/STOP, press FADER until the indicator disappears. The fader indicator stops flashing. Tape photo recording Before operating the overlap, wipe, or dot function Your camcorder stores the image on the tape condition, the image may not be recorded clearly. Digital effect - Using the fader function (1) When fading in the Digital8 system. •You...


