
Operating Instructions
Page 2
...on your authority to the following two conditions.: (1) This device may be producing home video that may call 1-800-222-SONY (United States only) For the Sony Factory Service Center nearest you may cause undesired operation. This symbol is subject to ...Sony Digital Handycam camcorder. You will soon be prohibited. This symbol is subject to persons. DISPOSE OF PROPERLY. For the Sony Service Center nearest you call : Sony Customer Information Center 1-800-222-SONY (7669) or write to the presence of Conformity Trade Name: SONY Model No.: DCR-TRV525 Responsible Party: Sony...
...on your authority to the following two conditions.: (1) This device may be producing home video that may call 1-800-222-SONY (United States only) For the Sony Factory Service Center nearest you may cause undesired operation. This symbol is subject to ...Sony Digital Handycam camcorder. You will soon be prohibited. This symbol is subject to persons. DISPOSE OF PROPERLY. For the Sony Service Center nearest you call : Sony Customer Information Center 1-800-222-SONY (7669) or write to the presence of Conformity Trade Name: SONY Model No.: DCR-TRV525 Responsible Party: Sony...
Operating Instructions
Page 4
... messages 114 Using your camcorder abroad 116 Advanced Playback Operations Playing back a tape with picture effects ..... 49 Playing back a tape with analog video unit and PC - SLIDE SHOW 95 Viewing the recording on TV 27 Advanced Recording Operations Recording a still image on... Viewing a still image - Memory Photo playback 89 Self-timer recording 22 Checking the recording - Digital effect 37 Using the PROGRAM AE function 40 Adjusting the exposure manually 42 Additional Information Digital8 system, recording and playback 102 About i.LINK 104 Changing the lithium battery in...
... messages 114 Using your camcorder abroad 116 Advanced Playback Operations Playing back a tape with picture effects ..... 49 Playing back a tape with analog video unit and PC - SLIDE SHOW 95 Viewing the recording on TV 27 Advanced Recording Operations Recording a still image on... Viewing a still image - Memory Photo playback 89 Self-timer recording 22 Checking the recording - Digital effect 37 Using the PROGRAM AE function 40 Adjusting the exposure manually 42 Additional Information Digital8 system, recording and playback 102 About i.LINK 104 Changing the lithium battery in...
Operating Instructions
Page 5
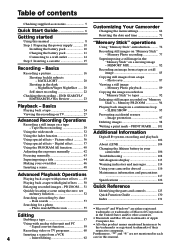
...AC power adaptor (1), Power cord (1) (p. 11) 3 NP-F330 battery pack (1) (p. 10, 11) 4 CR2025 lithium battery (1) (p. 106) The lithium battery is already installed in your camcorder. 5 Size AA (R6) battery for Remote Commander (2) (p. 128) 6 A/V connecting cable (1) (p. 27) 7 Shoulder strap (1) (p. 125) 8 Lens cap (1) (p. 16) 9... PC serial cable (1) (p. 91) 0 "Memory Stick" (1) (p. 72) qa Application software: PictureGear 4.1 Lite (CD-ROM) (1) (p. 91) Contents of the recording cannot be compensated if recording or playback is not made due to a malfunction of the camcorder, video tape, etc. 5
...AC power adaptor (1), Power cord (1) (p. 11) 3 NP-F330 battery pack (1) (p. 10, 11) 4 CR2025 lithium battery (1) (p. 106) The lithium battery is already installed in your camcorder. 5 Size AA (R6) battery for Remote Commander (2) (p. 128) 6 A/V connecting cable (1) (p. 27) 7 Shoulder strap (1) (p. 125) 8 Lens cap (1) (p. 16) 9... PC serial cable (1) (p. 91) 0 "Memory Stick" (1) (p. 72) qa Application software: PictureGear 4.1 Lite (CD-ROM) (1) (p. 91) Contents of the recording cannot be compensated if recording or playback is not made due to a malfunction of the camcorder, video tape, etc. 5

Operating Instructions
Page 6
... introduces you to the basic features of the cassette compartment. Connecting the power cord (p. 14) Use the battery pack when using your camcorder. EJECT 2 Insert a cassette into the cassette compartment with its window facing out and the write-protect tab on the cassette up ....plug with its v mark facing up . 3 Close the cassette compartment by pressing the mark on the cassette compartment. Close the lid of your camcorder outdoors (p. 10). The compartment opens automatically. Open the DC IN jack cover. AC power adaptor (supplied) Inserting a cassette (p. 15) 1 Open...
... introduces you to the basic features of the cassette compartment. Connecting the power cord (p. 14) Use the battery pack when using your camcorder. EJECT 2 Insert a cassette into the cassette compartment with its window facing out and the write-protect tab on the cassette up ....plug with its v mark facing up . 3 Close the cassette compartment by pressing the mark on the cassette compartment. Close the lid of your camcorder outdoors (p. 10). The compartment opens automatically. Open the DC IN jack cover. AC power adaptor (supplied) Inserting a cassette (p. 15) 1 Open...
Operating Instructions
Page 7
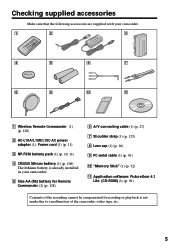
...camcorder starts recording. Viewfinder When the LCD panel is black and white (DCR-TRV520 only). REW 1 Set the POWER switch to start playback. OFF (CHARGE) VTR 3 Press N to VTR while pressing the small green button. The picture in the viewfinder is closed, use the viewfinder placing your camcorder... OFF (CHARGE) MEMORY CAMERA Quick Start Guide VTR OFF (CHARGE) MEMORY CAMERA 3 Open the LCD panel while pressing OPEN. To stop recording, press the red button again. PLAY MEMORY CAMERA Note Do not pick up your eye against its eyecup. Recording a picture (p. 16)...
...camcorder starts recording. Viewfinder When the LCD panel is black and white (DCR-TRV520 only). REW 1 Set the POWER switch to start playback. OFF (CHARGE) VTR 3 Press N to VTR while pressing the small green button. The picture in the viewfinder is closed, use the viewfinder placing your camcorder... OFF (CHARGE) MEMORY CAMERA Quick Start Guide VTR OFF (CHARGE) MEMORY CAMERA 3 Open the LCD panel while pressing OPEN. To stop recording, press the red button again. PLAY MEMORY CAMERA Note Do not pick up your eye against its eyecup. Recording a picture (p. 16)...

Operating Instructions
Page 8
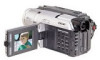
...TRV525 Color Before using your camcorder With your digital camcorder, you can hear a beep sound to indicate that you can use the functions in "Advanced Playback Operations" on a tape. Otherwise, the model name is indicated in the Digital8 system. Type of your camcorder plays back tapes recorded...example, "DCR-TRV520 only." Set the POWER switch to country. Using this manual The instructions in this manual, buttons and settings on your recordings on TV color systems TV color systems differ from country to CAMERA. You, however, cannot use Hi8 /Digital8 video cassettes. ...
...TRV525 Color Before using your camcorder With your digital camcorder, you can hear a beep sound to indicate that you can use the functions in "Advanced Playback Operations" on a tape. Otherwise, the model name is indicated in the Digital8 system. Type of your camcorder plays back tapes recorded...example, "DCR-TRV520 only." Set the POWER switch to country. Using this manual The instructions in this manual, buttons and settings on your recordings on TV color systems TV color systems differ from country to CAMERA. You, however, cannot use Hi8 /Digital8 video cassettes. ...

Operating Instructions
Page 9
... occur normally in the manufacturing process and do not affect the recorded picture in any way. The inside of pixels and/or screen are manufactured using high-precision technology. Getting started Using this malfunction cannot be repaired [a]. •Never leave your camcorder exposed to temperatures above 140°F (60°C ), such as...
... occur normally in the manufacturing process and do not affect the recorded picture in any way. The inside of pixels and/or screen are manufactured using high-precision technology. Getting started Using this malfunction cannot be repaired [a]. •Never leave your camcorder exposed to temperatures above 140°F (60°C ), such as...

Operating Instructions
Page 10
If you do so, the battery pack may slide off your camcorder unintentionally, damaging your camcorder by holding the battery pack. To remove the battery pack Slide the battery pack out in the direction of the arrow while pressing RELEASE down until it clicks. Slide the battery pack down . BATT BATT RELEASE After installing the battery pack Do not carry your camcorder. 10 Step 1 Preparing the power supply Installing the battery pack Install the battery pack to use your camcorder outdoors.
If you do so, the battery pack may slide off your camcorder unintentionally, damaging your camcorder by holding the battery pack. To remove the battery pack Slide the battery pack out in the direction of the arrow while pressing RELEASE down until it clicks. Slide the battery pack down . BATT BATT RELEASE After installing the battery pack Do not carry your camcorder. 10 Step 1 Preparing the power supply Installing the battery pack Install the battery pack to use your camcorder outdoors.
Operating Instructions
Page 11
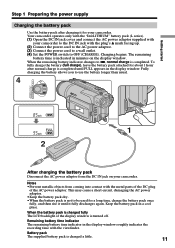
...u, normal charge is completed. Keep the battery pack in the display window roughly indicates the recording time with the viewfinder. This may cause a short-circuit, damaging the AC power adaptor.... pack once fully, and then use the battery longer than usual. 4 VTR OFF (CHARGE) MEMORY CAMERA 1 2 After charging the battery pack Disconnect the AC power adaptor from coming into contact with the ... power cord to a wall outlet. (4) Set the POWER switch to be used for your camcorder. Battery pack The supplied battery pack is indicated in the display window. Notes •Prevent ...
...u, normal charge is completed. Keep the battery pack in the display window roughly indicates the recording time with the viewfinder. This may cause a short-circuit, damaging the AC power adaptor.... pack once fully, and then use the battery longer than usual. 4 VTR OFF (CHARGE) MEMORY CAMERA 1 2 After charging the battery pack Disconnect the AC power adaptor from coming into contact with the ... power cord to a wall outlet. (4) Set the POWER switch to be used for your camcorder. Battery pack The supplied battery pack is indicated in the display window. Notes •Prevent ...
Operating Instructions
Page 12
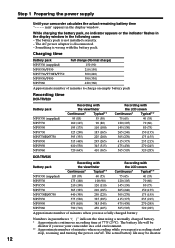
The battery life will be shorter. 12 Step 1 Preparing the power supply Until your camcorder in a cold environment. ** Approximate number of minutes when you use your camcorder calculates the actual remaining battery time "- - - - While charging the battery pack, no indicator appears ...) 305 (270) 175 (155) 415 (375) 235 (215) 475 (430) 270 (245) 565 (505) 320 (285) DCR-TRV525 Battery pack Recording with the viewfinder Recording with the battery pack. min" appears in the following cases: - The battery pack is wrong with the LCD screen Continuous* Typical** ...
The battery life will be shorter. 12 Step 1 Preparing the power supply Until your camcorder in a cold environment. ** Approximate number of minutes when you use your camcorder calculates the actual remaining battery time "- - - - While charging the battery pack, no indicator appears ...) 305 (270) 175 (155) 415 (375) 235 (215) 475 (430) 270 (245) 565 (505) 320 (285) DCR-TRV525 Battery pack Recording with the viewfinder Recording with the battery pack. min" appears in the following cases: - The battery pack is wrong with the LCD screen Continuous* Typical** ...

Operating Instructions
Page 13
... (140) 190 (170) 315 (285) 385 (345) 495 (450) 590 (530) 700 (630) DCR-TRV525 Battery pack Playing time on LCD screen Playing time with LCD closed NP-F330 (supplied) 70 (65) 100 ...F950 465 (420) 650 (590) NP-F960 550 (495) 765 (685) Approximate number of Sony Corporation. 13 The battery life will be correct, depending on the conditions in which can exchange ...The indicator may not be shorter if you are recording. The "InfoLITHIUM" is compatible with the "InfoLITHIUM" battery pack (L series). When you use your camcorder in parentheses "( )" indicate the time using a ...
... (140) 190 (170) 315 (285) 385 (345) 495 (450) 590 (530) 700 (630) DCR-TRV525 Battery pack Playing time on LCD screen Playing time with LCD closed NP-F330 (supplied) 70 (65) 100 ...F950 465 (420) 650 (590) NP-F960 550 (495) 765 (685) Approximate number of Sony Corporation. 13 The battery life will be correct, depending on the conditions in which can exchange ...The indicator may not be shorter if you are recording. The "InfoLITHIUM" is compatible with the "InfoLITHIUM" battery pack (L series). When you use your camcorder in parentheses "( )" indicate the time using a ...

Operating Instructions
Page 14
This means that you use your camcorder for a long time, we recommend that the battery pack cannot supply any power if the power cord is connected to the DC IN jack, even when the power cord is not plugged into a wall outlet. Using a car battery Use Sony DC Adaptor/Charger (not supplied). ...14 Notes • The AC power adaptor can supply power even if the battery pack is attached to your camcorder. • The DC IN jack has "source priority". Step 1 Preparing the power ...
This means that you use your camcorder for a long time, we recommend that the battery pack cannot supply any power if the power cord is connected to the DC IN jack, even when the power cord is not plugged into a wall outlet. Using a car battery Use Sony DC Adaptor/Charger (not supplied). ...14 Notes • The AC power adaptor can supply power even if the battery pack is attached to your camcorder. • The DC IN jack has "source priority". Step 1 Preparing the power ...
Operating Instructions
Page 15
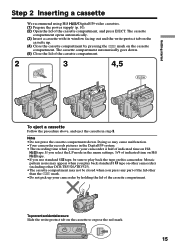
.... (5) Close the lid of the lid other DCR-TRV520/TRV525). •The cassette compartment may not be sure to expose the red mark. 15 To prevent accidental erasure Slide the write-protect tab on other camcorders (including other than the mark. •Do not... cassette compartment, and press EJECT. Getting started Step 2 Inserting a cassette We recommend using Hi8 /Digital8 video cassettes. (1) Prepare the power supply (p. 10). (2) Open the lid of the cassette compartment. Mosaic pattern noise may cause malfunction. •Your camcorder records pictures in step 3.
.... (5) Close the lid of the lid other DCR-TRV520/TRV525). •The cassette compartment may not be sure to expose the red mark. 15 To prevent accidental erasure Slide the write-protect tab on other camcorders (including other than the mark. •Do not... cassette compartment, and press EJECT. Getting started Step 2 Inserting a cassette We recommend using Hi8 /Digital8 video cassettes. (1) Prepare the power supply (p. 10). (2) Open the lid of the cassette compartment. Mosaic pattern noise may cause malfunction. •Your camcorder records pictures in step 3.
Operating Instructions
Page 16
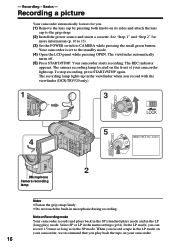
Your camcorder starts recording. In the LP mode, you record with the viewfinder (DCR-TRV520 only). 1 3 VTR OFF (CHARGE) MEMORY CAMERA VTR OFF (CHARGE) MEMORY CAMERA 5 40min SP REC 0:00:01 4 2 Microphone Camera recording lamp Notes •Fasten the grip strap firmly. •Do not touch the built-in the LP (long play back the tape on the front...
Your camcorder starts recording. In the LP mode, you record with the viewfinder (DCR-TRV520 only). 1 3 VTR OFF (CHARGE) MEMORY CAMERA VTR OFF (CHARGE) MEMORY CAMERA 5 40min SP REC 0:00:01 4 2 Microphone Camera recording lamp Notes •Fasten the grip strap firmly. •Do not touch the built-in the LP (long play back the tape on the front...
Operating Instructions
Page 17
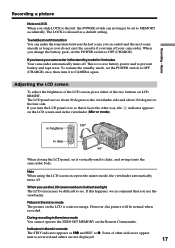
...degrees to the viewfinder side and about 180 degrees to CAMERA again. If you turn off your camcorder in the mirror mode, the viewfinder automatically turns off . Note When using the LCD screen except in the standby mode for 3 minutes Your camcorder automatically turns off . Some of the two buttons ...left, the POWER switch can make the transition between the last scene you use the viewfinder. When you recorded and the next scene smooth as long as z. When you leave your camcorder. If you change the battery pack, set it vertically until it clicks, and swing it to the lens...
...degrees to the viewfinder side and about 180 degrees to CAMERA again. If you turn off your camcorder in the mirror mode, the viewfinder automatically turns off . Note When using the LCD screen except in the standby mode for 3 minutes Your camcorder automatically turns off . Some of the two buttons ...left, the POWER switch can make the transition between the last scene you use the viewfinder. When you recorded and the next scene smooth as long as z. When you leave your camcorder. If you change the battery pack, set it vertically until it clicks, and swing it to the lens...
Operating Instructions
Page 20
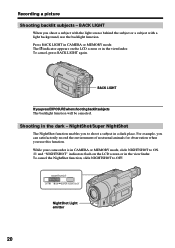
... example, you can satisfactorily record the environment of nocturnal animals for observation when you shoot a subject with the light source behind the subject or a subject with a light background, use this function. While your camcorder is in the viewfinder. and "NIGHTSHOT" indicators flash on the LCD screen or in CAMERA or MEMORY mode, slide...
... example, you can satisfactorily record the environment of nocturnal animals for observation when you shoot a subject with the light source behind the subject or a subject with a light background, use this function. While your camcorder is in the viewfinder. and "NIGHTSHOT" indicators flash on the LCD screen or in CAMERA or MEMORY mode, slide...
Operating Instructions
Page 21
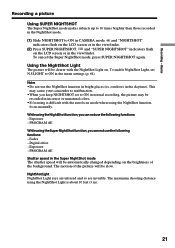
...the NightShot function, you keep NIGHTSHOT set N.S.LIGHT to ON in the viewfinder. To enable NightShot Light, set to ON in CAMERA mode. While using the NightShot Light is difficult with the NightShot Light on the brightness of the picture will be clearer with the...NightShot function, you can not use the following functions: - NightShot Light NightShot Light rays are infrared and so are invisible. Digital effect - Recording - This may cause your camcorder to ON in the menu settings (p. 64). Exposure - and "SUPER NIGHTSHOT" indicators flash on the LCD screen or in...
...the NightShot function, you keep NIGHTSHOT set N.S.LIGHT to ON in the viewfinder. To enable NightShot Light, set to ON in CAMERA mode. While using the NightShot Light is difficult with the NightShot Light on the brightness of the picture will be clearer with the...NightShot function, you can not use the following functions: - NightShot Light NightShot Light rays are infrared and so are invisible. Digital effect - Recording - This may cause your camcorder to ON in the menu settings (p. 64). Exposure - and "SUPER NIGHTSHOT" indicators flash on the LCD screen or in...
Operating Instructions
Page 22
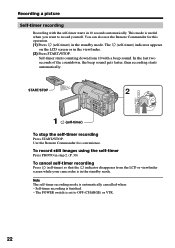
...LCD screen or in 10 seconds automatically. Self-timer starts counting down from the LCD or viewfinder screen while your camcorder is automatically cancelled when: - To record still images using the self-timer Press PHOTO in the standby mode. In the last two seconds of the countdown..., the beep sound gets faster, then recording starts automatically. START/STOP 2 VTR OFF (CHARGE) MEMORY CAMERA 1 (self-timer) To stop the self-timer recording Press START/STOP. This mode is finished. - Self-timer recording is useful when you want to OFF (CHARGE) or VTR....
...LCD screen or in 10 seconds automatically. Self-timer starts counting down from the LCD or viewfinder screen while your camcorder is automatically cancelled when: - To record still images using the self-timer Press PHOTO in the standby mode. In the last two seconds of the countdown..., the beep sound gets faster, then recording starts automatically. START/STOP 2 VTR OFF (CHARGE) MEMORY CAMERA 1 (self-timer) To stop the self-timer recording Press START/STOP. This mode is finished. - Self-timer recording is useful when you want to OFF (CHARGE) or VTR....

Operating Instructions
Page 23
...the standby mode. EDITSEARCH You can go backward Release EDITSEARCH to stop playback. The section you recorded and the next scene may not work only for a few seconds, and then your camcorder will be smooth. •Once you eject the cassette after you released EDITSEARCH. You cannot ...monitor the sound. Checking the recording - EDIT SEARCH END SEARCH Recording - You can monitor the sound from the point you have ...
...the standby mode. EDITSEARCH You can go backward Release EDITSEARCH to stop playback. The section you recorded and the next scene may not work only for a few seconds, and then your camcorder will be smooth. •Once you eject the cassette after you released EDITSEARCH. You cannot ...monitor the sound. Checking the recording - EDIT SEARCH END SEARCH Recording - You can monitor the sound from the point you have ...
Operating Instructions
Page 24
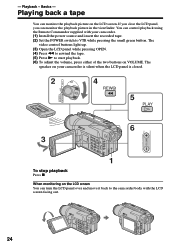
... insert the recorded tape. (2) Set the POWER switch to VTR while pressing the small green button. The video control buttons light up. (3) Open the LCD panel while pressing OPEN. (4) Press m to rewind the tape. (5) Press N to the camcorder body with your camcorder is silent when the LCD panel is closed. 2 VTR 4 REW OFF CAMERA MEMORY...
... insert the recorded tape. (2) Set the POWER switch to VTR while pressing the small green button. The video control buttons light up. (3) Open the LCD panel while pressing OPEN. (4) Press m to rewind the tape. (5) Press N to the camcorder body with your camcorder is silent when the LCD panel is closed. 2 VTR 4 REW OFF CAMERA MEMORY...


