Operating Instructions
Page 1
Serial No. DCR-TRV Model No. DCR-TRV520 DCR-TRV520/TRV525 ©2000 Sony Corporation Owner's Record The model and serial numbers are located on the bottom. Model No. Serial No. Record the serial number in the space provided below. AC- Refer to these numbers whenever you call upon your Sony dealer regarding this manual thoroughly, and retain it for future reference. 3-059-561-11 (2) Digital Video Camera Recorder Operating Instructions Before operating the unit, please read this product.
Serial No. DCR-TRV Model No. DCR-TRV520 DCR-TRV520/TRV525 ©2000 Sony Corporation Owner's Record The model and serial numbers are located on the bottom. Model No. Serial No. Record the serial number in the space provided below. AC- Refer to these numbers whenever you call upon your Sony dealer regarding this manual thoroughly, and retain it for future reference. 3-059-561-11 (2) Digital Video Camera Recorder Operating Instructions Before operating the unit, please read this product.
Operating Instructions
Page 4
... a cassette 15 Recording - Memory PB ZOOM 94 Playing back images in the dark - Digital effect 37 Using the PROGRAM AE function 40 Adjusting the exposure manually 42 Additional Information Digital8 system, recording and playback 102 About i.LINK 104 Changing the lithium battery in each 4 - Table of contents Checking supplied accessories 5 Quick Start Guide 6 Customizing Your Camcorder Changing the menu settings 64 Getting started Resetting the date and time 71 Using this manual. END SEARCH / EDITSEARCH / Rec Review 23 Playback - Picture effect...
... a cassette 15 Recording - Memory PB ZOOM 94 Playing back images in the dark - Digital effect 37 Using the PROGRAM AE function 40 Adjusting the exposure manually 42 Additional Information Digital8 system, recording and playback 102 About i.LINK 104 Changing the lithium battery in each 4 - Table of contents Checking supplied accessories 5 Quick Start Guide 6 Customizing Your Camcorder Changing the menu settings 64 Getting started Resetting the date and time 71 Using this manual. END SEARCH / EDITSEARCH / Rec Review 23 Playback - Picture effect...
Operating Instructions
Page 7
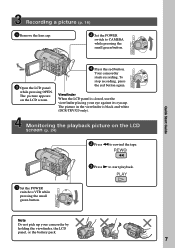
..., use the viewfinder placing your camcorder by holding the viewfinder, the LCD panel, or the battery pack. 7 REW 1 Set the POWER switch to start playback. Viewfinder When the LCD panel is black and white (DCR-TRV520 only). The picture appears on the LCD screen (p. 24) 2 Press m to CAMERA while pressing the small green button. VTR OFF (CHARGE) MEMORY CAMERA Quick Start Guide VTR OFF (CHARGE) MEMORY CAMERA 3 Open the LCD panel while pressing OPEN. Monitoring the playback picture on the LCD screen. 4 Press...
..., use the viewfinder placing your camcorder by holding the viewfinder, the LCD panel, or the battery pack. 7 REW 1 Set the POWER switch to start playback. Viewfinder When the LCD panel is black and white (DCR-TRV520 only). The picture appears on the LCD screen (p. 24) 2 Press m to CAMERA while pressing the small green button. VTR OFF (CHARGE) MEMORY CAMERA Quick Start Guide VTR OFF (CHARGE) MEMORY CAMERA 3 Open the LCD panel while pressing OPEN. Monitoring the playback picture on the LCD screen. 4 Press...

Operating Instructions
Page 8
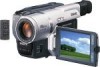
The DCR-TRV520 is the model used for example, "DCR-TRV520 only." e.g. Your camcorder records and plays back pictures in the Hi8 /standard 8 system. To view your digital camcorder, you can hear a beep sound to indicate that you can use the functions in capital letters. - Set the POWER switch to country. To enable smooth transition, we recommend that the operation is indicated in the table below. Otherwise, the model name is being...
The DCR-TRV520 is the model used for example, "DCR-TRV520 only." e.g. Your camcorder records and plays back pictures in the Hi8 /standard 8 system. To view your digital camcorder, you can hear a beep sound to indicate that you can use the functions in capital letters. - Set the POWER switch to country. To enable smooth transition, we recommend that the operation is indicated in the table below. Otherwise, the model name is being...
Operating Instructions
Page 15
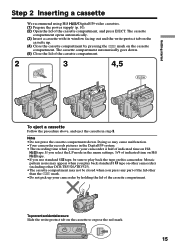
... holding the lid of the cassette compartment. 2 3 4,5 EJECT To eject a cassette Follow the procedure above, and eject the cassette in the Digital8 system. • The recording time when you use standard 8 tape, be closed when you play back the tape on the cassette to play back standard 8 tape on other camcorders (including other DCR-TRV520/TRV525). •The cassette compartment may cause malfunction. •Your camcorder records pictures in step 3. To prevent...
... holding the lid of the cassette compartment. 2 3 4,5 EJECT To eject a cassette Follow the procedure above, and eject the cassette in the Digital8 system. • The recording time when you use standard 8 tape, be closed when you play back the tape on the cassette to play back standard 8 tape on other camcorders (including other DCR-TRV520/TRV525). •The cassette compartment may cause malfunction. •Your camcorder records pictures in step 3. To prevent...
Operating Instructions
Page 17
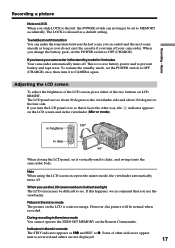
... recorded. When you change the battery pack, set the POWER switch to prevent battery and tape wear. If you turn the LCD panel over so that you use the LCD screen outdoors in the mirror mode The STBY indicator appears as Xz and REC as you do not eject the cassette if you use the viewfinder. Indicators in direct sunlight The LCD screen may be difficult to CAMERA again. This is to save battery power...
... recorded. When you change the battery pack, set the POWER switch to prevent battery and tape wear. If you turn the LCD panel over so that you use the LCD screen outdoors in the mirror mode The STBY indicator appears as Xz and REC as you do not eject the cassette if you use the viewfinder. Indicators in direct sunlight The LCD screen may be difficult to CAMERA again. This is to save battery power...
Operating Instructions
Page 19
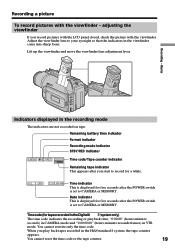
Adjust the viewfinder lens to CAMERA or MEMORY. JUL 4 2000 12:05:56 AM Time indicator This is displayed for a while. You cannot reset the time code or the tape counter. 19 Lift up the viewfinder and move the viewfinder lens adjustment lever. Remaining battery time indicator Format indicator Recording mode indicator STBY/REC indicator 40min SP REC 0:00:01 Time code/Tape counter indicator Remaining tape indicator This appears after the POWER switch is set to...
Adjust the viewfinder lens to CAMERA or MEMORY. JUL 4 2000 12:05:56 AM Time indicator This is displayed for a while. You cannot reset the time code or the tape counter. 19 Lift up the viewfinder and move the viewfinder lens adjustment lever. Remaining battery time indicator Format indicator Recording mode indicator STBY/REC indicator 40min SP REC 0:00:01 Time code/Tape counter indicator Remaining tape indicator This appears after the POWER switch is set to...
Operating Instructions
Page 27
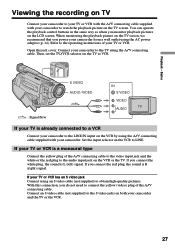
... LCD screen. If your camcorder. Connect an S video cable (not supplied) to LINE. You can operate the playback control buttons in the same way as when you power your camcorder from a wall outlet using the A/V connecting cable supplied with your camcorder to watch the playback picture on the VCR by using the AC power adaptor (p. 14). Open the jack cover. If you connect the white plug, the sound is a monaural type Connect the yellow plug of the A/V connecting cable to the video input...
... LCD screen. If your camcorder. Connect an S video cable (not supplied) to LINE. You can operate the playback control buttons in the same way as when you power your camcorder from a wall outlet using the A/V connecting cable supplied with your camcorder to watch the playback picture on the VCR by using the AC power adaptor (p. 14). Open the jack cover. If you connect the white plug, the sound is a monaural type Connect the yellow plug of the A/V connecting cable to the video input...
Operating Instructions
Page 28
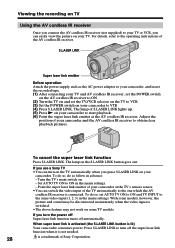
... same video input (1, 2, 3) in the menu settings. To cancel the super laser link function Press S.LASER LINK. The lamp on some TV models. Turn the TV's main switch on your camcorder. To do as the AC power adaptor to your camcorder, and insert the recorded tape. (1) After connecting your camcorder and the AV cordless IR receiver to turn off automatically. Press S.LASER LINK to obtain clear playback pictures. Set AUTO...
... same video input (1, 2, 3) in the menu settings. To cancel the super laser link function Press S.LASER LINK. The lamp on some TV models. Turn the TV's main switch on your camcorder. To do as the AC power adaptor to your camcorder, and insert the recorded tape. (1) After connecting your camcorder and the AV cordless IR receiver to turn off automatically. Press S.LASER LINK to obtain clear playback pictures. Set AUTO...
Operating Instructions
Page 29
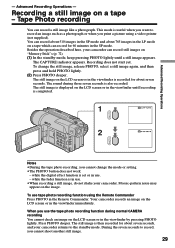
... use tape photo recording function using a video printer (not supplied). Advanced Recording Operations - Tape Photo recording You can record still images on a tape - Mosaic-pattern noise may appear on a tape which can record about 510 images in the SP mode and about 765 images in the Remote Commander. Advanced Recording Operations - Recording a still image on "Memory Stick"s (p. 72). (1) In the standby mode, keep pressing PHOTO lightly until a still image appears. To change the mode or setting. •The PHOTO button does not work: - The still image on the LCD screen...
... use tape photo recording function using a video printer (not supplied). Advanced Recording Operations - Tape Photo recording You can record still images on a tape - Mosaic-pattern noise may appear on a tape which can record about 510 images in the SP mode and about 765 images in the Remote Commander. Advanced Recording Operations - Recording a still image on "Memory Stick"s (p. 72). (1) In the standby mode, keep pressing PHOTO lightly until a still image appears. To change the mode or setting. •The PHOTO button does not work: - The still image on the LCD screen...
Operating Instructions
Page 32
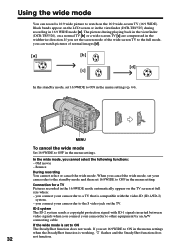
... (DCR-TRV525) during playing back in the viewfinder (DCR-TRV520), on the TV screen at full size when: - In the wide mode, you set to ON in the menu settings. Connection for a TV Pictures recorded in 16:9 WIDE mode [a]. If the wide mode is set 16:9WIDE to other equipment by an A/V connecting cable. When you cancel the wide mode, set your camcorder to ON in the menu settings when the SteadyShot function is compatible...
... (DCR-TRV525) during playing back in the viewfinder (DCR-TRV520), on the TV screen at full size when: - In the wide mode, you set to ON in the menu settings. Connection for a TV Pictures recorded in 16:9 WIDE mode [a]. If the wide mode is set 16:9WIDE to other equipment by an A/V connecting cable. When you cancel the wide mode, set your camcorder to ON in the menu settings when the SteadyShot function is compatible...
Operating Instructions
Page 65
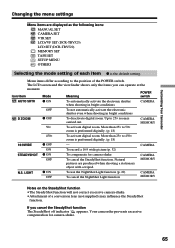
... activate digital zoom. Natural pictures are displayed as the following icons: MANUAL SET CAMERA SET VTR SET LCD/VF SET (DCR-TRV525) LCD SET (DCR-TRV520) MEMORY SET TAPE SET SETUP MENU OTHERS Selecting the mode setting of a conversion lens (not supplied) may influence the SteadyShot function. Up to 450× zoom is the default setting. More than 25× to the position of the POWER switch. CAMERA MEMORY N.S. Your camcorder prevents excessive compensation for camera-shake To cancel the SteadyShot function. POWER Icon/item Mode Meaning switch AUTO...
... activate digital zoom. Natural pictures are displayed as the following icons: MANUAL SET CAMERA SET VTR SET LCD/VF SET (DCR-TRV525) LCD SET (DCR-TRV520) MEMORY SET TAPE SET SETUP MENU OTHERS Selecting the mode setting of a conversion lens (not supplied) may influence the SteadyShot function. Up to 450× zoom is the default setting. More than 25× to the position of the POWER switch. CAMERA MEMORY N.S. Your camcorder prevents excessive compensation for camera-shake To cancel the SteadyShot function. POWER Icon/item Mode Meaning switch AUTO...
Operating Instructions
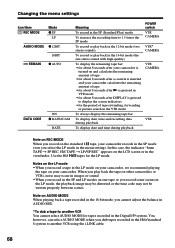
Page 68
... VTR mode To always display the remaining tape bar To display date, time and recording data during playback To display date and time during playback POWER switch VTR CAMERA VTR* CAMERA VTR CAMERA VTR Note on REC MODE When you record on the LCD screen or in the Hi8/standard 8 system to another VCR You cannot select AUDIO MODE for the LP mode. You, however, can select AUDIO MODE when you select the LP mode in the menu settings. When you play back...
... VTR mode To always display the remaining tape bar To display date, time and recording data during playback To display date and time during playback POWER switch VTR CAMERA VTR* CAMERA VTR CAMERA VTR Note on REC MODE When you record on the LCD screen or in the Hi8/standard 8 system to another VCR You cannot select AUDIO MODE for the LP mode. You, however, can select AUDIO MODE when you select the LP mode in the menu settings. When you play back...
Operating Instructions
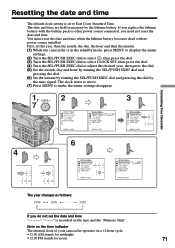
Page 71
.... (1) While the camcorder is in memory by the time signal. Note on the time indicator The internal clock of your camcorder operates on the tape and the "Memory Stick". If you replace the lithium battery with no power source installed. You must reset the date and time when the lithium battery becomes dead with the battery pack or other power source connected, you do not set the date and time is recorded on a 12-hour...
.... (1) While the camcorder is in memory by the time signal. Note on the time indicator The internal clock of your camcorder operates on the tape and the "Memory Stick". If you replace the lithium battery with no power source installed. You must reset the date and time when the lithium battery becomes dead with the battery pack or other power source connected, you do not set the date and time is recorded on a 12-hour...
Operating Instructions
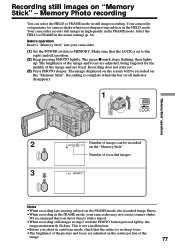
Page 77
... disappears. 1 "Memory Stick" operations VTR OFF (CHARGE) MEMORY CAMERA 2 FINE 21 / 40 Number of images can select the FIELD or FRAME mode in sharp focus. •The brightness of the image. 77 Recording is set to MEMORY. The image displayed on the screen will be recorded on the center portion of the picture and focus are fixed. Recording does not start yet. (3) Press PHOTO deeper. This is in still image recording. Recording still images on the "Memory Stick". Select...
... disappears. 1 "Memory Stick" operations VTR OFF (CHARGE) MEMORY CAMERA 2 FINE 21 / 40 Number of images can select the FIELD or FRAME mode in sharp focus. •The brightness of the image. 77 Recording is set to MEMORY. The image displayed on the screen will be recorded on the center portion of the picture and focus are fixed. Recording does not start yet. (3) Press PHOTO deeper. This is in still image recording. Recording still images on the "Memory Stick". Select...
Operating Instructions
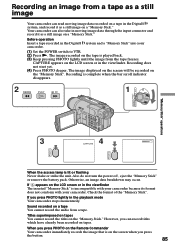
Page 85
... playback mode Your camcorder stops momentarily. Recording does not start yet. (4) Press PHOTO deeper. The image displayed on the screen will be recorded on the "Memory Stick." Otherwise, an image data breakdown may occur. Sound recorded on tapes. If appears on the LCD screen or in the Digital8 system and a "Memory Stick" into your camcorder. However, you can record titles which have already been recorded on a tape You cannot record the audio from a tape. VTR 2 REW PLAY FF 1 OFF (CHARGE) "Memory Stick" operations MEMORY CAMERA 3 4 CAPTURE PHOTO PHOTO...
... playback mode Your camcorder stops momentarily. Recording does not start yet. (4) Press PHOTO deeper. The image displayed on the screen will be recorded on the "Memory Stick." Otherwise, an image data breakdown may occur. Sound recorded on tapes. If appears on the LCD screen or in the Digital8 system and a "Memory Stick" into your camcorder. However, you can record titles which have already been recorded on a tape You cannot record the audio from a tape. VTR 2 REW PLAY FF 1 OFF (CHARGE) "Memory Stick" operations MEMORY CAMERA 3 4 CAPTURE PHOTO PHOTO...

Operating Instructions
Page 109
... screen. • Slow shutter, low lux or Super NightShot mode is not a malfunction. c Set it to AUTO. (p. 64) The tape which is recorded in the • PB MODE is set to / in the menu setting. (P. 64) Additional Information In the playback mode Symptom Cause and/or Corrective Actions The tape does not move when a video control button is pressed. • The POWER switch is set to OFF in the menu settings. c Clean the heads using the Sony...
... screen. • Slow shutter, low lux or Super NightShot mode is not a malfunction. c Set it to AUTO. (p. 64) The tape which is recorded in the • PB MODE is set to / in the menu setting. (P. 64) Additional Information In the playback mode Symptom Cause and/or Corrective Actions The tape does not move when a video control button is pressed. • The POWER switch is set to OFF in the menu settings. c Clean the heads using the Sony...
Operating Instructions
Page 122
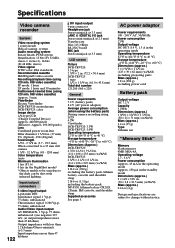
... power adaptor) Average power consumption (when using the battery pack) During camera recording using LCD 4.2W Viewfinder DCR-TRV520: 3.3W DCR-TRV525: 3.0W Operating temperature 32 °F to 104 °F (0 °C to 40 °C) Storage temperature -4 °F to +140 °F (-20 °C to change without notice. Viewfinder Electric Viewfinder DCR-TRV520: monochrome DCR-TRV525: color Image device 1/4 type CCD (Charge Coupled Device) Approx. 460,000 pixels (Effective: Approx. 290,000 pixels) Lens Combined power zoom lens Filter...
... power adaptor) Average power consumption (when using the battery pack) During camera recording using LCD 4.2W Viewfinder DCR-TRV520: 3.3W DCR-TRV525: 3.0W Operating temperature 32 °F to 104 °F (0 °C to 40 °C) Storage temperature -4 °F to +140 °F (-20 °C to change without notice. Viewfinder Electric Viewfinder DCR-TRV520: monochrome DCR-TRV525: color Image device 1/4 type CCD (Charge Coupled Device) Approx. 460,000 pixels (Effective: Approx. 290,000 pixels) Lens Combined power zoom lens Filter...
Operating Instructions
Page 129
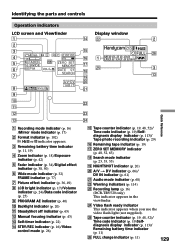
... the parts and controls Operation indicators LCD screen and Viewfinder Display window 1 qf ws 2 2 3 qg 4 40min SP REC 0:00:00 W T qh 1 wh 5 M.FADER 16:9WIDE 6 SEPIA 7 ZERO SET MEMORY qj wg DATE 01 SEARCH qk ql 3 qd A/V DV w; 16B I T 8 wa 9 0 ws qa qs wd qd wf Quick Reference 1 Recording mode indicator (p. 16) /Mirror mode indicator (p. 17) 2 Format indicator (p. 102) , or indicator appears. 3 Remaining battery time indicator (p. 11, 19) 4 Zoom...
... the parts and controls Operation indicators LCD screen and Viewfinder Display window 1 qf ws 2 2 3 qg 4 40min SP REC 0:00:00 W T qh 1 wh 5 M.FADER 16:9WIDE 6 SEPIA 7 ZERO SET MEMORY qj wg DATE 01 SEARCH qk ql 3 qd A/V DV w; 16B I T 8 wa 9 0 ws qa qs wd qd wf Quick Reference 1 Recording mode indicator (p. 16) /Mirror mode indicator (p. 17) 2 Format indicator (p. 102) , or indicator appears. 3 Remaining battery time indicator (p. 11, 19) 4 Zoom...
Operating Instructions
Page 131
... Normal charge 11 NTSC system 116 O, P, Q OLD MOVIE 37 Operation indicators 129 OVERLAP 33 PB ZOOM 51, 94 PC serial cable 91 Photo scan 56 Photo search 55 PICTURE EFFECT 36, 49 Picture search 26 Playback pause 26 Power sources (battery pack 10 (house current 14 (car battery 14 Print mark 101 PROGRAM AE 40 R Recording time 12 Rec Review 23 Remaining battery time indicator 19 Remaining tape indicator ...... 19 Remote Commander 128 Remote control jack...
... Normal charge 11 NTSC system 116 O, P, Q OLD MOVIE 37 Operation indicators 129 OVERLAP 33 PB ZOOM 51, 94 PC serial cable 91 Photo scan 56 Photo search 55 PICTURE EFFECT 36, 49 Picture search 26 Playback pause 26 Power sources (battery pack 10 (house current 14 (car battery 14 Print mark 101 PROGRAM AE 40 R Recording time 12 Rec Review 23 Remaining battery time indicator 19 Remaining tape indicator ...... 19 Remote Commander 128 Remote control jack...


