PIXELA ImageMixer v1.5 Instruction Manual
Page 234
... drive has a slow transfer speed (e.g., if it is too high. At this time, set to Video mode. 2. Select the speed for writing to the disk may not work properly if the speed setting is connected through a USB cable. Click the "Start" button. Introduction Chapter 1 Before Use Chapter 2 Capture Environment Chapter 3 Album Environment...
... drive has a slow transfer speed (e.g., if it is too high. At this time, set to Video mode. 2. Select the speed for writing to the disk may not work properly if the speed setting is connected through a USB cable. Click the "Start" button. Introduction Chapter 1 Before Use Chapter 2 Capture Environment Chapter 3 Album Environment...

Operating Instructions (primary manual)
Page 2
...for years to the presence of uninsulated "dangerous voltage" within the product's enclosure that may be producing home video that you . Operation is intended to alert the user to come. You will soon be of sufficient magnitude ...device must accept any interference received, including interference that may not cause harmful interference, and (2) this Sony Handycam. This Class B digital apparatus complies with Part 15 of rechargeable batteries, call toll free 1-800-8228837, or visit http://www...(fail), restart the application or disconnect and connect the USB cable again. 2
...for years to the presence of uninsulated "dangerous voltage" within the product's enclosure that may be producing home video that you . Operation is intended to alert the user to come. You will soon be of sufficient magnitude ...device must accept any interference received, including interference that may not cause harmful interference, and (2) this Sony Handycam. This Class B digital apparatus complies with Part 15 of rechargeable batteries, call toll free 1-800-8228837, or visit http://www...(fail), restart the application or disconnect and connect the USB cable again. 2
Operating Instructions (primary manual)
Page 7
...Viewing a still image - Digital program editing (on "Memory Stick" - Resize 135 Writing a print mark - Introduction 137 Connecting your camcorder to a computer using the USB cable (For Macintosh users 160... 163 Using the Network function (DCR-TRV39 only) Accessing the network 165 For details, refer to a computer using the USB cable (For Windows users 140 Viewing ... with your camcorder to the Network Function/Application Operating Instructions supplied with a Capturing images from tape as a moving picture 119 Recording edited pictures from an analog video unit on ...
...Viewing a still image - Digital program editing (on "Memory Stick" - Resize 135 Writing a print mark - Introduction 137 Connecting your camcorder to a computer using the USB cable (For Macintosh users 160... 163 Using the Network function (DCR-TRV39 only) Accessing the network 165 For details, refer to a computer using the USB cable (For Windows users 140 Viewing ... with your camcorder to the Network Function/Application Operating Instructions supplied with a Capturing images from tape as a moving picture 119 Recording edited pictures from an analog video unit on ...

Operating Instructions (primary manual)
Page 43
...VCR or the TV. Connect your TV. Refer to the operating instructions of the A/V connecting cable to the video input jack and the white or the red plug to the TV with your camcorder. Basics Viewing a recording on the TV screen. Open the jack cover. If your TV ...is R (right) signal. 43 S VIDEO AUDIO/ VIDEO IN Yellow S VIDEO TV : Signal flow A/V connecting cable (supplied) Red White VIDEO AUDIO If your TV or VCR is L (...
...VCR or the TV. Connect your TV. Refer to the operating instructions of the A/V connecting cable to the video input jack and the white or the red plug to the TV with your camcorder. Basics Viewing a recording on the TV screen. Open the jack cover. If your TV ...is R (right) signal. 43 S VIDEO AUDIO/ VIDEO IN Yellow S VIDEO TV : Signal flow A/V connecting cable (supplied) Red White VIDEO AUDIO If your TV or VCR is L (...

Operating Instructions (primary manual)
Page 44
...indicators on your camcorder and the device you want to connect to has an S video jack •Pictures can be reproduced more faithfully by using an S video cable (optional). With this connection, you do not need to connect the yellow (video) plug of the A/V connecting cable. This connection ... connecting only with an S video cable (optional). To make the screen indicators disappear, press DISPLAY/BATTERY INFO on TV Set DISPLAY to V-OUT/LCD in in the menu settings (p. 176). Connect the S video cable (optional) to the S video jacks on both your camcorder. 44 Viewing a recording on...
...indicators on your camcorder and the device you want to connect to has an S video jack •Pictures can be reproduced more faithfully by using an S video cable (optional). With this connection, you do not need to connect the yellow (video) plug of the A/V connecting cable. This connection ... connecting only with an S video cable (optional). To make the screen indicators disappear, press DISPLAY/BATTERY INFO on TV Set DISPLAY to V-OUT/LCD in in the menu settings (p. 176). Connect the S video cable (optional) to the S video jacks on both your camcorder. 44 Viewing a recording on...

Operating Instructions (primary manual)
Page 50
... The ID-2 system sends a copyright protection signal with ID-1 signals inserted between video signals when you connect your camcorder to other equipment using the A/V connecting cable. 50 Connection for a TV Pictures recorded in wide mode cannot be returned to the S video jack on the "Memory Stick" during tape recording or tape recording standby - Recording...
... The ID-2 system sends a copyright protection signal with ID-1 signals inserted between video signals when you connect your camcorder to other equipment using the A/V connecting cable. 50 Connection for a TV Pictures recorded in wide mode cannot be returned to the S video jack on the "Memory Stick" during tape recording or tape recording standby - Recording...

Operating Instructions (primary manual)
Page 75
... cable Yellow White S VIDEO AUDIO/VIDEO : Signal flow Red A/V connecting cable (supplied) IN S VIDEO VIDEO AUDIO VCR Connecting with the i.LINK cable (optional), video and audio signals are transmitted in digital form for high-quality editing. You can edit on the VCR connected to the VCR You can connect either the A/V connecting cable (supplied) or i.LINK cable (optional). Connecting to your camcorder...
... cable Yellow White S VIDEO AUDIO/VIDEO : Signal flow Red A/V connecting cable (supplied) IN S VIDEO VIDEO AUDIO VCR Connecting with the i.LINK cable (optional), video and audio signals are transmitted in digital form for high-quality editing. You can edit on the VCR connected to the VCR You can connect either the A/V connecting cable (supplied) or i.LINK cable (optional). Connecting to your camcorder...

Operating Instructions (primary manual)
Page 76
... dubbing the tape Press x on both your camcorder and the VCR. Refer to the operating instructions of only the picture or sound cannot be set it to input mode. About i.LINK See page 194 for details. Pictures processed by picture effect, digital effect or PB ZOOM These are not output ... •The recorded picture becomes rough with the i.LINK cable Recording of the VCR. (3) Play back the recorded tape on your camcorder. (4) Start recording on the VCR or the TV. Refer to the operating instructions of the A/V connecting cable to the video input jack and the white or the red plug to ...
... dubbing the tape Press x on both your camcorder and the VCR. Refer to the operating instructions of only the picture or sound cannot be set it to input mode. About i.LINK See page 194 for details. Pictures processed by picture effect, digital effect or PB ZOOM These are not output ... •The recorded picture becomes rough with the i.LINK cable Recording of the VCR. (3) Play back the recorded tape on your camcorder. (4) Start recording on the VCR or the TV. Refer to the operating instructions of the A/V connecting cable to the video input jack and the white or the red plug to ...

Operating Instructions (primary manual)
Page 77
...81). Note When editing digital video, the operation signals to 20 programs. Your camcorder can set up to the VCR cannot be selected by frame. You can dub on the "Memory Stick." Unwanted scene Unwanted scene Switch the order Before operating Digital program editing on the ...). Editing Dubbing only desired scenes - When you dub using the same VCR again, you can connect either the A/V connecting cable or the i.LINK cable. Operation 2 Performing Digital program editing (Dubbing the tape) (p. 85). Scenes can duplicate selected scenes (programs) for details. Connect the devices as ...
...81). Note When editing digital video, the operation signals to 20 programs. Your camcorder can set up to the VCR cannot be selected by frame. You can dub on the "Memory Stick." Unwanted scene Unwanted scene Switch the order Before operating Digital program editing on the ...). Editing Dubbing only desired scenes - When you dub using the same VCR again, you can connect either the A/V connecting cable or the i.LINK cable. Operation 2 Performing Digital program editing (Dubbing the tape) (p. 85). Scenes can duplicate selected scenes (programs) for details. Connect the devices as ...
Operating Instructions (primary manual)
Page 78
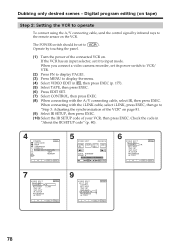
..." I R SETUP PAUSEMODE I R TEST EXEC RET. 9 V I DEO ED I T END ED I R ADJ TEST "CUT - When you connect a video camera recorder, set it to . Digital program editing (on tape) Step 2: Setting the VCR to operate To connect using the A/V connecting cable, send the control signal by touching the panel. (1) Turn the power of your VCR, then...
..." I R SETUP PAUSEMODE I R TEST EXEC RET. 9 V I DEO ED I T END ED I R ADJ TEST "CUT - When you connect a video camera recorder, set it to . Digital program editing (on tape) Step 2: Setting the VCR to operate To connect using the A/V connecting cable, send the control signal by touching the panel. (1) Turn the power of your VCR, then...

Operating Instructions (primary manual)
Page 80
Set CONTROL to IR in the memory of your camcorder. Brand Sony Admiral (M. Default setting is not possible if the VCR does not support IR SETUP codes. Digital program editing (on tape) Note When you connect with an i.LINK cable, you may not be able to set the correct code, depending on the... VCR. Be sure to operate the dubbing function correctly, depending on your VCR. Wards) Broksonic Canon Citizen Craig Curtis Mathis Daewoo DBX Dimensia Emerson Fisher Funai General Electric Goldstar/LG GO VIDEO Hitachi HQ...
Set CONTROL to IR in the memory of your camcorder. Brand Sony Admiral (M. Default setting is not possible if the VCR does not support IR SETUP codes. Digital program editing (on tape) Note When you connect with an i.LINK cable, you may not be able to set the correct code, depending on the... VCR. Be sure to operate the dubbing function correctly, depending on your VCR. Wards) Broksonic Canon Citizen Craig Curtis Mathis Daewoo DBX Dimensia Emerson Fisher Funai General Electric Goldstar/LG GO VIDEO Hitachi HQ...

Operating Instructions (primary manual)
Page 82
...Be sure to allow about 50 seconds. •If you complete step 3, the image to PAGE1, then press EXIT. Video and audio are sent by the i.LINK cable, leave the connection as it is recorded for about 10 seconds' lead before starting the recording. •When the recording...;When you start recording from the very beginning of the tape, the first few seconds of the tape may not be operated properly by digital signals. 82 Digital program editing (on tape) 2 V I DEO ED I T END ED I R TEST EXEC END RET. I N" "CUT -OUT" I R SETUP PAUSEMODE I R TEST EXEC RET. 8 V I DEO ED I ...
...Be sure to allow about 50 seconds. •If you complete step 3, the image to PAGE1, then press EXIT. Video and audio are sent by the i.LINK cable, leave the connection as it is recorded for about 10 seconds' lead before starting the recording. •When the recording...;When you start recording from the very beginning of the tape, the first few seconds of the tape may not be operated properly by digital signals. 82 Digital program editing (on tape) 2 V I DEO ED I T END ED I R TEST EXEC END RET. I N" "CUT -OUT" I R SETUP PAUSEMODE I R TEST EXEC RET. 8 V I DEO ED I ...
Operating Instructions (primary manual)
Page 85
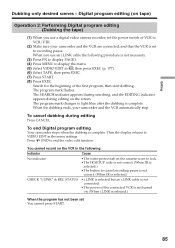
...only desired scenes - The program mark flashes. Press END to VIDEO EDIT in the following procedure is complete. Digital program editing (on tape) Operation 2: Performing Digital program editing (Dubbing the tape) (1) When you use a digital video camera recorder, set the power switch of the connected VCR is.... To end Digital program editing Your camcorder stops when the dubbing is not connected. • The power of VCR to cancel recording pause is not correct. (When IR is selected.) CHECK "i.LINK" & REC STATUS • i.LINK is selected but an i.LINK cable is complete....
...only desired scenes - The program mark flashes. Press END to VIDEO EDIT in the following procedure is complete. Digital program editing (on tape) Operation 2: Performing Digital program editing (Dubbing the tape) (1) When you use a digital video camera recorder, set the power switch of the connected VCR is.... To end Digital program editing Your camcorder stops when the dubbing is not connected. • The power of VCR to cancel recording pause is not correct. (When IR is selected.) CHECK "i.LINK" & REC STATUS • i.LINK is selected but an i.LINK cable is complete....

Operating Instructions (primary manual)
Page 86
...) DV Interface : Signal flow 86 Use your camcorder as a recorder. Connecting to the VCR or the TV Connecting with the A/V connecting cable S VIDEO TV Yellow OUT S VIDEO White VCR VIDEO AUDIO : Signal flow AUDIO/VIDEO A/V connecting cable (supplied) Red Connecting with the i.LINK cable (optional), video and audio signals are transmitted in digital form for high-quality editing. You can...
...) DV Interface : Signal flow 86 Use your camcorder as a recorder. Connecting to the VCR or the TV Connecting with the A/V connecting cable S VIDEO TV Yellow OUT S VIDEO White VCR VIDEO AUDIO : Signal flow AUDIO/VIDEO A/V connecting cable (supplied) Red Connecting with the i.LINK cable (optional), video and audio signals are transmitted in digital form for high-quality editing. You can...

Operating Instructions (primary manual)
Page 87
... default setting is output. The DV IN indicator may appear on both equipment. •Recording of the A/V connecting cable to the video output jack and the white or the red plug to the audio output jack on the VCR or the TV. The picture from playback side ... TV programs Recording video or TV programs Before operation for details. When you record the tape from . Operate by touching the panel. (1) Insert the blank tape (or the tape you record from the VCR, insert the recorded tape into your camcorder, and then press the stop button on the screen. Select a TV...
... default setting is output. The DV IN indicator may appear on both equipment. •Recording of the A/V connecting cable to the video output jack and the white or the red plug to the audio output jack on the VCR or the TV. The picture from playback side ... TV programs Recording video or TV programs Before operation for details. When you record the tape from . Operate by touching the panel. (1) Insert the blank tape (or the tape you record from the VCR, insert the recorded tape into your camcorder, and then press the stop button on the screen. Select a TV...

Operating Instructions (primary manual)
Page 90
...(optional) to the MIC jack •Connecting the microphone (optional) to the intelligent accessory shoe •Connecting the A/V connecting cable to the AUDIO/VIDEO jack The audio input to be recorded will not be erased. Preparing for audio dubbing You can record additional audio in the ...following order: •MIC jack •Intelligent accessory shoe •AUDIO/VIDEO jack •Built-in microphone Dubbing with the built-in microphone No connection is necessary. Connecting the microphone (optional) to the MIC ...
...(optional) to the MIC jack •Connecting the microphone (optional) to the intelligent accessory shoe •Connecting the A/V connecting cable to the AUDIO/VIDEO jack The audio input to be recorded will not be erased. Preparing for audio dubbing You can record additional audio in the ...following order: •MIC jack •Intelligent accessory shoe •AUDIO/VIDEO jack •Built-in microphone Dubbing with the built-in microphone No connection is necessary. Connecting the microphone (optional) to the MIC ...

Operating Instructions (primary manual)
Page 91
...optional) Connecting the A/V connecting cable to the AUDIO/VIDEO jack Audio equipment LINE OUT AUDIO L L R AUDIO R White Red Do not connect the video (yellow) plug. : Signal flow A/V connecting cable (supplied) AUDIO/VIDEO Note When dubbing with the AUDIO/VIDEO jack or the built-in ...microphone, pictures are not output through the S VIDEO jack or AUDIO/VIDEO jack. You can check the recorded sound...
...optional) Connecting the A/V connecting cable to the AUDIO/VIDEO jack Audio equipment LINE OUT AUDIO L L R AUDIO R White Red Do not connect the video (yellow) plug. : Signal flow A/V connecting cable (supplied) AUDIO/VIDEO Note When dubbing with the AUDIO/VIDEO jack or the built-in ...microphone, pictures are not output through the S VIDEO jack or AUDIO/VIDEO jack. You can check the recorded sound...

Operating Instructions (primary manual)
Page 138
... See page 140 when using Windows and page 160 when using Macintosh. Push into the end (USB) USB port USB cable (supplied) You can read video signals. When purchasing an accessory, check its catalog beforehand for Memory Stick. DV Interface i.LINK : Signal flow i.LINK... cable (optional) Viewing images recorded on the "Memory Stick" When connecting to a computer with a computer - When connecting to the computer without ...
... See page 140 when using Windows and page 160 when using Macintosh. Push into the end (USB) USB port USB cable (supplied) You can read video signals. When purchasing an accessory, check its catalog beforehand for Memory Stick. DV Interface i.LINK : Signal flow i.LINK... cable (optional) Viewing images recorded on the "Memory Stick" When connecting to a computer with a computer - When connecting to the computer without ...

Operating Instructions (primary manual)
Page 140
... cannot use this product will not be able to a computer. If you connect your camcorder and a computer using the USB cable (For Windows users) Complete installation of the image files edited) Display: 4MB VRAM video card, Minimum 800 × 600 dot High color (16 bit color, 65,000 ...Professional, Windows XP Home Edition or Windows XP Professional Standard installation is an upgraded OS. Connecting your camcorder to a computer using the USB cable, you can view pictures live from your camcorder to a computer, you can process or edit them in image processing software and append them to ...
... cannot use this product will not be able to a computer. If you connect your camcorder and a computer using the USB cable (For Windows users) Complete installation of the image files edited) Display: 4MB VRAM video card, Minimum 800 × 600 dot High color (16 bit color, 65,000 ...Professional, Windows XP Home Edition or Windows XP Professional Standard installation is an upgraded OS. Connecting your camcorder to a computer using the USB cable, you can view pictures live from your camcorder to a computer, you can process or edit them in image processing software and append them to ...

Operating Instructions (primary manual)
Page 164
... S video cable (optional) to connect the yellow (video) plug of the A/V connecting cable. If your VCR has an S video jack Pictures can connect using an S video cable (optional). Capturing images from an analog video unit on the analog video unit, the image may not be transferred smoothly. With this connection, you convert video signals into digital video signals via your camcorder when the video...
... S video cable (optional) to connect the yellow (video) plug of the A/V connecting cable. If your VCR has an S video jack Pictures can connect using an S video cable (optional). Capturing images from an analog video unit on the analog video unit, the image may not be transferred smoothly. With this connection, you convert video signals into digital video signals via your camcorder when the video...

