Operating Instructions (primary manual)
Page 2
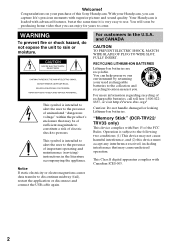
...Notice If static electricity or electromagnetism causes data transfer to rain or moisture. This Class B digital apparatus complies with advanced features, but at the same time it is subject to use. ... midway (fail), restart the application or disconnect and connect the USB cable again. "Memory Stick" (DCR-TRV22/ TRV33 only) This device complies with superior picture and sound quality. With your used rechargeable ... that may not cause harmful interference, and (2) this Sony Handycam. This symbol is intended to alert the user to persons. For customers in the literature ...
...Notice If static electricity or electromagnetism causes data transfer to rain or moisture. This Class B digital apparatus complies with advanced features, but at the same time it is subject to use. ... midway (fail), restart the application or disconnect and connect the USB cable again. "Memory Stick" (DCR-TRV22/ TRV33 only) This device complies with superior picture and sound quality. With your used rechargeable ... that may not cause harmful interference, and (2) this Sony Handycam. This symbol is intended to alert the user to persons. For customers in the literature ...
Operating Instructions (primary manual)
Page 4
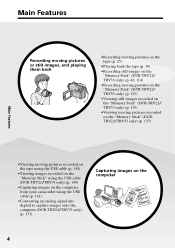
... the USB cable (p. 148) •Viewing images recorded on the "Memory Stick" using the USB cable (DCR-TRV22/TRV33 only) (p. 149) •Capturing images on the computer from your camcorder using the USB cable (p. 161) •Converting an analog signal into digital to capture images onto the computer (DCR-TRV22/TRV33 only) (p. 173) Capturing images on the computer 4
... the USB cable (p. 148) •Viewing images recorded on the "Memory Stick" using the USB cable (DCR-TRV22/TRV33 only) (p. 149) •Capturing images on the computer from your camcorder using the USB cable (p. 161) •Converting an analog signal into digital to capture images onto the computer (DCR-TRV22/TRV33 only) (p. 173) Capturing images on the computer 4
Operating Instructions (primary manual)
Page 6
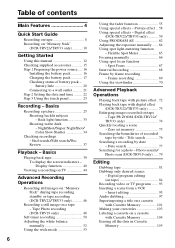
... a recording on TV 44 Advanced Recording Operations Recording still images on "Memory Stick" during tape recording standby or tape recording (DCR-TRV22/TRV33 only 46 Recording a still image on tape 84 Recording video or TV...Digital effect (DCR-TRV22/TRV33 only 59 Using PROGRAM AE 62 Adjusting the exposure manually ...... 64 Using spot light-metering function - Photo search/ Photo scan (DCR-TRV19 only) ..... 79 Editing Dubbing tape 81 Dubbing only desired scenes - Table of contents Main Features 4 Quick Start Guide Recording on tape 8 Recording on "Memory Stick" (DCR-TRV22/TRV33...
... a recording on TV 44 Advanced Recording Operations Recording still images on "Memory Stick" during tape recording standby or tape recording (DCR-TRV22/TRV33 only 46 Recording a still image on tape 84 Recording video or TV...Digital effect (DCR-TRV22/TRV33 only 59 Using PROGRAM AE 62 Adjusting the exposure manually ...... 64 Using spot light-metering function - Photo search/ Photo scan (DCR-TRV19 only) ..... 79 Editing Dubbing tape 81 Dubbing only desired scenes - Table of contents Main Features 4 Quick Start Guide Recording on tape 8 Recording on "Memory Stick" (DCR-TRV22/TRV33...
Operating Instructions (primary manual)
Page 7
... - Digital program editing (on "Memory Stick" - Memory Photo playback .......... 135 Viewing a moving pictures on a computer (For Macintosh users) (DCR-TRV22/TRV33 only) ......... 172 Capturing images from tape as a moving picture - Image protection 142 Deleting images - USB Streaming (For Windows users 161 Viewing images recorded on "Memory Stick" on a computer (For Windows users) (DCR-TRV22/TRV33 only) ......... 167 Connecting your camcorder to...
... - Digital program editing (on "Memory Stick" - Memory Photo playback .......... 135 Viewing a moving pictures on a computer (For Macintosh users) (DCR-TRV22/TRV33 only) ......... 172 Capturing images from tape as a moving picture - Image protection 142 Deleting images - USB Streaming (For Windows users 161 Viewing images recorded on "Memory Stick" on a computer (For Windows users) (DCR-TRV22/TRV33 only) ......... 167 Connecting your camcorder to...
Operating Instructions (primary manual)
Page 10
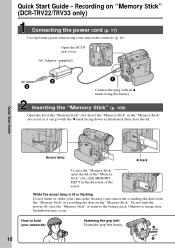
... the battery. How to hold your camcorder outdoors (p. 16). Insert the "Memory Stick" in the direction of the "Memory Stick" slot. While the access lamp is lit or flashing Do not shake or strike your camcorder because your camcorder is reading the data from the "Memory Stick" or recording the data on "Memory Stick" (DCR-TRV22/TRV33 only) Connecting the power cord (p. 17...
... the battery. How to hold your camcorder outdoors (p. 16). Insert the "Memory Stick" in the direction of the "Memory Stick" slot. While the access lamp is lit or flashing Do not shake or strike your camcorder because your camcorder is reading the data from the "Memory Stick" or recording the data on "Memory Stick" (DCR-TRV22/TRV33 only) Connecting the power cord (p. 17...
Operating Instructions (primary manual)
Page 11
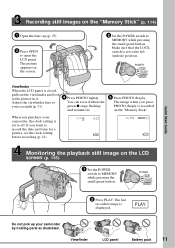
POWER VCR OFF(CHG) CAMERA MEMORY Viewfinder When the LCD panel is displayed. When you purchase your camcorder, the clock setting is set to your camcorder by holding parts as illustrated. PLAY Do not pick up your eyesight (p. 31). Adjust the viewfinder lens to off. The image...switch to open the LCD panel. Quick Start Guide Recording still images on the "Memory Stick" (p. 114) 1 Open the lens cap (p. 25). 3 Press OPEN to MEMORY while pressing the small green button. The picture appears on the "Memory Stick." Make sure that the LOCK switch is recorded on the screen. 2 Set ...
POWER VCR OFF(CHG) CAMERA MEMORY Viewfinder When the LCD panel is displayed. When you purchase your camcorder, the clock setting is set to your camcorder by holding parts as illustrated. PLAY Do not pick up your eyesight (p. 31). Adjust the viewfinder lens to off. The image...switch to open the LCD panel. Quick Start Guide Recording still images on the "Memory Stick" (p. 114) 1 Open the lens cap (p. 25). 3 Press OPEN to MEMORY while pressing the small green button. The picture appears on the "Memory Stick." Make sure that the LOCK switch is recorded on the screen. 2 Set ...
Operating Instructions (primary manual)
Page 15
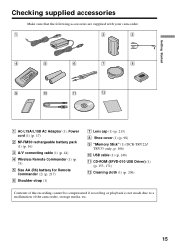
... accessories are supplied with your camcorder. 1 2 3 4 5 6 7 8 9 q; qa qs 1 AC-L15A/L15B AC Adaptor (1), Power cord (1) (p. 17) 2 NP-FM30 rechargeable battery pack (1) (p. 16) 3 A/V connecting cable (1) (p. 44) 4 Wireless Remote Commander (1) (p. 75) 5 Size AA (R6) battery for Remote Commander (2) (p. 217) 6 Shoulder strap (1) 7 Lens cap (1) (p. 213) 8 Shoe cover (1) (p. 98) 9 "Memory Stick" (1) (DCR-TRV22/ TRV33 only, p. 106) 0 USB cable (1) (p. 148...
... accessories are supplied with your camcorder. 1 2 3 4 5 6 7 8 9 q; qa qs 1 AC-L15A/L15B AC Adaptor (1), Power cord (1) (p. 17) 2 NP-FM30 rechargeable battery pack (1) (p. 16) 3 A/V connecting cable (1) (p. 44) 4 Wireless Remote Commander (1) (p. 75) 5 Size AA (R6) battery for Remote Commander (2) (p. 217) 6 Shoulder strap (1) 7 Lens cap (1) (p. 213) 8 Shoe cover (1) (p. 98) 9 "Memory Stick" (1) (DCR-TRV22/ TRV33 only, p. 106) 0 USB cable (1) (p. 148...
Operating Instructions (primary manual)
Page 22
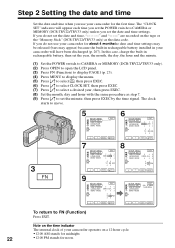
... SET USB STREAM LANGUAGE 2003 JUL 4 DEMO MODE 5 30 PM EXEC RET. Note on the time indicator The internal clock of your camcorder operates on the tape or the "Memory Stick" (DCR-TRV22/TRV33 only) as step 7. (9) Press r/R to set the minute, then press EXEC by the time signal. If you do not set ... midnight. 22 • 12:00 PM stands for noon. In this case, charge the built-in your camcorder will appear each time you set the POWER switch to CAMERA or MEMORY (DCR-TRV22/TRV33 only) unless you set the date and time settings. SETUP MENU CLOCK SET USB STREAM LANGUAGE DEMO MODE EXIT...
... SET USB STREAM LANGUAGE 2003 JUL 4 DEMO MODE 5 30 PM EXEC RET. Note on the time indicator The internal clock of your camcorder operates on the tape or the "Memory Stick" (DCR-TRV22/TRV33 only) as step 7. (9) Press r/R to set the minute, then press EXEC by the time signal. If you do not set ... midnight. 22 • 12:00 PM stands for noon. In this case, charge the built-in your camcorder will appear each time you set the POWER switch to CAMERA or MEMORY (DCR-TRV22/TRV33 only) unless you set the date and time settings. SETUP MENU CLOCK SET USB STREAM LANGUAGE DEMO MODE EXIT...
Operating Instructions (primary manual)
Page 23
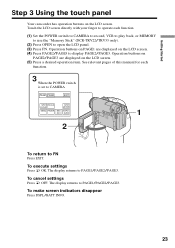
... PAGE1/PAGE2/PAGE3. To cancel settings Press OFF. The display returns to PAGE1/PAGE2/PAGE3. Getting Started Step 3 Using the touch panel Your camcorder has operation buttons on the LCD screen. Touch the LCD screen directly with your finger to operate each function. 3 When the POWER switch is... Press FN. See relevant pages of this manual for each function. (1) Set the POWER switch to CAMERA to record, VCR to play back, or MEMORY to use the "Memory Stick" (DCR-TRV22/TRV33 only). (2) Press OPEN to FN Press EXIT. To make screen indicators disappear Press DSPL/BATT INFO. 23
... PAGE1/PAGE2/PAGE3. To cancel settings Press OFF. The display returns to PAGE1/PAGE2/PAGE3. Getting Started Step 3 Using the touch panel Your camcorder has operation buttons on the LCD screen. Touch the LCD screen directly with your finger to operate each function. 3 When the POWER switch is... Press FN. See relevant pages of this manual for each function. (1) Set the POWER switch to CAMERA to record, VCR to play back, or MEMORY to use the "Memory Stick" (DCR-TRV22/TRV33 only). (2) Press OPEN to FN Press EXIT. To make screen indicators disappear Press DSPL/BATT INFO. 23

Operating Instructions (primary manual)
Page 46
...on the screen when you pressed PHOTO deeply will be recorded on the "Memory Stick." The image displayed on the screen when you pressed PHOTO deeply will be recorded on the "Memory Stick." 1 50min 640 FINE 12 CAPTURE 2 101 FN 50min 640 FINE 101 ...to . Recording still images on the screen disappears. Recording on the "Memory Stick" is complete when the bar scroll indicator at the upper right on "Memory Stick" during tape recording standby or tape recording (DCR-TRV22/TRV33 only) Insert a "Memory Stick" before the following operation. - Advanced Recording Operations -
...on the screen when you pressed PHOTO deeply will be recorded on the "Memory Stick." The image displayed on the screen when you pressed PHOTO deeply will be recorded on the "Memory Stick." 1 50min 640 FINE 12 CAPTURE 2 101 FN 50min 640 FINE 101 ...to . Recording still images on the screen disappears. Recording on the "Memory Stick" is complete when the bar scroll indicator at the upper right on "Memory Stick" during tape recording standby or tape recording (DCR-TRV22/TRV33 only) Insert a "Memory Stick" before the following operation. - Advanced Recording Operations -

Operating Instructions (primary manual)
Page 47
...; The image size will be recorded on "Memory Stick" during tape recording standby or tape recording (DCR-TRV22/TRV33 only) Note You cannot record still images in the "Memory Stick" during tape recording You cannot check an image on - During and after recording still images on the "Memory Stick" Your camcorder continues recording on the screen when you press...
...; The image size will be recorded on "Memory Stick" during tape recording standby or tape recording (DCR-TRV22/TRV33 only) Note You cannot record still images in the "Memory Stick" during tape recording You cannot check an image on - During and after recording still images on the "Memory Stick" Your camcorder continues recording on the screen when you press...

Operating Instructions (primary manual)
Page 50
Recording still images on the "Memory Stick" during recording standby (DCR-TRV22/TRV33 only) The POWER switch should be set to . To restart the countdown, press START/STOP again. To stop the countdown for this operation. In the ...
Recording still images on the "Memory Stick" during recording standby (DCR-TRV22/TRV33 only) The POWER switch should be set to . To restart the countdown, press START/STOP again. To stop the countdown for this operation. In the ...

Operating Instructions (primary manual)
Page 51
... standby, press SELFTIMER and the (self-timer) indicator disappears from the screen. When self-timer recording is finished The self-timer recording is set to MEMORY (DCR-TRV22/TRV33 only) You can set to 3 in recording standby mode. 51 When the POWER switch is automatically canceled. Operate by touching the panel. (1) Follow steps... for self-timer recording of still images. You cannot cancel the self-timer using the self-timer You can also record still images onto the "Memory Stick" with the self-timer (p. 127). Setting up a recording using the Remote Commander.
... standby, press SELFTIMER and the (self-timer) indicator disappears from the screen. When self-timer recording is finished The self-timer recording is set to MEMORY (DCR-TRV22/TRV33 only) You can set to 3 in recording standby mode. 51 When the POWER switch is automatically canceled. Operate by touching the panel. (1) Follow steps... for self-timer recording of still images. You cannot cancel the self-timer using the self-timer You can also record still images onto the "Memory Stick" with the self-timer (p. 127). Setting up a recording using the Remote Commander.
Operating Instructions (primary manual)
Page 54
...the screen size is compatible with ID-1 signals inserted between video signals when you connect your camcorder to normal size. If you cannot operate the following functions: - You connect your camcorder to other equipment using the A/V connecting cable. 54 Using the wide mode Notes •... TV compatible with video signals. BOUNCE - Recording still images on the TV screen at full size when: - OLD MOVIE (DCR-TRV22/TRV33 only) •Pictures recorded on the tape in the 16:9WIDE mode automatically appear on the "Memory Stick" during tape recording or tape recording standby...
...the screen size is compatible with ID-1 signals inserted between video signals when you connect your camcorder to normal size. If you cannot operate the following functions: - You connect your camcorder to other equipment using the A/V connecting cable. 54 Using the wide mode Notes •... TV compatible with video signals. BOUNCE - Recording still images on the TV screen at full size when: - OLD MOVIE (DCR-TRV22/TRV33 only) •Pictures recorded on the tape in the 16:9WIDE mode automatically appear on the "Memory Stick" during tape recording or tape recording standby...

Operating Instructions (primary manual)
Page 57
... functions: - Digital effect (DCR-TRV22/TRV33 only) - Manual exposure - Flexible Spot Meter - Picture effect - Manual focus - Wide mode - When the image is activated in the followings: - D ZOOM is being stored, the playback picture disappears. During BOUNCE is on the tape. Picture effect - PROGRAM AE 57 Interval Recording - Photo recording in "Memory Stick" (DCR-TRV22/TRV33 only) Note...
... functions: - Digital effect (DCR-TRV22/TRV33 only) - Manual exposure - Flexible Spot Meter - Picture effect - Manual focus - Wide mode - When the image is activated in the followings: - D ZOOM is being stored, the playback picture disappears. During BOUNCE is on the tape. Picture effect - PROGRAM AE 57 Interval Recording - Photo recording in "Memory Stick" (DCR-TRV22/TRV33 only) Note...

Operating Instructions (primary manual)
Page 63
... switch should be set to MEMORY, the SPORTS mode does not work. (The indicator flashes.) (DCR-TRV22/TRV33 only) 63 BOUNCE - To record images on the "Memory Stick" using the MEMORY MIX (DCR-TRV22/ TRV33 only) •When you set the POWER switch to or TRV33 only). To return to AUTO... in , then press EXEC (p. 176). (DCR-TRV22/ MANUAL SET PROGRAM AE ...
... switch should be set to MEMORY, the SPORTS mode does not work. (The indicator flashes.) (DCR-TRV22/TRV33 only) 63 BOUNCE - To record images on the "Memory Stick" using the MEMORY MIX (DCR-TRV22/ TRV33 only) •When you set the POWER switch to or TRV33 only). To return to AUTO... in , then press EXEC (p. 176). (DCR-TRV22/ MANUAL SET PROGRAM AE ...
Operating Instructions (primary manual)
Page 72
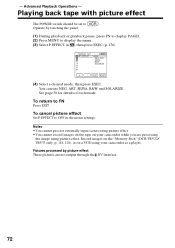
See page 58 for details of each mode. Record images on the "Memory Stick" (DCR-TRV22/ TRV33 only, p. 118, 128), or on your camcorder as a player. - Advanced Playback Operations - Pictures processed by touching the panel. (1) During playback or playback pause, press FN to display PAGE1. ... . Notes •You cannot process externally input scenes using picture effect. •You cannot record images on the tape on a VCR using your camcorder while you are not output through the DV Interface. 72 MANUAL SET P EFFECT EXIT OFF NEG. ART, SEPIA, B&W and SOLARIZE. To cancel...
See page 58 for details of each mode. Record images on the "Memory Stick" (DCR-TRV22/ TRV33 only, p. 118, 128), or on your camcorder as a player. - Advanced Playback Operations - Pictures processed by touching the panel. (1) During playback or playback pause, press FN to display PAGE1. ... . Notes •You cannot process externally input scenes using picture effect. •You cannot record images on the tape on a VCR using your camcorder while you are not output through the DV Interface. 72 MANUAL SET P EFFECT EXIT OFF NEG. ART, SEPIA, B&W and SOLARIZE. To cancel...

Operating Instructions (primary manual)
Page 73
...details of the each effect. To cancel digital effect Press OFF to return to FN Press EXIT. Record images on the "Memory Stick" (p. 118, 128), or on a VCR using digital effect. •You cannot record images on the tape on your camcorder as a still image. (4) Press -/+ ...cannot process externally input scenes using your camcorder while you select the mode to PAGE2. TRAIL (3) Select a desired mode. Advanced Playback Operations Playing back tape with digital effect (DCR-TRV22/TRV33 only) The POWER switch should be set to select a digital effect is stored in memory as a player.
...details of the each effect. To cancel digital effect Press OFF to return to FN Press EXIT. Record images on the "Memory Stick" (p. 118, 128), or on a VCR using digital effect. •You cannot record images on the tape on your camcorder as a still image. (4) Press -/+ ...cannot process externally input scenes using your camcorder while you select the mode to PAGE2. TRAIL (3) Select a desired mode. Advanced Playback Operations Playing back tape with digital effect (DCR-TRV22/TRV33 only) The POWER switch should be set to select a digital effect is stored in memory as a player.

Operating Instructions (primary manual)
Page 74
... to the center of the screen. However, you can record images on the "Memory Stick" (DCR-TRV33 only) (p. 118, 128), or on your camcorder as a player. •You cannot record moving pictures on the "Memory Stick" on the PB ZOOM screen disappears. Edge of the enlarged image The edge of... you are not output through the DV Interface. Enlarging images recorded on the "Memory Stick" (p. 140). W: Decrease the zoom ratio. Tape PB ZOOM (DCR-TRV22/TRV33 only) Besides the operation described here, your camcorder when you press another area again, the area moves to 5 times its size. You...
... to the center of the screen. However, you can record images on the "Memory Stick" (DCR-TRV33 only) (p. 118, 128), or on your camcorder as a player. •You cannot record moving pictures on the "Memory Stick" on the PB ZOOM screen disappears. Edge of the enlarged image The edge of... you are not output through the DV Interface. Enlarging images recorded on the "Memory Stick" (p. 140). W: Decrease the zoom ratio. Tape PB ZOOM (DCR-TRV22/TRV33 only) Besides the operation described here, your camcorder when you press another area again, the area moves to 5 times its size. You...
Operating Instructions (primary manual)
Page 82
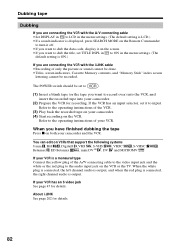
...on the Remote Commander to turn it off. •If you want to record over) into the VCR, and insert the recorded tape into your camcorder. (2) Prepare the VCR for details. 82 If your VCR. Refer to the operating instructions of the VCR. (3) Play back the recorded tape on your... are connecting the VCR with the i.LINK cable •Recording of only the picture or sound cannot be done. •Titles, screen indicators, Cassette Memory contents, and "Memory Stick" index screen lettering cannot be set to . (1) Insert a blank tape (or the tape you want to dub the data code, display it on ...
...on the Remote Commander to turn it off. •If you want to record over) into the VCR, and insert the recorded tape into your camcorder. (2) Prepare the VCR for details. 82 If your VCR. Refer to the operating instructions of the VCR. (3) Play back the recorded tape on your... are connecting the VCR with the i.LINK cable •Recording of only the picture or sound cannot be done. •Titles, screen indicators, Cassette Memory contents, and "Memory Stick" index screen lettering cannot be set to . (1) Insert a blank tape (or the tape you want to dub the data code, display it on ...


