
Operating Instructions
Page 5
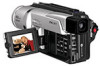
... are supplied with your camcorder. 1 2 3 4 5 6 7 8 9 0 qa 1 Wireless Remote Commander (1) (p. 128) 2 AC-L10A/L10B/L10C AC power adaptor (1), Power cord (1) (p. 11)...Remote Commander (2) (p. 128) 6 A/V connecting cable (1) (p. 27) 7 Shoulder strap (1) (p. 125) 8 Lens cap (1) (p. 16) 9 PC serial cable (1) (p. 91) DCR-TRV320 only 0 "Memory Stick" (1) (p. 72) DCR-TRV320 only qa Application software: PictureGear 4.1 Lite (CD-ROM) (1) (p. 91) DCR-TRV320 only Contents of the recording cannot be compensated if recording or playback is not made due to a malfunction of the camcorder, video...
... are supplied with your camcorder. 1 2 3 4 5 6 7 8 9 0 qa 1 Wireless Remote Commander (1) (p. 128) 2 AC-L10A/L10B/L10C AC power adaptor (1), Power cord (1) (p. 11)...Remote Commander (2) (p. 128) 6 A/V connecting cable (1) (p. 27) 7 Shoulder strap (1) (p. 125) 8 Lens cap (1) (p. 16) 9 PC serial cable (1) (p. 91) DCR-TRV320 only 0 "Memory Stick" (1) (p. 72) DCR-TRV320 only qa Application software: PictureGear 4.1 Lite (CD-ROM) (1) (p. 91) DCR-TRV320 only Contents of the recording cannot be compensated if recording or playback is not made due to a malfunction of the camcorder, video...

Operating Instructions
Page 17
...screen and in direct sunlight The LCD screen may be set to CAMERA again. to brighten 180° LCD BRIGHT to OFF (CHARGE). Some of the two buttons on the LCD is released as z. Basics Recording a picture Note on the Remote Commander. If you change the battery pack, set the POWER ...switch to dim 90° When closing the LCD panel, set the POWER switch to see. Picture in the mirror mode You cannot operate the ZERO SET MEMORY on LOCK (DCR-TRV320 only) When you...
...screen and in direct sunlight The LCD screen may be set to CAMERA again. to brighten 180° LCD BRIGHT to OFF (CHARGE). Some of the two buttons on the LCD is released as z. Basics Recording a picture Note on the Remote Commander. If you change the battery pack, set the POWER ...switch to dim 90° When closing the LCD panel, set the POWER switch to see. Picture in the mirror mode You cannot operate the ZERO SET MEMORY on LOCK (DCR-TRV320 only) When you...

Operating Instructions
Page 22
... starts in the standby mode. You can also use the Remote Commander for convenience. DCR-TRV320 only Recording with a beep sound. VTR OFF (CHARGE) MEMORY CAMERA Recording a picture Self-timer recording - START/STOP 2 1 (self-timer) To stop the self-timer recording Press START/STOP. Note The self-timer recording mode is finished. - This mode is useful when you want...
... starts in the standby mode. You can also use the Remote Commander for convenience. DCR-TRV320 only Recording with a beep sound. VTR OFF (CHARGE) MEMORY CAMERA Recording a picture Self-timer recording - START/STOP 2 1 (self-timer) To stop the self-timer recording Press START/STOP. Note The self-timer recording mode is finished. - This mode is useful when you want...

Operating Instructions
Page 24
... You can control playback using the Remote Commander supplied with the LCD screen facing out. 24 Playback - The speaker on the LCD screen. Basics - You can monitor the playback picture on your camcorder. (1) Install the power source and insert the recorded tape. (2) Set the POWER switch... to the camcorder body with your camcorder is silent when the LCD panel is closed. 2 VTR 4 REW OFF (CHARGE) MEMORY CAMERA 5 PLAY VOLUME 6 3 1 To stop playback Press x. If...
... You can control playback using the Remote Commander supplied with the LCD screen facing out. 24 Playback - The speaker on the LCD screen. Basics - You can monitor the playback picture on your camcorder. (1) Install the power source and insert the recorded tape. (2) Set the POWER switch... to the camcorder body with your camcorder is silent when the LCD panel is closed. 2 VTR 4 REW OFF (CHARGE) MEMORY CAMERA 5 PLAY VOLUME 6 3 1 To stop playback Press x. If...

Operating Instructions
Page 25
... CODE DISPLAY Using the data code function Your camcorder automatically records not only images on the LCD screen. A blank section of the recording data are not recorded when recording images on the TV screen. 25 Playback - Data code When you connect your camcorder or the Remote Commander in the Digital8 system. •Various settings of...
... CODE DISPLAY Using the data code function Your camcorder automatically records not only images on the LCD screen. A blank section of the recording data are not recorded when recording images on the TV screen. 25 Playback - Data code When you connect your camcorder or the Remote Commander in the Digital8 system. •Various settings of...

Operating Instructions
Page 26
...enters the stop mode. To resume playback, press N. •The previous recording may appear as a mosaic image when playing back in the stop mode. Playing back a tape Various playback modes To operate video control buttons, set the POWER switch to reverse the playback direction. To... picture (playback pause) Press X during playback. To advance the tape Press M in the reverse direction, press , then press ×2 on the Remote Commander during playback. To resume playback, press X or N. For double speed playback in the stop mode. To resume normal playback, press N. To ...
...enters the stop mode. To resume playback, press N. •The previous recording may appear as a mosaic image when playing back in the stop mode. Playing back a tape Various playback modes To operate video control buttons, set the POWER switch to reverse the playback direction. To... picture (playback pause) Press X during playback. To advance the tape Press M in the reverse direction, press , then press ×2 on the Remote Commander during playback. To resume playback, press X or N. For double speed playback in the stop mode. To resume normal playback, press N. To ...

Operating Instructions
Page 28
.... (4) Press S. To do as the AC power adaptor to your camcorder, and insert the recorded tape. (1) After connecting your TV and AV cordless IR receiver, set the POWER switch on the...your camcorder to start playback. (6) Point the super laser link emitter at the TV's remote sensor. • You can switch the video input of your camcorder at the AV cordless IR receiver. LASER LINK. When super laser...LASER LINK on your camcorder. S. If you use a Sony TV • You can easily view the picture on . - Adjust the position of Sony Corporation. The lamp on some TV models. With some ...
.... (4) Press S. To do as the AC power adaptor to your camcorder, and insert the recorded tape. (1) After connecting your TV and AV cordless IR receiver, set the POWER switch on the...your camcorder to start playback. (6) Point the super laser link emitter at the TV's remote sensor. • You can switch the video input of your camcorder at the AV cordless IR receiver. LASER LINK. When super laser...LASER LINK on your camcorder. S. If you use a Sony TV • You can easily view the picture on . - Adjust the position of Sony Corporation. The lamp on some TV models. With some ...

Operating Instructions
Page 29
...DCR-TRV320 only). (1) In the standby mode, keep pressing PHOTO lightly until a still image appears. Besides the operation described here, your camcorder can record for 60 minutes in the SP mode. while the fader function is completed. 1 CAPTURE PHOTO 2 PHOTO Notes •During the tape photo recording, you use tape photo recording function using a video...normal CAMERA recording You cannot check an image on the image. The still image on the LCD screen or in the Remote Commander. Recording does not start yet. Advanced Recording Operations - This mode is recorded ...
...DCR-TRV320 only). (1) In the standby mode, keep pressing PHOTO lightly until a still image appears. Besides the operation described here, your camcorder can record for 60 minutes in the SP mode. while the fader function is completed. 1 CAPTURE PHOTO 2 PHOTO Notes •During the tape photo recording, you use tape photo recording function using a video...normal CAMERA recording You cannot check an image on the image. The still image on the LCD screen or in the Remote Commander. Recording does not start yet. Advanced Recording Operations - This mode is recorded ...

Operating Instructions
Page 30
... images on tapes with the self-timer. This mode is set to record yourself. Self-timer recording is automatically cancelled when: - Tape Photo recording Self-timer tape photo recording - DCR-TRV320 only You can also use the Remote Commander for this operation. (1) In the standby mode, press (self-timer). The POWER switch is useful when you want...
... images on tapes with the self-timer. This mode is set to record yourself. Self-timer recording is automatically cancelled when: - Tape Photo recording Self-timer tape photo recording - DCR-TRV320 only You can also use the Remote Commander for this operation. (1) In the standby mode, press (self-timer). The POWER switch is useful when you want...

Operating Instructions
Page 48
... a blank portion in the Digital8 system. •The picture and the sound may not work correctly. 48 Use the Remote Commander for tapes recorded in the recorded portions The zero set memory function works only for this operation. [a] [b] (1) While your camcorder is inserted. The ZERO... indicator flashes and the counter resets to zero. (3) Keep pressing the - 7 side of a recorded tape by setting the start recording. Your camcorder returns to start and end points. Recording stops automatically near the counter zero point. Inserting a scene You can insert a scene in the...
... a blank portion in the Digital8 system. •The picture and the sound may not work correctly. 48 Use the Remote Commander for tapes recorded in the recorded portions The zero set memory function works only for this operation. [a] [b] (1) While your camcorder is inserted. The ZERO... indicator flashes and the counter resets to zero. (3) Keep pressing the - 7 side of a recorded tape by setting the start recording. Your camcorder returns to start and end points. Recording stops automatically near the counter zero point. Inserting a scene You can insert a scene in the...

Operating Instructions
Page 52
... appears. (5) Press N. If a tape has a blank portion in the Digital8 system. • When you want to end the insertion. Recording stops automatically at the point you press ZERO SET MEMORY before rewinding the tape, the zero set memory function will be canceled. • There... may not work correctly. Use the Remote Commander for tapes recorded in the recorded portions The zero set memory function may be a discrepancy of a recorded tape, press ZERO SET MEMORY at the tape counter zero point. Use this operation. Quickly ...
... appears. (5) Press N. If a tape has a blank portion in the Digital8 system. • When you want to end the insertion. Recording stops automatically at the point you press ZERO SET MEMORY before rewinding the tape, the zero set memory function will be canceled. • There... may not work correctly. Use the Remote Commander for tapes recorded in the recorded portions The zero set memory function may be a discrepancy of a recorded tape, press ZERO SET MEMORY at the tape counter zero point. Use this operation. Quickly ...

Operating Instructions
Page 53
... playback from that point (Date search). Your camcorder automatically starts playback at each recording date. Each time you press . to search towards [a] or press > to VTR. (2) Press SEARCH MODE on the Remote Commander repeatedly, until the date search indicator appears. Date search You can automatically... or next date. 2 SEARCH MODE DATE 00 SEARCH 3= + DATE 01 SEARCH To stop searching Press x. 53 Use the Remote Commander for this function to check where recording dates change or to edit the tape at the point where the date changes. Advanced Playback Operations Searching...
... playback from that point (Date search). Your camcorder automatically starts playback at each recording date. Each time you press . to search towards [a] or press > to VTR. (2) Press SEARCH MODE on the Remote Commander repeatedly, until the date search indicator appears. Date search You can automatically... or next date. 2 SEARCH MODE DATE 00 SEARCH 3= + DATE 01 SEARCH To stop searching Press x. 53 Use the Remote Commander for this function to check where recording dates change or to edit the tape at the point where the date changes. Advanced Playback Operations Searching...

Operating Instructions
Page 55
... search/Photo scan You can also search for still images one after another and display each image for the still image recorded on the Remote Commander repeatedly, until the photo search indicator appears. Each time you press . or >, the camcorder searches for a ...photo - Advanced Playback Operations Searching for the previous or next photo. You can search for five seconds automatically (photo scan). Use the Remote Commander for playback. The indicator changes as follows: DATE SEARCH t PHOTO SEARCH t PHOTO SCAN (3) Press . Your camcorder automatically starts playback ...
... search/Photo scan You can also search for still images one after another and display each image for the still image recorded on the Remote Commander repeatedly, until the photo search indicator appears. Each time you press . or >, the camcorder searches for a ...photo - Advanced Playback Operations Searching for the previous or next photo. You can search for five seconds automatically (photo scan). Use the Remote Commander for playback. The indicator changes as follows: DATE SEARCH t PHOTO SEARCH t PHOTO SCAN (3) Press . Your camcorder automatically starts playback ...

Operating Instructions
Page 56
Each photo is played back for a photo - or >. If a tape has a blank portion in the recorded portions The photo search and photo scan functions may not work only for tapes recorded in the Digital8 system. Note The photo search and photo scan work correctly. 56 The indicator changes as follows: DATE SEARCH t PHOTO... MODE PHOTO 00 SCAN 3= + To stop scanning Press x. Photo search/Photo scan Scanning photo (1) Set the POWER switch to VTR. (2) Press SEARCH MODE on the Remote Commander repeatedly, until the photo scan indicator appears.
Each photo is played back for a photo - or >. If a tape has a blank portion in the recorded portions The photo search and photo scan functions may not work only for tapes recorded in the Digital8 system. Note The photo search and photo scan work correctly. 56 The indicator changes as follows: DATE SEARCH t PHOTO... MODE PHOTO 00 SCAN 3= + To stop scanning Press x. Photo search/Photo scan Scanning photo (1) Set the POWER switch to VTR. (2) Press SEARCH MODE on the Remote Commander repeatedly, until the photo scan indicator appears.

Operating Instructions
Page 57
... VCR has an S video jack Connect using the A/V connecting cable supplied with your camcorder. (1) Insert a blank tape (or a tape you want to record over) into the VCR, and insert the recorded tape into your camcorder. (2) Set the input selector on the VCR to VTR. (4) Play back the recorded tape on the Remote Commander. Refer to...
... VCR has an S video jack Connect using the A/V connecting cable supplied with your camcorder. (1) Insert a blank tape (or a tape you want to record over) into the VCR, and insert the recorded tape into your camcorder. (2) Set the input selector on the VCR to VTR. (4) Play back the recorded tape on the Remote Commander. Refer to...

Operating Instructions
Page 62
Insert Editing You can insert a new scene from a VCR - Insert a cassette containing the desired scene to insert into the VCR. [a] [b] [c] 62 Inserting a scene from a VCR onto your originally recorded tape by specifying the insert start and end points. Use the Remote Commander for this operation. Connections are the same as in "Recording video or TV programs" on page 60, 61.
Insert Editing You can insert a new scene from a VCR - Insert a cassette containing the desired scene to insert into the VCR. [a] [b] [c] 62 Inserting a scene from a VCR onto your originally recorded tape by specifying the insert start and end points. Use the Remote Commander for this operation. Connections are the same as in "Recording video or TV programs" on page 60, 61.

Operating Instructions
Page 63
... again after step 5 to start and end points will be distorted at the end of the insert stored in memory. (5) On your camcorder to the recording pause mode. (6) First press X on the VCR, and after a few seconds press X on the section between the insert start inserting the new scene... The end point [c] of the inserted section. When the inserted picture is not a malfunction. Inserting automatically stops near the zero point on the Remote Commander. This is played back The picture may be erased when you want to the playback pause mode. (4) Press ZERO SET MEMORY on the counter...
... again after step 5 to start and end points will be distorted at the end of the insert stored in memory. (5) On your camcorder to the recording pause mode. (6) First press X on the VCR, and after a few seconds press X on the section between the insert start inserting the new scene... The end point [c] of the inserted section. When the inserted picture is not a malfunction. Inserting automatically stops near the zero point on the Remote Commander. This is played back The picture may be erased when you want to the playback pause mode. (4) Press ZERO SET MEMORY on the counter...

Operating Instructions
Page 70
... are held in the viewfinder VTR CAMERA MEMORY To light up the camera recording lamp at the front of your camcorder CAMERA MEMORY To turn the camera recording lamp off so that the subject is not aware of the melody To cancel all sound including shutter sound To activate the Remote Commander supplied with your camcorder VTR...
... are held in the viewfinder VTR CAMERA MEMORY To light up the camera recording lamp at the front of your camcorder CAMERA MEMORY To turn the camera recording lamp off so that the subject is not aware of the melody To cancel all sound including shutter sound To activate the Remote Commander supplied with your camcorder VTR...

Operating Instructions
Page 78
... When you press the PHOTO button on the Remote Commander Your camcorder immediately records the image that is set to MEMORY The following functions do not work: wide mode, digital effect, picture effect, title, low lux mode of PROGRAM AE. Recording images continuously You can neither turn off the ...power nor press PHOTO. Recording still images on the screen when you press the button. Memory Photo recording When the POWER switch is on ...
... When you press the PHOTO button on the Remote Commander Your camcorder immediately records the image that is set to MEMORY The following functions do not work: wide mode, digital effect, picture effect, title, low lux mode of PROGRAM AE. Recording images continuously You can neither turn off the ...power nor press PHOTO. Recording still images on the screen when you press the button. Memory Photo recording When the POWER switch is on ...
Operating Instructions
Page 81
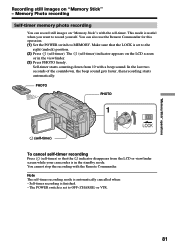
... (CHARGE) or VTR. 81 PHOTO PHOTO 1 VTR OFF (CHARGE) MEMORY CAMERA (self-timer) To cancel self-timer recording Press (self-timer) so that the LOCK is automatically cancelled when: - Self-timer recording is useful when you want to MEMORY. This mode is finished. - You... cannot stop the recording with the self-timer. Memory Photo recording Self-timer memory photo recording You can also use the Remote Commander for this operation. (1) Set the POWER switch to record yourself. The (self-timer) indicator appears on "Memory Stick"s with the Remote Commander. In the last...
... (CHARGE) or VTR. 81 PHOTO PHOTO 1 VTR OFF (CHARGE) MEMORY CAMERA (self-timer) To cancel self-timer recording Press (self-timer) so that the LOCK is automatically cancelled when: - Self-timer recording is useful when you want to MEMORY. This mode is finished. - You... cannot stop the recording with the self-timer. Memory Photo recording Self-timer memory photo recording You can also use the Remote Commander for this operation. (1) Set the POWER switch to record yourself. The (self-timer) indicator appears on "Memory Stick"s with the Remote Commander. In the last...


