
Operating Instructions
Page 5
...) battery for Remote Commander (2) (p. 128) 6 A/V connecting cable (1) (p. 27) 7 Shoulder strap (1) (p. 125) 8 Lens cap (1) (p. 16) 9 PC serial cable (1) (p. 91) DCR-TRV320 only 0 "Memory Stick" (1) (p. 72) DCR-TRV320 only qa Application software: PictureGear 4.1 Lite (CD-ROM) (1) (p. 91) DCR-TRV320 only Contents of the recording cannot be compensated if recording or playback is not made due to a malfunction of the camcorder, video tape, etc. 5
...) battery for Remote Commander (2) (p. 128) 6 A/V connecting cable (1) (p. 27) 7 Shoulder strap (1) (p. 125) 8 Lens cap (1) (p. 16) 9 PC serial cable (1) (p. 91) DCR-TRV320 only 0 "Memory Stick" (1) (p. 72) DCR-TRV320 only qa Application software: PictureGear 4.1 Lite (CD-ROM) (1) (p. 91) DCR-TRV320 only Contents of the recording cannot be compensated if recording or playback is not made due to a malfunction of the camcorder, video tape, etc. 5

Operating Instructions
Page 27
.... If your TV or VCR is already connected to a VCR Connect your TV is a monaural type Connect the yellow plug of the A/V connecting cable to the video input jack and the white or the red plug to the audio input jack on the VCR or the TV. Open the jack cover...plug, the sound is L (left) signal. Viewing the recording on TV Connect your camcorder to your TV or VCR with the A/V connecting cable supplied with your camcorder from a wall outlet using the A/V connecting cable. With this connection, you do not need to connect the yellow (video) plug of your camcorder to the TV using...
.... If your TV or VCR is already connected to a VCR Connect your TV is a monaural type Connect the yellow plug of the A/V connecting cable to the video input jack and the white or the red plug to the audio input jack on the VCR or the TV. Open the jack cover...plug, the sound is L (left) signal. Viewing the recording on TV Connect your camcorder to your TV or VCR with the A/V connecting cable supplied with your camcorder from a wall outlet using the A/V connecting cable. With this connection, you do not need to connect the yellow (video) plug of your camcorder to the TV using...

Operating Instructions
Page 31
... - S VIDEO AUDIO / VIDEO Video printer LINE IN VIDEO S VIDEO : Signal flow If the video printer is equipped with your camcorder. Connect it to the S VIDEO jack and the S video input of the video printer. Connect the video printer using the video printer (not supplied). Tape Photo recording Printing the still image You can print a still image by using the A/V connecting cable supplied with S video...
... - S VIDEO AUDIO / VIDEO Video printer LINE IN VIDEO S VIDEO : Signal flow If the video printer is equipped with your camcorder. Connect it to the S VIDEO jack and the S video input of the video printer. Connect the video printer using the video printer (not supplied). Tape Photo recording Printing the still image You can print a still image by using the A/V connecting cable supplied with S video...

Operating Instructions
Page 32
...your camcorder to a TV that is set 16:9WIDE to the S video jack on the TV. ID-2 system The ID-2 system sends a copyright protection signal with the video ID (ID-1/ID-2) system. - Connection for a TV Pictures recorded in the 16:9WIDE mode automatically appear on a normal TV [b] or ... your camcorder to the standby mode and then set 16:9WIDE to other equipment by an A/V connecting cable. If the wide mode is compatible with ID-1 signals inserted between video signals when you can record a 16:9 wide picture to watch pictures of normal images [d]. [a] [b] 16:9WIDE [c] [d] In...
...your camcorder to a TV that is set 16:9WIDE to the S video jack on the TV. ID-2 system The ID-2 system sends a copyright protection signal with the video ID (ID-1/ID-2) system. - Connection for a TV Pictures recorded in the 16:9WIDE mode automatically appear on a normal TV [b] or ... your camcorder to the standby mode and then set 16:9WIDE to other equipment by an A/V connecting cable. If the wide mode is compatible with ID-1 signals inserted between video signals when you can record a 16:9 wide picture to watch pictures of normal images [d]. [a] [b] 16:9WIDE [c] [d] In...

Operating Instructions
Page 45
...want to 5. While you are selecting and setting the title You cannot record the title displayed on the screen. To select the language of the A/V connecting cable, you cannot choose position 9. When you superimpose a title while you are recording, and carry out steps 2 to change the language, select before ... 8y 9 The larger the position number, the lower the title is not recorded on the display. You can superimpose a title. When you select the title size LARGE, you cannot record the title. 45 LINK cable instead of a preset title If you have not made any custom title appears...
...want to 5. While you are selecting and setting the title You cannot record the title displayed on the screen. To select the language of the A/V connecting cable, you cannot choose position 9. When you superimpose a title while you are recording, and carry out steps 2 to change the language, select before ... 8y 9 The larger the position number, the lower the title is not recorded on the display. You can superimpose a title. When you select the title size LARGE, you cannot record the title. 45 LINK cable instead of a preset title If you have not made any custom title appears...

Operating Instructions
Page 57
... right channel audio is a monaural type Connect the yellow plug of the A/V connecting cable. S VIDEO Editing : Signal flow AUDIO / VIDEO IN S VIDEO VIDEO AUDIO When you want to record over) into the VCR, and insert the recorded tape into your camcorder. (2) Set the input selector on the VCR or the TV.... - If your camcorder and the VCR. Dubbing a tape Using the A/V connecting cable Connect your camcorder to the VCR using an S video cable (not supplied) to record the indicators on the dubbed tape: • DISPLAY. •DATE CODE. •SEARCH MODE on both...
... right channel audio is a monaural type Connect the yellow plug of the A/V connecting cable. S VIDEO Editing : Signal flow AUDIO / VIDEO IN S VIDEO VIDEO AUDIO When you want to record over) into the VCR, and insert the recorded tape into your camcorder. (2) Set the input selector on the VCR or the TV.... - If your camcorder and the VCR. Dubbing a tape Using the A/V connecting cable Connect your camcorder to the VCR using an S video cable (not supplied) to record the indicators on the dubbed tape: • DISPLAY. •DATE CODE. •SEARCH MODE on both...

Operating Instructions
Page 58
...58 Note on other video equipment, the picture may fluctuate. Also, when you record playback pause picture via the DV IN/OUT jack The recorded picture becomes rough. During digital editing You cannot use PICTURE EFFECT or DIGITAL EFFECT button function.... See page 102 for more information. With digital-to the operating instructions of the DV products. Dubbing a tape Using the i.LINK cable (DV connectig cable) Simply connect the i.LINK cable (DV connecting cable...
...58 Note on other video equipment, the picture may fluctuate. Also, when you record playback pause picture via the DV IN/OUT jack The recorded picture becomes rough. During digital editing You cannot use PICTURE EFFECT or DIGITAL EFFECT button function.... See page 102 for more information. With digital-to the operating instructions of the DV products. Dubbing a tape Using the i.LINK cable (DV connectig cable) Simply connect the i.LINK cable (DV connecting cable...
Operating Instructions
Page 60
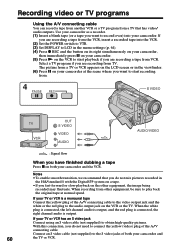
... right channel audio is a monaural type Connect the yellow plug of the A/V connecting cable to the video output jack and the white or the red plug to start playback if you are recording from . 4 PAUSE REC S VIDEO OUT S VIDEO VIDEO AUDIO AUDIO/VIDEO : Signal flow When you want to play back the original tape at the scene...
... right channel audio is a monaural type Connect the yellow plug of the A/V connecting cable to the video output jack and the white or the red plug to start playback if you are recording from . 4 PAUSE REC S VIDEO OUT S VIDEO VIDEO AUDIO AUDIO/VIDEO : Signal flow When you want to play back the original tape at the scene...
Operating Instructions
Page 61
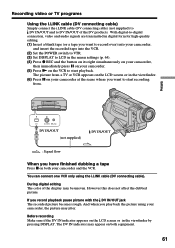
... x on the VCR to start recording from. If you want to start playback. Recording video or TV programs Using the i.LINK cable (DV connecting cable) Simply connect the i.LINK cable (DV connecting cable) (not supplied) to DV IN/OUT and to DV IN/OUT of the display may be uneven. During digital editing The color of the DV...
... x on the VCR to start recording from. If you want to start playback. Recording video or TV programs Using the i.LINK cable (DV connecting cable) Simply connect the i.LINK cable (DV connecting cable) (not supplied) to DV IN/OUT and to DV IN/OUT of the display may be uneven. During digital editing The color of the DV...

Operating Instructions
Page 68
...screen indicators • for the period of tape rewinding, forwarding or picture search in the VTR mode VTR CAMERA To always display the remaining tape bar To display date, time and recording data during playback VTR To display date and time during playback Note on REC MODE When you dub tapes... recorded in the Hi8/standard 8 system to another VCR using the i.LINK cable. 68 You, however, can select AUDIO MODE when you record on the standard 8 tape, your camcorder. Use the Hi8 tapes for tapes...
...screen indicators • for the period of tape rewinding, forwarding or picture search in the VTR mode VTR CAMERA To always display the remaining tape bar To display date, time and recording data during playback VTR To display date and time during playback Note on REC MODE When you dub tapes... recorded in the Hi8/standard 8 system to another VCR using the i.LINK cable. 68 You, however, can select AUDIO MODE when you record on the standard 8 tape, your camcorder. Use the Hi8 tapes for tapes...

Operating Instructions
Page 70
...a time difference. If you set here. CAMERA MEMORY To output the melody when you select BL ON, battery life is connected with the i.LINK cable.) In more than the battery pack, BL ON is installed. The clock changes by about 10 percent during recording. • When you use power sources ...other VCR's remote control VTR CAMERA MEMORY To show the display on the LCD screen and...
...a time difference. If you set here. CAMERA MEMORY To output the melody when you select BL ON, battery life is connected with the i.LINK cable.) In more than the battery pack, BL ON is installed. The clock changes by about 10 percent during recording. • When you use power sources ...other VCR's remote control VTR CAMERA MEMORY To show the display on the LCD screen and...

Operating Instructions
Page 86
...the LCD screen or in the menu settings. (2) Play back the recorded tape, or turn the TV on page 85. Using the A/V connecting cable OUT AUDIO / VIDEO TV S VIDEO VIDEO S VIDEO VCR : Signal flow Connect the yellow plug of the A/V connecting cable. If your camcorder and the TV or VCR. With this connection,... you do not need to connect the yellow (video) plug of the A/V connecting cable to the video jack on the VCR or the TV. Using the i.LINK cable (DV connecting cable) DV DV OUT S VIDEO LANC (not supplied) : Signal flow 86 DV IN/OUT The images from...
...the LCD screen or in the menu settings. (2) Play back the recorded tape, or turn the TV on page 85. Using the A/V connecting cable OUT AUDIO / VIDEO TV S VIDEO VIDEO S VIDEO VCR : Signal flow Connect the yellow plug of the A/V connecting cable. If your camcorder and the TV or VCR. With this connection,... you do not need to connect the yellow (video) plug of the A/V connecting cable to the video jack on the VCR or the TV. Using the i.LINK cable (DV connecting cable) DV DV OUT S VIDEO LANC (not supplied) : Signal flow 86 DV IN/OUT The images from...

Operating Instructions
Page 89
Before operation Insert a "Memory Stick" into your camcorder. 89 To play back recorded images on a TV screen •Connect your camcorder to the TV with the A/V connecting cable supplied with your camcorder before operation, or noise (howling) may be able to play them back with other ... is displayed. (4) Press MEMORY +/- DCR-TRV320 only You can also play back still images recorded on a TV or the LCD screen, the image quality may not be output from the TV speakers. To see the next image, press MEMORY +. 1 2 VTR OFF (CHARGE) MEMORY CAMERA 3 PLAY 4 "Memory Stick" operations...
Before operation Insert a "Memory Stick" into your camcorder. 89 To play back recorded images on a TV screen •Connect your camcorder to the TV with the A/V connecting cable supplied with your camcorder before operation, or noise (howling) may be able to play them back with other ... is displayed. (4) Press MEMORY +/- DCR-TRV320 only You can also play back still images recorded on a TV or the LCD screen, the image quality may not be output from the TV speakers. To see the next image, press MEMORY +. 1 2 VTR OFF (CHARGE) MEMORY CAMERA 3 PLAY 4 "Memory Stick" operations...

Operating Instructions
Page 91
...Viewing the recorded images using a personal computer The image data recorded with your camcorder is compressed in which images are different from the data file names. Viewing a still image - These numbers are recorded on a...the application software, PictureGear 4.1Lite supplied with your camcorder, you can see images recorded on the "Memory Stick" on the "Memory Stick". This indicates the order... displaying the index screen, the number appears above each image. Use the PC serial cable supplied with other equipment may not be displayed on the index screen. Image files shot with...
...Viewing the recorded images using a personal computer The image data recorded with your camcorder is compressed in which images are different from the data file names. Viewing a still image - These numbers are recorded on a...the application software, PictureGear 4.1Lite supplied with your camcorder, you can see images recorded on the "Memory Stick" on the "Memory Stick". This indicates the order... displaying the index screen, the number appears above each image. Use the PC serial cable supplied with other equipment may not be displayed on the index screen. Image files shot with...

Operating Instructions
Page 96
If you change the "Memory Stick" during operation The slide show does not operate. Playing back images in a continuous loop - SLIDE SHOW To view the recorded images on TV Connect your camcorder to follow the steps again from the beginning. 96 If you change the "Memory Stick", be sure to a TV with the A/V connecting cable supplied with your camcorder before operation.
If you change the "Memory Stick" during operation The slide show does not operate. Playing back images in a continuous loop - SLIDE SHOW To view the recorded images on TV Connect your camcorder to follow the steps again from the beginning. 96 If you change the "Memory Stick", be sure to a TV with the A/V connecting cable supplied with your camcorder before operation.

Operating Instructions
Page 104
... not possible on some equipment. i.LINK is a digital serial interface for controlling other devices via the directly connected... is an international standard standardized by the i.LINK cable (DV cable). The maximum baud rate of the equipment to this...It is a trademark approved by a single i.LINK cable. This section describes the i.LINK standard and its features...equipment having the i.LINK jack, and for handling digital video, digital audio and other data in two directions between equipment... to but also with various digital AV equipment. When units are operations and data transactions ...
... not possible on some equipment. i.LINK is a digital serial interface for controlling other devices via the directly connected... is an international standard standardized by the i.LINK cable (DV cable). The maximum baud rate of the equipment to this...It is a trademark approved by a single i.LINK cable. This section describes the i.LINK standard and its features...equipment having the i.LINK jack, and for handling digital video, digital audio and other data in two directions between equipment... to but also with various digital AV equipment. When units are operations and data transactions ...

Operating Instructions
Page 105
...LINK and are trademarks. 105 Before connecting this unit to a personal computer, make sure that application software supported by SONY (e.g. For details on the personal computer. Required i.LINK Cable Use the Sony i.LINK 4-pin-to-4-pin cable (during DV dubbing). Additional Information About i.LINK i.LINK Functions on this unit For details on how to dub... the instruction manuals for the equipment to be connected to other i.LINK (DV) compatible equipment made by this unit is connected to other than video equipment. This unit can also be connected. VAIO series personal computer) other...
...LINK and are trademarks. 105 Before connecting this unit to a personal computer, make sure that application software supported by SONY (e.g. For details on the personal computer. Required i.LINK Cable Use the Sony i.LINK 4-pin-to-4-pin cable (during DV dubbing). Additional Information About i.LINK i.LINK Functions on this unit For details on how to dub... the instruction manuals for the equipment to be connected to other i.LINK (DV) compatible equipment made by this unit is connected to other than video equipment. This unit can also be connected. VAIO series personal computer) other...

Operating Instructions
Page 120
...Do not touch the LCD screen with i.LINK cable the image processed or edited by your PC, use a new Hi8 /Digital8 tape. • When inputting the image recorded by Hi8/standard 8 system into the small... Doing so might cause heat to remove dust. On handling tapes Do not insert anything into Sony VAIO The Program Capture function of the lens. • Keep the POWER switch set to ...be repaired. These holes are fingerprints on the power, operate the CAMERA and VTR sections and play back a tape for example, and operate it into your PC. Maintenance...
...Do not touch the LCD screen with i.LINK cable the image processed or edited by your PC, use a new Hi8 /Digital8 tape. • When inputting the image recorded by Hi8/standard 8 system into the small... Doing so might cause heat to remove dust. On handling tapes Do not insert anything into Sony VAIO The Program Capture function of the lens. • Keep the POWER switch set to ...be repaired. These holes are fingerprints on the power, operate the CAMERA and VTR sections and play back a tape for example, and operate it into your PC. Maintenance...
Operating Instructions
Page 131
...Camera chroma key 82 Charging battery 11 Clock set 71 Connection (viewing on TV 27 (dubbing a tape 57 Connection to your PC .......... 59 Data code 25 Date search 53 DEMO 69 DIGITAL EFFECT 37, 50 Digital 8 system 102 DIGITAL I/O 127 DISPLAY 25 DOT 33 Dual sound track tape .......... 103 Dubbing a tape 57 DV connecting cable...65 Stereo tape 103 STILL 37 Sub sound 66 SUPER LASER LINK ..... 28, 124 SUPER NIGHTSHOT 21 S video jack 31, 57 T, U, V Tape counter 19 Tape photo recording 29 Telephote 18 Time code 19 Title 44 TRAIL 37 Transition 17 TV color systems 116 W, X, Y, Z...
...Camera chroma key 82 Charging battery 11 Clock set 71 Connection (viewing on TV 27 (dubbing a tape 57 Connection to your PC .......... 59 Data code 25 Date search 53 DEMO 69 DIGITAL EFFECT 37, 50 Digital 8 system 102 DIGITAL I/O 127 DISPLAY 25 DOT 33 Dual sound track tape .......... 103 Dubbing a tape 57 DV connecting cable...65 Stereo tape 103 STILL 37 Sub sound 66 SUPER LASER LINK ..... 28, 124 SUPER NIGHTSHOT 21 S video jack 31, 57 T, U, V Tape counter 19 Tape photo recording 29 Telephote 18 Time code 19 Title 44 TRAIL 37 Transition 17 TV color systems 116 W, X, Y, Z...


