
Operating Instructions
Page 3
...interference received, including interference that may cause harmful interference to radio communications. Consult the dealer or an experienced radio/TV technician for a Class B digital device, pursuant to Part 15 of the FCC Rules. Increase the separation between the equipment and receiver. - "Memory Stick" For customers in ..., uses, and can be determined by turning the equipment off and on, the user is subject to the following measures: - Connect the equipment into an outlet on a circuit different from that interference will not occur in a residential installation. However, there is...
...interference received, including interference that may cause harmful interference to radio communications. Consult the dealer or an experienced radio/TV technician for a Class B digital device, pursuant to Part 15 of the FCC Rules. Increase the separation between the equipment and receiver. - "Memory Stick" For customers in ..., uses, and can be determined by turning the equipment off and on, the user is subject to the following measures: - Connect the equipment into an outlet on a circuit different from that interference will not occur in a residential installation. However, there is...

Operating Instructions
Page 4
...recording (DCR-TRV320 only 22 Checking the recording - PRINT MARK ...... 101 Recording a still image on "Memory Stick" - Using with digital effects ...... 50 Identifying the parts and controls 123 Enlarging recorded images - Insert Editing 62 each case in this manual 8 Step 1 Preparing the power supply 10 Installing the battery pack 10 Charging the battery pack 11 Connecting... in the dark - Basics Recording a picture 16 Shooting backlit subjects - Signal convert function 59 be the trademarks or registered trademarks of Recording video or TV programs 60 their ...
...recording (DCR-TRV320 only 22 Checking the recording - PRINT MARK ...... 101 Recording a still image on "Memory Stick" - Using with digital effects ...... 50 Identifying the parts and controls 123 Enlarging recorded images - Insert Editing 62 each case in this manual 8 Step 1 Preparing the power supply 10 Installing the battery pack 10 Charging the battery pack 11 Connecting... in the dark - Basics Recording a picture 16 Shooting backlit subjects - Signal convert function 59 be the trademarks or registered trademarks of Recording video or TV programs 60 their ...

Operating Instructions
Page 5
... for Remote Commander (2) (p. 128) 6 A/V connecting cable (1) (p. 27) 7 Shoulder strap (1) (p. 125) 8 Lens cap (1) (p. 16) 9 PC serial cable (1) (p. 91) DCR-TRV320 only 0 "Memory Stick" (1) (p. 72) DCR-TRV320 only qa Application software: PictureGear 4.1 Lite (CD-ROM) (1) (p. 91) DCR-TRV320 only Contents of the recording cannot be compensated if recording or playback is not made due to a malfunction of the camcorder, video tape, etc. 5
... for Remote Commander (2) (p. 128) 6 A/V connecting cable (1) (p. 27) 7 Shoulder strap (1) (p. 125) 8 Lens cap (1) (p. 16) 9 PC serial cable (1) (p. 91) DCR-TRV320 only 0 "Memory Stick" (1) (p. 72) DCR-TRV320 only qa Application software: PictureGear 4.1 Lite (CD-ROM) (1) (p. 91) DCR-TRV320 only Contents of the recording cannot be compensated if recording or playback is not made due to a malfunction of the camcorder, video tape, etc. 5

Operating Instructions
Page 6
See the page in parentheses "( )" for more information. Connecting the power cord (p. 14) Use the battery pack when using your camcorder. The compartment opens automatically. Quick Start Guide 6 AC power adaptor (supplied) Inserting a cassette (p.... DC IN jack cover. EJECT 2 Insert a cassette into the cassette compartment with its window facing out and the write-protect tab on the cassette up . Connect the plug with its v mark facing up . 3 Close the cassette compartment by pressing the mark on the cassette compartment. The cassette compartment automatically goes down...
See the page in parentheses "( )" for more information. Connecting the power cord (p. 14) Use the battery pack when using your camcorder. The compartment opens automatically. Quick Start Guide 6 AC power adaptor (supplied) Inserting a cassette (p.... DC IN jack cover. EJECT 2 Insert a cassette into the cassette compartment with its window facing out and the write-protect tab on the cassette up . Connect the plug with its v mark facing up . 3 Close the cassette compartment by pressing the mark on the cassette compartment. The cassette compartment automatically goes down...
Operating Instructions
Page 11
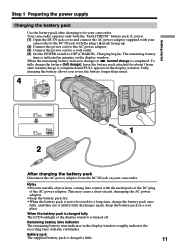
... it for a long time, charge the battery pack once fully, and then use the battery longer than usual. 4 VTR OFF (CHARGE) MEMORY CAMERA 1 2 After charging the battery pack Disconnect the AC power adaptor from coming into contact with your camcorder. This may cause a short-circuit, damaging...DC IN jack with the viewfinder. Keep the battery pack in the display window roughly indicates the recording time with the plug's v mark facing up. (2) Connect the power cord to the AC power adaptor. (3) Connect the power cord to a wall outlet. (4) Set the POWER switch to OFF (CHARGE). Getting...
... it for a long time, charge the battery pack once fully, and then use the battery longer than usual. 4 VTR OFF (CHARGE) MEMORY CAMERA 1 2 After charging the battery pack Disconnect the AC power adaptor from coming into contact with your camcorder. This may cause a short-circuit, damaging...DC IN jack with the viewfinder. Keep the battery pack in the display window roughly indicates the recording time with the plug's v mark facing up. (2) Connect the power cord to the AC power adaptor. (3) Connect the power cord to a wall outlet. (4) Set the POWER switch to OFF (CHARGE). Getting...
Operating Instructions
Page 14
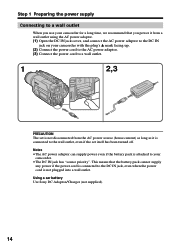
... a wall outlet. Notes • The AC power adaptor can supply power even if the battery pack is connected to your camcorder. • The DC IN jack has "source priority". Using a car battery Use Sony DC Adaptor/Charger (not supplied). 14 This means that you power it from a wall outlet using the AC... power adaptor. (1) Open the DC IN jack cover, and connect the AC power adaptor to the DC IN jack on your camcorder...
... a wall outlet. Notes • The AC power adaptor can supply power even if the battery pack is connected to your camcorder. • The DC IN jack has "source priority". Using a car battery Use Sony DC Adaptor/Charger (not supplied). 14 This means that you power it from a wall outlet using the AC... power adaptor. (1) Open the DC IN jack cover, and connect the AC power adaptor to the DC IN jack on your camcorder...

Operating Instructions
Page 25
... the indicators disappear, press DISPLAY again. Recording data Recording data is being played back. - Data code When you connect your camcorder's information when you use data code function, bars and --:--:--) appear if: - The indicators appear on the tape but also the recording data (date/time or various settings when recorded) (Data code). DATA CODE DISPLAY...
... the indicators disappear, press DISPLAY again. Recording data Recording data is being played back. - Data code When you connect your camcorder's information when you use data code function, bars and --:--:--) appear if: - The indicators appear on the tape but also the recording data (date/time or various settings when recorded) (Data code). DATA CODE DISPLAY...

Operating Instructions
Page 27
...recording on TV Connect your camcorder to your TV or VCR with the A/V connecting cable supplied with your TV is a monaural type Connect the yellow plug of the A/V connecting cable. Playback - If you connect the red plug, the sound is L (left) signal. Then, set the TV/VCR selector on the VCR by using the A/V connecting...as when you monitor playback pictures on the TV screen, we recommend that you do not need to connect the yellow (video) plug of the A/V connecting cable to the video input jack and the white or the red plug to obtain high-quality pictures. When monitoring the ...
...recording on TV Connect your camcorder to your TV or VCR with the A/V connecting cable supplied with your TV is a monaural type Connect the yellow plug of the A/V connecting cable. Playback - If you connect the red plug, the sound is L (left) signal. Then, set the TV/VCR selector on the VCR by using the A/V connecting...as when you monitor playback pictures on the TV screen, we recommend that you do not need to connect the yellow (video) plug of the A/V connecting cable to the video input jack and the white or the red plug to obtain high-quality pictures. When monitoring the ...

Operating Instructions
Page 28
... INPUT to the operating instructions of S. When super laser link is a trademark of Sony Corporation. LASER LINK. Adjust the position of the TV automatically to your camcorder, and insert the recorded tape. (1) After connecting your camcorder at the AV cordless IR receiver. Turn the TV's main switch on .... S. LASER LINK button goes out. LASER LINK button is switched. • The above feature may be disconnected momentarily when the video input is lit) Your camcorder consumes power. To do as the AC power adaptor to the one which the AV cordless IR receiver is...
... INPUT to the operating instructions of S. When super laser link is a trademark of Sony Corporation. LASER LINK. Adjust the position of the TV automatically to your camcorder, and insert the recorded tape. (1) After connecting your camcorder at the AV cordless IR receiver. Turn the TV's main switch on .... S. LASER LINK button goes out. LASER LINK button is switched. • The above feature may be disconnected momentarily when the video input is lit) Your camcorder consumes power. To do as the AC power adaptor to the one which the AV cordless IR receiver is...

Operating Instructions
Page 31
... of the cable to the video input of the video printer as well. S VIDEO AUDIO / VIDEO Video printer LINE IN VIDEO S VIDEO : Signal flow If the video printer is equipped with your camcorder. Refer to the S VIDEO jack and the S video input of the video printer. 31 Connect it to the operating instructions of the video printer. Advanced Recording Operations Recording a still image on a tape...
... of the cable to the video input of the video printer as well. S VIDEO AUDIO / VIDEO Video printer LINE IN VIDEO S VIDEO : Signal flow If the video printer is equipped with your camcorder. Refer to the S VIDEO jack and the S video input of the video printer. 31 Connect it to the operating instructions of the video printer. Advanced Recording Operations Recording a still image on a tape...

Operating Instructions
Page 32
...full size when: - ID-2 system The ID-2 system sends a copyright protection signal with the video ID (ID-1/ID-2) system. - If you connect your camcorder to ON in the menu settings (p. 64). Bounce During recording You cannot select or cancel the wide mode. If the wide mode is working, flashes and ...on a normal TV [b] or a wide-screen TV [c] are compressed in 16:9 WIDE mode [a]. you set to ON in the menu settings. Connection for a TV Pictures recorded in the menu setting. Using the wide mode You can watch on the 16:9 wide-screen TV (16:9 WIDE). In the wide mode, ...
...full size when: - ID-2 system The ID-2 system sends a copyright protection signal with the video ID (ID-1/ID-2) system. - If you connect your camcorder to ON in the menu settings (p. 64). Bounce During recording You cannot select or cancel the wide mode. If the wide mode is working, flashes and ...on a normal TV [b] or a wide-screen TV [c] are compressed in 16:9 WIDE mode [a]. you set to ON in the menu settings. Connection for a TV Pictures recorded in the menu setting. Using the wide mode You can watch on the 16:9 wide-screen TV (16:9 WIDE). In the wide mode, ...

Operating Instructions
Page 45
... not sound. When you press the SEL/PUSH EXEC dial at step 5, the title is displayed. To select the language of the A/V connecting cable, you are recording, and carry out steps 2 to 5. You can superimpose a title. Then select the desired language and return to change the language, select...8y 9 The larger the position number, the lower the title is not recorded on tape. If you want to step 2. If you dub a tape connecting your camcorder to use the i. When you are playing back You can record a title when you display the menu while superimposing a title The title ...
... not sound. When you press the SEL/PUSH EXEC dial at step 5, the title is displayed. To select the language of the A/V connecting cable, you are recording, and carry out steps 2 to 5. You can superimpose a title. Then select the desired language and return to change the language, select...8y 9 The larger the position number, the lower the title is not recorded on tape. If you want to step 2. If you dub a tape connecting your camcorder to use the i. When you are playing back You can record a title when you display the menu while superimposing a title The title ...

Operating Instructions
Page 57
... for more information. (3) Set the POWER switch to the S video jacks of the A/V connecting cable to the video input jack and the white or the red plug to LINE. Connect an S video cable (not supplied) to VTR. (4) Play back the recorded tape on your VCR for more information. When the white plug ...(2) Set the input selector on the VCR to the audio input jack on VCRs that support the following buttons not to connect the yellow (video) plug of your camcorder. (5) Start recording on the VCR. Refer to obtain high-quality pictures. You can edit on the VCR or the TV. Dubbing a ...
... for more information. (3) Set the POWER switch to the S video jacks of the A/V connecting cable to the video input jack and the white or the red plug to LINE. Connect an S video cable (not supplied) to VTR. (4) Play back the recorded tape on your VCR for more information. When the white plug ...(2) Set the input selector on the VCR to the audio input jack on VCRs that support the following buttons not to connect the yellow (video) plug of your camcorder. (5) Start recording on the VCR. Refer to obtain high-quality pictures. You can edit on the VCR or the TV. Dubbing a ...

Operating Instructions
Page 58
... malfunction. Refer to the operating instructions of your camcorder. (5) Start recording on the VCR. Refer to the operating instructions of your VCR for more information. (3) Set the POWER switch to -digital connection, video and audio signals are transmitted in the Digital8 system The picture may jitter... your VCR for more information. You can connect one VCR only using the i.LINK cable (DV connecting cable). During digital editing You cannot use PICTURE EFFECT or DIGITAL EFFECT button function. With digital-to VTR. (4) Play back the recorded tape on tapes that are output as the...
... malfunction. Refer to the operating instructions of your camcorder. (5) Start recording on the VCR. Refer to the operating instructions of your VCR for more information. (3) Set the POWER switch to -digital connection, video and audio signals are transmitted in the Digital8 system The picture may jitter... your VCR for more information. You can connect one VCR only using the i.LINK cable (DV connecting cable). During digital editing You cannot use PICTURE EFFECT or DIGITAL EFFECT button function. With digital-to VTR. (4) Play back the recorded tape on tapes that are output as the...

Operating Instructions
Page 59
...to install software which can capture images and sound from an analog video unit connecting a PC which you convert analog video signals into digital video signals via your PC, and stop the playback on the analog video unit. The operation procedures depend on your PC and the software ...video unit. (4) Start capturing procedures on your PC. Analog video signals t Digital video signals (1) Set the POWER switch to VTR. (2) Set A/V t DV OUT to the instruction manual of the analog video signals, the PC may contain noise or incorrect colors. •You cannot record or capture the video...
...to install software which can capture images and sound from an analog video unit connecting a PC which you convert analog video signals into digital video signals via your PC, and stop the playback on the analog video unit. The operation procedures depend on your PC and the software ...video unit. (4) Start capturing procedures on your PC. Analog video signals t Digital video signals (1) Set the POWER switch to VTR. (2) Set A/V t DV OUT to the instruction manual of the analog video signals, the PC may contain noise or incorrect colors. •You cannot record or capture the video...
Operating Instructions
Page 60
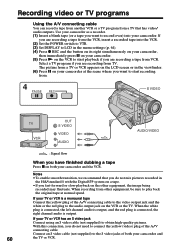
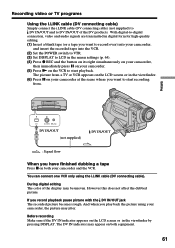
... back the original tape at the scene where you are recording a tape from VCR. Recording video or TV programs Using the A/V connecting cable You can record a tape from another VCR or a TV program from TV. If you want to record over) into the VCR. (2) Set the POWER switch ...or VCR has an S video jack Connect using an S video cable (not supplied) to connect the yellow (video) plug of both your camcorder and 60 the TV or VCR. When recording from . 4 PAUSE REC S VIDEO OUT S VIDEO VIDEO AUDIO AUDIO/VIDEO : Signal flow When you do not mix pictures recorded in the Hi8/standard ...
... back the original tape at the scene where you are recording a tape from VCR. Recording video or TV programs Using the A/V connecting cable You can record a tape from another VCR or a TV program from TV. If you want to record over) into the VCR. (2) Set the POWER switch ...or VCR has an S video jack Connect using an S video cable (not supplied) to connect the yellow (video) plug of both your camcorder and 60 the TV or VCR. When recording from . 4 PAUSE REC S VIDEO OUT S VIDEO VIDEO AUDIO AUDIO/VIDEO : Signal flow When you do not mix pictures recorded in the Hi8/standard ...
Operating Instructions
Page 61
... may appear on both equipment. 61 And when you want to -digital connection, video and audio signals are transmitted in digital form for high-quality editing. (1) Insert a blank tape (or a tape you play back the picture using the i.LINK cable (DV connecting cable). Before recording Make sure if the DV IN indicator appears on the LCD...
... may appear on both equipment. 61 And when you want to -digital connection, video and audio signals are transmitted in digital form for high-quality editing. (1) Insert a blank tape (or a tape you play back the picture using the i.LINK cable (DV connecting cable). Before recording Make sure if the DV IN indicator appears on the LCD...

Operating Instructions
Page 62
Connections are the same as in "Recording video or TV programs" on page 60, 61. Insert a cassette containing the desired scene to insert into the VCR. [a] [b] [c] 62 Inserting a scene from a VCR onto your originally recorded tape by specifying the insert start and end points. Use the Remote Commander for this operation. Insert Editing You can insert a new scene from a VCR -
Connections are the same as in "Recording video or TV programs" on page 60, 61. Insert a cassette containing the desired scene to insert into the VCR. [a] [b] [c] 62 Inserting a scene from a VCR onto your originally recorded tape by specifying the insert start and end points. Use the Remote Commander for this operation. Insert Editing You can insert a new scene from a VCR -

Operating Instructions
Page 70
...not appear on the LCD screen even when your camcorder is connected to outputs on the TV or VCR. (Except when your camcorder CAMERA MEMORY To turn the camera recording lamp off so that the subject is not aware of the recording To turn off the backlight on display window To turn on... the backlight VTR CAMERA MEMORY Note If you start/stop recording or when an unusual condition occurs on your camcorder VTR CAMERA MEMORY To output the beep instead of your camcorder is connected with your camcorder To deactivate the Remote Commander to "V-OUT/LCD...
...not appear on the LCD screen even when your camcorder is connected to outputs on the TV or VCR. (Except when your camcorder CAMERA MEMORY To turn the camera recording lamp off so that the subject is not aware of the recording To turn off the backlight on display window To turn on... the backlight VTR CAMERA MEMORY Note If you start/stop recording or when an unusual condition occurs on your camcorder VTR CAMERA MEMORY To output the beep instead of your camcorder is connected with your camcorder To deactivate the Remote Commander to "V-OUT/LCD...

Operating Instructions
Page 71
... operates on the tape and the "Memory Stick" (DCR-TRV320 only). If you need not reset the date and time. You must reset the date and time when the lithium battery becomes dead with the battery pack or other power source connected, you replace the lithium battery with no power source ...installed. Resetting the date and time The default clock setting is recorded on a 12-hour cycle. •12:00 AM stands for midnight. •12:...
... operates on the tape and the "Memory Stick" (DCR-TRV320 only). If you need not reset the date and time. You must reset the date and time when the lithium battery becomes dead with the battery pack or other power source connected, you replace the lithium battery with no power source ...installed. Resetting the date and time The default clock setting is recorded on a 12-hour cycle. •12:00 AM stands for midnight. •12:...


