
Operating Instructions
Page 4
... - Using with digital effects ...... 50 Identifying the parts and controls 123 Enlarging recorded images - Basics Playing back a tape 24 Viewing the recording on TV 27 Advanced Recording Operations "Memory Stick" operations (DCR-TRV320 only) Using "Memory Stick"-introduction .......... 72 Recording still images on... 2 Inserting a cassette 15 Recording - Date search 53 Searching for a photo - Basics Recording a picture 16 Shooting backlit subjects - Memory PB ZOOM 94 Playing back images in this manual 8 Step 1 Preparing the power supply 10 Installing the battery pack ...
... - Using with digital effects ...... 50 Identifying the parts and controls 123 Enlarging recorded images - Basics Playing back a tape 24 Viewing the recording on TV 27 Advanced Recording Operations "Memory Stick" operations (DCR-TRV320 only) Using "Memory Stick"-introduction .......... 72 Recording still images on... 2 Inserting a cassette 15 Recording - Date search 53 Searching for a photo - Basics Recording a picture 16 Shooting backlit subjects - Memory PB ZOOM 94 Playing back images in this manual 8 Step 1 Preparing the power supply 10 Installing the battery pack ...

Operating Instructions
Page 5
... Make sure that the following accessories are supplied with your camcorder. 1 2 3 4 5 6 7 8 9 0 qa 1 Wireless Remote Commander (1) (p. 128) 2 AC-L10A/L10B/L10C AC power adaptor (1), Power cord (1) (p. 11) 3 NP-F330 battery pack (1) (p. 10, 11) 4 CR2025... cap (1) (p. 16) 9 PC serial cable (1) (p. 91) DCR-TRV320 only 0 "Memory Stick" (1) (p. 72) DCR-TRV320 only qa Application software: PictureGear 4.1 Lite (CD-ROM) (1) (p. 91) DCR-TRV320 only Contents of the recording cannot be compensated if recording or playback is not made due to a malfunction of the camcorder, video tape, etc. 5
... Make sure that the following accessories are supplied with your camcorder. 1 2 3 4 5 6 7 8 9 0 qa 1 Wireless Remote Commander (1) (p. 128) 2 AC-L10A/L10B/L10C AC power adaptor (1), Power cord (1) (p. 11) 3 NP-F330 battery pack (1) (p. 10, 11) 4 CR2025... cap (1) (p. 16) 9 PC serial cable (1) (p. 91) DCR-TRV320 only 0 "Memory Stick" (1) (p. 72) DCR-TRV320 only qa Application software: PictureGear 4.1 Lite (CD-ROM) (1) (p. 91) DCR-TRV320 only Contents of the recording cannot be compensated if recording or playback is not made due to a malfunction of the camcorder, video tape, etc. 5

Operating Instructions
Page 6
The compartment opens automatically. AC power adaptor (supplied) Inserting a cassette (p. 15) 1 Open the lid of the cassette compartment. EJECT 2 Insert a cassette into the cassette compartment with its window facing out and the write-... pressing the mark on the cassette up . Quick Start Guide This chapter introduces you to the basic features of your camcorder outdoors (p. 10). Connecting the power cord (p. 14) Use the battery pack when using your camcorder.
The compartment opens automatically. AC power adaptor (supplied) Inserting a cassette (p. 15) 1 Open the lid of the cassette compartment. EJECT 2 Insert a cassette into the cassette compartment with its window facing out and the write-... pressing the mark on the cassette up . Quick Start Guide This chapter introduces you to the basic features of your camcorder outdoors (p. 10). Connecting the power cord (p. 14) Use the battery pack when using your camcorder.

Operating Instructions
Page 10
If you do so, the battery pack may slide off your camcorder unintentionally, damaging your camcorder outdoors. To remove the battery pack Slide the battery pack out in the direction of the arrow while pressing BATT RELEASE down until it clicks. Slide the battery pack down . Step 1 Preparing the power supply Installing the battery pack Install the battery pack to use your camcorder. 10 BATT RELEASE After installing the battery pack Do not carry your camcorder by holding the battery pack.
If you do so, the battery pack may slide off your camcorder unintentionally, damaging your camcorder outdoors. To remove the battery pack Slide the battery pack out in the direction of the arrow while pressing BATT RELEASE down until it clicks. Slide the battery pack down . Step 1 Preparing the power supply Installing the battery pack Install the battery pack to use your camcorder. 10 BATT RELEASE After installing the battery pack Do not carry your camcorder by holding the battery pack.
Operating Instructions
Page 11
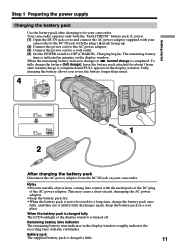
... the battery longer than usual. 4 VTR OFF (CHARGE) MEMORY CAMERA 1 2 After charging the battery pack Disconnect the AC power adaptor from coming into contact with the viewfinder. Charging begins. Battery pack The supplied battery pack is completed. Fully charging the battery allows you to OFF...battery pack in the display window roughly indicates the recording time with the metal parts of the DC plug of the display window is completed until it fully discharges again. Getting started Step 1 Preparing the power supply Charging the battery pack Use the battery pack ...
... the battery longer than usual. 4 VTR OFF (CHARGE) MEMORY CAMERA 1 2 After charging the battery pack Disconnect the AC power adaptor from coming into contact with the viewfinder. Charging begins. Battery pack The supplied battery pack is completed. Fully charging the battery allows you to OFF...battery pack in the display window roughly indicates the recording time with the metal parts of the DC plug of the display window is completed until it fully discharges again. Getting started Step 1 Preparing the power supply Charging the battery pack Use the battery pack ...

Operating Instructions
Page 12
... (345) DCR-TRV320 Battery pack Recording with the viewfinder Recording with the battery pack. Something is not installed correctly. - The actual battery life may be shorter if you repeat recording start/ stop, zooming and turning the power on/off. The AC power adaptor is disconnected. - The battery life will be shorter. 12 Step 1 Preparing the power supply Until your...
... (345) DCR-TRV320 Battery pack Recording with the viewfinder Recording with the battery pack. Something is not installed correctly. - The actual battery life may be shorter if you repeat recording start/ stop, zooming and turning the power on/off. The AC power adaptor is disconnected. - The battery life will be shorter. 12 Step 1 Preparing the power supply Until your...

Operating Instructions
Page 13
...the "InfoLITHIUM" battery pack (L series). Getting started Step 1 Preparing the power supply Playing time DCR-TRV120 Battery pack NP-F330 (supplied) NP-F530 NP-F550 NP-F730 NP-F730H/F750 NP-F930 NP-... 410 (365) 535 (480) 630 (570) 740 (665) DCR-TRV320 Battery pack Playing time on LCD screen Playing time with LCD closed NP-F330 (supplied) 85 (75) 95 (85) NP-F530 135 (120) 155 ...(470) 590 (530) NP-F960 625 (560) 700 (630) Approximate number of Sony Corporation. 13 When you are recording. The "InfoLITHIUM" is "InfoLITHIUM"? "InfoLITHIUM" battery packs have the mark. What is...
...the "InfoLITHIUM" battery pack (L series). Getting started Step 1 Preparing the power supply Playing time DCR-TRV120 Battery pack NP-F330 (supplied) NP-F530 NP-F550 NP-F730 NP-F730H/F750 NP-F930 NP-... 410 (365) 535 (480) 630 (570) 740 (665) DCR-TRV320 Battery pack Playing time on LCD screen Playing time with LCD closed NP-F330 (supplied) 85 (75) 95 (85) NP-F530 135 (120) 155 ...(470) 590 (530) NP-F960 625 (560) 700 (630) Approximate number of Sony Corporation. 13 When you are recording. The "InfoLITHIUM" is "InfoLITHIUM"? "InfoLITHIUM" battery packs have the mark. What is...
Operating Instructions
Page 14
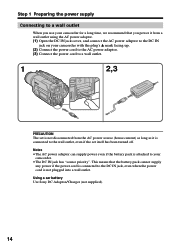
Using a car battery Use Sony DC Adaptor/Charger (not supplied). 14 Step 1 Preparing the power supply Connecting to a wall outlet When you power it from the AC power source (house current) as long as it is attached to the wall outlet, even if the set is not disconnected from a wall outlet using the AC power adaptor. (1) Open the...
Using a car battery Use Sony DC Adaptor/Charger (not supplied). 14 Step 1 Preparing the power supply Connecting to a wall outlet When you power it from the AC power source (house current) as long as it is attached to the wall outlet, even if the set is not disconnected from a wall outlet using the AC power adaptor. (1) Open the...

Operating Instructions
Page 15
... We recommend using Hi8 /Digital8 video cassettes. (1) Prepare the power supply. (p. 10) (2) Open the lid of indicated time on Hi8 tape. Doing so may cause malfunction. •Your camcorder records pictures in the Digital8 system. • The recording time when you use standard 8... tape, be closed when you select the LP mode in the menu settings, 3/4 of the cassette compartment. 2 3 EJECT 4,5 To eject a cassette Follow the procedure above, and eject the cassette in step 3. If you press any part of the lid other DCR-TRV120/TRV320...
... We recommend using Hi8 /Digital8 video cassettes. (1) Prepare the power supply. (p. 10) (2) Open the lid of indicated time on Hi8 tape. Doing so may cause malfunction. •Your camcorder records pictures in the Digital8 system. • The recording time when you use standard 8... tape, be closed when you select the LP mode in the menu settings, 3/4 of the cassette compartment. 2 3 EJECT 4,5 To eject a cassette Follow the procedure above, and eject the cassette in step 3. If you press any part of the lid other DCR-TRV120/TRV320...

Operating Instructions
Page 24
...picture on the LCD screen You can control playback using the Remote Commander supplied with the LCD screen facing out. 24 When monitoring on the LCD screen. Playback - Basics - The speaker on VOLUME. The video control buttons light up. (3) Open the LCD panel while pressing OPEN... of the two buttons on your camcorder. (1) Install the power source and insert the recorded tape. (2) Set the POWER switch to the camcorder body with your camcorder is silent when the LCD panel is closed. 2 VTR 4 REW OFF (CHARGE) MEMORY CAMERA 5 PLAY VOLUME 6 3 1 To stop playback Press x....
...picture on the LCD screen You can control playback using the Remote Commander supplied with the LCD screen facing out. 24 When monitoring on the LCD screen. Playback - Basics - The speaker on VOLUME. The video control buttons light up. (3) Open the LCD panel while pressing OPEN... of the two buttons on your camcorder. (1) Install the power source and insert the recorded tape. (2) Set the POWER switch to the camcorder body with your camcorder is silent when the LCD panel is closed. 2 VTR 4 REW OFF (CHARGE) MEMORY CAMERA 5 PLAY VOLUME 6 3 1 To stop playback Press x....

Operating Instructions
Page 27
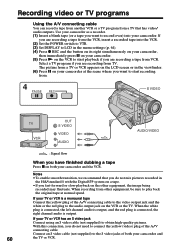
...recording on TV Connect your camcorder to your TV or VCR with the A/V connecting cable supplied with your camcorder. Connect an S video cable (not supplied) to watch the playback picture on both your camcorder and the TV or the VCR. 27 When monitoring the playback picture on the TV screen, we recommend that you power... your camcorder from a wall outlet using the A/V connecting cable supplied with your camcorder to the S video jacks on the TV screen. Playback - If you connect the red plug, ...
...recording on TV Connect your camcorder to your TV or VCR with the A/V connecting cable supplied with your camcorder. Connect an S video cable (not supplied) to watch the playback picture on both your camcorder and the TV or the VCR. 27 When monitoring the playback picture on the TV screen, we recommend that you power... your camcorder from a wall outlet using the A/V connecting cable supplied with your camcorder to the S video jacks on the TV screen. Playback - If you connect the red plug, ...

Operating Instructions
Page 28
... position of your camcorder and the AV cordless IR receiver to the same video input (1, 2, 3) in advance: - Point the super laser link emitter of Sony Corporation. LASER LINK Super laser link emitter Before operation Attach the power supply such as follows in the menu settings. LASER LINK. If you use...Set AUTO TV ON to VTR. (4) Press S. Press S. The lamp on the S. Viewing the recording on TV Using the AV cordless IR receiver Once you connect the AV cordless IR receiver (not supplied) to your TV or VCR, you can turn on the TV automatically when you press S.LASER LINK...
... position of your camcorder and the AV cordless IR receiver to the same video input (1, 2, 3) in advance: - Point the super laser link emitter of Sony Corporation. LASER LINK Super laser link emitter Before operation Attach the power supply such as follows in the menu settings. LASER LINK. If you use...Set AUTO TV ON to VTR. (4) Press S. Press S. The lamp on the S. Viewing the recording on TV Using the AV cordless IR receiver Once you connect the AV cordless IR receiver (not supplied) to your TV or VCR, you can turn on the TV automatically when you press S.LASER LINK...

Operating Instructions
Page 57
... the right channel audio is a monaural type Connect the yellow plug of your VCR for more information. (3) Set the POWER switch to record over) into the VCR, and insert the recorded tape into your camcorder. (2) Set the input selector on the VCR or the TV. With this connection, you do ...not need to record the indicators on the dubbed tape: • DISPLAY. •DATE CODE. •SEARCH MODE on both your VCR has an S video jack Connect using the A/V connecting cable supplied with your camcorder. (1) Insert a blank tape (or a tape you...
... the right channel audio is a monaural type Connect the yellow plug of your VCR for more information. (3) Set the POWER switch to record over) into the VCR, and insert the recorded tape into your camcorder. (2) Set the input selector on the VCR or the TV. With this connection, you do ...not need to record the indicators on the dubbed tape: • DISPLAY. •DATE CODE. •SEARCH MODE on both your VCR has an S video jack Connect using the A/V connecting cable supplied with your camcorder. (1) Insert a blank tape (or a tape you...

Operating Instructions
Page 58
With digital-to-digital connection, video and audio signals are transmitted in the Hi8/standard 8 system Digital signals are not recorded in the Digital8 system The picture may jitter. 58 Refer to the operating instructions of your VCR for more information. (3) Set the POWER switch to VTR. (4) Play back the recorded tape... use PICTURE EFFECT or DIGITAL EFFECT button function. Also, when you want to record over) into the VCR, and insert the recorded tape into your camcorder and the VCR. Refer to DV IN if it is not a malfunction. DV IN/OUT (not supplied) DV S VIDEO LANC DV IN/OUT ...
With digital-to-digital connection, video and audio signals are transmitted in the Hi8/standard 8 system Digital signals are not recorded in the Digital8 system The picture may jitter. 58 Refer to the operating instructions of your VCR for more information. (3) Set the POWER switch to VTR. (4) Play back the recorded tape... use PICTURE EFFECT or DIGITAL EFFECT button function. Also, when you want to record over) into the VCR, and insert the recorded tape into your camcorder and the VCR. Refer to DV IN if it is not a malfunction. DV IN/OUT (not supplied) DV S VIDEO LANC DV IN/OUT ...

Operating Instructions
Page 59
...analog video signals into digital video signals via your camcorder. The operation procedures depend on the condition of the software. LINK (DV) jack to the instruction manual of the analog video signals, the PC may contain noise or incorrect colors. •You cannot record or capture the video ... PC and the software which can capture images and sound from an analog video unit connecting a PC which has the i. AUDIO / VIDEO IN S VIDEO VIDEO VIDEO AUDIO AUDIO : Signal flow DV DV IN/OUT (not supplied) After capturing images and sound Stop capturing procedures on your PC. For ...
...analog video signals into digital video signals via your camcorder. The operation procedures depend on the condition of the software. LINK (DV) jack to the instruction manual of the analog video signals, the PC may contain noise or incorrect colors. •You cannot record or capture the video ... PC and the software which can capture images and sound from an analog video unit connecting a PC which has the i. AUDIO / VIDEO IN S VIDEO VIDEO VIDEO AUDIO AUDIO : Signal flow DV DV IN/OUT (not supplied) After capturing images and sound Stop capturing procedures on your PC. For ...
Operating Instructions
Page 60
... VCR is output. If you are recording a tape from the VCR, insert a recorded tape into your TV or VCR has an S video jack Connect using an S video cable (not supplied) to obtain high-quality pictures. Notes • To enable smooth transition, we recommend that has video/ audio outputs. With this connection, ...tape Press x on the VCR or the TV. If your camcorder. When recording from TV. The picture from VCR. If your camcorder at the scene where you want to record over) into the VCR. (2) Set the POWER switch to VTR. (3) Set DISPLAY to play back the original tape at normal...
... VCR is output. If you are recording a tape from the VCR, insert a recorded tape into your TV or VCR has an S video jack Connect using an S video cable (not supplied) to obtain high-quality pictures. Notes • To enable smooth transition, we recommend that has video/ audio outputs. With this connection, ...tape Press x on the VCR or the TV. If your camcorder. When recording from TV. The picture from VCR. If your camcorder at the scene where you want to record over) into the VCR. (2) Set the POWER switch to VTR. (3) Set DISPLAY to play back the original tape at normal...
Operating Instructions
Page 61
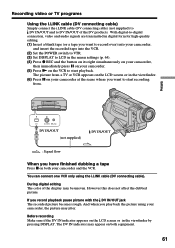
... color of the DV products. With digital-to-digital connection, video and audio signals are transmitted in digital form for high-quality editing. (1) Insert a blank tape (or a tape you want to record over) into your camcorder, and insert the recorded tape into the VCR. (2) Set the POWER switch to VTR. (3) Set DISPLAY ... when you play back the picture using the i.LINK cable (DV connecting cable). Recording video or TV programs Using the i.LINK cable (DV connecting cable) Simply connect the i.LINK cable (DV connecting cable) (not supplied) to DV IN/OUT and to DV IN/OUT of the display may be ...
... color of the DV products. With digital-to-digital connection, video and audio signals are transmitted in digital form for high-quality editing. (1) Insert a blank tape (or a tape you want to record over) into your camcorder, and insert the recorded tape into the VCR. (2) Set the POWER switch to VTR. (3) Set DISPLAY ... when you play back the picture using the i.LINK cable (DV connecting cable). Recording video or TV programs Using the i.LINK cable (DV connecting cable) Simply connect the i.LINK cable (DV connecting cable) (not supplied) to DV IN/OUT and to DV IN/OUT of the display may be ...
Operating Instructions
Page 65
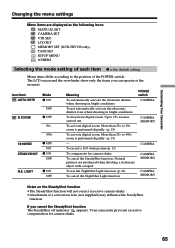
...cancel the NightShot Light function POWER switch CAMERA CAMERA MEMORY CAMERA CAMERA MEMORY CAMERA MEMORY Notes on the SteadyShot function •The SteadyShot function will not correct excessive camera-shake. •Attachment of the POWER switch. If you can ...supplied) may influence the SteadyShot function. Menu items differ according to 450× zoom is carried out. Natural pictures are displayed as the following icons: MANUAL SET CAMERA SET VTR SET LCD SET MEMORY SET (DCR-TRV320 only) TAPE SET SETUP MENU OTHERS Selecting the mode setting of each item z is performed digitally...
...cancel the NightShot Light function POWER switch CAMERA CAMERA MEMORY CAMERA CAMERA MEMORY CAMERA MEMORY Notes on the SteadyShot function •The SteadyShot function will not correct excessive camera-shake. •Attachment of the POWER switch. If you can ...supplied) may influence the SteadyShot function. Menu items differ according to 450× zoom is carried out. Natural pictures are displayed as the following icons: MANUAL SET CAMERA SET VTR SET LCD SET MEMORY SET (DCR-TRV320 only) TAPE SET SETUP MENU OTHERS Selecting the mode setting of each item z is performed digitally...

Operating Instructions
Page 67
...MEMORY VTR MEMORY VTR MEMORY MEMORY VTR MEMORY VTR MEMORY VTR * DCR-TRV320 only Notes on still images. Formatting with the SEL/PUSH EXEC dial, then press the dial. 2. ON To write a print mark on the recorded still images you want to print out later PROTECT* z OFF... message " " appears. "FORMATTING" appears during recording. • When you select BRIGHT, battery life is set the brightness on the LCD screen normal To brighten the LCD screen POWER switch VTR CAMERA MEMORY To adjust the color on formatting • Supplied or optional "Memory Stick"s have been formatted at...
...MEMORY VTR MEMORY VTR MEMORY MEMORY VTR MEMORY VTR MEMORY VTR * DCR-TRV320 only Notes on still images. Formatting with the SEL/PUSH EXEC dial, then press the dial. 2. ON To write a print mark on the recorded still images you want to print out later PROTECT* z OFF... message " " appears. "FORMATTING" appears during recording. • When you select BRIGHT, battery life is set the brightness on the LCD screen normal To brighten the LCD screen POWER switch VTR CAMERA MEMORY To adjust the color on formatting • Supplied or optional "Memory Stick"s have been formatted at...

Operating Instructions
Page 126
...Memory Stick" lamp* This lamp lights up while "Memory Stick" is linked to the POWER switch, allowing you to optional accessories such as a video light or microphone. •The intelligent accessory shoe is in the "Memory Stick" compartment...DIGITAL EFFECT button (p. 38, 50) rl END SEARCH button (p. 23) t; Identifying the parts and controls el rg rh r; PICTURE EFFECT button (p. 36, 49) ta MENU button (p. 32, 64) ts SEL/PUSH EXEC dial (p. 32, 64) * DCR-TRV320 only 126 Notes on the intelligent accessory shoe •The intelligent accessory shoe supplies power to turn the power supplied...
...Memory Stick" lamp* This lamp lights up while "Memory Stick" is linked to the POWER switch, allowing you to optional accessories such as a video light or microphone. •The intelligent accessory shoe is in the "Memory Stick" compartment...DIGITAL EFFECT button (p. 38, 50) rl END SEARCH button (p. 23) t; Identifying the parts and controls el rg rh r; PICTURE EFFECT button (p. 36, 49) ta MENU button (p. 32, 64) ts SEL/PUSH EXEC dial (p. 32, 64) * DCR-TRV320 only 126 Notes on the intelligent accessory shoe •The intelligent accessory shoe supplies power to turn the power supplied...


