
Operating Instructions
Page 5
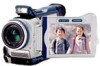
qa 1 Wireless Remote Commander (1) (p. 184) 2 AC-L10A/L10B/L10C AC power adaptor (1), Power cord (1) (p. 13) 3 Size AA (R6) battery for Remote Commander (2) (p. 184) 4 NP-FM50 battery pack (1) (p. 12, 13) 5 A/V connecting cable (1) (p. 33, 68) 6 Shoulder strap (1) (p. 179) 7 Lens cap (1) ... following accessories are supplied with your camcorder. 1 2 3 4 5 6 7 8 9 q; CD-ROM (SPVD-004 USB Driver) (1) (p. 140) qa Lens hood (1) (p. 22) Contents of the recording cannot be compensated if recording or playback is not made due to a malfunction of the camcorder, storage media, etc. 5
qa 1 Wireless Remote Commander (1) (p. 184) 2 AC-L10A/L10B/L10C AC power adaptor (1), Power cord (1) (p. 13) 3 Size AA (R6) battery for Remote Commander (2) (p. 184) 4 NP-FM50 battery pack (1) (p. 12, 13) 5 A/V connecting cable (1) (p. 33, 68) 6 Shoulder strap (1) (p. 179) 7 Lens cap (1) ... following accessories are supplied with your camcorder. 1 2 3 4 5 6 7 8 9 q; CD-ROM (SPVD-004 USB Driver) (1) (p. 140) qa Lens hood (1) (p. 22) Contents of the recording cannot be compensated if recording or playback is not made due to a malfunction of the camcorder, storage media, etc. 5

Operating Instructions
Page 8
See the page in a straight line deeply into the cassette compartment with its v mark facing up. Quick Start Guide 8 AC power adaptor (supplied) Connect the plug with the window facing out. 3 Close the cassette compartment by pressing the mark on the cassette...down completely, close the lid until it clicks. Open the DC IN jack cover. Insert the cassette in parentheses "( )" for more information. Connecting the power cord (p. 16) Use the battery pack when using your camcorder. Quick Start Guide This chapter introduces you to insert. Inserting a cassette (p. 18) 1 Slide ...
See the page in a straight line deeply into the cassette compartment with its v mark facing up. Quick Start Guide 8 AC power adaptor (supplied) Connect the plug with the window facing out. 3 Close the cassette compartment by pressing the mark on the cassette...down completely, close the lid until it clicks. Open the DC IN jack cover. Insert the cassette in parentheses "( )" for more information. Connecting the power cord (p. 16) Use the battery pack when using your camcorder. Quick Start Guide This chapter introduces you to insert. Inserting a cassette (p. 18) 1 Slide ...
Operating Instructions
Page 13
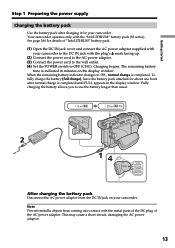
... the battery longer than usual. 2 14 POWER VCR OFF(CHG) CAMERA MEMORY After charging the battery pack Disconnect the AC power adaptor from coming into contact with the plug's v mark facing up. (2) Connect the power cord to the AC power adaptor. (3) Connect the power cord to the wall outlet. (4) Set the POWER switch to , normal charge is completed. Your...
... the battery longer than usual. 2 14 POWER VCR OFF(CHG) CAMERA MEMORY After charging the battery pack Disconnect the AC power adaptor from coming into contact with the plug's v mark facing up. (2) Connect the power cord to the AC power adaptor. (3) Connect the power cord to the wall outlet. (4) Set the POWER switch to , normal charge is completed. Your...

Operating Instructions
Page 16
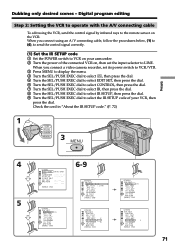
... disconnected from a wall outlet using the AC power adaptor. (1) Open the DC IN jack cover. Notes •The AC power adaptor can supply power even if the battery pack is not plugged into a wall outlet. Using a car battery Use Sony DC Adaptor/Charger (optional). Refer to the ... recommend that the battery pack cannot supply any power if the power cord is connected to the DC IN jack, even when the power cord is attached to your camcorder with the plug's v mark facing up. (2) Connect the power cord to the AC power adaptor. (3) Connect the power cord to a wall outlet. 1 2,3 PRECAUTION The...
... disconnected from a wall outlet using the AC power adaptor. (1) Open the DC IN jack cover. Notes •The AC power adaptor can supply power even if the battery pack is not plugged into a wall outlet. Using a car battery Use Sony DC Adaptor/Charger (optional). Refer to the ... recommend that the battery pack cannot supply any power if the power cord is connected to the DC IN jack, even when the power cord is attached to your camcorder with the plug's v mark facing up. (2) Connect the power cord to the AC power adaptor. (3) Connect the power cord to a wall outlet. 1 2,3 PRECAUTION The...
Operating Instructions
Page 71
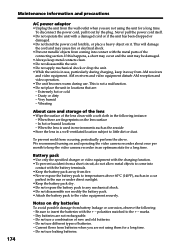
When you connect a video camera recorder, set the input selector to LINE. I N " " CUT-OUT " I R SETUP P AUS EMODE I R ADJ TEST " CUT- Dubbing only desired scenes - Digital program editing Step 2: Setting the VCR to operate with the A/V connecting cable To edit using an A/V connecting cable, follow.... 9 Turn the SEL/PUSH EXEC dial to the remote sensor on your camcorder. 2 Turn the power of your VCR, then press the dial. Check the cord in "About the IR SETUP code." (P. 72) 1 POWER VCR OFF(CHG) CAMERA MEMORY 3 MENU Editing 4 5 OTHERS DATA CODE DATE / CAM BEEP COMMA ND E R D ...
When you connect a video camera recorder, set the input selector to LINE. I N " " CUT-OUT " I R SETUP P AUS EMODE I R ADJ TEST " CUT- Dubbing only desired scenes - Digital program editing Step 2: Setting the VCR to operate with the A/V connecting cable To edit using an A/V connecting cable, follow.... 9 Turn the SEL/PUSH EXEC dial to the remote sensor on your camcorder. 2 Turn the power of your VCR, then press the dial. Check the cord in "About the IR SETUP code." (P. 72) 1 POWER VCR OFF(CHG) CAMERA MEMORY 3 MENU Editing 4 5 OTHERS DATA CODE DATE / CAM BEEP COMMA ND E R D ...

Operating Instructions
Page 160
...Something is not properly installed. c Remove the cassette and insert it to OFF (CHG). c Contact your camcorder. No function works though the power is on . If the functions still do not work, open the LCD panel and press the RESET button under rREC button using a sharp-...8226; Some troubles have occurred in about one minute. c Set it again, then operate your Sony dealer or local authorized Sony service facility. Turn the power on . • Disconnect the power cord of trouble and their solutions Symptom Cause and/or Corrective Actions The melody or beep sounds for at...
...Something is not properly installed. c Remove the cassette and insert it to OFF (CHG). c Contact your camcorder. No function works though the power is on . If the functions still do not work, open the LCD panel and press the RESET button under rREC button using a sharp-...8226; Some troubles have occurred in about one minute. c Set it again, then operate your Sony dealer or local authorized Sony service facility. Turn the power on . • Disconnect the power cord of trouble and their solutions Symptom Cause and/or Corrective Actions The melody or beep sounds for at...

Operating Instructions
Page 161
..., contact your Sony dealer or local authorized Sony service facility and inform them of the 5-digit code. (example: E:61:10) If you are unable to acclimatize. (p. 171) • The video heads are using the cleaning cassette (optional). (p. 172) • A malfunction other than the above that you cannot service has occurred. c Disconnect the power cord of your...
..., contact your Sony dealer or local authorized Sony service facility and inform them of the 5-digit code. (example: E:61:10) If you are unable to acclimatize. (p. 171) • The video heads are using the cleaning cassette (optional). (p. 172) • A malfunction other than the above that you cannot service has occurred. c Disconnect the power cord of your...
Operating Instructions
Page 174
... has been dropped or damaged. •Do not bend the power cord forcibly, or place a heavy object on the lens surface - Do not use different types of new and old batteries. - This will damage the cord and may be damaged. •Always keep the video camera recorder in locations that are not rechargeable. - Vibrating About care... unit in an optimum state for a long time. - Do not use . Extremely hot or cold - This is in the following : - Notes on and operating the video camera recorder about once per month to the...
... has been dropped or damaged. •Do not bend the power cord forcibly, or place a heavy object on the lens surface - Do not use different types of new and old batteries. - This will damage the cord and may be damaged. •Always keep the video camera recorder in locations that are not rechargeable. - Vibrating About care... unit in an optimum state for a long time. - Do not use . Extremely hot or cold - This is in the following : - Notes on and operating the video camera recorder about once per month to the...
Operating Instructions
Page 177
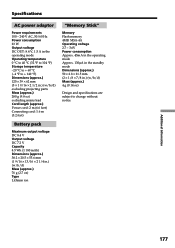
... °F) Dimensions (approx.) 125 × 39 × 62 mm (5 × 1 9/16 × 2 1/2 in.) (w/h/d) excluding projecting parts Mass (approx.) 280 g (9.8 oz) excluding mains lead Cord length (approx.) Power cord: 2 m (6.6 feet) Connecting cord: 1.6 m (5.2 feet) Battery pack Maximum output voltage DC 8.4 V Output voltage DC 7.2 V Capacity 8.5 Wh (1 180 mAh) Dimensions (approx.) 38.2 × 20.5 × 55.6 mm (1 9/16...
... °F) Dimensions (approx.) 125 × 39 × 62 mm (5 × 1 9/16 × 2 1/2 in.) (w/h/d) excluding projecting parts Mass (approx.) 280 g (9.8 oz) excluding mains lead Cord length (approx.) Power cord: 2 m (6.6 feet) Connecting cord: 1.6 m (5.2 feet) Battery pack Maximum output voltage DC 8.4 V Output voltage DC 7.2 V Capacity 8.5 Wh (1 180 mAh) Dimensions (approx.) 38.2 × 20.5 × 55.6 mm (1 9/16...


