Operating Instructions
Page 2
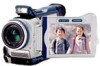
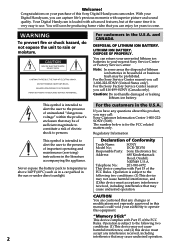
... authority to the following two conditions: (1) This device may not cause harmful interference, and (2)this Sony Digital Handycam camcorder. You will soon be producing home video that you can enjoy for the FCC related matters only. For customers in household or business trash ...can return your nearest Sony Service Center or Factory Service Center. Welcome! Your Digital Handycam is intended to alert the user to your unwanted lithium ion batteries to the presence of Conformity Trade Name: SONY Model No.: DCR-TRV30 Responsible Party: Sony Electronics Inc. and CANADA...
... authority to the following two conditions: (1) This device may not cause harmful interference, and (2)this Sony Digital Handycam camcorder. You will soon be producing home video that you can enjoy for the FCC related matters only. For customers in household or business trash ...can return your nearest Sony Service Center or Factory Service Center. Welcome! Your Digital Handycam is intended to alert the user to your unwanted lithium ion batteries to the presence of Conformity Trade Name: SONY Model No.: DCR-TRV30 Responsible Party: Sony Electronics Inc. and CANADA...

Operating Instructions
Page 5
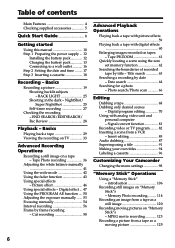
Getting started Checking supplied accessories Make sure that the following accessories are supplied with your camcorder. 1 2 3 4 5 6 7 8 9 q; qa 1 Wireless Remote Commander (1) (p. 184) 2 AC-L10A/L10B/L10C AC power adaptor (1), Power cord (1) (p. 13) 3 Size AA (R6) battery for Remote ...cap (1) (p. 19) 8 USB cable (1) (p. 140) 9 "Memory Stick" (1) (p. 106) q; CD-ROM (SPVD-004 USB Driver) (1) (p. 140) qa Lens hood (1) (p. 22) Contents of the recording cannot be compensated if recording or playback is not made due to a malfunction of the camcorder, storage media, etc. 5
Getting started Checking supplied accessories Make sure that the following accessories are supplied with your camcorder. 1 2 3 4 5 6 7 8 9 q; qa 1 Wireless Remote Commander (1) (p. 184) 2 AC-L10A/L10B/L10C AC power adaptor (1), Power cord (1) (p. 13) 3 Size AA (R6) battery for Remote ...cap (1) (p. 19) 8 USB cable (1) (p. 140) 9 "Memory Stick" (1) (p. 106) q; CD-ROM (SPVD-004 USB Driver) (1) (p. 140) qa Lens hood (1) (p. 22) Contents of the recording cannot be compensated if recording or playback is not made due to a malfunction of the camcorder, storage media, etc. 5
Operating Instructions
Page 6
... recording on TV 33 Advanced Recording Operations Recording a still image on "Memory Stick"s - Digital effect ... 47 Using the PROGRAM AE function .... 50 Adjusting the exposure manually ...... 53 Focusing manually 54 Interval recording 56 Frame by date - Signal convert function 81 Recording video ... Your Camcorder Changing the menu settings 98 "Memory Stick" Operations Using a "Memory Stick" - Memory Photo recording ......... 114 Recording an image from a tape as a moving pictures on tapes - NightShot/ Super NightShot 25 Self-timer recording 27 Checking the recording - ...
... recording on TV 33 Advanced Recording Operations Recording a still image on "Memory Stick"s - Digital effect ... 47 Using the PROGRAM AE function .... 50 Adjusting the exposure manually ...... 53 Focusing manually 54 Interval recording 56 Frame by date - Signal convert function 81 Recording video ... Your Camcorder Changing the menu settings 98 "Memory Stick" Operations Using a "Memory Stick" - Memory Photo recording ......... 114 Recording an image from a tape as a moving pictures on tapes - NightShot/ Super NightShot 25 Self-timer recording 27 Checking the recording - ...

Operating Instructions
Page 7
MPEG movie playback 137 Viewing images using computer ...... 139 Copying the image recorded on "Memory Stick"s to tapes 144 Enlarging still images recorded on a moving picture - Image protection 149 Deleting images 150 Writing a print mark - SLIDE SHOW ...161 Warning indicators and messages .... 162 Additional Information Usable cassettes 164 About "InfoLITHIUM" battery ......... 166 About i.LINK 168 Using your camcorder abroad .......... 170 Maintenance information and precautions 171 Specifications 176 Quick Reference Identifying the parts and controls .... 178 Index 186 7 Photo...
MPEG movie playback 137 Viewing images using computer ...... 139 Copying the image recorded on "Memory Stick"s to tapes 144 Enlarging still images recorded on a moving picture - Image protection 149 Deleting images 150 Writing a print mark - SLIDE SHOW ...161 Warning indicators and messages .... 162 Additional Information Usable cassettes 164 About "InfoLITHIUM" battery ......... 166 About i.LINK 168 Using your camcorder abroad .......... 170 Maintenance information and precautions 171 Specifications 176 Quick Reference Identifying the parts and controls .... 178 Index 186 7 Photo...

Operating Instructions
Page 8
... the direction of the arrow and open the lid. 2 Push the middle portion of the back of the cassette to the basic features of your camcorder outdoors (p. 12). Open the DC IN jack cover. After the cassette compartment goes down completely, close the lid until it clicks. Insert the cassette in...
... the direction of the arrow and open the lid. 2 Push the middle portion of the back of the cassette to the basic features of your camcorder outdoors (p. 12). Open the DC IN jack cover. After the cassette compartment goes down completely, close the lid until it clicks. Insert the cassette in...

Operating Instructions
Page 9
... again. Quick Start Guide Recording a picture (p. 19) 1 Remove the lens cap. POWER VCR OFF(CHG) CAMERA MEMORY 2 Press m to VCR while pressing the small green button. PLAY NOTE Do not pick up your eye against its eyecup. 3 Press OPEN to off. If you purchase your camcorder, the clock setting is... 1 Set the POWER switch to rewind the tape. Monitoring the playback picture on the screen. REW 3 Press N to CAMERA while pressing the small green button. When you want to record the date and time for a picture, set to open the LCD panel. Viewfinder When the LCD panel is set the...
... again. Quick Start Guide Recording a picture (p. 19) 1 Remove the lens cap. POWER VCR OFF(CHG) CAMERA MEMORY 2 Press m to VCR while pressing the small green button. PLAY NOTE Do not pick up your eye against its eyecup. 3 Press OPEN to off. If you purchase your camcorder, the clock setting is... 1 Set the POWER switch to rewind the tape. Monitoring the playback picture on the screen. REW 3 Press N to CAMERA while pressing the small green button. When you want to record the date and time for a picture, set to open the LCD panel. Viewfinder When the LCD panel is set the...

Operating Instructions
Page 10
Using this manual As you can operate only with your camcorder. You can hear a beep sound to CAMERA. Date search (p. 64) - Photo search (p. 66) The functions you read through this mark in capital letters. We recommend that you can only use a tape with... the DV format. Superimposing a title (p. 91) - Set the POWER switch to indicate that are operated only with cassette memory . Note on Cassette Memory Your camcorder is being carried out. Labeling a cassette (p. 96) For details, see this manual, buttons and settings on whether the tape has the cassette memory or not...
Using this manual As you can operate only with your camcorder. You can hear a beep sound to CAMERA. Date search (p. 64) - Photo search (p. 66) The functions you read through this mark in capital letters. We recommend that you can only use a tape with... the DV format. Superimposing a title (p. 91) - Set the POWER switch to indicate that are operated only with cassette memory . Note on Cassette Memory Your camcorder is being carried out. Labeling a cassette (p. 96) For details, see this manual, buttons and settings on whether the tape has the cassette memory or not...

Operating Instructions
Page 11
... periods may cause malfunctions [c]. •Do not directly shoot the sun. Copyright precautions Television programs, films, video tapes, and other materials may cause your camcorder away from country to the provision of the sun in low light conditions such as in a car parked ... normal in the manufacturing process and do not affect the recording in the sun or under direct sunlight [b]. •Be careful when placing the camera near a window or outdoors. However, there may be repaired [a]. •Never leave your camcorder to temperatures above 60°C (140°F), such as...
... periods may cause malfunctions [c]. •Do not directly shoot the sun. Copyright precautions Television programs, films, video tapes, and other materials may cause your camcorder away from country to the provision of the sun in low light conditions such as in a car parked ... normal in the manufacturing process and do not affect the recording in the sun or under direct sunlight [b]. •Be careful when placing the camera near a window or outdoors. However, there may be repaired [a]. •Never leave your camcorder to temperatures above 60°C (140°F), such as...

Operating Instructions
Page 12
Step 1 Preparing the power supply Installing the battery pack We recommend that you use the battery pack when you use your camcorder outdoors. (1) Lift up the viewfinder. (2) Slide the battery pack down until it clicks. 1 2 To remove the battery pack (1) Lift up the viewfinder. (2) Slide the battery pack out in the direction of the arrow while pressing BATT down. 1 2 2 BATT release button If you use the large capacity battery pack If you install the NP-FM70/FM90/FM91 battery pack on your camcorder, extend its viewfinder. 12
Step 1 Preparing the power supply Installing the battery pack We recommend that you use the battery pack when you use your camcorder outdoors. (1) Lift up the viewfinder. (2) Slide the battery pack down until it clicks. 1 2 To remove the battery pack (1) Lift up the viewfinder. (2) Slide the battery pack out in the direction of the arrow while pressing BATT down. 1 2 2 BATT release button If you use the large capacity battery pack If you install the NP-FM70/FM90/FM91 battery pack on your camcorder, extend its viewfinder. 12
Operating Instructions
Page 13
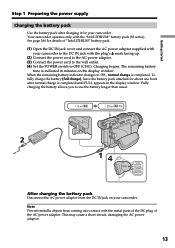
...details of the AC power adaptor. Fully charging the battery allows you to use the battery longer than usual. 2 14 POWER VCR OFF(CHG) CAMERA MEMORY After charging the battery pack Disconnect the AC power adaptor from coming into contact with the metal parts of the DC plug of "InfoLITHIUM..." battery pack. (1) Open the DC IN jack cover and connect the AC power adaptor supplied with your camcorder. Your camcorder operates only with the plug's v mark facing up. (2) Connect the power cord to the AC power adaptor. (3) Connect the power cord to the...
...details of the AC power adaptor. Fully charging the battery allows you to use the battery longer than usual. 2 14 POWER VCR OFF(CHG) CAMERA MEMORY After charging the battery pack Disconnect the AC power adaptor from coming into contact with the metal parts of the DC plug of "InfoLITHIUM..." battery pack. (1) Open the DC IN jack cover and connect the AC power adaptor supplied with your camcorder. Your camcorder operates only with the plug's v mark facing up. (2) Connect the power cord to the AC power adaptor. (3) Connect the power cord to the...

Operating Instructions
Page 14
... the display window. The actual battery life may be shorter if you use your camcorder calculates the actual remaining battery time "---- Until your camcorder in a cold environment. ** Approximate number of minutes when recording while you use a fully charged battery * Approximate continuous recording time at 25 °C (77 °F) to charge an empty battery pack...
... the display window. The actual battery life may be shorter if you use your camcorder calculates the actual remaining battery time "---- Until your camcorder in a cold environment. ** Approximate number of minutes when recording while you use a fully charged battery * Approximate continuous recording time at 25 °C (77 °F) to charge an empty battery pack...

Operating Instructions
Page 15
... AC power adaptor Place the AC power adaptor near a wall outlet. This unit is "InfoLITHIUM"? Your camcorder operates only with compatible electronic equipment. When you use your camcorder in an ambient temperature of between 10 °C to 30 °C (50 °F to operate ... consumption with the "InfoLITHIUM" battery. "InfoLITHIUM" M series battery packs have the mark. The recording and playing times of a normally charged battery are about 90% of those of Sony Corporation. The battery life will be shorter if you use a fully charged battery Approximate continuous playing...
... AC power adaptor Place the AC power adaptor near a wall outlet. This unit is "InfoLITHIUM"? Your camcorder operates only with compatible electronic equipment. When you use your camcorder in an ambient temperature of between 10 °C to 30 °C (50 °F to operate ... consumption with the "InfoLITHIUM" battery. "InfoLITHIUM" M series battery packs have the mark. The recording and playing times of a normally charged battery are about 90% of those of Sony Corporation. The battery life will be shorter if you use a fully charged battery Approximate continuous playing...

Operating Instructions
Page 16
... further information. 16 Connect the AC power adaptor supplied with your camcorder to the DC IN jack on your camcorder. •The DC IN jack has "source priority." Using a car battery Use Sony DC Adaptor/Charger (optional). Step 1 Preparing the power supply Connecting to a wall outlet When you power it from... pack cannot supply any power if the power cord is connected to the DC IN jack, even when the power cord is connected to your camcorder with the plug's v mark facing up. (2) Connect the power cord to the AC power adaptor. (3) Connect the power cord to a wall outlet. 1 2,3 ...
... further information. 16 Connect the AC power adaptor supplied with your camcorder to the DC IN jack on your camcorder. •The DC IN jack has "source priority." Using a car battery Use Sony DC Adaptor/Charger (optional). Step 1 Preparing the power supply Connecting to a wall outlet When you power it from... pack cannot supply any power if the power cord is connected to the DC IN jack, even when the power cord is connected to your camcorder with the plug's v mark facing up. (2) Connect the power cord to the AC power adaptor. (3) Connect the power cord to a wall outlet. 1 2,3 ...

Operating Instructions
Page 17
... T V L ON TVT I NPUT L TROS I ZE DEMO MODE RETURN [ MENU ] : END The year changes as follows: 1995 T t 2001 T t 2079 If you do not use your camcorder for noon. 17 "CLOCK SET" will have been discharged (p. 172). Getting started Step 2 Setting the date and time Set the date and time settings when...be released (bars may appear) because the built-in rechargeable battery installed in your camcorder will be displayed each time that you set the POWER switch to CAMERA/ MEMORY unless you set the date and time is recorded on a 12-hour cycle. •12:00 AM stands for midnight. •...
... T V L ON TVT I NPUT L TROS I ZE DEMO MODE RETURN [ MENU ] : END The year changes as follows: 1995 T t 2001 T t 2079 If you do not use your camcorder for noon. 17 "CLOCK SET" will have been discharged (p. 172). Getting started Step 2 Setting the date and time Set the date and time settings when...be released (bars may appear) because the built-in rechargeable battery installed in your camcorder will be displayed each time that you set the POWER switch to CAMERA/ MEMORY unless you set the date and time is recorded on a 12-hour cycle. •12:00 AM stands for midnight. •...

Operating Instructions
Page 19
... on the front of your camcorder. 19 Your camcorder starts recording. The camera recording lamp located on your camcorder lights up. Recording - The REC indicator appears. To stop recording, press START/STOP again. 1 3 LOCK switch POWER VCR OFF(CHG) CAMERA MEMORY 4 Camera recording lamp Microphone 5 2 40min REC 0:00:01 Note Fasten the grip strap firmly. Recording - Recording a picture Your camcorder automatically focuses for more...
... on the front of your camcorder. 19 Your camcorder starts recording. The camera recording lamp located on your camcorder lights up. Recording - The REC indicator appears. To stop recording, press START/STOP again. 1 3 LOCK switch POWER VCR OFF(CHG) CAMERA MEMORY 4 Camera recording lamp Microphone 5 2 40min REC 0:00:01 Note Fasten the grip strap firmly. Recording - Recording a picture Your camcorder automatically focuses for more...
Operating Instructions
Page 20
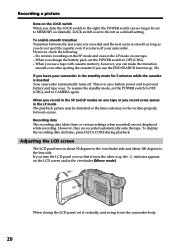
... may be distorted or the time code may not be set to MEMORY accidentally. Do not mix recordings in the SP mode and ones in the LP mode on one tape or you leave your camcorder. To resume the standby mode, set to the left as you do not eject the cassette..., however, you can no longer be written properly between the last scene you recorded and the next scene is set the POWER switch to OFF (CHG), and to CAMERA again. However, they are not displayed while recording. To display the recording date and time, press DATA CODE during playback. Adjusting the LCD screen The...
... may be distorted or the time code may not be set to MEMORY accidentally. Do not mix recordings in the SP mode and ones in the LP mode on one tape or you leave your camcorder. To resume the standby mode, set to the left as you do not eject the cassette..., however, you can no longer be written properly between the last scene you recorded and the next scene is set the POWER switch to OFF (CHG), and to CAMERA again. However, they are not displayed while recording. To display the recording date and time, press DATA CODE during playback. Adjusting the LCD screen The...

Operating Instructions
Page 22
...appear in the corners of the screen. 22 Lift up the viewfinder and move the viewfinder lens adjustment lever. Attaching the supplied lens hood To record fine pictures under strong light, we recommend attaching the lens hood. If you do so forcibly, you will no longer be attached even with ...B.L. In such case, remove the lens hood from the lens. in the viewfinder come into sharp focus. Viewfinder backlight You can be able to your camcorder. •You cannot attach filters or other objects onto the lens hood. Notes •When you use the filter (optional) The shadow of the ...
...appear in the corners of the screen. 22 Lift up the viewfinder and move the viewfinder lens adjustment lever. Attaching the supplied lens hood To record fine pictures under strong light, we recommend attaching the lens hood. If you do so forcibly, you will no longer be attached even with ...B.L. In such case, remove the lens hood from the lens. in the viewfinder come into sharp focus. Viewfinder backlight You can be able to your camcorder. •You cannot attach filters or other objects onto the lens hood. Notes •When you use the filter (optional) The shadow of the ...

Operating Instructions
Page 26
...clearer with the flash When the POWER switch is set to MEMORY You cannot use the following functions: - LIGHT to ON in CAMERA mode. White balance While using the NightShot function, focus manually. Exposure - PROGRAM AE - While using the Super NightShot function, you... Notes • Do not use the following functions: - Digital effect - Exposure - NightShot Light NightShot Light rays are infrared and so are invisible. This may cause your camcorder to ON in normal recording, the picture may be recorded in incorrect or unnatural colors. • If focusing is ...
...clearer with the flash When the POWER switch is set to MEMORY You cannot use the following functions: - LIGHT to ON in CAMERA mode. White balance While using the NightShot function, focus manually. Exposure - PROGRAM AE - While using the Super NightShot function, you... Notes • Do not use the following functions: - Digital effect - Exposure - NightShot Light NightShot Light rays are infrared and so are invisible. This may cause your camcorder to ON in normal recording, the picture may be recorded in incorrect or unnatural colors. • If focusing is ...

Operating Instructions
Page 27
... 2 1 To stop the count down from the screen while your camcorder is set to OFF (CHG) or VCR. To record still images on the screen. (2) Press START/STOP. Basics Recording a picture Self-timer recording Recording with the self-timer. (p. 119) 27 Note The self-timer recording mode is finished. - Self-timer starts counting down Press START...
... 2 1 To stop the count down from the screen while your camcorder is set to OFF (CHG) or VCR. To record still images on the screen. (2) Press START/STOP. Basics Recording a picture Self-timer recording Recording with the self-timer. (p. 119) 27 Note The self-timer recording mode is finished. - Self-timer starts counting down Press START...

Operating Instructions
Page 28
.../ EDITSEARCH / Rec Review You can search for a few seconds, and then your camcorder returns to check the recorded picture or shoot so that the transition between the last recorded scene and the next scene you record. Press END SEARCH in the standby mode. EDITSEARCH You can use a tape with ...back. + : to go forward - 7: to go to the end of the recorded section are played back and your camcorder will be played back for the next recording start point. If you press START/STOP, re-recording begins from the point you have stopped most recently will return to stop playback. ...
.../ EDITSEARCH / Rec Review You can search for a few seconds, and then your camcorder returns to check the recorded picture or shoot so that the transition between the last recorded scene and the next scene you record. Press END SEARCH in the standby mode. EDITSEARCH You can use a tape with ...back. + : to go forward - 7: to go to the end of the recorded section are played back and your camcorder will be played back for the next recording start point. If you press START/STOP, re-recording begins from the point you have stopped most recently will return to stop playback. ...


