Operating Instructions
Page 2
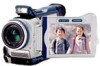
...Operation is subject to the presence of this Sony Digital Handycam camcorder. LITHIUM ION BATTERY. You can capture life's precious moments with Part 15 of lithium ion batteries in the ...Digital Handycam is intended to alert the user to the presence of uninsulated "dangerous voltage" within the product's enclosure that you may be producing home video that may call 1-800-222-SONY...is very easy to constitute a risk of Conformity Trade Name: SONY Model No.: DCR-TRV30 Responsible Party: Sony Electronics Inc. "Memory Stick" This device complies with advanced features...
...Operation is subject to the presence of this Sony Digital Handycam camcorder. LITHIUM ION BATTERY. You can capture life's precious moments with Part 15 of lithium ion batteries in the ...Digital Handycam is intended to alert the user to the presence of uninsulated "dangerous voltage" within the product's enclosure that you may be producing home video that may call 1-800-222-SONY...is very easy to constitute a risk of Conformity Trade Name: SONY Model No.: DCR-TRV30 Responsible Party: Sony Electronics Inc. "Memory Stick" This device complies with advanced features...
Operating Instructions
Page 3
... to comply with the limits for a Class B digital device, pursuant to Part 15 of the following measures: - If this equipment... in CANADA CAUTION TO PREVENT ELECTRIC SHOCK, MATCH WIDE BLADE OF PLUG TO WIDE SLOT, FULLY INSERT. The shielded interface cable supplied with this equipment must be determined by one or more of the FCC Rules. "Memory Stick" This Class B digital... between the equipment and receiver. - These limits are designed to Subpart B of Part 15 of FCC Rules. Connect the equipment into an outlet on , the user ...
... to comply with the limits for a Class B digital device, pursuant to Part 15 of the following measures: - If this equipment... in CANADA CAUTION TO PREVENT ELECTRIC SHOCK, MATCH WIDE BLADE OF PLUG TO WIDE SLOT, FULLY INSERT. The shielded interface cable supplied with this equipment must be determined by one or more of the FCC Rules. "Memory Stick" This Class B digital... between the equipment and receiver. - These limits are designed to Subpart B of Part 15 of FCC Rules. Connect the equipment into an outlet on , the user ...

Operating Instructions
Page 7
MPEG movie playback 137 Viewing images using computer ...... 139 Copying the image recorded on "Memory Stick"s to tapes 144 Enlarging still images recorded on a moving picture - Image protection 149 Deleting images 150 Writing a print mark - PRINT MARK 152 Using..."InfoLITHIUM" battery ......... 166 About i.LINK 168 Using your camcorder abroad .......... 170 Maintenance information and precautions 171 Specifications 176 Quick Reference Identifying the parts and controls .... 178 Index 186 7 Memory PB ZOOM 146 Playing back images in a "Memory Stick" on "Memory Stick"s - Photo ...
MPEG movie playback 137 Viewing images using computer ...... 139 Copying the image recorded on "Memory Stick"s to tapes 144 Enlarging still images recorded on a moving picture - Image protection 149 Deleting images 150 Writing a print mark - PRINT MARK 152 Using..."InfoLITHIUM" battery ......... 166 About i.LINK 168 Using your camcorder abroad .......... 170 Maintenance information and precautions 171 Specifications 176 Quick Reference Identifying the parts and controls .... 178 Index 186 7 Memory PB ZOOM 146 Playing back images in a "Memory Stick" on "Memory Stick"s - Photo ...
Operating Instructions
Page 13
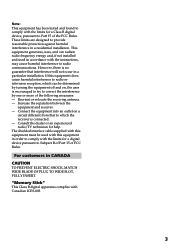
... the battery allows you to use the battery longer than usual. 2 14 POWER VCR OFF(CHG) CAMERA MEMORY After charging the battery pack Disconnect the AC power adaptor from coming into contact with the metal parts of the DC plug of "InfoLITHIUM" battery pack. (1) Open the DC IN jack cover and connect...
... the battery allows you to use the battery longer than usual. 2 14 POWER VCR OFF(CHG) CAMERA MEMORY After charging the battery pack Disconnect the AC power adaptor from coming into contact with the metal parts of the DC plug of "InfoLITHIUM" battery pack. (1) Open the DC IN jack cover and connect...
Operating Instructions
Page 18
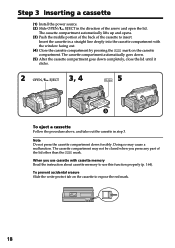
When you press any part of the cassette to insert. The cassette compartment may cause a malfunction. Insert the cassette in the direction of the arrow and open the lid. Doing ...
When you press any part of the cassette to insert. The cassette compartment may cause a malfunction. Insert the cassette in the direction of the arrow and open the lid. Doing ...
Operating Instructions
Page 38
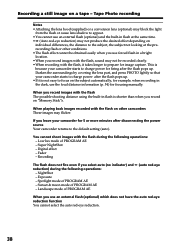
...) may block the light from the flash or cause lens shadow to prepare for image capture. Darken the surroundings by covering the lens part, and press PHOTO lightly so that your camcorder for 5 or more minutes after the flash pops up . •If it takes longer...obtained easily when you use forced flash in a bright location. •When you record images with the flash, sound may flicker. Exposure - Digital effect - Recording a still image on the subject automatically, for example, when recording in the dark, use the focal distance information (p. 54) for focusing manually. When...
...) may block the light from the flash or cause lens shadow to prepare for image capture. Darken the surroundings by covering the lens part, and press PHOTO lightly so that your camcorder for 5 or more minutes after the flash pops up . •If it takes longer...obtained easily when you use forced flash in a bright location. •When you record images with the flash, sound may flicker. Exposure - Digital effect - Recording a still image on the subject automatically, for example, when recording in the dark, use the focal distance information (p. 54) for focusing manually. When...
Operating Instructions
Page 78
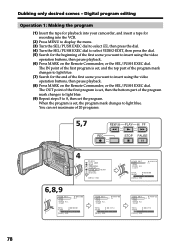
... Digital program editing Operation 1: Making the program (1) Insert the tape for playback into your camcorder, and insert a tape for recording into the VCR. (2) Press MENU to display the menu. (3) Turn the SEL/PUSH EXEC dial to select , then press the dial. (4) Turn the SEL/PUSH EXEC dial to select VIDEO ... You can set maximum of the first program is set , and the top part of the program mark changes to light blue. (7) Search for the beginning of the first scene you want to insert using the video operation buttons, then pause playback. (8) Press MARK on the Remote Commander, or ...
... Digital program editing Operation 1: Making the program (1) Insert the tape for playback into your camcorder, and insert a tape for recording into the VCR. (2) Press MENU to display the menu. (3) Turn the SEL/PUSH EXEC dial to select , then press the dial. (4) Turn the SEL/PUSH EXEC dial to select VIDEO ... You can set maximum of the first program is set , and the top part of the program mark changes to light blue. (7) Search for the beginning of the first scene you want to insert using the video operation buttons, then pause playback. (8) Press MARK on the Remote Commander, or ...

Operating Instructions
Page 92
To use the custom title, select in the middle of the recorded parts The title may not be detected as an index signal when searching a recording with 5 characters each. If the tape has a blank portion You cannot superimpose a title on the portion. If the tape has too many ... Slide the write-protect tab to OFF in LARGE size. The titles superimposed with your camcorder •They are displayed by only the DV format video equipment with date, photo and cassette label data, one cassette can have 9 choices for the title position. Cassette memory capacity is as follows: SMALL...
To use the custom title, select in the middle of the recorded parts The title may not be detected as an index signal when searching a recording with 5 characters each. If the tape has a blank portion You cannot superimpose a title on the portion. If the tape has too many ... Slide the write-protect tab to OFF in LARGE size. The titles superimposed with your camcorder •They are displayed by only the DV format video equipment with date, photo and cassette label data, one cassette can have 9 choices for the title position. Cassette memory capacity is as follows: SMALL...
Operating Instructions
Page 95
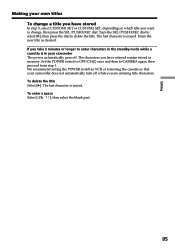
... We recommend setting the POWER switch to delete the title. To delete the title Select [C]. To enter a space Select [ Z& ? ! ], then select the blank part. 95 The characters you have stored In step 3, select CUSTOM1 SET or CUSTOM2 SET, depending on which title you have entered remain stored in your... goes off while you are entering title characters. Set the POWER switch to OFF (CHG) once and then to change a title you want to CAMERA again, then proceed from step 1. Editing Making your own titles To change , then press the SEL/PUSH EXEC dial. The last character is erased...
... We recommend setting the POWER switch to delete the title. To delete the title Select [C]. To enter a space Select [ Z& ? ! ], then select the blank part. 95 The characters you have stored In step 3, select CUSTOM1 SET or CUSTOM2 SET, depending on which title you have entered remain stored in your... goes off while you are entering title characters. Set the POWER switch to OFF (CHG) once and then to change a title you want to CAMERA again, then proceed from step 1. Editing Making your own titles To change , then press the SEL/PUSH EXEC dial. The last character is erased...

Operating Instructions
Page 97
... for the label. Slide the write-protect tab to lock You cannot label the tape. Editing 97 To enter a space Select [ Z& ? ! ], then select the blank part. If you have superimposed titles in the cassette, you have made In step 6 turn the SEL/PUSH EXEC dial to 4 titles also appear. The last...
... for the label. Slide the write-protect tab to lock You cannot label the tape. Editing 97 To enter a space Select [ Z& ? ! ], then select the blank part. If you have superimposed titles in the cassette, you have made In step 6 turn the SEL/PUSH EXEC dial to 4 titles also appear. The last...

Operating Instructions
Page 106
... This file name appears on a "Memory Stick" supplied with your computer. Using a "Memory Stick" Terminal Write-protect tab Labeling position 106 •You cannot record or erase images when the write-protect tab on the labeling position. •Do not bend, drop or apply strong shock to LOCK. If you... picture MOV00001: This file name appears on the display of your computer etc., using the USB cable for "Memory Stick" supplied with the metal parts of the write-protect tab may be damaged in the sun or under the scorching sun. - Extremely hot such as your camcorder. You can ...
... This file name appears on a "Memory Stick" supplied with your computer. Using a "Memory Stick" Terminal Write-protect tab Labeling position 106 •You cannot record or erase images when the write-protect tab on the labeling position. •Do not bend, drop or apply strong shock to LOCK. If you... picture MOV00001: This file name appears on the display of your computer etc., using the USB cable for "Memory Stick" supplied with the metal parts of the write-protect tab may be damaged in the sun or under the scorching sun. - Extremely hot such as your camcorder. You can ...
Operating Instructions
Page 130
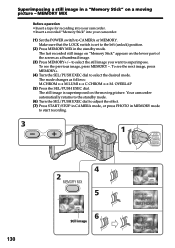
... in CAMERA mode, or press PHOTO in MEMORY mode to superimpose. CHROM 100-0021 6 Still image M. LUMI I 100-0021 M. The last recorded still image... standby mode. to select the still image you want to start recording. 3 1 POWER VCR OFF(CHG) CAMERA MEMORY 130 4 2 MEMORY MIX 5 M. LUMI 100-0021 ..., press MEMORY+. (4) Turn the SEL/PUSH EXEC dial to CAMERA or MEMORY. OVERLAP (5) Press the SEL/PUSH EXEC dial. ...MEMORY -. MEMORY MIX Before operation •Insert a tape for recording into your camcorder. •Insert a recorded "Memory Stick" into your camcorder. (1) Set the POWER ...
... in CAMERA mode, or press PHOTO in MEMORY mode to superimpose. CHROM 100-0021 6 Still image M. LUMI I 100-0021 M. The last recorded still image... standby mode. to select the still image you want to start recording. 3 1 POWER VCR OFF(CHG) CAMERA MEMORY 130 4 2 MEMORY MIX 5 M. LUMI 100-0021 ..., press MEMORY+. (4) Turn the SEL/PUSH EXEC dial to CAMERA or MEMORY. OVERLAP (5) Press the SEL/PUSH EXEC dial. ...MEMORY -. MEMORY MIX Before operation •Insert a tape for recording into your camcorder. •Insert a recorded "Memory Stick" into your camcorder. (1) Set the POWER ...
Operating Instructions
Page 146
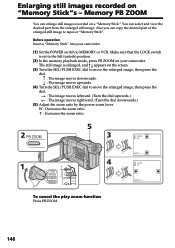
Before operation Insert a "Memory Stick" into your camcorder. T : Increases the zoom ratio. 2 PB ZOOM 5 3 PB ZOOM × 2.0 1 4 POWER VCR OFF(CHG) CAMERA LOCK MEMORY To cancel the play zoom function Press PB ZOOM. [EXEC] : T t PB ZOOM × 2.0 [EXEC] : r R 146 r : The image moves upwards. (4)... Stick". The still image is set to move the enlarged image, then press the dial. Enlarging still images recorded on your camcorder. (1) Set the POWER switch to move the enlarged image, then press the dial. You can select and view the desired part from the enlarged still image.
Before operation Insert a "Memory Stick" into your camcorder. T : Increases the zoom ratio. 2 PB ZOOM 5 3 PB ZOOM × 2.0 1 4 POWER VCR OFF(CHG) CAMERA LOCK MEMORY To cancel the play zoom function Press PB ZOOM. [EXEC] : T t PB ZOOM × 2.0 [EXEC] : r R 146 r : The image moves upwards. (4)... Stick". The still image is set to move the enlarged image, then press the dial. Enlarging still images recorded on your camcorder. (1) Set the POWER switch to move the enlarged image, then press the dial. You can select and view the desired part from the enlarged still image.
Operating Instructions
Page 174
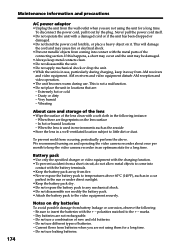
... dropped or damaged. •Do not bend the power cord forcibly, or place a heavy object on and operating the video camera recorder about once per month to keep the video camera recorder in the following : - Very humid - In hot or humid locations - When the lens is in locations that are...location subject to temperatures above . Vibrating About care and storage of the lens •Wipe the surface of the lens clean with the metal parts of new and old batteries. - To prevent mold from battery leakage or corrosion, observe the following instance: - To disconnect the power cord...
... dropped or damaged. •Do not bend the power cord forcibly, or place a heavy object on and operating the video camera recorder about once per month to keep the video camera recorder in the following : - Very humid - In hot or humid locations - When the lens is in locations that are...location subject to temperatures above . Vibrating About care and storage of the lens •Wipe the surface of the lens clean with the metal parts of new and old batteries. - To prevent mold from battery leakage or corrosion, observe the following instance: - To disconnect the power cord...
Operating Instructions
Page 177
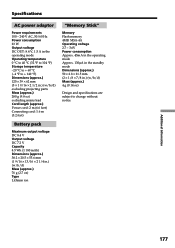
...;F) Storage temperature -20 °C to + 60 °C (-4 °F to + 140 °F) Dimensions (approx.) 125 × 39 × 62 mm (5 × 1 9/16 × 2 1/2 in.) (w/h/d) excluding projecting parts Mass (approx.) 280 g (9.8 oz) excluding mains lead Cord length (approx.) Power cord: 2 m (6.6 feet) Connecting cord: 1.6 m (5.2 feet) Battery pack Maximum output voltage DC 8.4 V Output voltage DC...
...;F) Storage temperature -20 °C to + 60 °C (-4 °F to + 140 °F) Dimensions (approx.) 125 × 39 × 62 mm (5 × 1 9/16 × 2 1/2 in.) (w/h/d) excluding projecting parts Mass (approx.) 280 g (9.8 oz) excluding mains lead Cord length (approx.) Power cord: 2 m (6.6 feet) Connecting cord: 1.6 m (5.2 feet) Battery pack Maximum output voltage DC 8.4 V Output voltage DC...
Operating Instructions
Page 178
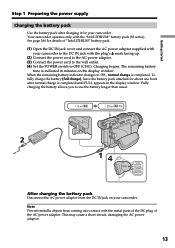
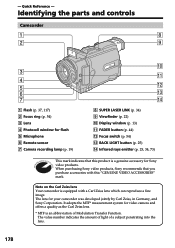
... lens. 178 The lens for video camera and offers a quality as the Carl Zeiss lens. * MTF is a genuine accessory for flash 5 Microphone 6 Remote sensor 7 Camera recording lamp (p. 19) q; - qa qs qd qf 8 SUPER LASER LINK (p. 34) 9 Viewfinder (p. 22) q; Identifying the parts and controls Camcorder 1 8 2 9 3 4 5 6 7 1 Flash (p. 37, 117) 2 Focus ring (p. 54) 3 Lens 4 Photocell window for Sony video products.
... lens. 178 The lens for video camera and offers a quality as the Carl Zeiss lens. * MTF is a genuine accessory for flash 5 Microphone 6 Remote sensor 7 Camera recording lamp (p. 19) q; - qa qs qd qf 8 SUPER LASER LINK (p. 34) 9 Viewfinder (p. 22) q; Identifying the parts and controls Camcorder 1 8 2 9 3 4 5 6 7 1 Flash (p. 37, 117) 2 Focus ring (p. 54) 3 Lens 4 Photocell window for Sony video products.

Operating Instructions
Page 179
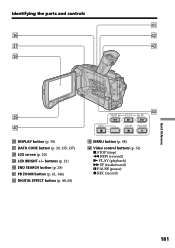
Quick Reference 179 Identifying the parts and controls qg w; wa qh ws wd qj qk wf ql wg qg MEMORY EJECT Lever (p. 108) qh PHOTO button (p. 36, 114) qj LOCK switch (p. ... as CONTROL L or REMOTE. Attaching the shoulder strap Attach the shoulder strap supplied with your camcorder is used for Local Application Control Bus System. wf S VIDEO jack (p. 33, 40, 68, 82, 122, 127) wg i (headphones) jack When you use headphones, the speaker on your camcorder to the...
Quick Reference 179 Identifying the parts and controls qg w; wa qh ws wd qj qk wf ql wg qg MEMORY EJECT Lever (p. 108) qh PHOTO button (p. 36, 114) qj LOCK switch (p. ... as CONTROL L or REMOTE. Attaching the shoulder strap Attach the shoulder strap supplied with your camcorder is used for Local Application Control Bus System. wf S VIDEO jack (p. 33, 40, 68, 82, 122, 127) wg i (headphones) jack When you use headphones, the speaker on your camcorder to the...

Operating Instructions
Page 180
Identifying the parts and controls wh ea wj es wk ed wl ef e; This jack also accepts a "plug-in-power" microphone. wh Intelligent accessory shoe (p. 87) wj Power zoom lever (p. 23) wk BATT release button (p. 12) wl Hooks for fixing the installed accessory securely. eg AUDIO/VIDEO ID-2 jack (p....68, 82, 122, 127) 180 Notes on the intelligent accessory shoe •The intelligent accessory shoe supplies power to optional accessories such as a video light or microphone. •The intelligent accessory shoe is linked to the POWER switch, allowing you to the end, and then tighten the screw....
Identifying the parts and controls wh ea wj es wk ed wl ef e; This jack also accepts a "plug-in-power" microphone. wh Intelligent accessory shoe (p. 87) wj Power zoom lever (p. 23) wk BATT release button (p. 12) wl Hooks for fixing the installed accessory securely. eg AUDIO/VIDEO ID-2 jack (p....68, 82, 122, 127) 180 Notes on the intelligent accessory shoe •The intelligent accessory shoe supplies power to optional accessories such as a video light or microphone. •The intelligent accessory shoe is linked to the POWER switch, allowing you to the end, and then tighten the screw....
Operating Instructions
Page 181
buttons (p. 21) r; eh DISPLAY button (p. 30) ej DATA CODE button (p. 30, 135, 137) ek LCD screen (p. 20) el LCD BRIGHT +/- END SEARCH button (p. 28) ra PB ZOOM button (p. 61, 146) rs DIGITAL EFFECT button (p. 48, 60) rf REW PLAY FF REC STOP PAUSE rd MENU button (p. 98) rf Video control buttons (p. 31) x STOP (stop) m REW (rewind) N PLAY (playback) M FF (fastforward) X PAUSE (pause) z REC (record) Quick Reference 181 Identifying the parts and controls ra eh rs ej rd ek el r;
buttons (p. 21) r; eh DISPLAY button (p. 30) ej DATA CODE button (p. 30, 135, 137) ek LCD screen (p. 20) el LCD BRIGHT +/- END SEARCH button (p. 28) ra PB ZOOM button (p. 61, 146) rs DIGITAL EFFECT button (p. 48, 60) rf REW PLAY FF REC STOP PAUSE rd MENU button (p. 98) rf Video control buttons (p. 31) x STOP (stop) m REW (rewind) N PLAY (playback) M FF (fastforward) X PAUSE (pause) z REC (record) Quick Reference 181 Identifying the parts and controls ra eh rs ej rd ek el r;
Operating Instructions
Page 182
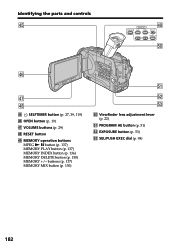
Viewfinder lens adjustment lever (p. 22) ta PROGRAM AE button (p. 51) ts EXPOSURE button (p. 53) td SEL/PUSH EXEC dial (p. 98) 182 buttons (p. 137) MEMORY MIX button (p. 130) ta ts td t; Identifying the parts and controls rg MPEG MEMORY PLAY INDEX rl DELETE MEMORY MIX t; rh rj rk rg SELFTIMER button (p. 27, 39, 119) rh OPEN button (p. 19) rj VOLUME buttons (p. 29) rk RESET button rl MEMORY operation buttons MPEG N X button (p. 137) MEMORY PLAY button (p. 137) MEMORY INDEX button (p. 136) MEMORY DELETE button (p. 150) MEMORY +/-
Viewfinder lens adjustment lever (p. 22) ta PROGRAM AE button (p. 51) ts EXPOSURE button (p. 53) td SEL/PUSH EXEC dial (p. 98) 182 buttons (p. 137) MEMORY MIX button (p. 130) ta ts td t; Identifying the parts and controls rg MPEG MEMORY PLAY INDEX rl DELETE MEMORY MIX t; rh rj rk rg SELFTIMER button (p. 27, 39, 119) rh OPEN button (p. 19) rj VOLUME buttons (p. 29) rk RESET button rl MEMORY operation buttons MPEG N X button (p. 137) MEMORY PLAY button (p. 137) MEMORY INDEX button (p. 136) MEMORY DELETE button (p. 150) MEMORY +/-


