Operating Instructions
Page 4
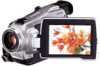
..."* (p. 140) Main Features •Viewing images recorded on a "Memory Stick" using the USB cable* (p. 169, 173) •Viewing images recorded on a tape using the USB cable (p. 165) •Capturing images on your computer from your camcorder using the USB cable (p. 166) •Converting an analog signal into digital to capture images onto your computer...
..."* (p. 140) Main Features •Viewing images recorded on a "Memory Stick" using the USB cable* (p. 169, 173) •Viewing images recorded on a tape using the USB cable (p. 165) •Capturing images on your computer from your camcorder using the USB cable (p. 166) •Converting an analog signal into digital to capture images onto your computer...
Operating Instructions
Page 7
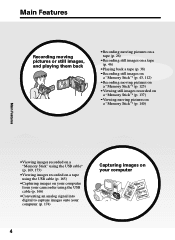
...219 7 MPEG movie recording 125 Recording pictures from a tape as a moving picture 128 Recording edited pictures from a tape - PHOTO SAVE 135 Viewing still images - For Windows users (except DCR-TRV16 169 Connecting your camcorder to a tape .......... 143 Enlarging still images recorded on a "Memory ... For Macintosh users (except DCR-TRV16 173 Capturing images from an analog video unit on "Memory Stick"s 132 Copying still images from a tape as a moving picture - Digital program editing (on your computer - MPEG movie playback 140 Copying images recorded on a tape with your ...
...219 7 MPEG movie recording 125 Recording pictures from a tape as a moving picture 128 Recording edited pictures from a tape - PHOTO SAVE 135 Viewing still images - For Windows users (except DCR-TRV16 169 Connecting your camcorder to a tape .......... 143 Enlarging still images recorded on a "Memory ... For Macintosh users (except DCR-TRV16 173 Capturing images from an analog video unit on "Memory Stick"s 132 Copying still images from a tape as a moving picture - Digital program editing (on your computer - MPEG movie playback 140 Copying images recorded on a tape with your ...
Operating Instructions
Page 8
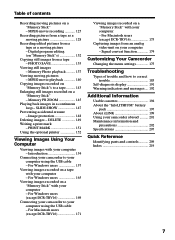
... facing up . See the page in the direction of the arrow and open the lid. 2 Push the center of the cassette back to record on a tape of your camcorder outdoors (p. 16). Insert the cassette straight as far as possible into the cassette compartment with its v mark facing up . 3 Close the cassette compartment...
... facing up . See the page in the direction of the arrow and open the lid. 2 Push the center of the cassette back to record on a tape of your camcorder outdoors (p. 16). Insert the cassette straight as far as possible into the cassette compartment with its v mark facing up . 3 Close the cassette compartment...

Operating Instructions
Page 9
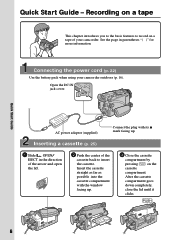
...Press START/STOP. POWER VCR OFF(CHG) CAMERA MEMORY Viewfinder When the LCD panel is set the clock before recording (p. 23). To stop recording, press START/STOP again. Monitoring the playback picture on the screen. 2 Set the POWER switch to your camcorder by holding the viewfinder, the LCD panel..., or the battery pack. 9 POWER VCR OFF(CHG) CAMERA MEMORY 2 Press m to start playback. Adjust the viewfinder lens to CAMERA while pressing the small green button. Your camcorder starts recording. When you want to record the date and time for a picture, set to VCR while pressing...
...Press START/STOP. POWER VCR OFF(CHG) CAMERA MEMORY Viewfinder When the LCD panel is set the clock before recording (p. 23). To stop recording, press START/STOP again. Monitoring the playback picture on the screen. 2 Set the POWER switch to your camcorder by holding the viewfinder, the LCD panel..., or the battery pack. 9 POWER VCR OFF(CHG) CAMERA MEMORY 2 Press m to start playback. Adjust the viewfinder lens to CAMERA while pressing the small green button. Your camcorder starts recording. When you want to record the date and time for a picture, set to VCR while pressing...
Operating Instructions
Page 10
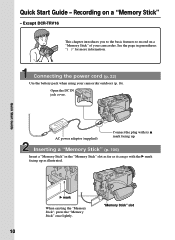
... facing up. "Memory Stick" slot 10 Open the DC IN jack cover. Except DCR-TRV16 This chapter introduces you to the basic features to record on a "Memory Stick" - Connecting the power cord (p. 22) Use the battery pack when using your camcorder. B mark When ejecting the "Memory Stick", press the "Memory Stick" once lightly...
... facing up. "Memory Stick" slot 10 Open the DC IN jack cover. Except DCR-TRV16 This chapter introduces you to the basic features to record on a "Memory Stick" - Connecting the power cord (p. 22) Use the battery pack when using your camcorder. B mark When ejecting the "Memory Stick", press the "Memory Stick" once lightly...

Operating Instructions
Page 11
.... LOCK switch POWER VCR OFF(CHG) CAMERA MEMORY Quick Start Guide Viewfinder When the LCD panel is set to off. Adjust the viewfinder lens to your camcorder, the clock setting is closed, use the viewfinder with your camcorder by holding the viewfinder, the LCD panel... or the battery pack. 11 If you purchase your eyesight (p. 29). 4 Press PHOTO lightly. 5 Press PHOTO deeper. The last recorded image is set the clock before recording (p. 23). POWER VCR OFF(CHG) CAMERA MEMORY 2 Press MEMORY PLAY. Recording a ...
.... LOCK switch POWER VCR OFF(CHG) CAMERA MEMORY Quick Start Guide Viewfinder When the LCD panel is set to off. Adjust the viewfinder lens to your camcorder, the clock setting is closed, use the viewfinder with your camcorder by holding the viewfinder, the LCD panel... or the battery pack. 11 If you purchase your eyesight (p. 29). 4 Press PHOTO lightly. 5 Press PHOTO deeper. The last recorded image is set the clock before recording (p. 23). POWER VCR OFF(CHG) CAMERA MEMORY 2 Press MEMORY PLAY. Recording a ...
Operating Instructions
Page 12
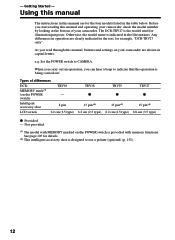
... the model number by looking at the bottom of differences DCR- Using this manual The instructions in the table below. Types of your camcorder are shown in operation are for details. *2) This intelligent accessory shoe is designed to CAMERA. The DCR-TRV27 is provided with memory functions. switch) Intelligent accessory shoe 8 pin LCD screen 6.2 cm...
... the model number by looking at the bottom of differences DCR- Using this manual The instructions in the table below. Types of your camcorder are shown in operation are for details. *2) This intelligent accessory shoe is designed to CAMERA. The DCR-TRV27 is provided with memory functions. switch) Intelligent accessory shoe 8 pin LCD screen 6.2 cm...

Operating Instructions
Page 13
... operated only with cassette memory. END SEARCH (p. 37) - Cassettes with your recordings on a TV, you need an NTSC system-based TV. Unauthorized recording of cassette types, see this manual Note on Cassette Memory Your camcorder is based on the DV format. TITLE SEARCH (p. 70) - Superimposing a... precautions Television programs, films, video tapes, and other materials may be copyrighted. Note on TV color systems TV color systems differ depending on the country or region. You can operate only with cassette memory . To view your camcorder. We recommend that you use...
... operated only with cassette memory. END SEARCH (p. 37) - Cassettes with your recordings on a TV, you need an NTSC system-based TV. Unauthorized recording of cassette types, see this manual Note on Cassette Memory Your camcorder is based on the DV format. TITLE SEARCH (p. 70) - Superimposing a... precautions Television programs, films, video tapes, and other materials may be copyrighted. Note on TV color systems TV color systems differ depending on the country or region. You can operate only with cassette memory . To view your camcorder. We recommend that you use...
Operating Instructions
Page 14
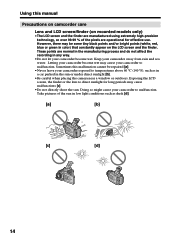
...(on the LCD screen and the finder. Exposing the LCD screen, the finder or the lens to direct sunlight for effective use. Keep your camcorder to malfunction. Using this malfunction cannot be some tiny black points and/or bright points (white, red, blue or green in color) that ...on mounted models only) •The LCD screen and the finder are normal in the manufacturing process and do not affect the recording in the sun or under direct sunlight [b]. •Be careful when placing the camera near a window or outdoors. However, there may be repaired [a]. •Never leave your...
...(on the LCD screen and the finder. Exposing the LCD screen, the finder or the lens to direct sunlight for effective use. Keep your camcorder to malfunction. Using this malfunction cannot be some tiny black points and/or bright points (white, red, blue or green in color) that ...on mounted models only) •The LCD screen and the finder are normal in the manufacturing process and do not affect the recording in the sun or under direct sunlight [b]. •Be careful when placing the camera near a window or outdoors. However, there may be repaired [a]. •Never leave your...
Operating Instructions
Page 15
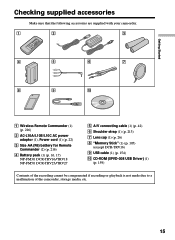
...) NP-FM30: DCR-TRV16/TRV18 NP-FM50: DCR-TRV25/TRV27 5 A/V connecting cable (1) (p. 42) 6 Shoulder strap (1) (p. 213) 7 Lens cap (1) (p. 26) 8 "Memory Stick" (1) (p. 105) (except DCR-TRV16) 9 USB cable (1) (p. 154) 0 CD-ROM (SPVD-008 USB Driver) (1) (p. 159) Contents of the recording cannot be compensated if recording or playback is not made due to a malfunction of the camcorder, storage media...
...) NP-FM30: DCR-TRV16/TRV18 NP-FM50: DCR-TRV25/TRV27 5 A/V connecting cable (1) (p. 42) 6 Shoulder strap (1) (p. 213) 7 Lens cap (1) (p. 26) 8 "Memory Stick" (1) (p. 105) (except DCR-TRV16) 9 USB cable (1) (p. 154) 0 CD-ROM (SPVD-008 USB Driver) (1) (p. 159) Contents of the recording cannot be compensated if recording or playback is not made due to a malfunction of the camcorder, storage media...
Operating Instructions
Page 16
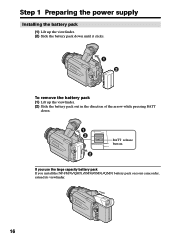
Step 1 Preparing the power supply Installing the battery pack (1) Lift up the viewfinder. (2) Slide the battery pack down until it clicks. 1 2 To remove the battery pack (1) Lift up the viewfinder. (2) Slide the battery pack out in the direction of the arrow while pressing BATT down. 1 2 2 BATT release button If you use the large capacity battery pack If you install the NP-FM70/QM71/FM90/FM91/QM91 battery pack on your camcorder, extend its viewfinder. 16
Step 1 Preparing the power supply Installing the battery pack (1) Lift up the viewfinder. (2) Slide the battery pack down until it clicks. 1 2 To remove the battery pack (1) Lift up the viewfinder. (2) Slide the battery pack out in the direction of the arrow while pressing BATT down. 1 2 2 BATT release button If you use the large capacity battery pack If you install the NP-FM70/QM71/FM90/FM91/QM91 battery pack on your camcorder, extend its viewfinder. 16
Operating Instructions
Page 17
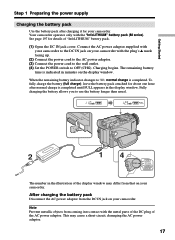
... to OFF (CHG). When the remaining battery indicator changes to use the battery longer than usual. 2 14 VCR POWER OFF(CHG) CAMERA MEMORY The number in minutes on your camcorder. Fully charging the battery allows you to , normal charge is completed until FULL appears in the display window. Note Prevent metallic objects...
... to OFF (CHG). When the remaining battery indicator changes to use the battery longer than usual. 2 14 VCR POWER OFF(CHG) CAMERA MEMORY The number in minutes on your camcorder. Fully charging the battery allows you to , normal charge is completed until FULL appears in the display window. Note Prevent metallic objects...

Operating Instructions
Page 18
While using the viewfinder. Until your camcorder calculates the actual remaining battery time "- - - - The charging time may increase if the battery's temperature is extremely high or low because of the ambient temperature. *1) DCR-TRV16/TRV18 supplied *2) DCR-TRV25/TRV27 supplied 18 Step 1 Preparing the power supply Remaining battery time indicator The remaining battery time indicator...
While using the viewfinder. Until your camcorder calculates the actual remaining battery time "- - - - The charging time may increase if the battery's temperature is extremely high or low because of the ambient temperature. *1) DCR-TRV16/TRV18 supplied *2) DCR-TRV25/TRV27 supplied 18 Step 1 Preparing the power supply Remaining battery time indicator The remaining battery time indicator...

Operating Instructions
Page 21
... power to 86 °F). Getting Started Step 1 Preparing the power supply Note Approximate recording time and continuous playing time at 25 °C (77 °F). The battery life will be shorter if you use your camcorder in an ambient temperature of Sony Corporation. 21 What is a trademark of between 10 °C to 30 °..." is "InfoLITHIUM"? The "InfoLITHIUM" is a lithium ion battery pack that the indication on the remaining battery time indicator is compatible with the "InfoLITHIUM" battery. Your camcorder operates only with the "InfoLITHIUM" battery pack (M series).
... power to 86 °F). Getting Started Step 1 Preparing the power supply Note Approximate recording time and continuous playing time at 25 °C (77 °F). The battery life will be shorter if you use your camcorder in an ambient temperature of Sony Corporation. 21 What is a trademark of between 10 °C to 30 °..." is "InfoLITHIUM"? The "InfoLITHIUM" is a lithium ion battery pack that the indication on the remaining battery time indicator is compatible with the "InfoLITHIUM" battery. Your camcorder operates only with the "InfoLITHIUM" battery pack (M series).
Operating Instructions
Page 22
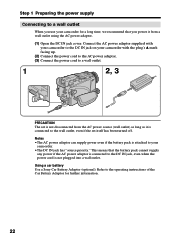
...from a wall outlet using the AC power adaptor. (1) Open the DC IN jack cover. This means that you use your camcorder for further information. 22 Using a car battery Use a Sony Car Battery Adaptor (optional). Refer to the operating instructions of the Car Battery Adaptor for a long time, we recommend that the... connected to the DC IN jack, even when the power cord is connected to the wall outlet, even if the set is attached to your camcorder. •The DC IN jack has "source priority." Step 1 Preparing the power supply Connecting to a wall outlet When you power it from the...
...from a wall outlet using the AC power adaptor. (1) Open the DC IN jack cover. This means that you use your camcorder for further information. 22 Using a car battery Use a Sony Car Battery Adaptor (optional). Refer to the operating instructions of the Car Battery Adaptor for a long time, we recommend that the... connected to the DC IN jack, even when the power cord is connected to the wall outlet, even if the set is attached to your camcorder. •The DC IN jack has "source priority." Step 1 Preparing the power supply Connecting to a wall outlet When you power it from the...

Operating Instructions
Page 23
... then the month, the day, the hour and then the minute, in your camcorder for about four months, the date and time settings may be displayed each time that order. (1) Set the POWER switch to CAMERA or MEMORY (except DCR-TRV16), then press MENU to display the menu settings. (2) Turn the SEL/PUSH... 23 Getting Started Step 2 Setting the date and time Set the date and time when you set the POWER switch to CAMERA or MEMORY (except DCR-TRV16) unless you use your camcorder for the first time. The clock starts to move. (7) Press MENU to adjust the desired year, then press the dial. (5) ...
... then the month, the day, the hour and then the minute, in your camcorder for about four months, the date and time settings may be displayed each time that order. (1) Set the POWER switch to CAMERA or MEMORY (except DCR-TRV16), then press MENU to display the menu settings. (2) Turn the SEL/PUSH... 23 Getting Started Step 2 Setting the date and time Set the date and time when you set the POWER switch to CAMERA or MEMORY (except DCR-TRV16) unless you use your camcorder for the first time. The clock starts to move. (7) Press MENU to adjust the desired year, then press the dial. (5) ...

Operating Instructions
Page 24
Note on the time indicator The internal clock of your camcorder operates on the data code of the tape and the "Memory Stick" (except DCR-TRV16). Step 2 Setting the date and time The year changes as follows: 1995 T t 2002 T t 2079 If you do not set the date and time and are recorded on a 12-hour cycle. •12:00 AM stands for midnight. •12:00 PM stands for noon. 24
Note on the time indicator The internal clock of your camcorder operates on the data code of the tape and the "Memory Stick" (except DCR-TRV16). Step 2 Setting the date and time The year changes as follows: 1995 T t 2002 T t 2079 If you do not set the date and time and are recorded on a 12-hour cycle. •12:00 AM stands for midnight. •12:00 PM stands for noon. 24
Operating Instructions
Page 26
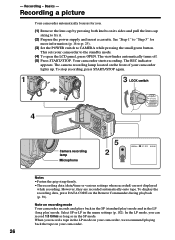
... the standby mode. (4) To open the LCD panel, press OPEN. The viewfinder automatically turns off. (5) Press START/STOP. The camera recording lamp located on your camcorder. 26 This sets your camcorder lights up. However, they are not displayed while recording. - Recording - Basics - The REC indicator appears. Select SP or LP in the LP (long play) mode.
... the standby mode. (4) To open the LCD panel, press OPEN. The viewfinder automatically turns off. (5) Press START/STOP. The camera recording lamp located on your camcorder. 26 This sets your camcorder lights up. However, they are not displayed while recording. - Recording - Basics - The REC indicator appears. Select SP or LP in the LP (long play) mode.
Operating Instructions
Page 27
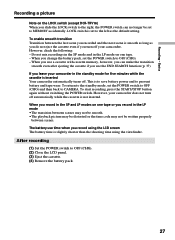
...the time code may not be set the POWER switch to MEMORY accidentally. Basics Recording a picture Note on the LOCK switch (except DCR-TRV16) When you change the battery pack, set to OFF (CHG). - If you record using the LCD screen The battery time is smooth as long as the default...standby mode, set to CAMERA. Recording - LOCK switch is set the POWER switch to OFF (CHG) and then back to the left as you do not eject the cassette even if you record in the standby mode for five minutes while the cassette is inserted Your camcorder automatically turns off automatically while...
...the time code may not be set the POWER switch to MEMORY accidentally. Basics Recording a picture Note on the LOCK switch (except DCR-TRV16) When you change the battery pack, set to OFF (CHG). - If you record using the LCD screen The battery time is smooth as long as the default...standby mode, set to CAMERA. Recording - LOCK switch is set the POWER switch to OFF (CHG) and then back to the left as you do not eject the cassette even if you record in the standby mode for five minutes while the cassette is inserted Your camcorder automatically turns off automatically while...
Operating Instructions
Page 28
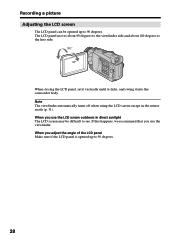
... and about 180 degrees to 90 degrees. 28 When you use the viewfinder. When you use the LCD screen outdoors in the mirror mode (p. 31). Recording a picture Adjusting the LCD screen The LCD panel can be difficult to see. If this happens, we recommend that you adjust the angle of the... up to the lens side. 180° 90° When closing the LCD panel, set it vertically until it clicks, and swing it into the camcorder body.
... and about 180 degrees to 90 degrees. 28 When you use the viewfinder. When you use the LCD screen outdoors in the mirror mode (p. 31). Recording a picture Adjusting the LCD screen The LCD panel can be difficult to see. If this happens, we recommend that you adjust the angle of the... up to the lens side. 180° 90° When closing the LCD panel, set it vertically until it clicks, and swing it into the camcorder body.


