Operating Instructions
Page 5
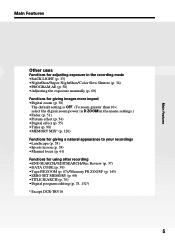
...recording mode •BACK LIGHT (p. 33) •NightShot/Super NightShot/Color Slow Shutter (p. 34) •PROGRAM AE (p. 58) •Adjusting the exposure manually (p. 60) Functions for giving images more impact •Digital ...recordings •Landscape (p. 58) •Sports lesson (p. 58) •Manual focus (p. 61) Functions for using after recording •END SEARCH/EDITSEARCH/Rec Review (p. 37) •DATA CODE (p. 39) •Tape PB ZOOM (p. 67)/Memory PB ZOOM* (p. 145) •ZERO SET MEMORY (p. 69) •TITLE SEARCH (p. 70) •Digital program editing (p. 78, 132*) * Except DCR...
...recording mode •BACK LIGHT (p. 33) •NightShot/Super NightShot/Color Slow Shutter (p. 34) •PROGRAM AE (p. 58) •Adjusting the exposure manually (p. 60) Functions for giving images more impact •Digital ...recordings •Landscape (p. 58) •Sports lesson (p. 58) •Manual focus (p. 61) Functions for using after recording •END SEARCH/EDITSEARCH/Rec Review (p. 37) •DATA CODE (p. 39) •Tape PB ZOOM (p. 67)/Memory PB ZOOM* (p. 145) •ZERO SET MEMORY (p. 69) •TITLE SEARCH (p. 70) •Digital program editing (p. 78, 132*) * Except DCR...
Operating Instructions
Page 6
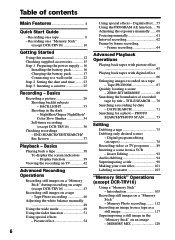
...desired scenes - Recording on a tape 8 - BACK LIGHT 33 Shooting in the "Memory Stick" on an image - Display function 39 Viewing the recording on TV 42 Advanced Recording Operations Recording still images on a "Memory Stick" during recording on a tape (except DCR-TRV16 43 Recording still images ... 60 Focusing manually 61 Interval recording 62 Frame by date - Frame recording 64 Advanced Playback Operations Playing back tapes with picture effect 65 Playing back tapes with digital effect 66 Enlarging images recorded on tapes 78 Recording video or TV programs ....... 89 Inserting...
...desired scenes - Recording on a tape 8 - BACK LIGHT 33 Shooting in the "Memory Stick" on an image - Display function 39 Viewing the recording on TV 42 Advanced Recording Operations Recording still images on a "Memory Stick" during recording on a tape (except DCR-TRV16 43 Recording still images ... 60 Focusing manually 61 Interval recording 62 Frame by date - Frame recording 64 Advanced Playback Operations Playing back tapes with picture effect 65 Playing back tapes with digital effect 66 Enlarging images recorded on tapes 78 Recording video or TV programs ....... 89 Inserting...
Operating Instructions
Page 10
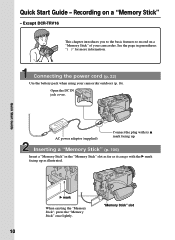
Except DCR-TRV16 This chapter introduces you to the basic features to record on a "Memory Stick" - Inserting a "Memory Stick" (p. 106) Insert a "Memory Stick" in parentheses "( )" for more information. Quick Start Guide - "Memory Stick" slot 10 See the ...go with its v mark facing up as illustrated. Open the DC IN jack cover. B mark When ejecting the "Memory Stick", press the "Memory Stick" once lightly. Recording on a "Memory Stick" of your camcorder outdoors (p. 16). Connecting the power cord (p. 22) Use the battery pack when using your camcorder. Quick Start Guide ...
Except DCR-TRV16 This chapter introduces you to the basic features to record on a "Memory Stick" - Inserting a "Memory Stick" (p. 106) Insert a "Memory Stick" in parentheses "( )" for more information. Quick Start Guide - "Memory Stick" slot 10 See the ...go with its v mark facing up as illustrated. Open the DC IN jack cover. B mark When ejecting the "Memory Stick", press the "Memory Stick" once lightly. Recording on a "Memory Stick" of your camcorder outdoors (p. 16). Connecting the power cord (p. 22) Use the battery pack when using your camcorder. Quick Start Guide ...

Operating Instructions
Page 11
... date and time for a picture, set the clock before recording (p. 23). POWER VCR OFF(CHG) CAMERA MEMORY 2 Press MEMORY PLAY. If you purchase your eyesight (p. 29). 4 Press PHOTO lightly. 5 Press PHOTO deeper. NOTE Do not pick up your eye against the eyecup. PHOTO PHOTO When you want to ...on the screen. 2 Set the POWER switch to MEMORY or VCR while pressing the small green button. LOCK switch POWER VCR OFF(CHG) CAMERA MEMORY Quick Start Guide Viewfinder When the LCD panel is set to select the desired image. Monitoring the playback still images on a "Memory ...
... date and time for a picture, set the clock before recording (p. 23). POWER VCR OFF(CHG) CAMERA MEMORY 2 Press MEMORY PLAY. If you purchase your eyesight (p. 29). 4 Press PHOTO lightly. 5 Press PHOTO deeper. NOTE Do not pick up your eye against the eyecup. PHOTO PHOTO When you want to ...on the screen. 2 Set the POWER switch to MEMORY or VCR while pressing the small green button. LOCK switch POWER VCR OFF(CHG) CAMERA MEMORY Quick Start Guide Viewfinder When the LCD panel is set to select the desired image. Monitoring the playback still images on a "Memory ...
Operating Instructions
Page 14
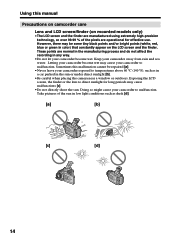
Take pictures of the pixels are normal in the manufacturing process and do not affect the recording in the sun or under direct sunlight [b]. •Be careful when placing the camera near a window or outdoors. Letting your camcorder become wet. Exposing the LCD screen, the finder or the lens to malfunction. ...only) •The LCD screen and the finder are manufactured using extremely high-precision technology, so over 99.99 % of the sun in low light conditions such as in a car parked in any way. •Do not let your camcorder become wet may cause your camcorder away from rain...
Take pictures of the pixels are normal in the manufacturing process and do not affect the recording in the sun or under direct sunlight [b]. •Be careful when placing the camera near a window or outdoors. Letting your camcorder become wet. Exposing the LCD screen, the finder or the lens to malfunction. ...only) •The LCD screen and the finder are manufactured using extremely high-precision technology, so over 99.99 % of the sun in low light conditions such as in a car parked in any way. •Do not let your camcorder become wet may cause your camcorder away from rain...
Operating Instructions
Page 26
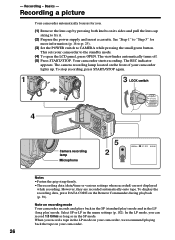
...CAMERA MEMORY Camera recording lamp Microphone 5 2 50min REC 0:00:01 Notes •Fasten the grip strap firmly. •The recording data (date/time or various settings when recorded) are recorded automatically onto tape. However, they are not displayed while recording. To display the recording data, press DATA CODE on the front of your camcorder lights... up. In the LP mode, you record a tape in the LP (long play ) mode and in the LP mode on your camcorder, we recommend playing back the tape on its sides and pull the lens cap string to CAMERA while pressing ...
...CAMERA MEMORY Camera recording lamp Microphone 5 2 50min REC 0:00:01 Notes •Fasten the grip strap firmly. •The recording data (date/time or various settings when recorded) are recorded automatically onto tape. However, they are not displayed while recording. To display the recording data, press DATA CODE on the front of your camcorder lights... up. In the LP mode, you record a tape in the LP (long play ) mode and in the LP mode on your camcorder, we recommend playing back the tape on its sides and pull the lens cap string to CAMERA while pressing ...
Operating Instructions
Page 33
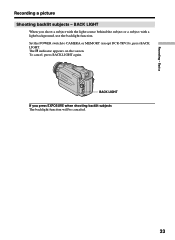
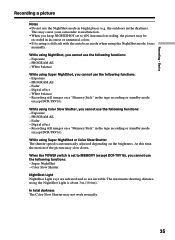
BACK LIGHT When you press EXPOSURE when shooting backlit subjects The backlight function will be canceled. 33 Set the POWER switch to CAMERA or MEMORY (except DCR-TRV16), press BACK LIGHT. BACK LIGHT If you shoot a subject with the light source behind the subject or a subject with a light background, use the backlight function. To cancel, press BACK LIGHT again. Recording - indicator appears on the screen. Basics Recording a picture Shooting backlit subjects - The .
BACK LIGHT When you press EXPOSURE when shooting backlit subjects The backlight function will be canceled. 33 Set the POWER switch to CAMERA or MEMORY (except DCR-TRV16), press BACK LIGHT. BACK LIGHT If you shoot a subject with the light source behind the subject or a subject with a light background, use the backlight function. To cancel, press BACK LIGHT again. Recording - indicator appears on the screen. Basics Recording a picture Shooting backlit subjects - The .
Operating Instructions
Page 34
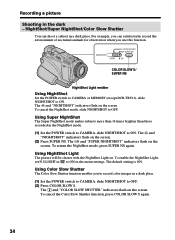
... observation when you to record color images in the menu settings. To cancel the NightShot mode, slide NIGHTSHOT to ON in a dark place. (1) Set the POWER switch to CAMERA, slide NIGHTSHOT to OFF. (2) Press COLOR SLOW S. To enable the NightShot Light, set N.S.LIGHT in the NightShot mode....SLOW S again. 34 Recording a picture Shooting in a dark place. To return the NightShot mode, press SUPER NS again. NIGHTSHOT OFF COLOR SLOW S SUPER NS ON COLOR SLOW S/ SUPER NS NightShot Light emitter Using NightShot Set the POWER switch to CAMERA or MEMORY (except DCR-TRV16), slide NIGHTSHOT to...
... observation when you to record color images in the menu settings. To cancel the NightShot mode, slide NIGHTSHOT to ON in a dark place. (1) Set the POWER switch to CAMERA, slide NIGHTSHOT to OFF. (2) Press COLOR SLOW S. To enable the NightShot Light, set N.S.LIGHT in the NightShot mode....SLOW S again. 34 Recording a picture Shooting in a dark place. To return the NightShot mode, press SUPER NS again. NIGHTSHOT OFF COLOR SLOW S SUPER NS ON COLOR SLOW S/ SUPER NS NightShot Light emitter Using NightShot Set the POWER switch to CAMERA or MEMORY (except DCR-TRV16), slide NIGHTSHOT to...
Operating Instructions
Page 35
.... Color Slow Shutter NightShot Light NightShot Light rays are infrared and so are invisible. Basics Recording a picture Notes •Do not use the following functions: - Exposure - The maximum shooting distance using Super NightShot, you cannot use the NightShot mode in the tape recording or standby mode (except DCR-TRV16). PROGRAM AE - Digital effect - When the POWER...
.... Color Slow Shutter NightShot Light NightShot Light rays are infrared and so are invisible. Basics Recording a picture Notes •Do not use the following functions: - Exposure - The maximum shooting distance using Super NightShot, you cannot use the NightShot mode in the tape recording or standby mode (except DCR-TRV16). PROGRAM AE - Digital effect - When the POWER...

Operating Instructions
Page 43
... and hold PHOTO lightly. (2) Press PHOTO deeper. Advanced Recording Operations - Except DCR-TRV16 You can be recorded on the "Memory Stick." 1 [a][b] 50min 640 SFN 1 / 12 CAPTURE PHOTO 2 50min 640 SFN PHOTO [a]: Number of recorded images [b]: Approximate number of images that can record still images on the "Memory Stick" 43 Recording does not start yet. Recording is MEMORY.) (1) In...
... and hold PHOTO lightly. (2) Press PHOTO deeper. Advanced Recording Operations - Except DCR-TRV16 You can be recorded on the "Memory Stick." 1 [a][b] 50min 640 SFN 1 / 12 CAPTURE PHOTO 2 50min 640 SFN PHOTO [a]: Number of recorded images [b]: Approximate number of images that can record still images on the "Memory Stick" 43 Recording does not start yet. Recording is MEMORY.) (1) In...
Operating Instructions
Page 44
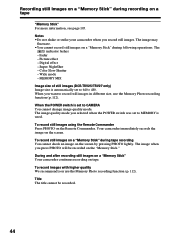
...by pressing PHOTO lightly. To record images with higher quality We recommend you press PHOTO will be recorded. 44 Color Slow Shutter - The image when you use the Memory Photo recording function (p. 112). MEMORY MIX Image size of still images (DCR-TRV25/TRV27 only) Image ...fluctuate. •You cannot record still images on the Remote Commander. Digital effect - To record still images using the Remote Commander Press PHOTO on a "Memory Stick" during following operations. During and after recording still images on a "Memory Stick" Your camcorder continues recording on a tape "Memory ...
...by pressing PHOTO lightly. To record images with higher quality We recommend you press PHOTO will be recorded. 44 Color Slow Shutter - The image when you use the Memory Photo recording function (p. 112). MEMORY MIX Image size of still images (DCR-TRV25/TRV27 only) Image ...fluctuate. •You cannot record still images on the Remote Commander. Digital effect - To record still images using the Remote Commander Press PHOTO on a "Memory Stick" during following operations. During and after recording still images on a "Memory Stick" Your camcorder continues recording on a tape "Memory ...

Operating Instructions
Page 46
... PHOTO REC in to TAPE in the menu settings (p. 177). (except DCR-TRV16) (2) Keep pressing PHOTO lightly until recording is also recorded. Digital effect 46 The still image is displayed on page 45. Recording still images on tapes. Fader - The indicator flashes.: - Tape Photo recording You can record about 510 images in the menu settings (p. 177). (2) Follow steps...
... PHOTO REC in to TAPE in the menu settings (p. 177). (except DCR-TRV16) (2) Keep pressing PHOTO lightly until recording is also recorded. Digital effect 46 The still image is displayed on page 45. Recording still images on tapes. Fader - The indicator flashes.: - Tape Photo recording You can record about 510 images in the menu settings (p. 177). (2) Follow steps...
Operating Instructions
Page 47
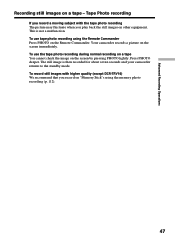
..."s using the Remote Commander Press PHOTO on a tape - Tape Photo recording If you record a moving subject with higher quality (except DCR-TRV16) We recommend that you play back the still images on other equipment. Your camcorder records a picture on the screen by pressing PHOTO lightly. The still image is not a malfunction. To use the tape...
..."s using the Remote Commander Press PHOTO on a tape - Tape Photo recording If you record a moving subject with higher quality (except DCR-TRV16) We recommend that you play back the still images on other equipment. Your camcorder records a picture on the screen by pressing PHOTO lightly. The still image is not a malfunction. To use the tape...
Operating Instructions
Page 48
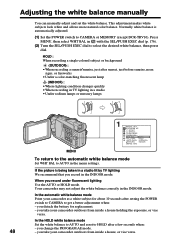
...In the HOLD white balance mode Set the white balance to AUTO and reset to select the desired white balance, then press dial. you record under fluorescent lighting Use the AUTO or HOLD mode. you take your camcorder outdoors from inside a house holding the exposure, or vice versa. Your camcorder... LIGHT HOLD AUTO SHTR OUTDOOR RETURN INDOOR [MENU] : END MENU To return to the automatic white balance mode Set WHT BAL to AUTO in with the SEL/PUSH EXEC dial (p. 176). (2) Turn the SEL/PUSH EXEC dial to HOLD after setting the POWER switch to CAMERA to CAMERA or MEMORY (except DCR-...
...In the HOLD white balance mode Set the white balance to AUTO and reset to select the desired white balance, then press dial. you record under fluorescent lighting Use the AUTO or HOLD mode. you take your camcorder outdoors from inside a house holding the exposure, or vice versa. Your camcorder... LIGHT HOLD AUTO SHTR OUTDOOR RETURN INDOOR [MENU] : END MENU To return to the automatic white balance mode Set WHT BAL to AUTO in with the SEL/PUSH EXEC dial (p. 176). (2) Turn the SEL/PUSH EXEC dial to HOLD after setting the POWER switch to CAMERA to CAMERA or MEMORY (except DCR-...
Operating Instructions
Page 52
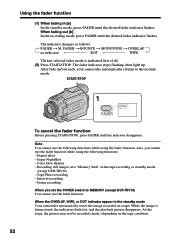
... stops flashing, then light up. Digital effect - Recording still images on the tape condition. 52 Tape Photo recording - Interval recording - At this stage, the picture may not be recorded clearly, depending on a "Memory Stick" in /out ends, your camcorder automatically returns to MEMORY (except DCR-TRV16) You cannot ...use the fader function while using the following functions while using the fader function. After fade in the tape recording or standby mode (except DCR-TRV16) - Note You cannot use the following functions: - Also, you set the POWER switch to the normal ...
... stops flashing, then light up. Digital effect - Recording still images on the tape condition. 52 Tape Photo recording - Interval recording - At this stage, the picture may not be recorded clearly, depending on a "Memory Stick" in /out ends, your camcorder automatically returns to MEMORY (except DCR-TRV16) You cannot ...use the fader function while using the following functions while using the fader function. After fade in the tape recording or standby mode (except DCR-TRV16) - Note You cannot use the following functions: - Also, you set the POWER switch to the normal ...
Operating Instructions
Page 54
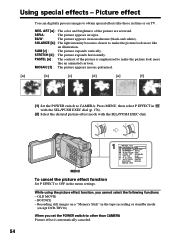
... The color and brightness of the picture is automatically canceled. 54 SLIM [c] : The picture expands vertically. Recording still images on a "Memory Stick" in films or on TV. NEG. LIGHT STRETCH AUTO SHTR PASTEL RETURN MOSAIC [MENU] : END MENU To cancel the picture effect function Set P ... recording or standby mode (except DCR-TRV16) When you cannot select the following functions: - While using the picture effect function, you set the POWER switch to obtain special effects like an illustration. Picture effect You can digitally process images to other than CAMERA...
... The color and brightness of the picture is automatically canceled. 54 SLIM [c] : The picture expands vertically. Recording still images on a "Memory Stick" in films or on TV. NEG. LIGHT STRETCH AUTO SHTR PASTEL RETURN MOSAIC [MENU] : END MENU To cancel the picture effect function Set P ... recording or standby mode (except DCR-TRV16) When you cannot select the following functions: - While using the picture effect function, you set the POWER switch to obtain special effects like an illustration. Picture effect You can digitally process images to other than CAMERA...

Operating Instructions
Page 56
... press the dial. The larger the shutter speed number, the slower the shutter speed becomes. LIGHT AUTO SHTR RETURN [MENU] : END To cancel the digital effect function Set D EFFECT to CAMERA. Using special effects - Digital effect (1) Set the POWER switch to OFF in with a moving picture FLASH Frame by frame...adjusted STILL The rate of the area in the still image which is recorded in the memory. (3) Turn the SEL/PUSH EXEC dial to be swapped with the SEL/PUSH EXEC dial (p. 176). (2) Select the desired digital effect mode in the following modes: STILL, FLASH, LUMI. OLD ...
... press the dial. The larger the shutter speed number, the slower the shutter speed becomes. LIGHT AUTO SHTR RETURN [MENU] : END To cancel the digital effect function Set D EFFECT to CAMERA. Using special effects - Digital effect (1) Set the POWER switch to OFF in with a moving picture FLASH Frame by frame...adjusted STILL The rate of the area in the still image which is recorded in the memory. (3) Turn the SEL/PUSH EXEC dial to be swapped with the SEL/PUSH EXEC dial (p. 176). (2) Select the desired digital effect mode in the following modes: STILL, FLASH, LUMI. OLD ...
Operating Instructions
Page 58
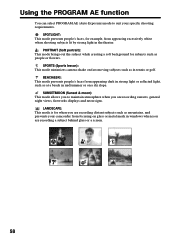
...the subject while creating a soft background for subjects such as in tennis or golf. SPORTS (Sports lesson): This mode minimizes camera-shake on fast-moving subjects such as people or flowers. BEACH&SKI: This mode prevents people's faces from appearing excessively white...light or reflected light, such as mountains, and prevents your specific shooting requirements. LANDSCAPE: This mode is for example, from appearing dark in the theater. SPOTLIGHT: This mode prevents people's faces, for when you are recording distant subjects such as at a beach in windows when you are recording...
...the subject while creating a soft background for subjects such as in tennis or golf. SPORTS (Sports lesson): This mode minimizes camera-shake on fast-moving subjects such as people or flowers. BEACH&SKI: This mode prevents people's faces from appearing excessively white...light or reflected light, such as mountains, and prevents your specific shooting requirements. LANDSCAPE: This mode is for example, from appearing dark in the theater. SPOTLIGHT: This mode prevents people's faces, for when you are recording distant subjects such as at a beach in windows when you are recording...
Operating Instructions
Page 59
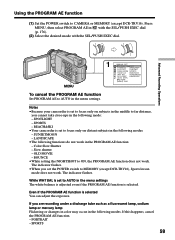
LIGHT LANDSCAPE AUTO SHTR RETURN [MENU] : END To cancel the PROGRAM AE ... function: - Color Slow Shutter - S. The indicator flashes. SPORTS - The indicator flashes. • When you are recording under a discharge tube such as a fluorescent lamp, sodium lamp or mercury lamp Flickering or changes in color may occur ... PROGRAM AE function (1) Set the POWER switch to CAMERA or MEMORY (except DCR-TRV16). LANDSCAPE • The following modes. SPORTS 59 Even if the PROGRAM AE function is selected. Advanced Recording Operations MENU 1 MANUAL SET PROGRAM AE AUTO P EFFECT...
LIGHT LANDSCAPE AUTO SHTR RETURN [MENU] : END To cancel the PROGRAM AE ... function: - Color Slow Shutter - S. The indicator flashes. SPORTS - The indicator flashes. • When you are recording under a discharge tube such as a fluorescent lamp, sodium lamp or mercury lamp Flickering or changes in color may occur ... PROGRAM AE function (1) Set the POWER switch to CAMERA or MEMORY (except DCR-TRV16). LANDSCAPE • The following modes. SPORTS 59 Even if the PROGRAM AE function is selected. Advanced Recording Operations MENU 1 MANUAL SET PROGRAM AE AUTO P EFFECT...
Operating Instructions
Page 60
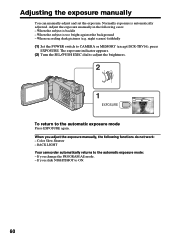
When the subject is automatically adjusted. When recording dark pictures (e.g. Adjust the exposure manually in the following functions do not work: - Color Slow Shutter - BACK LIGHT Your camcorder automatically returns to the automatic exposure mode Press EXPOSURE again. The exposure indicator...the automatic exposure mode: - night scenes) faithfully (1) Set the POWER switch to ON. 60 If you slide NIGHTSHOT to CAMERA or MEMORY (except DCR-TRV16), press EXPOSURE. Adjusting the exposure manually You can manually adjust and set the exposure. When you change the PROGRAM AE...
When the subject is automatically adjusted. When recording dark pictures (e.g. Adjust the exposure manually in the following functions do not work: - Color Slow Shutter - BACK LIGHT Your camcorder automatically returns to the automatic exposure mode Press EXPOSURE again. The exposure indicator...the automatic exposure mode: - night scenes) faithfully (1) Set the POWER switch to ON. 60 If you slide NIGHTSHOT to CAMERA or MEMORY (except DCR-TRV16), press EXPOSURE. Adjusting the exposure manually You can manually adjust and set the exposure. When you change the PROGRAM AE...


